Introduction
Hi, and welcome back.
In the last few movies, we upgraded our boat using the Gradient Transform Tool.
We created lightning in Photoshop and imported it into Adobe Animate using the Adobe Creative Cloud Library and we imported some sounds to bring it all together.
In this video, I'd like to add a sailor to the boat
Drawing and assembling a simple sailor character
and make him wave using the Asset Warp Tool and some classic tweening.
So let's get started.
So let's start out by going into the Library.
And we'll double click on our boat to go into its editing or dressing area.
And we can make a new layer for our sailor.
And maybe we can lock all other layers so that we don't click on them by accident.
And maybe we start with a circle with no stroke, and we can grab some skin tone and I just draw a big head.
So this is going to be a very, very simple piece of art, don't expect anything crazy.
We're just going to get the characters that we could use the Asset Warp Tool, and then some movements.
This can be done with bitmaps as well.
So I'm just going to go ahead and grab the Move Tool, I'm going to hold down the Option key which is in a grab a point out of here, and I'll keep holding it down and another there and maybe one more for the mouth.
And I can pull this up a little bit.
And then maybe one more for a point here add then the mouth.
We'll grab an eye, we'll grab another circle, and we'll make it white.
Maybe we'll add a black stroke to that.
And I go back and change this maybe to blue or whatever color you'd like to use.
Maybe we'll get rid of the stroke this time.
And then we'll add one more circle for a pupil, that's black.
I'll press Command + to zoom in.
Use the Spacebar to get the Hand Tool.
And I'll draw a little pupil right there.
So we have an eye.
I can select that, press Command G to group it together, and I can move it into place.
Something like that.
Maybe we can create a sailor cap.
So I'll grab a rectangle, make that white, and I'll drag a little rectangle like this, push this up, and push that up and maybe pull the sides out a little bit.
And then I'll grab maybe a circle and just add a little bump on top, so you have a bigger sailor's hat there.
Good enough.
Again, we'll select that, I can press Command G there as well, you know even though things are on the same layer, Command G will help it so that it doesn't mesh together.
And I'll still be able to go ahead and move it, or shrink it, or scale it, etc.
So there's our little dude.
If you want to add hair, we can always grab the brush, maybe grab some hair color, whatever color that is.
And I can always use the bracket keys.
Next to the letter P, the right bracket increases the brush size, the left bracket decreases the brush size.
If you use Photoshop, it's exactly the same quick keys.
And I just maybe just squiggle the surrounds.
And because the hat is grouped, this is going to end up underneath the hat.
Boom.
I'll zoom back out, Command -.
I press the Spacebar to grab the Hand Tool here and I grab maybe the Line Tool, go to Properties, maybe I'll increase that Stroke size to about three or four.
And we can just draw a little body or how he would be situated, you know, a little dude will have a leg over this way and a wag over that way.
And maybe an arm touching this side of the boat and an arm going to the other side of the boat.
So just something simple.
And then we can just grab the Brush Tool, and maybe I can grab blue for his pants.
And again, grab the Zoom Tool, maybe zoom right in to where his pants are.
Again, increasing the brush size if I want, with the right bracket key next to the letter P.
And I can just kind of draw in a pair of pants.
Give him a little bit of a butt waist.
So this is going to be far away.
It's small, it doesn't really matter that much.
We just clean up the remnants here, maybe push this up a little bit, so it looks like it's inside of the boat.
And then maybe we'll grab a white shirt.
Again, pressing the Spacebar to move the Canvas, add a little shirt here and his arms.
So something like that, doesn't need to be perfect.
We can double click the Zoom Tool to bring us back to 100%, which also works in Photoshop.
So maybe we can zoom into the face to grab that color.
And we'll grab the Paintbrush quick here.
Instead of selecting a color from here, we'll just drag the cursor outside and use the Ink Dropper to select that skin color again.
And now we could move over here and maybe create a hand.
Nothing crazy, just a wrist maybe.
And then a hand here.
Good enough.
Preparing the timeline and grouping artwork
So now that we have our character, we can zoom in.
Maybe on the Timeline, we'll add a bunch of frames.
I'll go down to about a second and a half or 30 frames about.
Maybe I'll select all the frames.
And then I can either press F5 to insert frames, or I could use this Insert Keyframe button.
Let's click and hold and then click on the word Frame to add a bunch of frames in there.
So if I go to my sailor layer, I'll click on that.
And I'll click on the first keyframe of the sailor layer which selects all the contents that's in that keyframe.
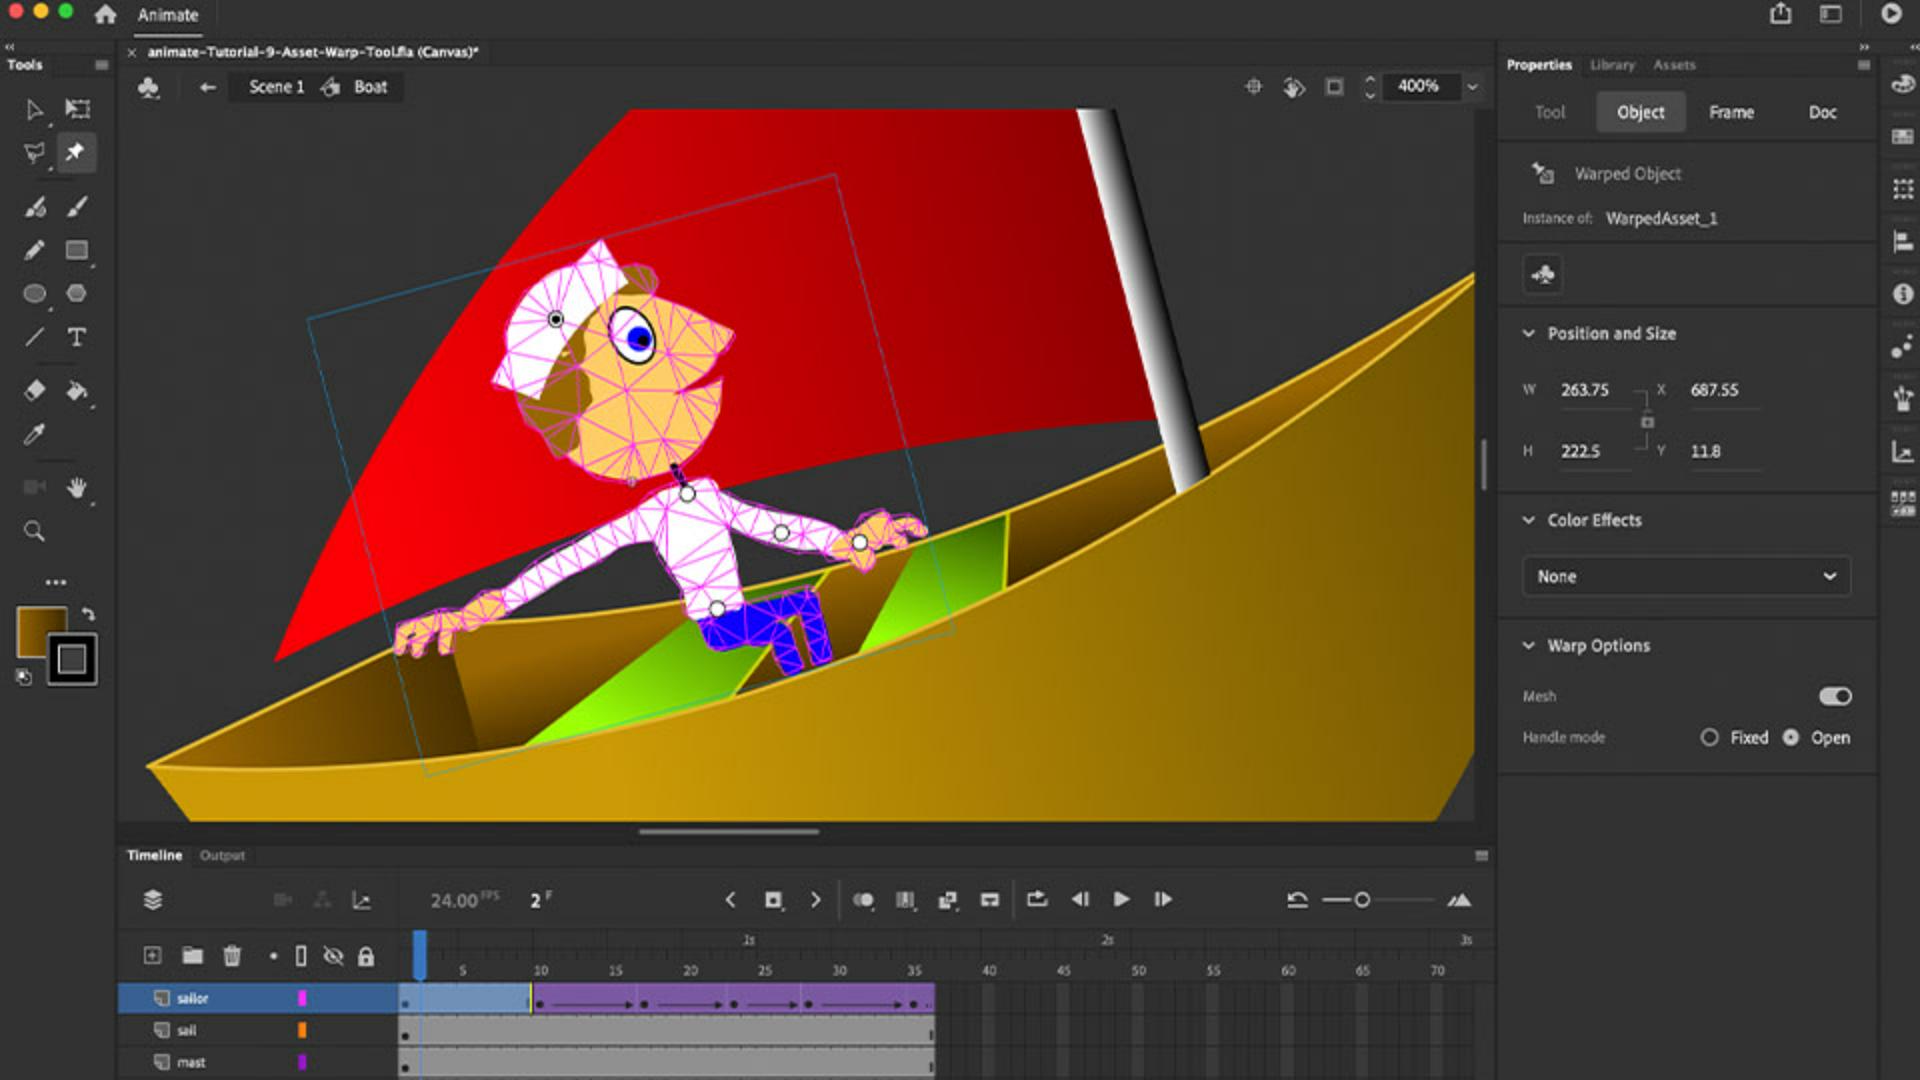
And I can press Command G to group my art and then I come over here to these Asset Warp Tool.
Using the asset warp tool to pose the character
This Asset Warp Tool works by just clicking and I can add pins.
So let's say I wanted his arm to move, I can click on his arm, and then it turns everything into a mesh.
And then I can move that arm, which actually in this case moves everything.
So what I'm going to do is add a bunch of pins to lock down his body here.
And I'll add one, to the base of his neck and I'll add one at the elbow.
And if I want his head to move, I can even add one at his head.
And now I can pull any of the points.
You see I can actually add movement to the character.
So we can start his head back a little bit and we can keep his arm down, and then maybe a few keyframes down.
Animating a waving motion with keyframes
I'll add another keyframe here.
This time, I'll click and hold and select the word Keyframe and boom.
I add a keyframe on the Timeline.
Maybe in the second keyframe I can click on that little pin and kind of rotate it backwards a little bit.
And you'll see now from the first keyframe to the second I have a little bit of movement.
Then we can go further and add another keyframe using the new Insert Keyframe button.
And this time, maybe we'll pick up his arm so we can throw his arm up there, move his elbow like he's waving "Hello".
We can move forward.
Once again, add another keyframe, add a little bit of movement with his hand, maybe go a little bit further, add one more keyframe.
Maybe this time, his hand goes back and then we can add maybe some more frames in here.
Again, clicking and holding, adding a frame.
And then over here, maybe we can add one more last keyframe and putting his hand back down on the boat.
Something like that.
So it's a very simple animation.
And what's nice is that now we can actually select all these frames
Smoothing the animation with classic tweening
and right click and add a classic tween.
And that'll smooth out the motion between all the keyframes that we just created.
And that's it.
I'll press Command Return to test the movie.
And you can see how easy it is to create movements and animation using the Asset Warp Tool in Adobe Animate.