Introduction
In this tutorial, we'll explore the Object Selection Tool and refine edge in Photoshop for iPad to create a selection of a subject that has both smooth and complex edges.
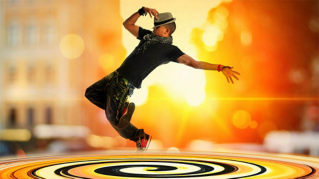
To finish this composite, I need to make an accurate selection of the dancer
Creating an initial selection with the object selection tool
In the Toolbar on the left, I'll long press on the Lasso Tool to reveal all of the Selection Tools.
And I'll choose the second one, the Object Selection Tool.
If I tap on the three dots in the Tool Options bar I can choose between a Rectangle or a Lasso.
I'll leave this set to a Rectangle.
I'll drag a selection marquee around the dancer to tell Photoshop what I wanted to select.
And even though I didn't include all of the dancer’s foot or her hair in the rectangle the tool is smart enough to figure out what needs to be selected.
Now we have a good starter selection of the dancer.
It looks pretty accurate for the smooth edges of her body but it's a bit rough around the more complex edges of her hair.
I'll tap the More button in the Selection Actions bar
Refining complex edges with refine edge
at the bottom of the screen and I'll choose Refine edge.
In the View mode menu, there are different ways to view the selection that you're modifying.
Two of the most useful ones are: Overlay which shows the non-selected or masked areas with a transparent red overlay and Black and white which is very good for evaluating fine edge details.
I'll use the two-finger gesture to zoom up for a closer view of the dancer's hair.
And I'll start by turning on Smart radius.
This can be useful if you have a subject with both smooth and rough edges.
Next, I'll experiment with Edge detection radius.
And you can see as I increase this value it starts to refine the outer edges of the hair.
Sometimes, Edge detection and Smart radius may be all that you need to refine the selection.
For the dancer however, we need to do some additional work with the Refine Edge Brush Tool.
Improving hair details using the refine edge brush
This tool is already active when you're in the Refine Edge workspace.
And you can see it's controlled on the left side.
I'll tap on the Brush Size control and I'll increase this and set it up to about 260.
Below the Size Control the Brush Mode is set to add.
I'll begin by brushing over the hair to start the refinement process.
And you can see that it's already doing a great job refining those irregular edges and creating a more accurate mask.
I'll set the View mode back to Overlay so I can have a better view of the areas that I need to work on.
And I'll continue to brush over those areas where we can see the white background through the hair That's looking pretty good.
I'll set the View mode back to Black and white just because it's a great way to evaluate the improved detail of the edges.
And you can see what an excellent job Refine Edge has done to create an accurate mask for the irregular edges of the dancer's hair.
Now that we have seen how good those edge details look let's go back to the Overlay view.
Outputting refined selections as masks and layers
Down at the bottom of the Control panel on the right side I'll open up the Output as menu and you can see that there are different ways that you can output the modified selection.
Most of the time, I choose to output as either a Layer mask or as a New layer with mask, just because this gives me the most flexibility for making further improvements.
For this image, I'm going to choose the Decontaminate colors option which will help remove any stray white pixels from the original background.
When you use this option it automatically creates a new layer with a layer mask.
I'll tap Done to apply the Refine Edge changes In the Layer stack, you can see that there's now a copy of the dancer layer and it has an accurate layer mask created by Refine Edge.
The visibility for the original dancer layer has been turned off and this happens automatically when the selected output option in Refine Edge is set to New layer with mask.
Linking layers and reviewing mask accuracy
With the new dancer copy layer active I'll press on the Touch Shortcut and tap the flower costume layer group so that both it and the new dancer layer are active.
Then I'll tap the Link icon in the Taskbar on the right side to link those layers together.
And I'll turn on the visibility for the flower costume layer group by tapping the Eye icon.
I'll zoom in close and choose the Move Tool in the Toolbar.
And I'll move the dancer over some of the details of the flowers and the grass, so you can really see how accurate the mask is.
When you need to make a selection of a complex shape, Refine Edge in Photoshop can help you get the edges looking just right.