Introduction
[Jesús Ramirez]: You can now quickly replace backgrounds, change poses, and change the camera angles of your images with Nano Banana in Photoshop.
I'm Jesús Ramirez, and in this video I'll show you how Gemini 2.5 Nano Banana integrates with Photoshop to create stunning results.
With it, you can make instructional edits while keeping the entire scene coherent.
The best part is you can combine your generations with Photoshop's traditional tools for even more precision.
Let me show you how it works.
To start, enable the Selection Brush Tool,
Create broader, soft-edged selections to provide context for better blending
which allows you to specify where to apply the AI generation.
From the Options bar, click on this dropdown, then increase the brush Size, and decrease the Hardness to create a soft edge, which helps blend the new details more naturally.
Now make a loose selection around the skateboard.
You can loop around it, when you come back to where you started and release, Photoshop will fill in the loop.
Unlike the Firefly models, the new partner models can only see what's inside your selection.
If your selection is too tight, the result might look disconnected or out of place.
To include more of the scene that you think you need, the more the model can see, the better it understands the overall context, which leads to more realistic results.
Use clear, descriptive prompts to easily modify objects or change parts of a scene
Then from the Taskbar, click on Generative Fill and from this icon, choose one of the new partner models: Flux Kontext Pro or Gemini 2.5 (Nano Banana).
That's the one I'll select.
It maintains scene coherence and keeps the lighting, perspective and subjects consistent.
Now enter your instructional prompt.
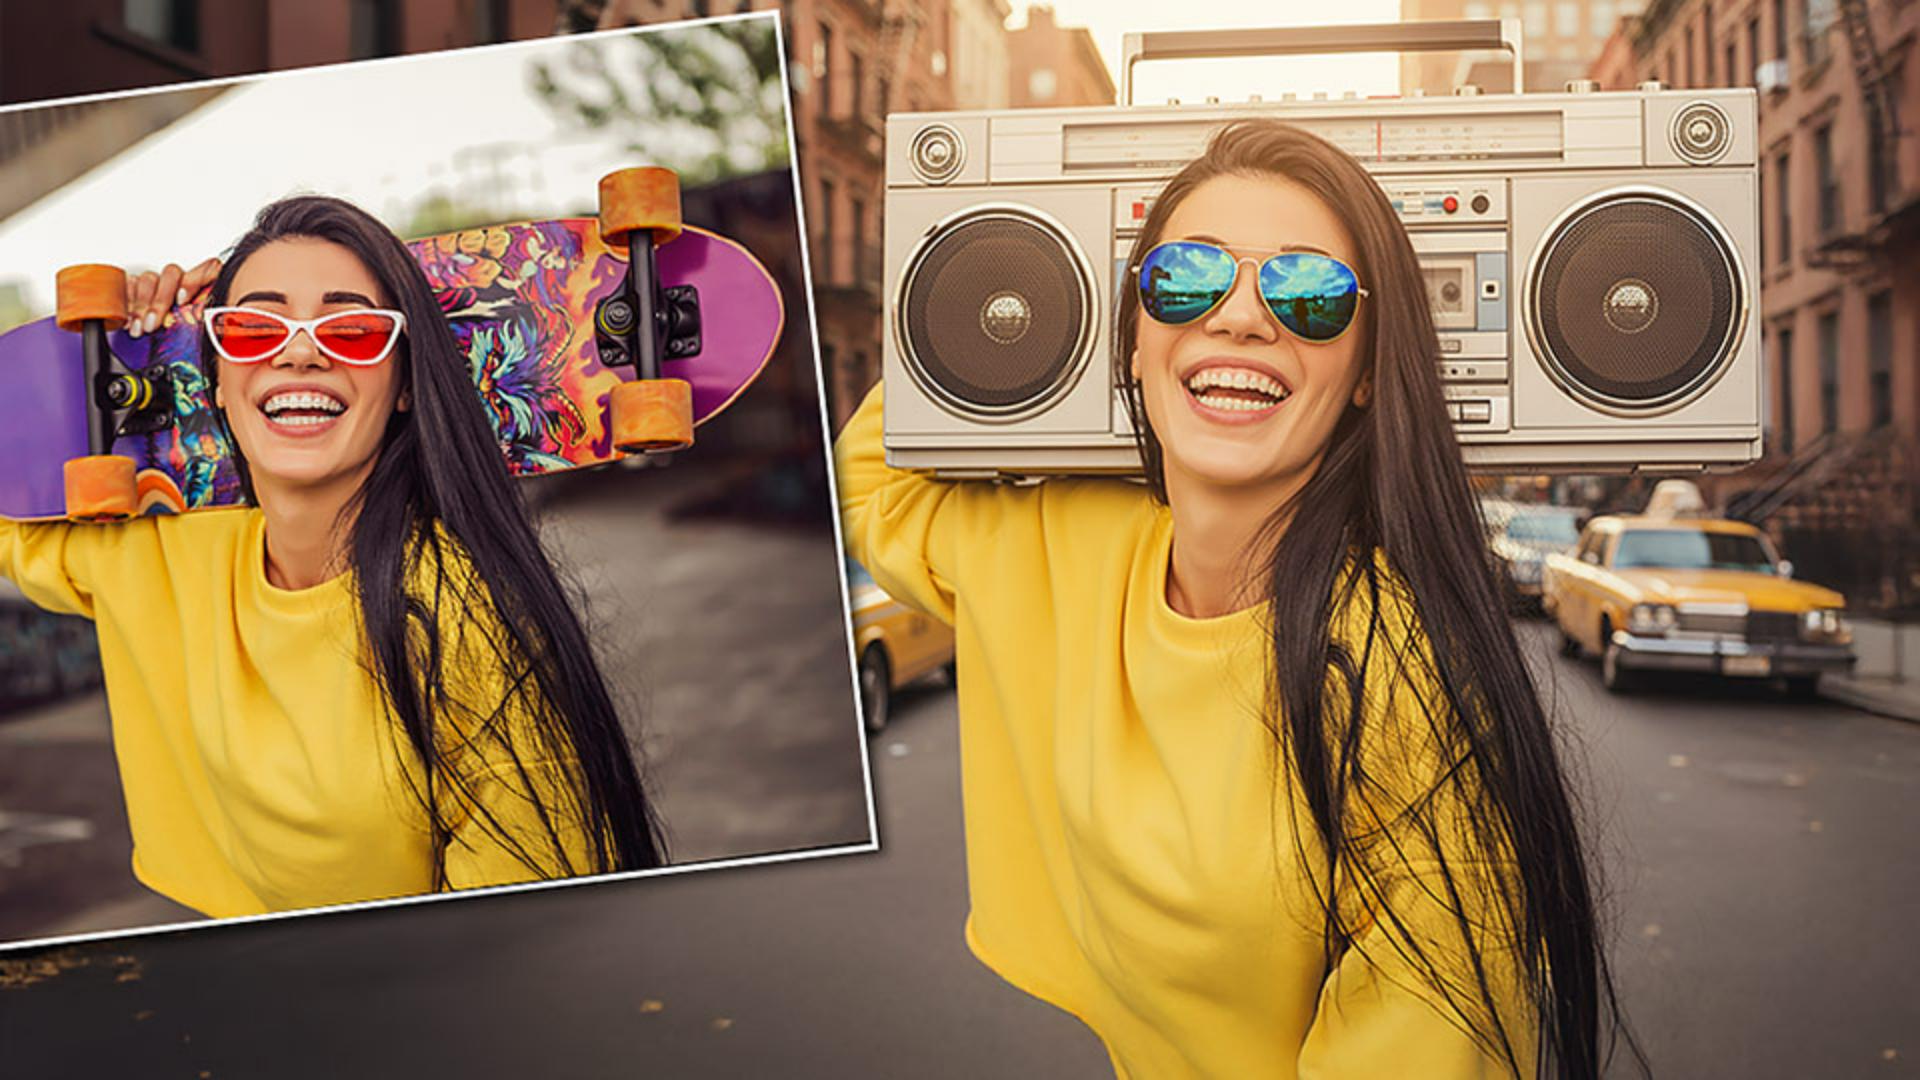
For example, "Replace the skateboard with an 80s style boombox".
Then click on Generate.
In a few moments we will get one generation.
And as you can see, it gave us fantastic results.
Nano Banana keeps the original face, matches lighting and color, and it makes everything feel like it was part of the same photo.
That's what makes it incredible.
One important thing to remember is that in Photoshop, Nano Banana is not a chat model.
If you enter a new prompt in the Properties panel, it will always reference the original image, not the previous generation.
So if you type "Replace her glasses with blue aviator sunglasses", we will replace her glasses, but the skateboard will return because it was in the original image.
To modify a previous generation, create a selection of the area you want to change and then use a new prompt
To reference the previous generation, create a new selection around the area you want to change and enter the prompt, "Replace her glasses with blue aviator sunglasses".
Then click on Generate.
Now Nano Banana will build on your previous generation instead of starting over.
Replace backgrounds by selecting the entire image and providing a detailed description of the new background scene
This model is also great for background replacements.
To replace the background, first select the entire image.
Press Ctrl A on Windows or Cmd A on the Mac.
Selecting all tells Photoshop to replace the entire image, not just a portion of it.
If you're on the Selection Brush, you will see the magenta overlay, and if you're on any other tool, you will see the marching ants around the canvas.
Both will work.
Then enter a prompt that fully describes the scene you want.
Include details like the location, objects, lighting, and time of day.
That extra context helps the AI understand the overall mood and create a more believable result.
The more specific you are, the better Nano Banana can match your vision rather than generating something random.
In this case, I'll type "Replace the background with an 80s new york city street with brownstone buildings during a golden hour sunset".
Then click Generate, and the background replacement is incredible.
Combine Generative Fill with Photoshop tools like Remove or Find Distractions for additional editing flexibility
And the best part is you're still in Photoshop.
That means you can combine AI edits with traditional tools for even more precision.
For example, if you find the people distracting on this new background, you can remove them by enabling the Remove Tool.
Then, from the Options bar, click on Find distractions, and choose People.
This will select the two people in the scene, and you can click on the Checkmark to remove them.
The changes are applied to a new layer so you can always work non-destructively.
Now let me show you a few more powerful examples of how Nano Banana can completely transform your images.
Transform poses and camera angles while preserving subject identity
Using this image, we're going to use Nano Banana to change her pose.
To start, press Ctrl A on Windows, that's Cmd A on the Mac, to select the entire image.
In this case, we have the marching ants around the canvas.
Then click on Generative Fill.
I'm using the Nano Banana model, and now you can enter a clear and descriptive prompt of what you want.
Remember you can describe more than one change at a time.
I'll use the prompt "bring her hand down, give her a surprised look, and replace her jacket with a green t shirt."
And I'll click on Generate.
I gave a prompt with three instructions, and in a few moments Photoshop will output one generation with the changes applied.
And the results are just incredible.
This is the same person with her hand off her face, wearing a green t shirt and a surprised look on her face.
As you can see, Nano Banana recognizes the content of your image and it allows you to do incredible things.
Here's another great example that shows how Nano Banana understands your image.
In this case, we would change the angle of the photo.
To start, select the entire image.
Then click on Generative Fill.
I'll enter the prompt "Give me a drone view version of this image.
Keep the same pose."
Sometimes you need to remind Nano Banana not to change the pose.
Then click on Generate.
The result is the same man in the same pose riding the skateboard, but it now looks as if this photo was shot with a drone.
Use annotations on your image to guide Nano Banana generative edits for additional options or visual workflows
To further demonstrate Nano Banana's understanding of your image, I'll show you how to edit a photo by writing annotations directly on it.
To start, create a new layer to place your annotations.
Then enable the Brush Tool.
Currently my foreground color is red.
Then I can start annotating the image to give my instructions.
I'll write " Remove her", draw an arrow, and cross out her face.
Then I'll write "Put a leather jacket on her", and I'll also draw an arrow pointing to her.
These will be the instructions for Nano Banana.
Now I'll press Ctrl A on Windows, that's Cmd A on the Mac, to select all.
But this time, instead of clicking on Generative Fill from the Taskbar, I'm going to go into Edit, and choose Generative Fill...
This will give us a larger input box that will make it easier for us to see and edit the longer prompts required by these new partner models.
Keep in mind that you can assign a custom keyboard shortcut to this command to access it faster.
Then I'll enter the prompt "Follow the red prompts in the image.
Remove them after you're done."
Sometimes if you don't enter this phrase, the prompts may remain in the final output.
Then click on Generate and Nano Banana will apply my written instructions.
And the results are just incredible.
It removed the woman on the right and added a leather jacket to the one on the left.
We don't have time to cover everything Nano Banana can do, but I encourage you to experiment with it.
Try any prompt that comes to mind.
I'm sure you'll be surprised with what it can create.
Again, I'm Jesús Ramirez.
Thank you for watching.


