Bu Photoshop eğitimlerini deneyin
Yeni görüntüler ve grafikler oluşturmak için fotoğrafları düzenleyin.
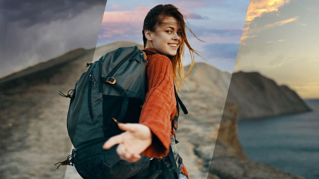
Lidia Lukianova creates an artistic color design for a photo silhouette using a gradient overlay in Adobe Photoshop.
Lidia Lukianova is an artist and designer with a passion for illustration. Her design work includes all kinds of projects from identity and illustration to lettering and animation.
This sample file has Adobe Stock images you can use to practice what you learn in this tutorial. If you want to use the sample file beyond this tutorial, you can purchase a license onAdobe Stock . Check out the ReadMe file in the folder for the terms that apply to your use of this sample file.
This technique works best on high-contrast photos so Lukianova applied the effect to this black-and-white photo. She then chose the Magic Wand (W) and clicked to select the black dress.

Next, she added a Gradient adjustment layer.

Lukianova then reviewed the available gradient presets before choosing the one she liked. She ultimately chose one of the orange-to-purple presets from the Reds category on the Gradient Fill dialog and clicked OK.

She wanted to customize the gradient, so she double-clicked the Gradient preview to open the Gradient Editor.

To add transparency to the top color, Lukianova clicked the Opacity stop and lowered the Opacity.

Lukianova was able to create a smooth gradient by moving the color stops and Color Midpoints to get the look she wanted. She clicked OK when she was happy with the results.

The Gradient Fill adjustment created a layer mask above the model layer, filling the selected area of the photo with the color gradient. Lukianova wanted to refine the edges of the mask, so she clicked the mask thumb of the Gradient Fill in the Layers (Window > Layers) panel. Then she chose the Brush (B) tool, set it to a soft round edge and painted with black to reveal the top part of the dress. She refined the edge of the selection using a smaller brush and painted with a white brush on the mask to reveal parts of the gradient she accidentally hid.

For a subtle color correction, Lukianova added a solid purple color adjustment layer over the image, clicked OK, and lowered the Opacity for the new adjustment layer.

Apply colorful gradients for your high-contrast photos to create a portfolio that is sure to get noticed.

Note: Project files included with this tutorial are for practice purposes only.