Scan
You can use the Adobe Scan app to instantly scan various types of documents, capture new images, or use existing images and convert them to digital copies. The Scan app converts images to PDF and saves them to Adobe cloud storage. Empowered with Optical Character Recognition (OCR), the app supports automatic text recognition that automatically converts image text to real text.
To quickly scan a document in auto-capture mode:
Open the app and wait for the camera to be ready.
Once the app captures the document, tap on the thumbnail to view and/or edit your scan.
Scan a document
To scan a document from the capture window:
Open the app and tap

Select the document type. Refer to Customize scan capture for more details.
Optionally, tap the
 to change flash settings. Refer to Customize scan capture for more details.
Start a new scan using one of the following capture modes:
 Auto-capture (default): The app displays the capture screen and detects the document.
In auto-capture mode, the app uses live edge boundary detection that displays blue dots to identify document corners.
Auto-capture (default): The app displays the capture screen and detects the document.
In auto-capture mode, the app uses live edge boundary detection that displays blue dots to identify document corners. Manual-capture: Center the document in window and tap the capture button.
Follow the on-screen messages to complete the scan workflow:
Looking for document: The app is looking for the document and trying to detect its boundaries.
Capturing… hold steady: Edge detection can see the entire document.
No document found. Capture manually: The app cannot detect the document edges. Users can take captures manually by tapping on the shutter button.
The app uses auto crop and image cleaning to improve scan quality. The captured scan appears on the screen with crop handles and the modifying tools menu.
On the capture screen, modify your capture as desired using the tools menu.
Optionally, tap Keep scanning to continue capturing more documents or tap Retake to recapture the document if you are not satisfied with your current capture.
Once you tap Save PDF, the scan is automatically saved to the Adobe cloud storage. You can open the scan again to modify it. Refer to Modify your scan for more details.
Adjust crop points
Tap Document or Book mode to capture your document.Tap the Import an image option to load an image from your device
Tap Crop
 .
.Adjust the borders of the scan area using any of the following:
Drag the crop handles to resize the scan area manually.
Auto-Detect
: Let the app automatically position the crop borders. Tap again to remove the crop borders and use the full image.
In crop mode, Tap Straighten
 to apply or remove the curvature correction to a page.
Tap Crop
to view the original image without correction or adjust the borders of the scan area.Tap Keep Scanning or Save PDF as required.
If the Straighten option is turned on, the app preserves the context of the straightened image, so you do not need to straighten it again for a re-crop.
Note
Curvature correction is also available in High-Speed Scan mode, which uses Document capture mode but lets you scan multiple pages without pressing Keep Scanning.
Straighten pages while scanning
You can use the AI-powered Straighten feature while scanning pages in Book or Document mode. When turned on, the feature detects and smooths curved pages in a book or document to produce a readable scan. The feature also supports curvature correction for pages where not all four boundaries are clearly visible in the image.
For example, when one edge falls outside the image boundary, the app can still detect and apply the curvature correction
To use the feature:
Open the Adobe Scan app on your device. Tap the
.Select the document type as Book or Document.
Scan your document.
In the Crop screen, tap Straighten
to apply curvature correction to the page.
You can turn the Straighten feature on or off for individual pages using the ![]() button in the Crop screen.
button in the Crop screen.
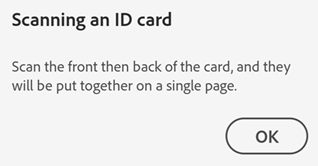
Scan ID Cards
Adobe Scan now allows you to scan ID cards with the new ID card scanning feature. To scan ID cards:
Open the app and tap
Select the document type as ID card.
Set the optional settings as desired.
With auto-capture enabled, keep the ID card with first page up. The app captures the first page and prompts you to capture the second page.
If you need to recapture the first page, tap Retake.
Tap Next page to capture the other side of the ID card.
Tap Adjust and save to modify the scan and save as PDF.
Scan books
Adobe Scan now allows you to simultaneously scan both left and right pages of a bounded book. The Scan app’s book scanning feature can help you scan an entire book in lesser time by scanning two pages at a time. It automatically splits the capture into separate pages.
To scan the pages of a book:
Open the app and tap
Select the document type as Book.
Set the optional settings as desired.
Rotate your camera to a landscape view for a better capture of both sides.
Align the dotted divider line to your book’s center bind and adjust the borders. The divider line and the borders automatically identifies the book binding and the split.
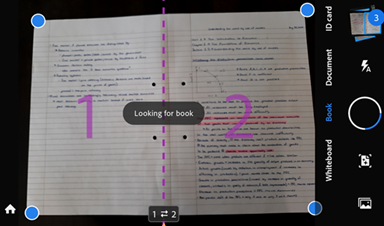
Verify the scanning order. To change the book scanning order, tap

Tap the capture button if auto-capture is not enabled. The scan is captured and split into 2 pages.
Tap the thumbnail icon to open the captured scans.
Modify each page as required and tap Save PDF.
Note
The Adjust border screen shows the full original photo for both pages, allowing you to readjust the border and center binding.
Scan QR codes
Scan android app allows you to scan QR codes. To do so:
Open the app and tap
Select Document as the capture mode. It displays a QR code icon at the top-right corner.
Set the optional settings as desired.
Focus the camera on the QR code that you want to scan.
It shows a badge that contains the QR code value, as shown below.
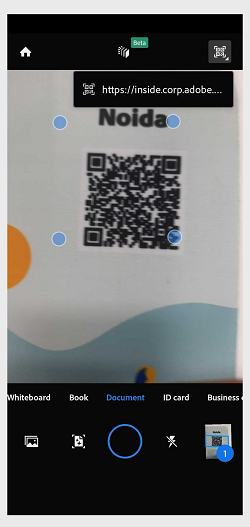
You can take one of the following actions:
To open the page associated with the link, tap the badge.
If you see an option to copy the QR code text as shown below, tap the badge to copy the text and paste it in a browser.
To dismiss the badge, tap anywhere on the screen.
Note
Once you dismiss a badge with the QR code value, the badge may not appear with the next scan of QR code. To reopen the badge menu, you can tap the QR icon in the top-right corner. The QR code icon lights up if the capture screen detects a QR code.
Tap the capture button to take an image of the QR code or tap Home button to exit.
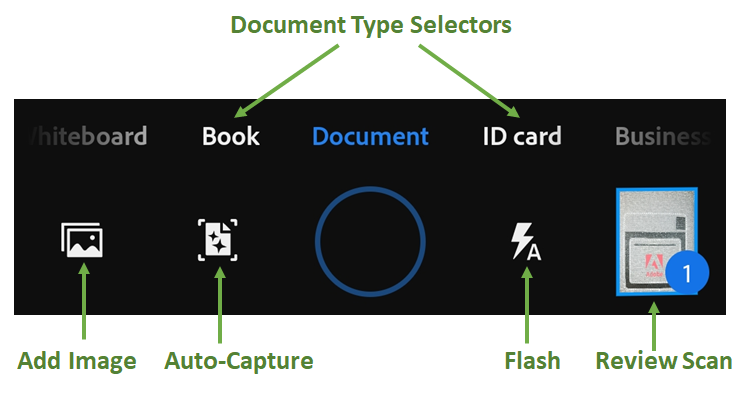
Customize scan capture
Use the options on the capture screen to customize how you scan:
Item |
Description |
|---|---|
Document type |
Streamline your workflow by selecting one of the Document types. |
|
If your device has a flash, you can set it to always on |
|
Toggle auto capture on |
|
Add an existing photo or document to your current scan collection |
|
Long press the thumbnail stack to view your last 3 scan thumbnails–you can delete these captures now or later. Tap the thumbnail to end your scan session and view/edit the file. |
 , or auto
  (only use in dark settings).
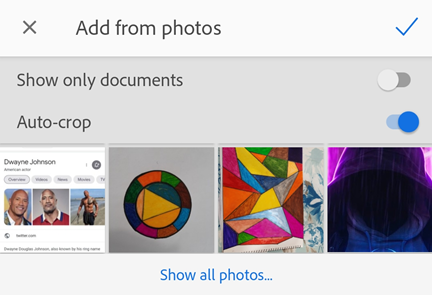
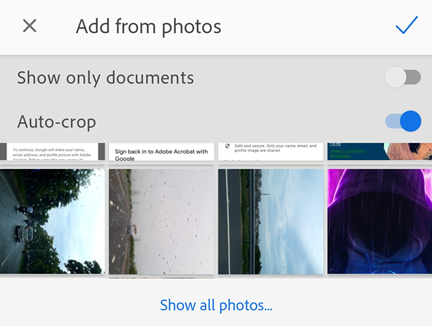
Create scan from digital photos or documents
Scan’s integration with the device photo library allows you to create scans from existing photos or digital documents. Scan uses the document detection feature to distinguish documents from selfies, artwork, and other non-document photos.
To create scans from photos or documents:
Tap

It opens the image gallery. To include photos or documents from other locations, tap Show all photos and tap on a location to view files.
Tap one or more images to select them.
Optionally, enable Show only documents to view only the documents. Tap one or more documents to select them.
Optionally, disable Auto-crop to import the original photos or documents without cropping. By default the app auto-crops the imported photos or documents.
Tap
 to import the image/images as scan.
Edit the scan if required and tap Save PDF.
You can also directly import images from your gallery. To do so, open your gallery, tap  , and then tap
  . When the image opens in the scan app, edit, rename, and save your scan as usual.
Document types
Selecting a scan type changes the scan name as well as how the app captures the scan. For example, the app captures the entire camera view for a whiteboard but uses boundary detection when capturing a business card.
- Whiteboard
File name: Whiteboard + <date>
Full screen capture
Save as JPEG shown as the 3rd option on file card
- Book
File name: Book + <date>
Boundary detection
Save as JPEG shown as the 3rd option on file card
- Document
File name: Adobe Scan + <date>
Boundary detection
Save as JPEG shown as the 3rd option on file card
- ID Card
File name: ID card + <date>
Boundary detection
Save as JPEG shown as the 3rd option on file card
- Business Card
File name: Business Card + <date>
Boundary detection
 shown as the 3rd option on file card
Edit text in scanned documents
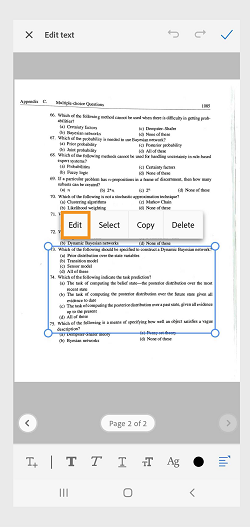
Edit scans using the contextual menu
You can now edit your scans using the contextual menu. Open your Adobe Scan document, long press the area where you want to make the edits, a contextual menu opens. Select Edit from the contextual menu to begin editing.
Language support for editing text in scanned files
In addition to English, Adobe Scan supports editing text in 18 more languages.
Supported languages include: English, Dutch, Japanese, Finnish, Norwegian, Swedish, French, Spanish, Brazilian Portuguese, Italian, German, Traditional Chinese, Simplified Chinese, Korean, Turkish, Russian, Czech, Polish, Hindi, Vietnamese, and Indonesian.
To change the text recognition language:
Select the profile icon
 from the upper left.
Select Preferences > Text recognition language.
Select the desired language for your scanned document, in which you want to edit your text.
Note
To download the language pack for the desired language, select
Download on the Text (OCR) language screen.
Close the Text (OCR) language screen.
Adobe Scan allows you to edit the text in the selected language.
Modify your scan
When you scan one or more pages, the app displays an edit toolbar under the captured images. You can use the edit toolbar to quickly modify and save your scans.
To modify your existing scans, tap  > Modify scan for the file that you want to modify. It opens the scan in Modify mode, which displays the following options.

These options allow you to:
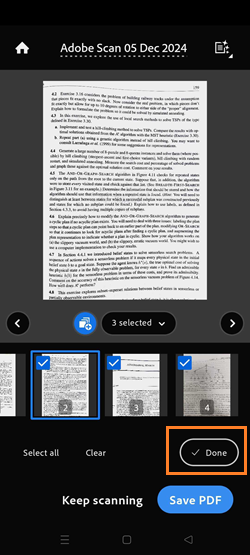
Multipage modification
Quickly rotate or delete multiple pages simultaneously using Adobe Scan. You can also change filters and adjust brightness and contrast of multiple pages.To modify multiple pages:
Open the app and tap
.After you capture or import multiple pages, select the multipage icon
 located above the page thumbnails at the bottom, or Long press any page thumbnail.
Select the pages you want to modify, then select Done in the lower right corner.
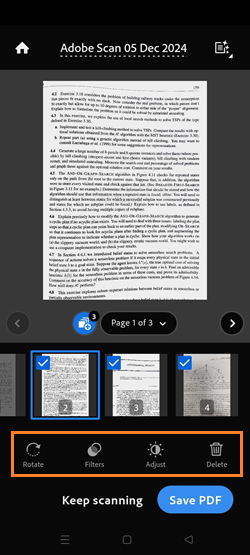
Choose from the following options:
Rotate
 : To rotate the selected pages.
Filters
 : To add or change filters.
Adjust
 : To adjust brightness or contrast.
Delete
 : To remove the selected pages. Confirm the deletion when prompted.
To exit multipage modification mode, select the multipage icon again.
Save your changes by selecting Save PDF in the lower right corner.
Skip to a specific page
To modify multiple pages, you can easily skip to any page using the ‘Go to page’ feature, as follows:
1. From under the scanned image of the current page, tap the page number banner. A thumbnail section pops up showing all the pages in the current scan. Tap on any page’s thumbnail to open the page.
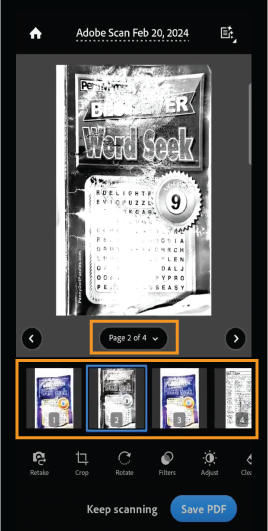
Note: The thumbnail section pops up automatically if your scan has three or more pages.
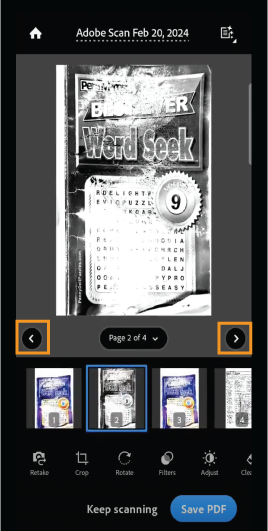
Alternatively, you can tap the left and right navigation arrows to navigate the pages.
Retake the scan
If you are not satisfied with your current capture or with any of you previous captures in the ongoing scan, you can skip to the desired page using the page navigation arrows or using the thumbnails as explained in Skip to a specific page.
Tap ![]() in the lower left to open the capture mode. Then focus the screen on your document and capture again.
in the lower left to open the capture mode. Then focus the screen on your document and capture again.
Crop pages
To crop or adjust the borders of your scanned pages:
Navigate to the page you want to modify.
Tap
Drag the crop handles to resize the scan area or tap Auto-Detect
to let the app automatically position the crop borders.Optionally, tap
to rotate your scans 90 degrees in clockwise direction.Once done, select Save PDF.
If the Straighten option is turned on, the app preserves the context of the curvature-corrected image, so you do not need to straighten it again during re-crop.
Rotate pages
To rotate your scanned pages:
Navigate to the page you want to rotate.
Tap
Repeat as needed for other pages.
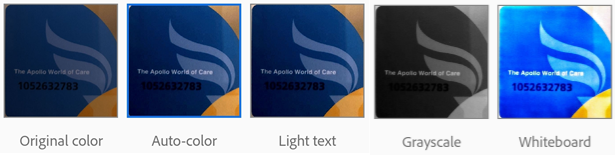
Apply filter
You can apply filters to adjust the color of your scanned pages. To do so:
Navigate to the page that you want to modify.
Tap
Filters.Choose one of the following filter options:
Original color to keep the colors as is.
Auto-color to let the scan app make the adjustments.
Light text to highlight light text or drawings.
Grayscale to remove color.
Whiteboard to increase the contrast.
To apply the setting across multiple pages, enable Apply to all pages.
Adjust brightness & contrast
To adjust the brightness and contrast of your scans:
Navigate to the page that you want to modify.
From the bottom menu, tap
Adjust.To adjust the brightness, tap or drag the Brighness level bar to a desired value.

To change the image contrast, tap
 Contrast and then drag the Contrast level bar to a desired value.
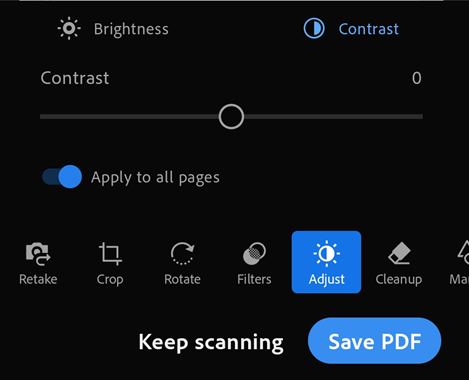
If your scan has multiple pages, you can apply the change to all the pages by tapping Apply to all pages toggle to enable it.
Once done, tap Save PDF.
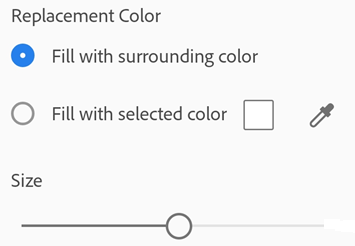
Cleanup the image
You can erase unwanted artifacts, fuzzy images, or any other content. The “erase” action is essentially filling a selected area with a color you select (thus hiding that area). You can perform image cleanup on a new scan or an existing scan.
To clean up:
Navigate to the page you want to clean up.
Tap
 Cleanup.
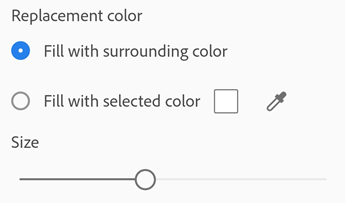
Select one of the following fill colors:
Fill with surrounding color: Use an app-selected background image as a brush color.
Fill with selected color: There are two ways to choose a color to fill the screen with:
Tap the square: Choose a color from the color picker popup.
Tap the eyedropper: When the moveable eyedropper appears, move it over the image to detect the color of that section, and tap
Zoom the image in and out with two fingers as needed.
Swipe your finger over the area that you want to erase.
Tap
Add markups
You can use Scan app’s Markup tool to add shapes and freehand drawings to your scanned pages. To do so:
Navigate to the page that you want to markup.
Tap
 Shapes.
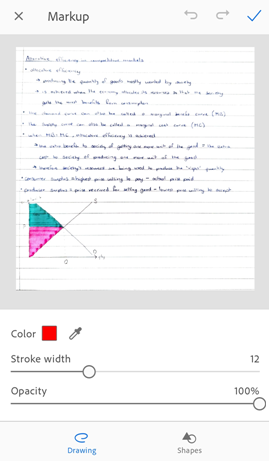
To add a freehand drawing:
Make sure Drawing tool is selected from the bottom bar.
Select a color for your drawings or markings using one of the following ways:
Fill with surrounding color: Select this to choose the surrounding color as fill color.
Fill with selected color: Select this to choose a color of your choice using one of these methods:
Tap the square: Tap and drag the picker to highlight a color on the right. Drag the Change the opacity if desired.
Tap the eyedropper: When the moveable eyedropper appears, move it over the image to detect the color of that section, and tap
Tap or drag the Stroke width bar to change the width as desired.
Use your finger to draw on the page. You may zoom your scan page for better precision.
To add a shape:
Tap Shapes from the bottom bar.
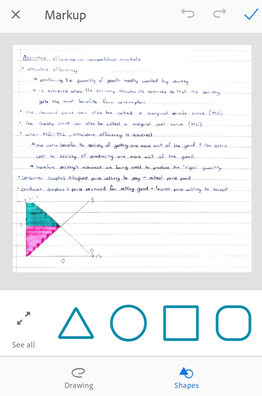
Tap See all to view all the shapes and then tap on a desired shape. The selected shape appears on the document.
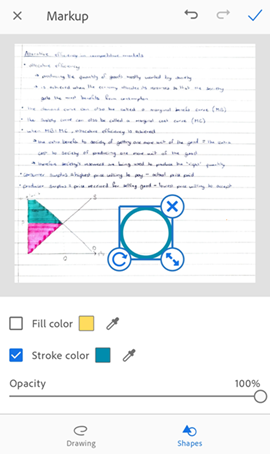
Take any of the following actions as required:
To resize the added shape, tap the Resize handle and drag it inward, upward, or sideways to get a desired size.
To rotate the shape, long-press the Rotate handle and move it as desired.
To move the shape to a different location, long-press the centre of the shape and move it to a desired location.
To delete the shape, tap X.
To change the stroke color, tap the Stroke color square and then tap on the desired color.
To fill the shape with color, tap Fill color square and then tap on the desired color.
To redo or undo your actions, tap the respective icons from the top bar.
Tap
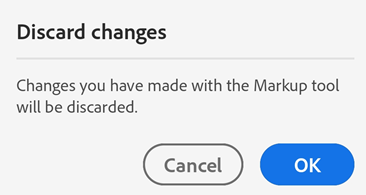
to save your drawings and shapes.To discard your changes on the page, tap X from the top toolbar. In the dialog that appears, tap OK.
Note: You can go back anytime to the Markup tool mode to delete or modify your saved drawings and shapes using the undo and redo buttons.
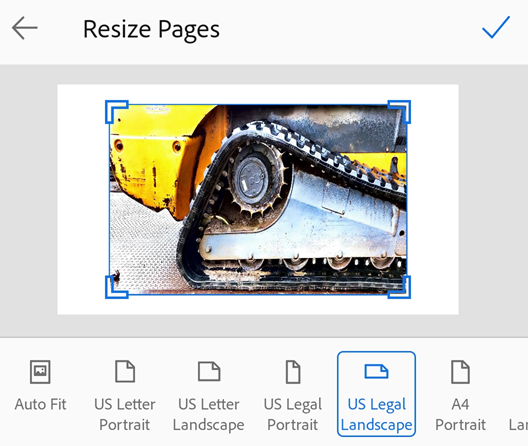
Resize pages
You can easily adjust the page size in Review screen. For example, you can select A4 Portrait or another size that suits your printing needs.
To resize pages:
Tap
 Resize.
Navigate to the page that you want to resize.
Resize the page. Repeat this step for any page.
Tap
Reorder pages
While in Review mode, you can reorder 1 or more pages:
Tap
 Reorder.
Drag and drop pages to new locations.
Tap
Delete pages
While in Review mode, you can delete any number of pages.
Navigate to the page that you want to delete.
Tap
Delete.In the dialog that appears, tap Delete to confirm.
Add pages
You can include more pages to your existing file by quickly taking more scans or including images/documents from your device. To do so:
Tap Keep scanning.
To scan a new page, focus the screen on the page and capture it.
To add images or documents from your device, tap
 and then select the photos or documents that you want to add.
Note
If prompted, you must allow access to your device storage to be able to add images and documents from your device.
Save as PDF
Once you’re satisfied with the scan, tap Save PDF to automatically convert your scan to a PDF and upload to Adobe cloud storage.