Manage documents
Create a signature
When you first attempt to sign a document using Adobe Acrobat Sign, you are prompted to create and save your signature for future use as well. At any time you can modify or delete your saved signature.
To create a signature:
Open a document and tap

Tap on a signature field.
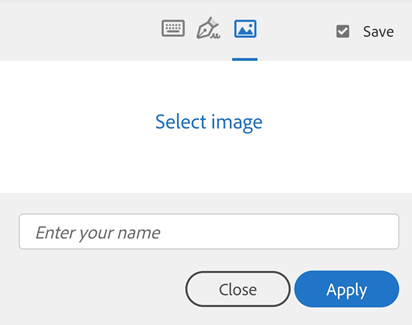
In the Signature dialog that opens, create your signatuer using one of the following methods:
Type: Type your signature.
Draw: Draw your signature.
Image: Tap the image icon, select an image, and choose Done.
Check Save if you want to reuse this signature. Note that the label varies based on whether you’re logged in.
Tap Done.
Note
If camera or photo access is blocked, see Allow access to camera, photos, and more. To change or clear a signature, see Change your signature.
If you have a Document Cloud or Adobe Acrobat Sign account or use Single Sign On (SSO), you can save your signature for future use. Note the following:
Typed signatures are automatically saved for later use.
Drawn and image signatures are not saved unless you check the Save signature checkbox.
Allow file access
Signing workflows require access to the files that require signing. Granting Adobe Acrobat Sign access to your local and online files streamlines subsequent workflows.
To allow file access:
Initiate any workflow, such as ‘Send for Signature’ or ‘Get Signature in Person’, which requires choosing a document.
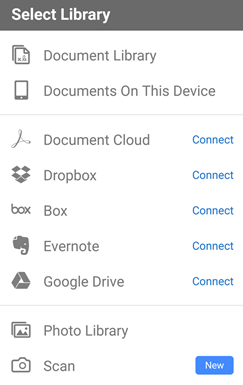
Tap one of the following file accesses:
Local documents
Local files in your gallery
Online storage locations (Document Cloud, Dropbox, Google Drive, etc.)
Photos and document scan that you take on-the-fly
Search for a document
Document views which display lists of documents provide a search field. To search for a document, tap  . You can search for any part of the text string in the display, including the file name, date, signer’s name, and so on.
View the quick access menu
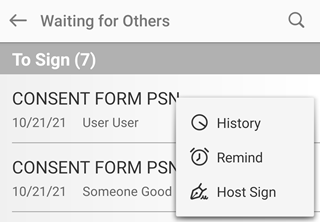
Adobe Acrobat Sign allows you to quickly access the pending documents’ details without the need to open each document. From any document list, tap  to view the quick access menu. From the quick access menu, you can:
View an agreement’s history.
Send reminders.
Initiate host signing.
Note that the available options vary according to the current context, and some items don’t appear on the menu if they are not relevant to that document or document list. For example, the completed documents list will only provide a link to History.
View history
Adobe Acrobat Sign provides audit trails with details about your signature workflows, including when a document was sent, who signed it, and so on. To view a document’s history, do one of the following:
Open a document, and tap

From any document list, tap
and then tap
View documents in completed/canceled workflows
The ‘Completed’ and ‘Cancelled/Declined’ views enable viewing documents in finished or ended workflows. Tap Completed or Cancelled/Declined to display the document list. From here you can:
Download documents
View file history
Search for documents
Share or print documents
Navigate a document
When a document has multiple pages, you can use the up and down arrows to scroll through pages.

To go to a specific page:
Tap the first page number to highlight it.
Enter a page number.
Tap

Print agreements
You can not print an agreement that’s in an open workflow. To print, the agreement must be completed or cancelled.
Tap Completed or Cancelled/Declined.
Open a document.
Tap

Set your options such as number of copies, page size, and orientation.
Tap Print.

Note
Adobe Acrobat Sign leverages your device’s print capabilities and displays print options specific to your device.
Share agreements
Share PDFs directly through the Acrobat Sign app on your Android device. When viewing an agreement, the Share PDF option is available on the Completed and Cancelled/Declined screens. You can share PDFs via email, messaging apps, or any other platform, streamlining the document-sharing process for faster and easier access.
Open the Acrobat Sign app.
From the home screen, select Completed or Cancelled/Declined as per your need.
Open the agreement you want to share.
From the upper-right, tap
and then tap Share PDF.You get options to share the PDF through various platforms. Select the platform of your choice and follow the onscreen instructions to share the PDF.