Sharpen photos and correct exposures with the histogram tool.
View brightness levels, tones and colour intensity all in one place. Learn to read the histogram graph on your camera or in photo editing software to help enhance photo details.
Eliminate exposure and setting errors with a histogram.
Discover how this digital bar graph determines a photo’s exposure accuracy — and helps you to avoid the errors that can ruin a great shot. Learn how to read left and right side run-offs, decipher a “bunched-up” histogram and shoot in raw format for more editing options with Lightroom’s post-processing histogram tool. Plus, find out how using a histogram before can make for a better print after.
Style
xl spacing, two up
Layout
1 | 2
How your camera’s histogram can help.
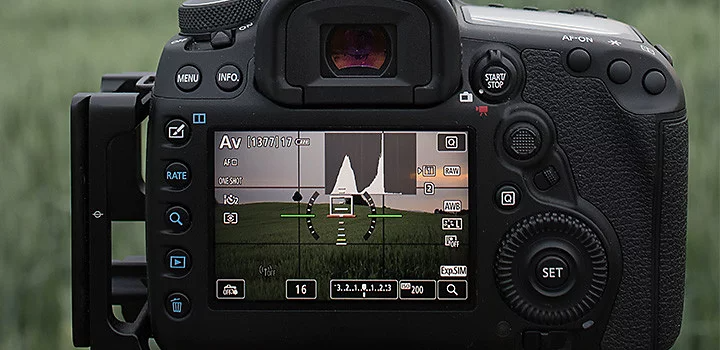
If you’re in the middle of a shoot, you can check the histogram on your camera’s LCD screen or in your viewfinder. Make adjustments if you’re surprised to find any of the following:
Left side run-off.
If you see high-frequency tones or peaks running off the left side of your histogram, that means your blacks are being clipped and your camera is not picking up all of the shadow detail that it might. This type of “low-key” image might be what you’re going for, but if it isn’t, you can let in more light by lowering the shutter speed, widening the aperture or raising the ISO (light sensitivity) of your camera. Each of these fixes can reduce the image quality, but you can experiment with slight adjustments to all three to get the combination of brightness and sharpness that you want.
Right side run-off.
If your image is “high-key,” you might expect peaks on the right side of the histogram. But if those peaks are cut off at the right edge, the image may be overexposed, meaning the highlight detail is washed out. In this case, take a shorter exposure, narrow your aperture or lower the ISO to reduce the light your camera is capturing.
A bunched-up histogram.
If all your tones are packed into one area of your histogram and there’s a lot of space on either side, the contrast may be too low. If you’re shooting in a controlled environment, you can add light to intensify highlights and deepen shadows. If the environment is out of your control, try reframing your photo to include contrasting elements or plan to adjust contrast in post-processing.
Shoot in a raw file format to maximise editing options.
It’s important to remember that there is no single correct histogram shape. As subject and lighting conditions vary, so will the histogram that captures that information. If you shoot in an uncompressed, raw format, all of the information that your camera captures will be retained. Then you can decide in post-processing what to keep and what to discard. Experiment with the histogram to avoid losing shadow or highlight details.
How the histogram helps in post-processing.
In Lightroom, you can find the histogram at the top of the right-hand panel. If your shadows are clipped, the grey triangle in the left corner of the histogram will turn white. Click the triangle or tap the J key to show shadow clipping and the clipped shadows will turn blue so you can see them in the photo.
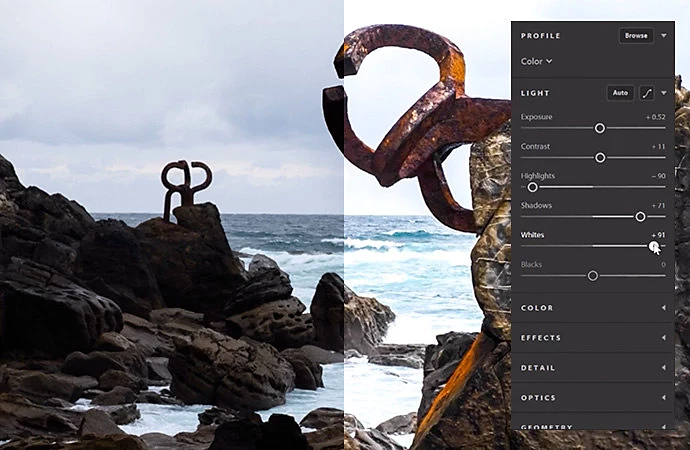
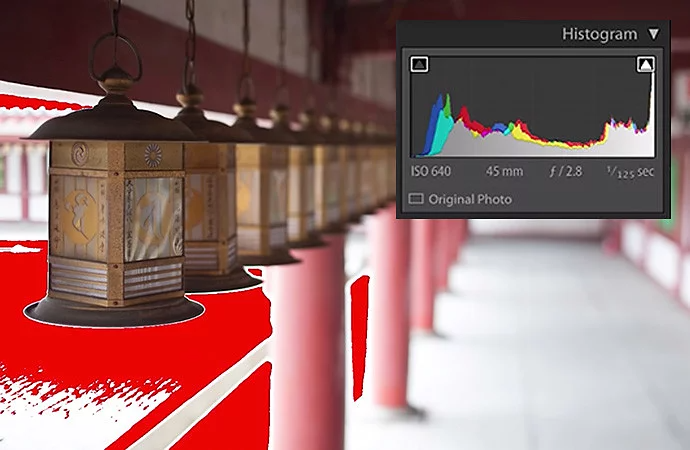
If your highlights are clipped, the triangle in the top right corner of the histogram will turn white. Click the triangle or tap the J key to see the lost highlight detail, which will be coloured red. Depending on what you find, you can adjust exposure or contrast as needed. The histogram will change as you move the sliders. You can also click the histogram itself and move to the left or right and the sliders will move accordingly.
If your histogram frequencies are all bunched up toward the middle with empty space at the edges, your photo might be lacking in contrast. To fix this, deepen the midtones and increase the dynamic range of your image by moving the Contrast slider to the right. Slight adjustments to the Clarity and Sharpening sliders can also increase the dynamic range of your photo.
Experiment with Highlight and Shadow Clipping warnings in Lightroom. Discover shortcuts and tips for maximising the dynamic range of your photos in this short video by Julieanne Kost, Adobe’s Principal Evangelist for Photoshop and Lightroom.
style
two up
Always check the histogram before printing.
Your photo might look perfect on your screen, but when you print it, you find that you’ve clipped blacks and whites. Photographers can make great use of pure black, but blown-out highlights can be especially distracting, as the eye is drawn to places where no ink has been laid on the paper. “I tell my students, if they’re going to print, always look at the histogram first,” photographer and teacher Tina Tryforos says. “Then adjust the right and left sliders to ensure that you have a full tonal range in your print.”
When you print, if your photo’s colours look vastly different from what you expected, you might need to calibrate your monitor. Mac and Windows machines offer colour calibration tools, but truly accurate calibration requires a colorimeter. These devices measure your screen’s colours against industry colour standards and create a unique colour profile for your monitor.
With an accurate colour profile, as well as a balanced histogram, you can capture the full dynamic range of your photos. You’ll avoid any unpleasant surprises when you print and trust that you’ve maintained shadow and highlight detail when you share images online. And by making the histogram part of your process while shooting, you’ll have better images before you even begin editing.
View brightness levels, tones and colour intensity all in one place. Learn to read the histogram graph on your camera or in photo editing software to help enhance photo details.
View brightness levels, tones and colour intensity all in one place. Learn to read the histogram graph on your camera or in photo editing software to help enhance photo details.
cardImage
cardImageAltText
How to read a histogram
Cookie Settings
General information
You can control how Adobe websites use cookies and similar technologies by making choices below. But note that if you disable cookies and similar technologies entirely, Adobe websites may not function properly.
Cookies are small text files stored by your web browser when you use websites. There are also other technologies that can be used for similar purposes like HTML5 Local Storage and local shared objects, web beacons, and embedded scripts. These technologies help us do things like remembering you and your preferences when you return to our sites, measure how you use the website, conduct market research, and gather information about the ads you see and interact with.
You can make choices in the menu below about what cookies and other technologies you want us to use on Adobe sites when you visit them from this browser. You can always change those choices later by clicking on the Cookie Preferences link at the bottom of the page.
If enabled:
We can improve your experience by tailoring the site and the content to things we think might be of interest
We can better keep track of your preferences — like what language you prefer to use
We will better understand your likely interests so we can provide you more relevant Adobe ads and content on non-Adobe websites and in non-Adobe apps
It will help us improve the performance of our website and those of our partners who use the Adobe Experience Cloud
If disabled:
We won’t be able to remember you from session to session so the experience may not be tailored to your interests
You’ll still have access to the content of the site but certain features that depend on cookies may not function
You’ll still see ads, they just may not be as relevant to you
General information
You can control how Adobe websites use cookies and similar technologies by making choices below. But note that if you disable cookies and similar technologies entirely, Adobe websites may not function properly.
Cookies are small text files stored by your web browser when you use websites. There are also other technologies that can be used for similar purposes like HTML5 Local Storage, web beacons, and embedded scripts. These technologies help us do things like remembering you and your preferences when you return to our sites, measure how you use the website, conduct market research, and gather information about the ads you see and interact with.
You can make choices in the menu below about what cookies and other technologies you want us to use on Adobe sites when you visit them from this browser. You can always change those choices later by clicking on the Cookie Preferences link at the bottom of the page.
If enabled:
We can improve your experience by tailoring the site and the content to things we think might be of interest
We can better keep track of your preferences — like what language you prefer to use
We will better understand your likely interests so we can provide you more relevant Adobe ads and content on non-Adobe websites and in non-Adobe apps
It will help us improve the performance of our website and those of our partners who use the Adobe Experience Cloud
If disabled:
We won’t be able to remember you from session to session so the experience may not be tailored to your interests
We’ll still count your use of our site and services
You’ll still have access to the content of the site but certain features that depend on cookies may not function
You’ll still see ads, they just may not be as relevant to you
Operate the site and core servicesOperate site and measure engagement
Always active
These cookies are required, and they are used to enable the site and related services core functionality. Without them the site could not operate, so they cannot be disabled.
These cookies enable the site and related services’ core functionality and collect statistics about user engagement, such as counting active use to help us understand trends. These cookies cannot be disabled.
Measure performance
These cookies are used to analyze site usage to measure and improve performance. Without them Adobe cannot know what content is most valued and how often unique visitors return to the site, making it hard to improve information we offer to you.
These cookies are used to analyze site usage to measure and improve performance. Without them Adobe cannot know what content is most valued, making it hard to improve information we offer to you.
Extend functionality
These cookies are used to enhance the functionality of Adobe sites such as remembering your settings and preferences to deliver a personalized experience; for example, your username, your repeated visits, preferred language, your country, or any other saved preference.
Personalize advertising
These cookies are used to enable Adobe and our partners to serve ads more relevant to your interests. Without them you will still see ads, but they might not be as relevant to you.