Introduction
In After Effects CC we can use the VR Comp Editor to quickly stabilize and track 360 footage.
Setting up VR Comp Editor and stabilizing 360 footage
First we need to open up the VR Comp Editor, so come over here to the Window tab.
At the very bottom you're going to see VR Comp Editor.
That's going to launch VR Comp Editor, and we can go ahead and dock this in the After Effects CC interface.
I'm just going to click on it and dock it over here.
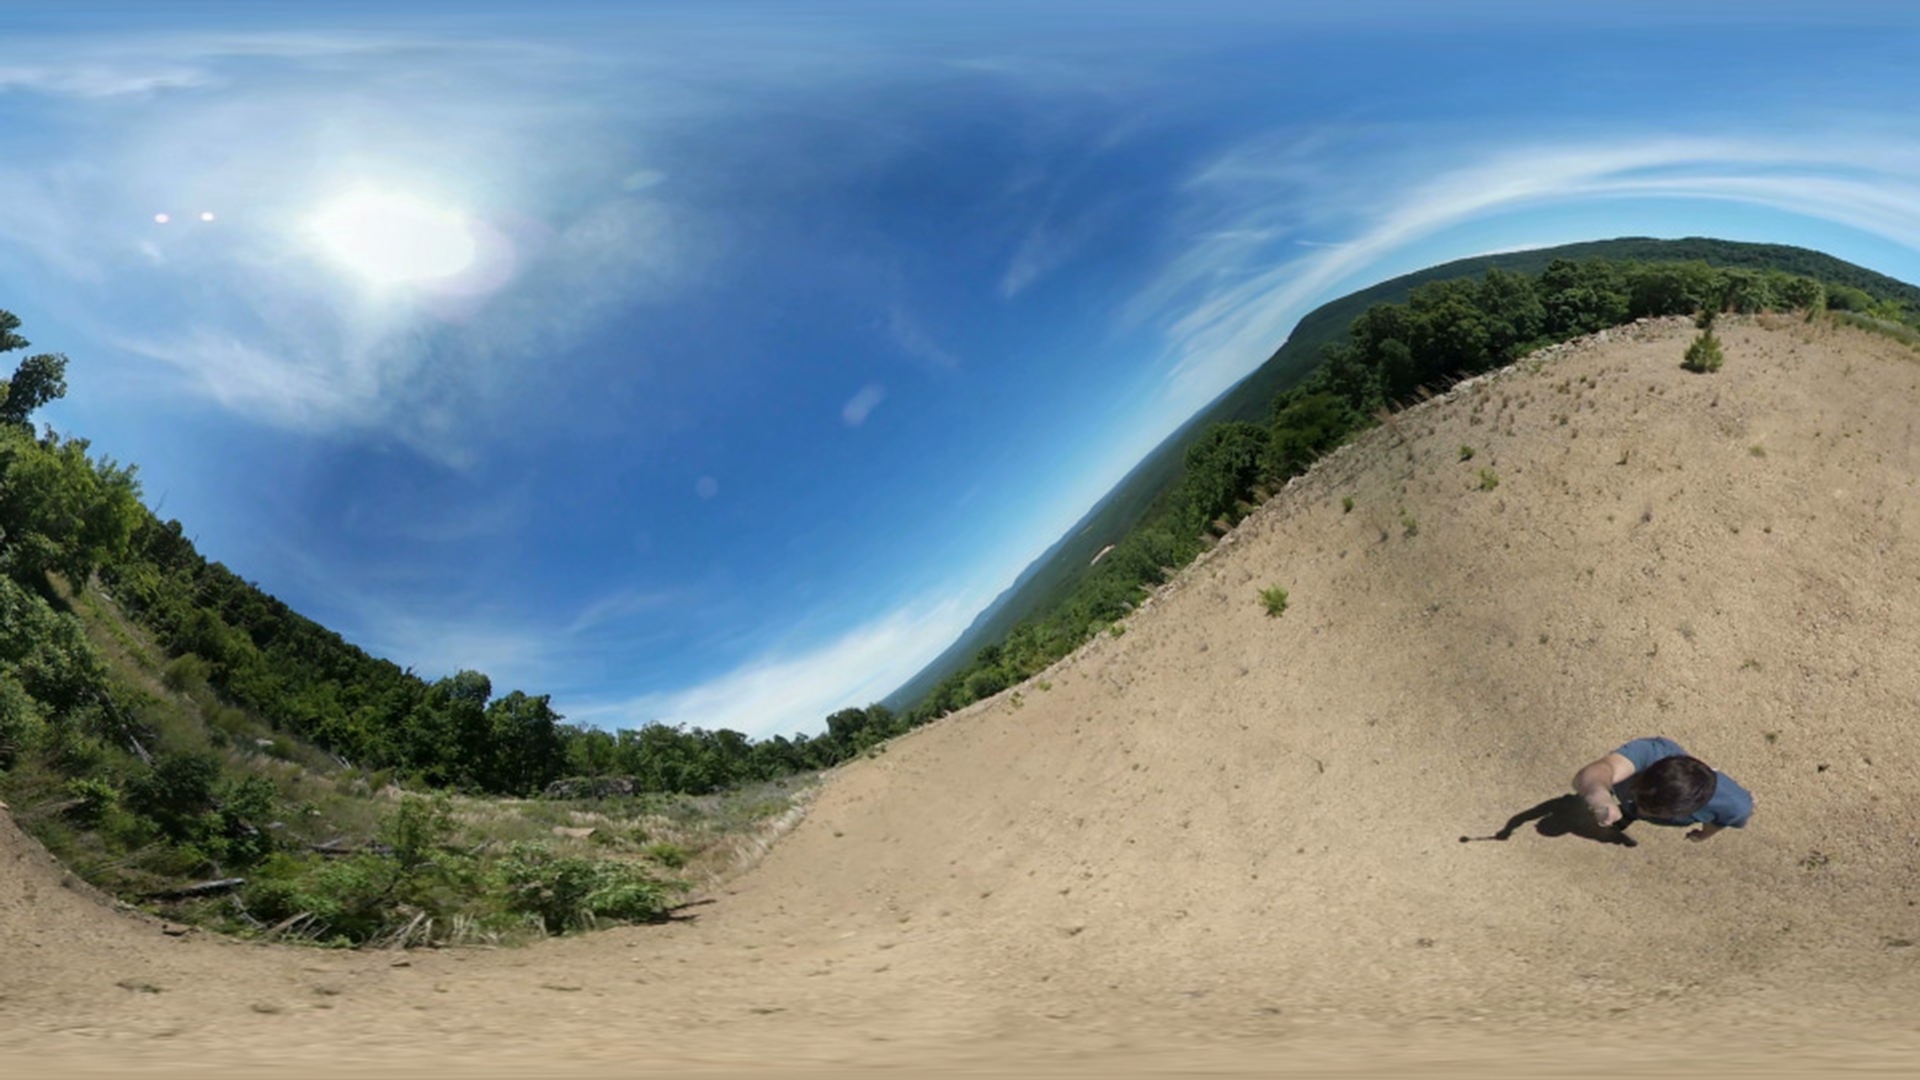
And you can see I have some footage here, that has not been stabilized and it's from the 360 camera walking on a monopod you can see how the footage kind of has a little bit of shake to it, and we want to go ahead and iron that out.
What I'm going to do is flip my footage selected here.
I'm going to come here to VR Comp Editor and I want to select Add 3D Edit This will allow me to select a composition I'm going to be working with.
So, I want to select my composition and currently the one I'm working with is "Walking - Non Stabilized."
So, I'll come here and I'm going to select, "Walking - Non Stabilized."
And I want to come down here to Add 3D Edit.
And now we'll see that's opened up the Edit 1 window And you can see this just looks like normal footage.
Now we can go ahead and scroll the Timeline here, you'll see we also see the camera is still shaking.
So, what we need to do is actually track this footage.
So, in the Edit 1 Window I want to go over here to Properties.
And that will open up the Properties options and the first thing we need to select is to Apply AE 3D Camera Tracker.
And when we do that, I'll go ahead and move this over to the side, we'll see we have this banner where it says "Analyzing in background (step 1 of 2)".
I do recommend doing something else, if you want to get better results.
Since the composition has been selected, come over here to the Effect Controls panel.
And you'll see we have the 3D Camera Tracker and it's currently analyzing our footage.
Go ahead and toggle down the Advanced options.
And down here check on Detailed Analysis.
That'll actually restart the analysis process, but you'll get much better results using the Detailed Analysis.
Now, I'm going to go ahead and speed this next part up until this finishes analyzing.
All right, we can now see that it's Solving Camera.
The analysis took a few minutes for this 15 second clip.
Once the banner goes away, you'll see we have some track points on our footage.
That let's us know that the solve has completed and before we do anything we need to come over here and select Create Camera So, I'm going to go ahead and click that.
And you'll notice that added a new camera down here to our composition.
And now on our Edit Properties, what we need to select now is go ahead and select Stabilize Footage.
That's going to link our VR camera up to that new 3D Tracker Camera.
When we do that you'll see there's a few new objects down here and the cameras have been rearranged, but if we go ahead and scroll through the Timeline of our footage; we can now see our footage has been stabilized, and is much smoother.
Now to see this in 360 though, we need to navigate back over here to the VR Comp Editor
Viewing and exporting the stabilized 360 output
and open up the Output Render.
When I select that we'll have an equirectangular view of our footage.
If I go ahead and scroll through this, we'll see that it has been stabilized.
And now we can see the stabilized output of our footage.
You'll notice on our footage over here, it's applied VR Converter.
And if we go ahead and toggle down the Reorient Camera View, it's applied some expressions and linked them here. that was attached to the camera in the previous composition.
That's what's allowing us to be stabilized.
Now, if you want to render this version out, you need to make sure that you render out the output version.
If you come back up over here to the Project panel, you'll see we've created a folder structure, automatically from the VR Comp Editor.
And we have this "Walking - Non Stabilized (VR2 Output)".
And that's the composition with the stabilization applied to it.
Now, if you'd like to go ahead and track this footage.
You have two options: you can either render out this version of the video, or you can go ahead and precompose the output composition of the already stabilized footage, and then work with that.
I've actually went ahead and rendered out a stabilized version, that's what I have right here if I click on this composition.
I have a Walking - Stabilized composition and it's the same footage, that has just been stabilized that I went ahead and rendered out.
So, now I'm going to go ahead and track the scene using the VR Comp Editor.
Tracking a stabilized 360 scene with the VR Comp Editor
And I'm going to go ahead and delete that previous edit, that we had on our stabilized footage.
So, I'm going to select Properties and then I'm going to select Delete and it'll ask me if I'm sure, and I'll say, "Yes."
So, now you can see we've deleted that VR Comp Edit.
So, now I'm going to go ahead and select Add 3D Edit.
That's going to pop up our Add 3D Edit options.
And under composition this time, I'm going to select the, "Walking - Stabilized" composition. and go ahead, and Add 3D Edit.
And you'll see again, that went ahead and launched our Edit 1 view And if I scroll through this, we'll see the camera has been stabilized on a stabilized version of our footage.
You maybe wondering why we can't use the tracking data from the previous version of out footage and that's because that footage was shaky.
So, if we're going to actually track this, the actual tracking points will be different.
They don't actually link up between the two, because our original footage, again, had that shake to it.
So, what I need to do is to go ahead and apply the Camera Tracker again to our footage.
So, I'm going to navigate over here to Properties for Edit 1.
And you're going to see Apply AE 3D Camera Tracker and I'm going to go ahead and select that.
Once again I'm going to go ahead and move this out of the way, you'll see it's analyzing our footage in the background.
With that footage selected, I'm going to come over here to Effect Controls And under Advanced for the 3D Camera Tracker, I'm again going to go ahead and check on turn on Detailed Analysis And now I'm going to go ahead and let this analize my footage and I'll speed up to when this finishes.
Now we can see it's on that part two, where its Soving Camera.
And again, when that completes, the banner will disappear, and you'll see the track points on our footage.
Before we do anything we need to come over here to the 3D Camera Tracker and select Create Camera.
And once again that will add another camera to our scene, so now we have a 3D Tracker Camera, along with our VR Master Camera.
Now under Edit Properties we need to select Track Scene.
And what that's going to do is link up the VR Master Camera to that 3D Tracker Camera So, now if we go ahead and scroll through this footage, you'll see those track points will stick to our scene.
So, we've effectively tracked our 360 footage.
To demonstrate this a little bit more
Adding and rendering 3D elements in a tracked 360 scene
I'm going to come over here to the Text Tool and I'm going to click in here and add in some 3D Text.
So, I'm just going to type in, "3D text" and on that text layer, I'm going to come here and I'm going to make it 3D.
You'll see it actually moved a little bit in space.
So, now if we go ahead and scroll through this footage. we'll see that text is actually floating in our shot.
And I can actually move it in Z space a little bit further down, and maybe line it up a little bit.
So, now let's go ahead and see this on the output for the 360 view.
So, I'm going to come here to the VR Comp Editor and select Open Output Render. and now we can see that text has been applied to our 360 composition.
Now, if we go ahead and RAM Preview this we will see the text is actually tracking in our 360 scene.
And once again if you want to go ahead and render this out, make sure you render out the output version.
So, I come back over here to my Project panel you'll see it created a new folder structure, and you'll see the, "Walking - Stabilized (VR2 Output".
If you'd like to add anything back in your shot just jump back over to that Edit 1 view And you can add in more 3D elements in here.
And then just go ahead and go back to your Open Output Render, once you're ready to complete and render out your footage.


