Introduction
Do you ever wonder why your underwater photos always end up looking dull or green, no matter how clear the visibility was that day?
Well, the ocean absorbs light differently, and with Lightroom, we're able to bring back a lot of those natural colors.
Hi everyone, my name is Aliah Banchik.
I'm a marine scientist, underwater photographer, and ocean explorer, and I spend a significant amount of time underwater documenting the world's most beautiful wonders.
And in this quick Lightroom tutorial, I'm going to take you through and show you how to transform your underwater photos to make them something that you're truly proud of just by using a few simple tools in Lightroom.
Let's get into it.
Restore natural colors with the White Balance tools
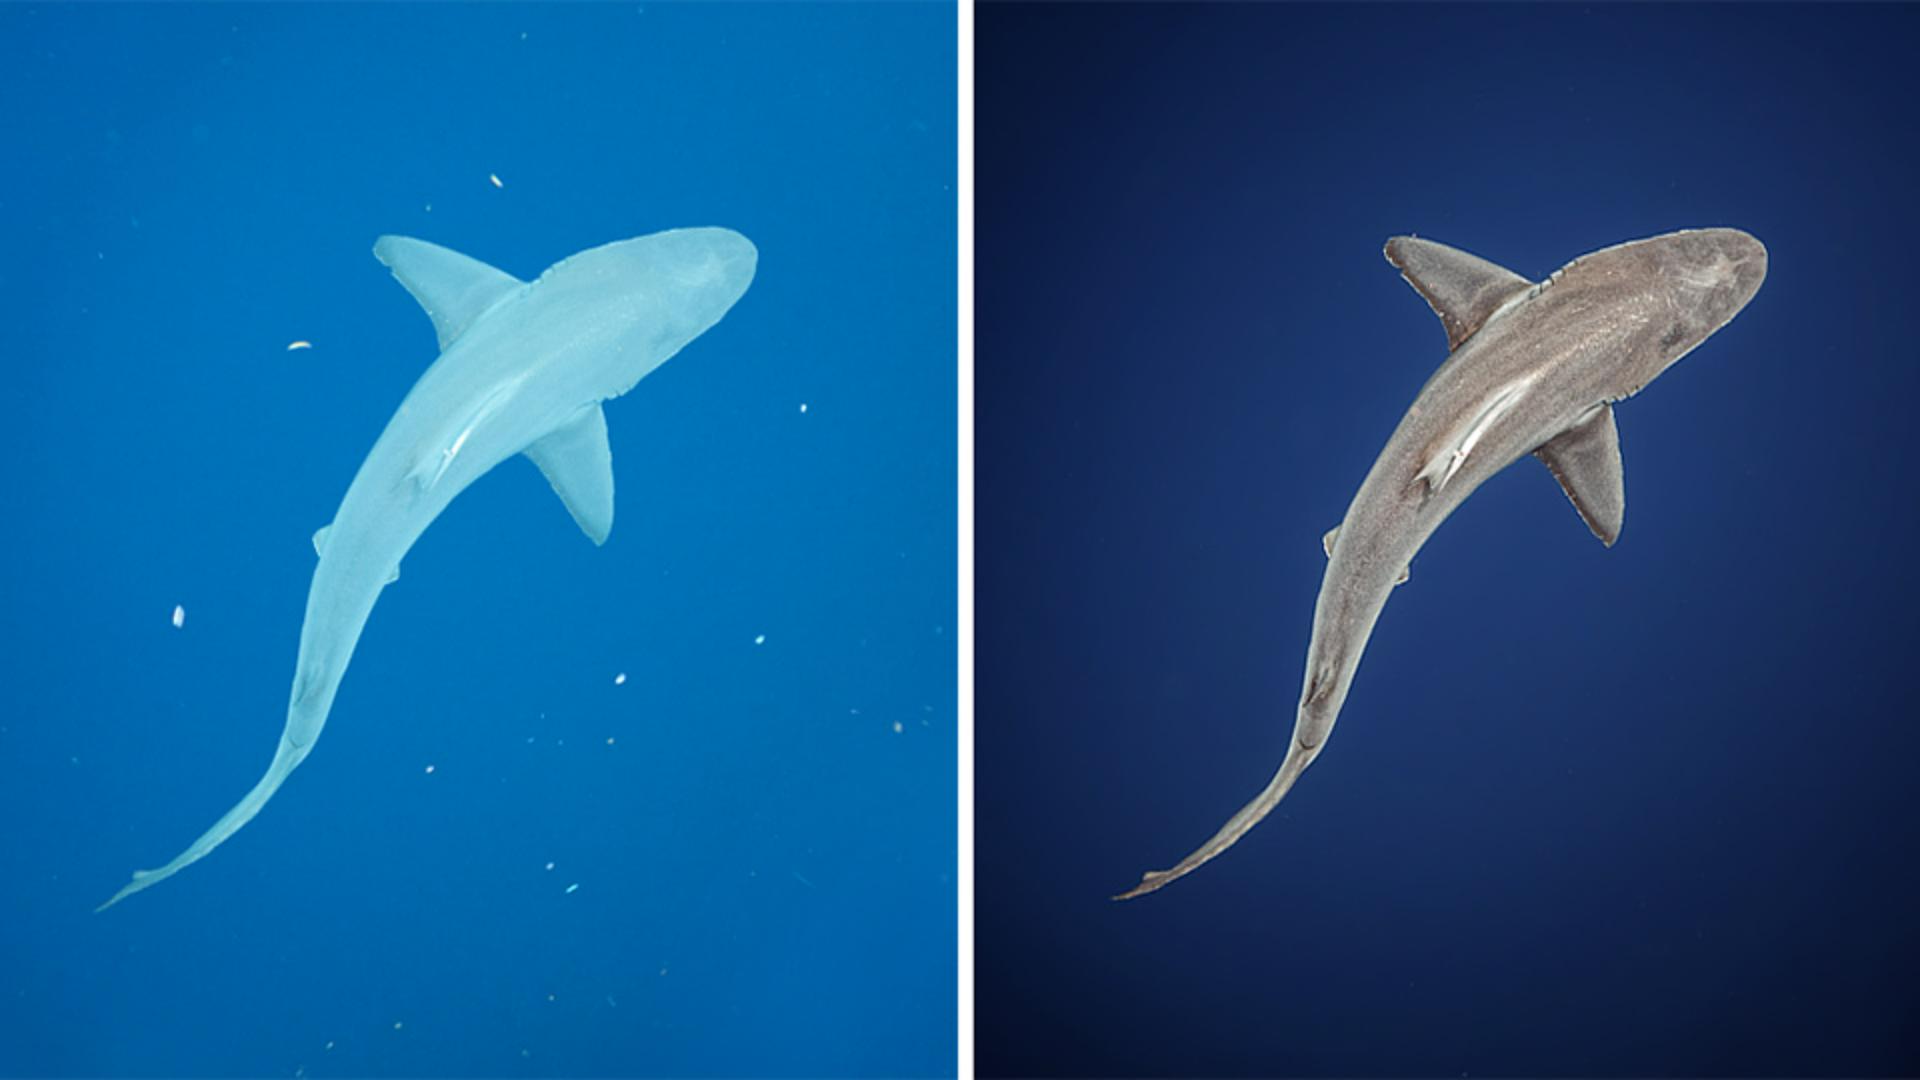
Here's our photo that we're working with.
First thing that I'm noticing is that the shark looks very blue, and it wasn't actually blue in real life, so we're going to color-correct the shark.
Let's go over to our Editing panel and then click on our Color panel.
If we use this Eyedropper Tool, we'll be able to click on a part of the image that's neutral in real life, something that's either black, white, or gray, and it will automatically white-balance the image according to what we've selected.
For example, I'm going to come over here and select the shark, which was a bit more gray in real life.
And now as you can see, this removes the blue color cast from the shark and makes it gray, which is pretty accurate to what it looks like in real life.
If for whatever reason I wasn't happy with that selection, I can do it manually by using the Temp and Tint slider.
So, I will pull the Temp slider away from the cool tones and towards the warm tones, and then I'll go down to the Tint and pull those towards the magentas.
And that's because underwater, warm colors like reds and oranges are the first things that disappear.
And that's because they have the longest wavelengths.
Fine-tune the color with a Color Mixer adjustment
Next thing I'm going to do is recognize that this background area is not the right color.
The ocean is not purple, so I'm going to come over to our Color Mixing Tool and click on Purple.
And now, what I can do is I can use the Hue slider and slide the Hue away from purples all the way to blues, which makes it look a bit more accurate.
Now, I'm going to close the Color panel and just briefly bop over to the Light panel.
Now that I have it color-corrected, the next step I would typically do is just fix the Exposure a little bit, bring that down, maybe bump the Whites and decrease the Blacks.
Apply separate adjustments to the subject and the background
But since this image is so nicely separated into two separate things - we have our subject, which is the shark, and then the background - I'm going to go straight over to our Masking panel and create a mask for the shark and a mask for the background, and edit those independently.
So, first things first, let's create a mask for our shark just by clicking on the Subject, and Lightroom is going to automatically detect my subject, which it correctly did as the shark.
And now, you can see that the only part of this image that I'm going to be editing is what's selected in red right now.
That's what that's showing.
And you can also see that over here in the side panel by clicking here.
So, first thing I want to do here is increase the Contrast a bit and maybe bring down the Exposure a little.
I also feel like the shark is still just a little bit too green and blue, so I'm going to adjust the Temp and Tint sliders to fix that just a little bit.
If I go over to the Color adjustment for this masked area, which is just the shark, then I can pull those sliders away from the cooler tones and into the warmer tones.
And I'm pretty happy with that.
Next, I'm going to make a new mask by clicking this blue + sign, and I want to make one for the background.
Now, we can see that the whole background is selected in red, and that's the only area that I'm editing.
I'm going to do some lighting-play first.
So, clicking on the Lighting panel, I'm going to slide my Exposure down to about here.
It just helps reduce the clutter of all the particles that are in the water.
Enhance the texture and details of the shark
The next step is making our subject really pop.
We're going to use two of my favorite tools, which are Clarity and Dehaze, to make this shark really stand out.
So, I'm going to go back over to my shark mask just by clicking on the mask in the corner here, and I'm going to go to the Effects panel.
So, clicking that, I can tell that there're actually some crazy patterns going on in the shark.
So, I'm going to increase Texture, and you can already start to see some of those scars, and increase Clarity, so you can really see the distinction.
Now, hold your horses, because Dehaze is simply an underwater photographer's best friend.
This usually has the ability to do some really incredible things to underwater photos, like cut through all of the foggy look that you usually get underwater.
We're going to increase that Dehaze and get some real character into the shark, which is amazing.
Now, just because I'm a perfectionist, I'm going to go back to the Color Tool and see that it's a little bit too warm for my liking, and I'm also going to decrease the Saturation just a little bit, because the shark wasn't that bright in real life.
Remove particles with the Healing Brush
Photos taken in the ocean often have particles just floating everywhere in the water, and it decreases the impact of your image.
So, if you wanted to go and retouch those, you can go over and use the Remove Tool.
If I wanted to take some time and really go through all the particles, I'd click on my Healing Brush and just come over and click away all of the particles underwater.
And then it looks a little bit better, in my opinion.
And that's it.
With just a few simple adjustments in Lightroom - white balance, dehaze, some targeted masking - you can really bring out the true colors from the underwater world.
And once again, my name is Aliah Banchik.
Thanks so much for watching, and I'll see you in the next tutorial.
Bye!