Premiere Pro CC allows you to create animated multi-layer titles and graphics that you can save as motion graphic templates for future use.
Let's take a look at the workflow.
To follow along download the sample files that accompany this tutorial.
I'm working on a project that's going to use the font Myriad Pro.
If your system doesn't have this font installed, it's included with Adobe Typekit as part of your Creative Cloud license.
If you see a warning advising you that you don't have the font just check the box to sync it from Typekit and then click the Sync Fonts button.
Wait for the fonts to sync and you'll want to reload the project so that existing titles using the font will be rendered correctly.
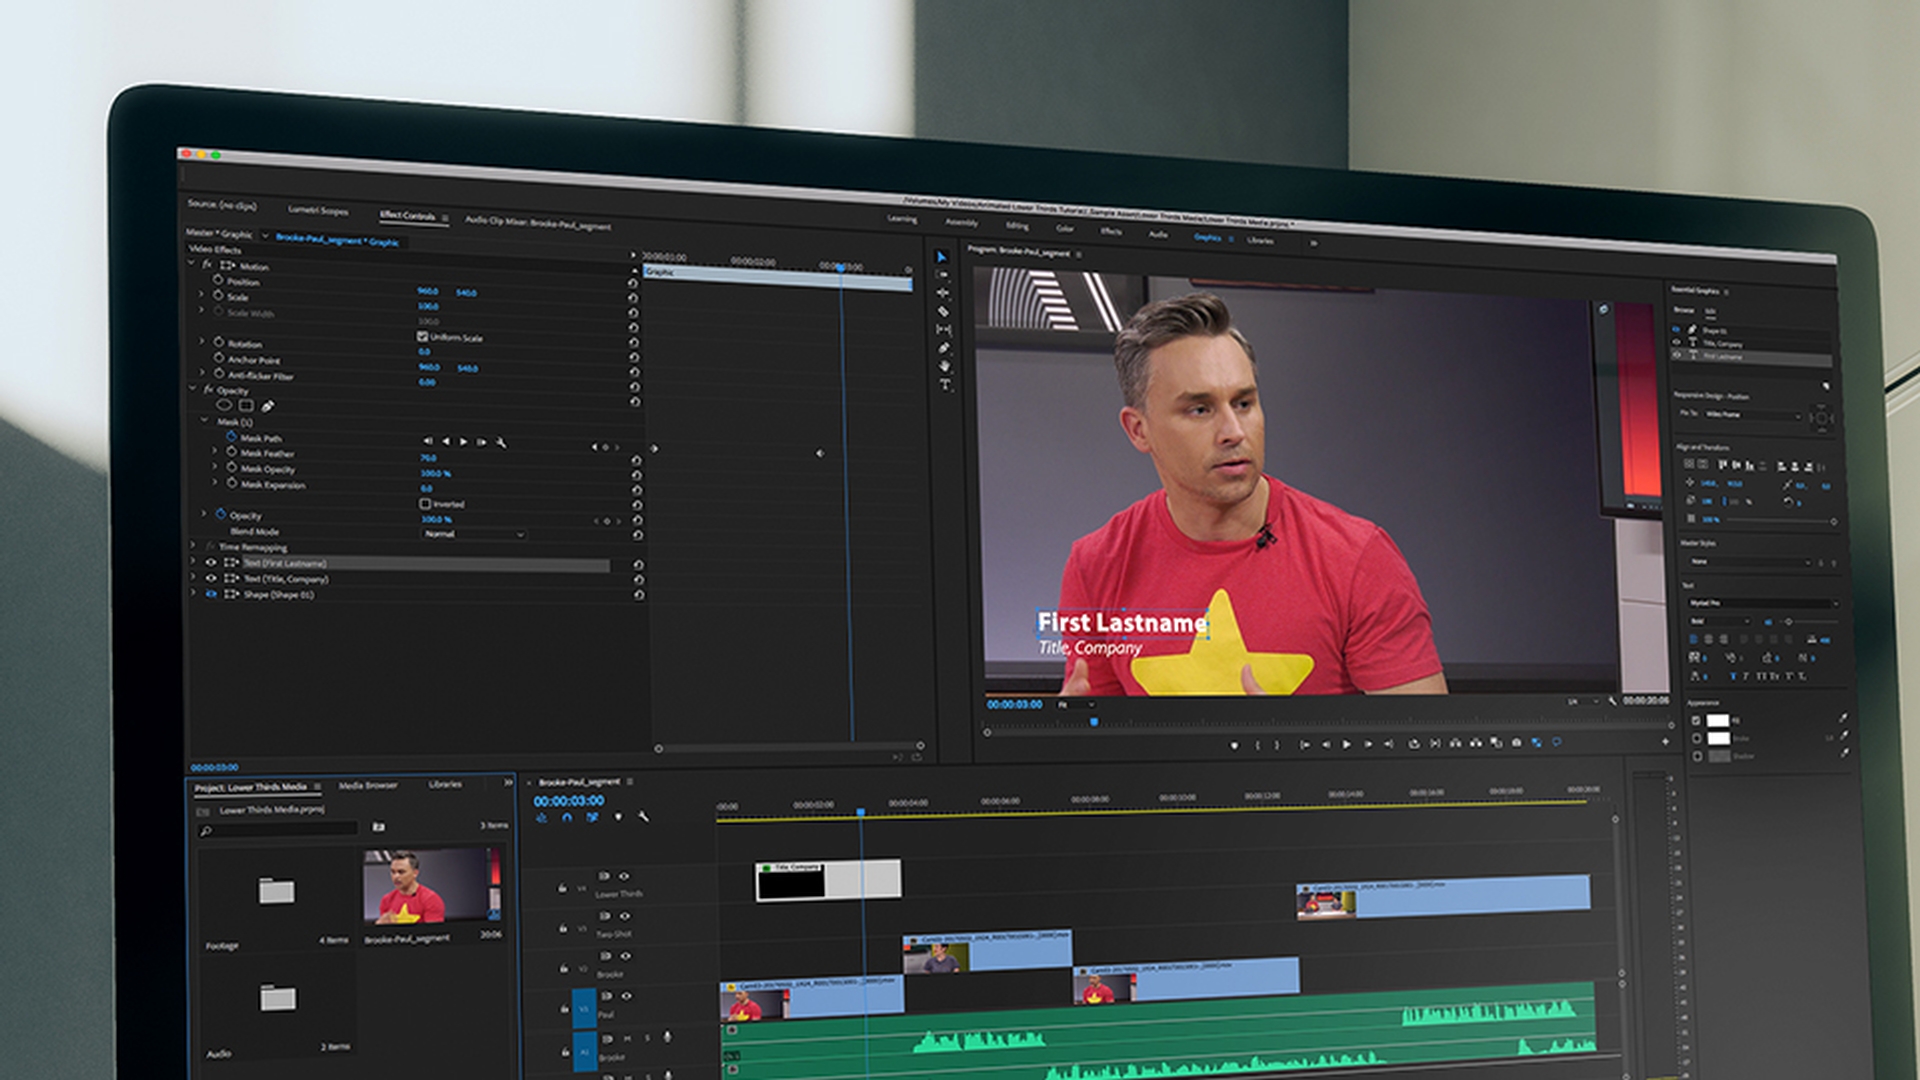
I'm in the Graphics workspace in Premiere Pro CC.
I have this Brooke_Paul_segment sequence open.
It's a simple presentation where I'd like to show the speakers names with a lower third title.
I'll just play the start, so you can see what we have.
I'm switching over to Illustrator CC because this is kind of where we first started or dabbled in the three.
Right, so the vector Illustration 3D...
I'm going to position the play head over the first clip right at the start of the sequence where I'd like my new title to begin.
All I need to do to create a new title is select the Type tool and I'll click somewhere in the picture and begin with the subject's name.
You'll notice in the sequence that the title is added to the lowest unlocked video track with enough space for the clip.
In this case that's video 3, but actually I've got a two shot on that track later in the sequence.
You can see it just there towards the end.
So, I'm going to scroll up a little bit and I'm going to pull this graphic up onto a track that I've already named Lower Thirds.
Once you've added your text you can begin to change the settings for it in the Essential Graphics panel and you'll notice that the edit pane of the Essential Graphics Panel has come up automatically.
However, I need to select the whole item and at the moment I'm in the process of editing the text.
So, I need to deselect and then reselect the layer.
I can do that by choosing the Selection tool and then clicking on that item or just in the Essential Graphics panel I can click away from the layer and then select it.
And now I've got the whole item and I can make some changes to it.
I'm going to set the Font to Myriad Pro.
I'll choose the Bold type.
I'll turn on the Full Bold as well just to give some extra weight to the font and then I am going to switch to the Selection tool and I'm going to position this somewhere down the bottom left corner of the video.
So, notice I can click and drag or click and type to add numbers here in the Essential Graphics panel for this layer item as well.
In fact, I think I'm going to set this manually to 140 horizontally and I'm pressing the Tab key on my keyboard and I'm going to put in 915 pixels vertically.
This is just for position.
That looks pretty good.
So, I'm going to add a new text layer.
I'm going back to the Type tool and I'll just click anywhere in the image for now and I'll add his job title "3D compositor".
Now I'll go to my Selection tool, so the item is selected.
And this time I'm going to use the Italic font of Myriad Pro.
And let's move this down.
And I think I need to put in some different font sizes.
Those are a little too large for this image.
Let's go for maybe 45 point for this smaller layer.
I'll just click and type that in, tab away from the number and for the upper layer there maybe let's go for 65 point.
I'm going to select the lower layer and let's position that also at 140 pixels horizontally, but maybe a little bit lower maybe 970, 972 vertically.
Of course, this positioning is a science to craft and an art and you'll be making your own choices for positioning, but I think that kind of works for me.
Now let's say the director of this program suggests that we have a rectangle to surround the text.
I'm going to go to the Pen tool here.
And I'm going to click and hold and select the Rectangle tool and I'm going to zoom out, so I can see around the image and I'm going to drag from offscreen here just across and over the text like that.
You'll notice of course that because this is a new layer it's added on top so it's in front of the existing text layers and you can see that up here at the top right corner of the Essential Graphics panel.
I'm going to take that shape layer and drag it down under and behind the text.
Now that I've done that I can see the positioning is not ideal, so I'll go back to my Selection tool and just pull that down a little.
Something like that looks ok to me.
Now let's give it a color.
And rather than using the color swatch in the color picker I'm going to use the eyedropper.
I'm just clicking to select it and I'll choose this darkish background.
And now let's animate that coming on screen.
I'm going to set the play head on the Timeline to about 1 second.
That's close enough.
And now with the shape here selected I'm going to click right here on the Toggle animation for Position icon.
This icon is telling me what the controls are for, but it also toggles animation off and on.
I'm going to click this and in doing so I'm adding a key frame for the position for this layer.
So now I can move my play head back to the start and just to keep this nice in level horizontally, I'm going to drag the horizontal position control left until that rectangle is of screen.
That way I haven't modified the vertical position at all.
Let's play that back and see how it looks.
I'm switching over to Illustrator CC because...
Not bad.
Now let's fade the text up just after the rectangle has finished moving on screen.
I'll just scrub to a point after the rectangles arrived and I'm going to select both text layers in the Essential Graphics panel.
I'm holding down the Shift key here to select both.
And you can see all the controls that I can apply on mass to multiple layers are now visible.
I'm going to turn on key framing for opacity and I'm going to pull the opacity control right the way down to zero.
Now let's move the play head on a little and I'll pull the opacity back up.
Once again, I'll go back to the beginning of the sequence and let's take a look.
I'll just deselect so we don't have those highlights for the layers.
I'm switching over to Illustrator CC because this is kind of where we...
I think that kind of works.
I'm going to shorten the clip a little bit because the default duration for still image media in Premiere Pro CC right now is 5 seconds.
So, I'm just going to trim this back so it's not overlapping the second clip down here.
And I think that rectangle is not really working for me.
So, I'm going to select the graphic in the sequence and I'm just going to turn the visibility for the layer off.
So, we still have the layer there in case we want it later, but for now it's not impacting our title.
It has given me an idea though.
So, I'm going to select these Text layers again and I'm going to turn off the animation for opacity.
I get a warning saying this is going to delete key frames and that's okay.
So now we don't have that fade out.
Now with the graphic selected in the Timeline panel I'm going to go to my Effect Controls panel.
All the changes made in the Essential Graphics panel add and update effects in the Effect Controls panel where they are fully editable.
Here is that shape layer for example where you can see the visibility is turned off.
I'm going to position my play head at the start of the clip.
I'm going to expand the Opacity for the whole clip and I'm going to add a mask.
I'll position this down off screen and now I'm going to enable animation for the Mask Path, move my play head into the sequence a little, make sure my mask is selected and reshape the mask, so we can see the text.
I kind of like the idea of it having an angle for the text as well.
And also, I'm going to turn up the feathering, so we have a soft edge and now you can see the key frames have being added.
I'm going to deselect, click back to the start of the sequence, set my zoom to fit and let's take another look.
I'm switching over to Illustrator CC because this is kind of...
Perfect.
I'd like to use this new animated title in other parts of this project and in other projects.
So, I'm going to export the animated title as a Motion Graphics Template.
Again, I'm selecting the clip in the sequence and I'm going to the Graphics menu and I'm choosing Export As Motion Graphics Template...
At the top of the dialogue box I've got the option to name the new template.
Let me call this "Presenter Lower Third".
We can then specify where the Motion Graphics Template file is going to go.
Now I'm going to choose the Local Templates Folder because it's preset and directly accessible in the Essential Graphics panel.
I could choose Local Drive and just make it a file to share with other systems or I can choose one of my libraries.
You'll notice we have the option to Include Video Thumbnail and that actually allows you to hover scrub and see the animation displayed in the Essential Graphics panel.
That's a great idea and I'm going to include it.
I also have these options to give me warnings if there are fonts that are not available on Typekit because of course you might have installed other fonts on your system if the motion graphics template uses effects that are not included with Premiere Pro CC because of course you could have third party effects and if the templates incompatible with mobile devices.
If you're producing a version that can't be used on any of the Adobe mobile apps.
I'm also going to put a keyword in here.
I'm going to just put the keyword in Show3 to help me remember which show this is associated with.
And that's going to be searchable in the Essential Graphics panel.
I'll click OK.
And now let's add that motion graphics template to the second clip in our sequence.
I'm going to go to the browse pan in the Essential Graphics panel and you'll notice here I can toggle between browsing Adobe Stock or browsing my templates.
I'm going to put a check in the box for the local templates folder rather than browsing inside specific libraries.
And to save me searching manually I'm going to put in that tag that I added when I created the motion graphics template - Show3.
There's my Lower Third and I'll just increase the size of this thumbnail, so you can see.
As I hover the mouse over the thumbnail.
I'm seeing that animation just as I would see the contents of a clip in the Project panel.
I'll drag this into my sequence and I'm going to place it right after the first lower third that I've got.
I'm going to select the graphic.
Right away you can see I've got my editable layers available.
Let's move the play head on a little so I can see the text, go to my Type tool, click on the first line of text.
I'm going to press Control A here on Windows, that will be Command A on Mac OS, and I'll put in the subjects name.
Click onto the layer that has the job title.
Again, I'll pressing Control A or Command A.
And that's all I need to do to change the contents of the Motion Graphics Template that's now been incorporated into my sequence.
I'll just deselect and play that through.
Right, so the vector illustration 3D...
Now I can see that there's an issue at the end of this graphic.
My mask is going to need to be adjusted because it's not long enough to show all of this longer job title.
So, let's select the motion graphics template in my sequence.
Select the Mask.
And I'm going to jump back to that keyframe, so I don't add unnecessary keyframes and just stretch this out.
That looks better.
I'll deselect, jump back and play.
Right.
So the vector illustration...
Perfect!
That motion graphics template is now available for use in other projects and as you've seen is fully editable if anything needs adjusting when it's used again.


