Advanced Configuration
This section describes a few of the many available customimzation options. Refer to the Wizard user interface and the Preference Reference for more options.
See also:
Note
Macintosh users should refer to the Admin Guide for Mac. While most examples are Windows-based, Mac supports almost all of the same configurations.
Tools and tool set configuration
Tools appear in two main areas: The Tools tab (sometimes called the “Tools Center”), and in shortcuts in the right hand tools pane. You can configure both via the following options:
User interface: Configure new tools as shown in the screen below.
Wizard: In the Tools pane, check Disable Apps in Tools tab.
Registry: Set a FeatureLockdown preference that maps to the tool’s AppID. For examples, see the Preference Reference.

Use this feature to standardize task-specific tool views, reduce training costs, and improve employee efficiency by grouping related tools into a common view. This feature allows:
Creating or import custom tool sets.
Switching between different tool sets.
Creating and managing tool sets across the enterprise via the Wizard or .aaui files.
Tool configuration files
Tool set files reside in these locations:
A local user directory (full access): Files which are stored and imported by the current user are placed in the default current user’s directory. For example:
C:\Users\<username>\AppData\Roaming\Adobe\Acrobat\<version>\UICustomization\<anyname>.aauiA local, product directory (read only): Files in this directory are visible to any user on the machine. For example:
C:\Program Files (x86)\Adobe\Acrobat <version>\Acrobat\UICustomization\<language>\<anyname>.aaui
You can find a list of tools and their available properties in the .aapp configuration files at %installdir%\(product name)\AcroApp\(language ID)\. While it is possible to modify these files and leverage their rich configuration options, this technique is not officially supported since such options cannot be tested by Adobe.
Note
If you’re customizing shortcuts in the right hand pane, you can determine the a(index) value to use for cDisabled and cFavorites by looking in the .aapp file. For example, the Create PDF tool is named CreatePDFApp.
Custom tools
Note also that custom entries for 3rd party plugins added post deployment are overwritten on the next product update. To assure that your settings remain in place, add them via the Customization Wizard during the initial install. For details, see https://www.adobe.com/go/acrobatwizard.
Example tool set list
AccessibilityApp: Create and verify PDF files to meet accessibility standards for people with disabilities
ActionsApp: Use guided Actions to complete PDF tasks quickly and standardize routine tasks
CertificatesApp: Digitally sign or certify documents and validate authenticity
CollectSignaturesApp: Get signatures from others and track results
CombineApp: Combine and arrange files into a single PDF
CommentApp: Add comments with highlights, sticky notes, and mark-up tools
CompareApp: Compare and highlight the differences between two versions of a PDF
CreateCustomUIApp: Create a customized collection of Acrobat features and share with others
CreatePDFApp: Create a PDF from any format
DeveloperApp: Enhance PDF forms and connect to databases with JavaScript
EditPDFApp: Edit text and images in PDF files
ExportPDFApp: Convert PDFs to Word, Excel, PowerPoint and more
FillSignApp: Fill and sign documents and forms electronically
FormsApp: Quickly convert Word, Excel or scanned forms into PDF forms
IndexApp: Index PDF files to speed search across document collections
MeasureApp: Measure distance, area, and perimeter of objects
OptimizePDFApp: Reduce PDF file size, enable fast web view, control image and font options
PagesApp: Delete, insert, extract, or rotate pages
PaperToPDFApp: Turn scans or photos of paper documents into searchable PDFs with selectable text
PrintProductionApp: Preview, preflight, correct, and prepare PDF files for high-end print production
ProtectApp: Prevent others from copying, printing & editing the information in PDFs
RedactApp: Permanently delete sensitive text, graphics, or hidden data
ReviewApp: Automatically collect comments from reviewers in a single PDF
RichMediaApp: Add audio, video, and interactive objects
StampApp: Add stamps such as ‘approved’ or ‘draft’
StandardsApp: Create PDF/A, PDF/E, or PDF/X files to comply with ISO standards
SendAppFull: Send documents, track views and downloads
Preferences Synchronization (12.x and later)
When preferences synchronization is enabled (the default), desktop preferences sync across machines where Acrobat and Reader are installed and when the user is signed in with an Adobe ID. This feature allows users to leverage their customizations and streamlined workflows on any machine. Syncing is controlled by the preference:
[HKLM\Software\Policies\Adobe\<product name>\<version>\FeatureLockdown\cServices]
"bTogglePrefsSync"
bTogglePrefsSyncdisables preference synchronization across devices. This new feature which synchronizes desktop preferences across machines with Acrobat and Reader on which the user is signed in with an Adobe ID.
Preference |
Type |
Applications that sync |
Settings that sync |
|---|---|---|---|
Commenting |
User Settings |
Acrobat & Reader |
All the preferences in the UI under Preferences > Commenting |
Identity |
User Settings |
Acrobat & Reader |
Everything in the registry under |
Document Open/Save Settings |
User Settings |
Acrobat & Reader |
All the preferences in the UI under Preferences > Documents |
Favorite Apps |
User Settings |
Acrobat |
Everything in the registry under |
Quick tools |
User Settings |
Acrobat |
Everything in the registry under |
Left Hand Panes |
User Settings |
Acrobat |
Everything in the registry under |
Convert From PDF |
User Settings |
Acrobat |
Everything in the registry under |
Convert To PDF |
User Settings |
Acrobat |
Everything in the registry under |
Scan & OCR |
User Settings |
Acrobat |
Everything in the registry under |
Actions |
User data |
Acrobat |
The files under |
Corporate fonts & printing
You can set printing options via joboptions files. This example shows how to set corporate fonts.
Open the PDFMaker’s settings panel (method varies by the software product you are using to access it.
Choose Advanced Settings.
Add your font to the Always Embed list.
Save the settings as a new joboptions file.
Distribute the file:
Predeployment: Use the Customization Wizard’s distiller feature: https://www.adobe.com/devnet-docs/acrobatetk/tools/Wizard/distiller.html
Post deployment: Distribute the file to C:Users<username>AppDataRoamingAdobeAdobe PDFSettings and set the default joboptions file to use for the PDF printer and Distiller in the Registry. You will need to set the
JobOptionsregistry entry for each PDFMaker used by specific software as well as for Distiller. For example:
[HKEY_CURRENT_USER\Software\Adobe\Acrobat\PDFMaker\<version>\Visio\Settings]
"JobOptions"="Standard"

[HKEY_CURRENT_USER\Software\Adobe\Acrobat\PDFMaker\<version>\Word\Settings]
"JobOptions"="High Quality Print"

[HKEY_CURRENT_USER\Software\Adobe\Acrobat\PDFMaker\<version>\Word\Settings\PrePDFA]
"JobOptions"="High Quality Print"

[HKEY_CURRENT_USER\Software\Adobe\Acrobat Distiller\<version>]
"JobOptions"="Standard"
Browser integration
Acrobat and Reader ship with browser plugins that enable viewing and creating PDF files in a browser. However, behavior as well as customization options vary across browsers.
Note
For manual browser configuration details, see https://www.adobe.com/go/pdfinbrowser.
Internet Explorer add ins
Disable the IE PDF viewer add-in via one of the methods below.
For more detail provided by Microsoft, see:
IE config on the command line
You can use the command line property DISABLE_BROWSER _INTEGRATION to prevent the installation of (or uninstall) the PDF Viewer ActiveX control.
IE config via the registry
Create the following preference if it does not exist, and set its value to 1.
HKEY_CURRENT_USER\Software\Microsoft\Windows\CurrentVersion\Ext\Settings\{CA8A9780-280D-11CF-A24D-444553540000}[Flags]=1 (DWORD)
Chrome PDF viewer extensions
Registry configuration options for Chrome include:
Disable the Chrome PDF viewer
HKLM\SOFTWARE\WOW6432Node\Policies\Adobe\(product name)\(version)\FeatureLockdown[bAcroSuppressOpenInReader]=1
Disable the first time startup screens that prompt for the Chrome extension install
HKLM\SOFTWARE\Adobe\Acrobat Reader\DC\Installer[ENABLE_CHROMEEXT]=1
Note
For Chrome details about the end user experience and associated UI, see https://helpx.adobe.com/acrobat/kb/open-in-acrobat-reader-from-chrome.html
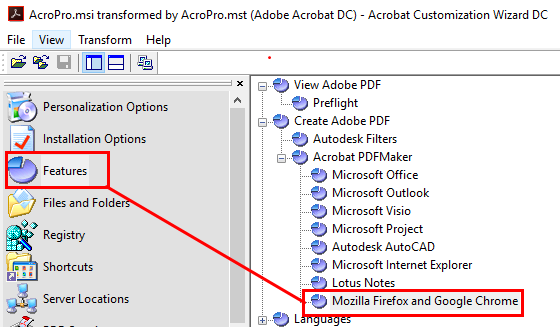
PDF Maker extensions
When installing Acrobat, block the installation of PDFMaker’s browser extensions for Firefox and Chrome with the Wizard’s Features panel:
WebMail
Features include support for:
Sending PDFs as email attachments using any mail account that supports SMTP/IMAP protocols. In addition to existing desktop email clients, users can now configure these mail accounts by providing User Name, Password, IMAP and SMTP details.
Gmail and Yahoo mail accounts (Yahoo mail accounts that end with yahoo.co.jp are unsupported).
Using Webmail in various Acrobat workflows like Shared Reviews and Forms Distribution. Users can send emails for inviting participants to a Shared Review or distribute PDF forms using the above-mentioned Webmail or other mail accounts. Users can also retrieve their contacts list while composing the mail (Gmail only).
For configuration details, see the Preference Reference or the Wizard Guide.
AATL and EUTL certificate download
As part of the Adobe Acrobat Trust List program, Adobe periodically pushes vetted trust anchors (certificates) for use in digital signature workflows. In the Wizard, use the Load trusted root certificates from Adobe drop down list to specify how trusted root certificates are loaded:
Enable & Ask before installing
Enable & Install silently
Disable
Alternatively, set this preferences manually:
[HKCU\Software\Adobe\<product name>\<version>
\Security\cDigSig\cAdobeDownload]
"bAskBeforeInstalling"
Custom file deployment
Custom files are one of the primary ways an enterprise can improve business efficiency and lower the Acrobat’s total cost of ownership. This feature is often under utilized, and workflow owners may find it beneficial to review the list below as well as the directories under the product’s root install location. Some of the customizable files include:
Files that improve workflow efficiency such as those for Actions, combining files, eEnvelopes, Quickbooks templates, forms templates, etc.
Files that customize application behavior such as JavaScripts and plugins.
Digital signature files: digital IDs, trusted identities, LDAP server list, custom signature handlers, certificate revocation lists, etc.
Printing and Distiller files.
Document backgrounds, headers, footers, watermarks, stamps.
Document security files, redaction codes, custom security handlers, etc.
Multimedia skins, navigators, preflight, color swatches, and many more.
Deployment options
IT can deploy custom files before or after product installation.
Deploy files with initial installation
Prior to product deployment, IT typically uses the Customization Wizard to add files to any requisite directory or to set configure the registry to scan custom, shared directories. To do so:
Use the Wizard’s Files and Folders feature to add files to the requisite locations.
Save the modified installer and deploy normally.
Deploy files using Group Policy Objects
Admins that use GPO and Active Directory deployments can use their standard methodologies for deploying files and custom registry settings. At a high level, the steps include:
Do one of the following:
Create a Group Policy which runs a file copy script at system log on or log off or at a scheduled time.
Place the files on the target machines via
User Configuration\Preferences\Windows Settings\FilesorUser Configuration\Preferences\Windows Settings\Folder.
Verify the files are copied to the standard product or user directory so that Acrobat can find the files.
Platform considerations
Most files are applicable to both Windows and Macintosh. Except for the root path, file locations are identical under the product install directories. Where registry or plist preferences provide file-related configuration options, corresponding registry preferences can typically be used on Macintosh by specifying equivalent plist settings in /Library/Preferences/com.adobe.Acrobat.
Refer to the Preference Reference for registry and plist details.
Plug-ins
Many organizations use plug-ins to customize workflows for particular needs. The Customization Wizard allows you to specify custom plug-ins for automatic installation. You can use plug-ins from third-party suppliers or develop your own using the Acrobat Software Developers Kit (SDK). For more information, see the Acrobat Developer Center: https://www.adobe.com/devnet/acrobat/.
JavaScripts
JavaScript can be used to add and remove items from menus, automate Actions, and perform an almost limitless variety of other tasks that can improved workflow efficiency. You can use scripts from third-party suppliers or develop your own using the Acrobat Software Developers Kit (SDK). For more information, see the Acrobat Developer Center: https://www.adobe.com/devnet/acrobat/.
10.1.1 introduced changes that affect the use of global variables and user scripts. If you are migrating to a newer version, refer to the Application Security Guide for details.
Custom Actions (macros)
Actions provide a way to reduce repetition, automate common tasks, and enable batch processing on one or more PDFs. Actions are similar to macros in other popular software applications and lower Acrobat’s total cost of ownership by increasing business efficiency. They also allow organizations standardize document preparation, minimize errors, reduce training costs, and improve employee efficiency by combining repetitive multi-steps tasks into guided Actions. Actions provide a way for the enterprise to:
Improve compliance by guiding end users through a set of tasks ensuring that no step is missed.
Simplify and speed up document preparation by optimizing the user experience.
Centrally distribute and update Actions.
Increase value and flexibility by integrating guided Actions with local and hosted repositories.
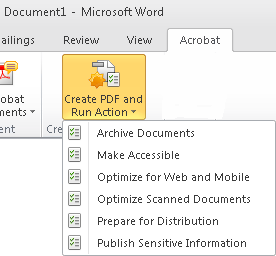
Integration with other products
Actions are integrated with PDFMakers so that they can be invoked from other applications. For example, when saving a file as a PDF in Microsoft Word, the PDF tool bar now displays a Create PDF and Run Action button. The drop down list of Actions show all the available Actions that the product can find. The list is populated from these directories:
The default Actions user directory.
The default Actions product directory.
Any custom directory IT has configured the product to scan for action files.
Action file locations
Action files can be stored in three locations:
A local user directory (full access): Actions which are stored and imported by the current user are placed in the default current user’s directory. For example:
C:\Users\<username>\AppData\Roaming\Adobe\Acrobat\<version>\Sequences\MyAction.sequ.A local, product directory (read only): Files in this directory are visible to any user on the machine. For example:
C:\Program Files (x86)\Adobe\Acrobat <version>\Acrobat\Sequences\<language>\MyAction.sequ.A shared directory (read only): Custom Actions that are created for and shared across the enterprise can reside in any location visible by the product. Deployment should include configuring the product via registry preferences to look for the files that reside in any non-default location.
Offline Help access
The Reader Help system is only available online. If the product does not have online access, configure installs to point to a local version on your Intranet.
To configure local access to Help:
Download the Help in PDF format.
Install it in some accessible location.
Place the JavaScript in in the JavaScripts directory of each installed client. For example, (
C:\Program Files\Adobe\Reader <version>\Reader\Javascripts). This script replaces the existing Help link with your custom link.
Note
The easiest way to place this file prior to deployment is by using the Customization Wizard’s Files and Folders feature. The Wizard allows you to create an MST file that will modify the installer with any of your customizations.
Help menu JavaScript
/************************* Hide Menu ********************************/
//Hide the default Help menu

app.hideMenuItem("HelpReader");

/******************************   Menu Execution items **********************/
app.addMenuItem({ cName: "Adobe Reader Help PDF", cParent: "Help", cExec: "fTDocs1()", nPos: 0});
/***************************** Functions ************************************/

// Note: The "/C/Program Files/Adobe/" convention was used to conform to the
// Adobe SDK format but the installer does not do this so you may need to
// edit the path for your system.

function fTDocs1()
    {app.openDoc("/C/Program Files/Adobe/Reader 10.0/Help/reader_X_help.pdf");};
Accessing Help behind a proxy
The online help system can be made accessible when users are behind an authenticating proxy by setting the following preferences:
32-bit:
[HKLM\SOFTWARE\Adobe\<product name>\<version>\FeatureState]"3179427"=dword:0000000164-bit:
[HKLM\SOFTWARE\Adobe\<product name>\<version>\FeatureState]"3179427"=dword:00000001
EMF and XPS conversion to PDF
The December 2018 Acrobat release disabled XPS and EMF file conversion to PDF.
At Adobe, we build security into our products and we implement numerous security processes and controls to help us comply with industry-accepted standards, regulations and certifications. Some examples of overall security improvements specific to Acrobat and Reader include: sandboxing (Protected Mode and Protected View), fuzzing high value targets like the broker process, finding memory corruption bugs via ASAN/GFlags, and running continuous static analysis on the codebase. Additionally, as an added security measure, where we see features with low usage, like XPS and/or EMF to PDF conversion, we disable these features. However, if you trust the document origin, you can enable the feature by creating and setting the following preferences:
HKLM\SOFTWARE\(Wow6432Node)\Adobe\Adobe Acrobat\(track name)\FeatureState[BlockXPSParsing]=0
HKLM\SOFTWARE\(Wow6432Node)\Adobe\Adobe Acrobat\(track name)\FeatureState[BlockEMFParsing]=0
Customization Wizard overview
The Adobe Customization Wizard tunes the Acrobat and Reader installer prior to mass deployments. The Wizard is a free utility designed to help IT professionals take greater control of enterprise-wide deployments.
Modify the installer via a transform file (MST file) without altering the original download.
Optimize installer and installation workflow by including silent installation, pre-serialization, reboot, multilingual, and custom setup choices, including suppressing the EULA, registration prompts, and the Getting Started window.
Customize application preferences such as collaboration, security settings, Acrobat.com integration, printing, and most other features.
Leverage existing installations by drag and dropping registry settings and files from existing installed applications.
Prevent users from modifying certain preferences by locking them.
Feature configuration-Registry: Install and configure the application to suit your environment and the use the Wizard to leverage you changes. Many application preferences and directories do not exist until the code is exercised from an installed application. While you could build the paths and add the values manually, simply configuring an installed application and using it as a template does most of the work for you.
Files and Folders: Many template files won’t exist unless you have installed and configured the application. For example, the easiest way to create a directory server file is via the application’s GUI. Use the Wizard to add these files to the installer.
Although many tools such as Orca and Admin Studio can be used to customize Microsoft transform (MST) files, Adobe only supports the Adobe Customization Wizard.
A typical workflow which uses an existing reference install could include the following:
Configure the application via its user interface. In particular, go through the menus under Edit > Preferences. Product UI configuration provides a simple way to configure features.
Use the Wizard’s Registry feature to drag and drop the configured template registry to the installer.
Use the Wizard UI to configure application preferences not already configured manually.
Lock down features so that settings can not be changed by end users: You can use the Wizard’s UI or the manually set lockable preferences.
Use the Wizard’s Files and Folders feature to drag and drop your enterprise files to the installer.
Save the installer changes to an MST file and install the customized product.
Use MSI and Adobe properties to further modify the install during deployment.