Take scans
You can use the Adobe Scan app to instantly scan various types of documents, capture new images, or use existing images and convert them to digital copies. The Scan app converts images to PDF and saves them to Adobe cloud storage. Empowered with Optical Character Recognition (OCR), the app supports automatic text recognition that automatically converts image text to real text.
The scan feature requires access to your camera. If prompted, choose Allow. For details, see Change settings.
To quickly scan a document in auto-capture mode:
Open the app and wait for the capture.
Once the app captures the document, tap on the thumbnail to view and modify your scan.
Scan a document
To scan a document from the capture window:
Open the app and tap

Select the document type. Refer to Perform quick actions for more details.
Optionally, tap the
 to change flash settings. Refer to Perform quick actions for more details.
Invoke a scan using one of the following capture modes:
 Auto-capture (default): The app displays the capture screen and detects the document.
In auto-capture mode, the app uses live edge boundary detection that displays blue dots to identify document corners.
Auto-capture (default): The app displays the capture screen and detects the document.
In auto-capture mode, the app uses live edge boundary detection that displays blue dots to identify document corners. Manual-capture: Center the document in window and tap the capture button.
Follow the on-screen messages to complete the scan workflow:
Looking for document: The app is looking for the document and trying to detect its boundaries.
Capturing… hold steady: Edge detection can see the entire document.
No document found. Capture manually: The app cannot detect the document edges.
The app uses auto crop and image cleaning to improve scan quality. The captured scan appears on the screen.
Optionally, tap Keep scanning to continue capturing more documents or tap Retake to recapture the document if you are not satisfied with your current capture. Refer to Modify your scans for more details.
Tap Save PDF.
It automatically converts your scan to a PDF and saves it to Adobe cloud storage.
Note
The Scan app uses live edge boundary detection to automatically detect the document boundaries in auto-capture mode.
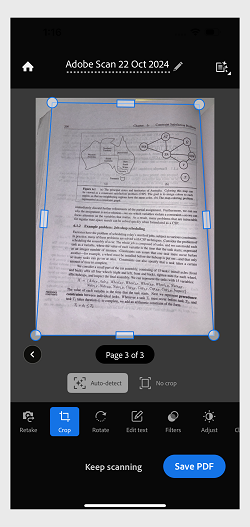
Adjust crop points
Tap Document or Book mode to capture your document.Tap the Import an image option to load an image from your device
Tap Crop
 .
.Adjust the borders of the scan area using any of the following:
Drag the crop handles to resize the scan area manually.
Auto-Detect
: Let the app automatically position the crop borders. Tap again to remove the crop borders and use the full image.
In crop mode, Tap Straighten
 to apply or remove the curvature correction to a page.
Tap Crop
to view the original image without correction or adjust the borders of the scan area.Tap Keep Scanning or Save PDF as required.
If the Straighten option is turned on, the app preserves the context of the straightened image, so you do not need to straighten it again for a re-crop.
Note
Curvature correction is also available in High-Speed Scan mode, which uses Document capture mode but lets you scan multiple pages without pressing Keep Scanning.
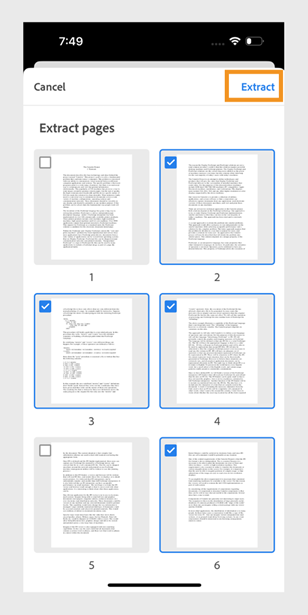
Extract pages from scanned PDFs
Open your Adobe Scan app.
On the Home screen, from the list of All scans or Recent scans, tap
 next to the file from which you want to extract the pages.
Select Extract pages. The pages are listed.
Select the pages you want to extract.
Select Extract. The pages are extracted, and you get a notification once the file is created.
Note
You can also open the document preview and select Extract pages from the toolbar.
Scan books
Adobe Scan now allows you to simultaneously scan both left and right pages of a bounded book. The Scan app’s book scanning feature can help you scan an entire book in less time by scanning two pages at a time. It automatically splits the capture into separate pages.
To scan the pages of a book:
Open the app and tap
Select the document type as Book.
Set the optional settings as desired.
Rotate your camera to a landscape view for a better capture of both sides, as prompted on the screen.
Align the dotted divider line to your book’s center bind and adjust the borders. The divider line and the borders automatically identifies the book binding and the split.
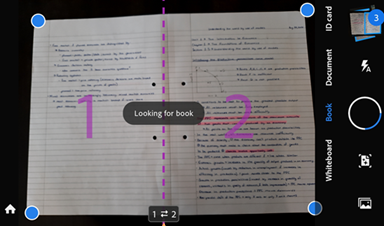
Verify the scanning order. To change the book scanning order, tap

Tap the capture button if auto-capture is not enabled. The scan is captured and split into 2 pages.
Tap the thumbnail icon to open the captured scans.
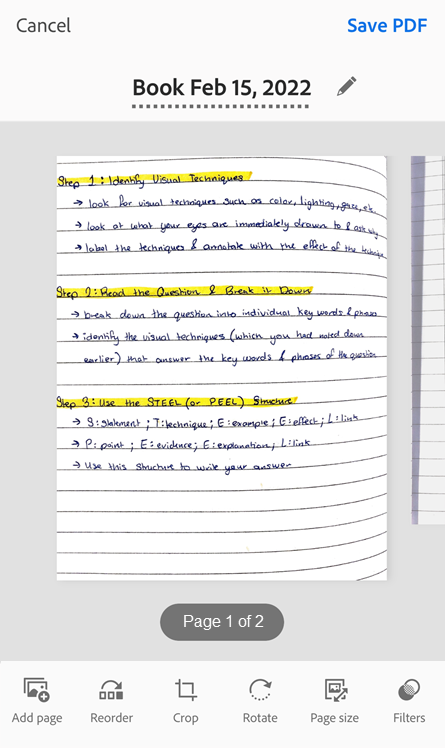
Modify each page as required and tap Save PDF.
Note
The Crop screen shows the full original photo for both pages, allowing you to readjust the border and center binding.
Straighten pages while scanning
You can use the AI-powered Straighten feature while scanning pages in Book or Document mode. When turned on, the feature detects and smooths curved pages in a book or document to produce a readable scan. The feature also supports curvature correction for pages where not all four boundaries are clearly visible in the image.
For example, when one edge falls outside the image boundary, the app can still detect and apply the curvature correction
To use the feature:
Open the Adobe Scan app on your device. Tap the
.Select the document type as Book or Document.
Scan your document.
In the Crop screen, tap Straighten
to apply curvature correction to the page.
You can turn the Straighten feature on or off for individual pages using the ![]() button in the Crop screen.
button in the Crop screen.
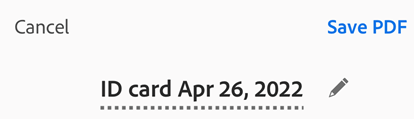
Scan ID Cards
Adobe Scan now allows you to scan ID cards with the new ID card scanning feature. To scan ID cards:
Open the app and tap
Select the document type as ID card.
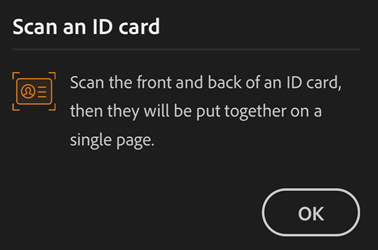
With auto-capture enabled, keep the ID card with first page up. The app captures the first page and prompts you to capture the second page.

If you need to recapture the first page, tap Retake.
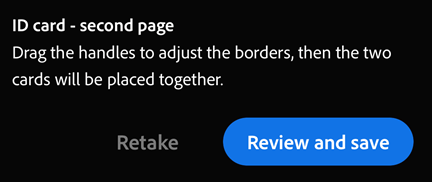
Tap Next page to capture the other side of the ID card.
Tap Review and save to modify the scan and save as PDF.
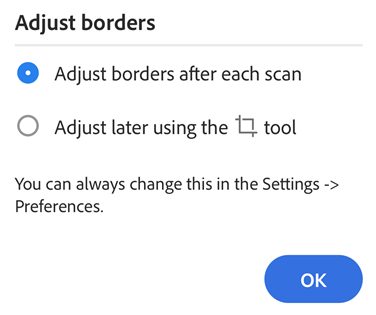
If prompted to select settings for adjusting borders, select a desired option in the Adjust borders dialog, and then select OK.
The two sides of an ID card are scanned and appears as a single page.
Modify the scanned page as desired and then select Save PDF.
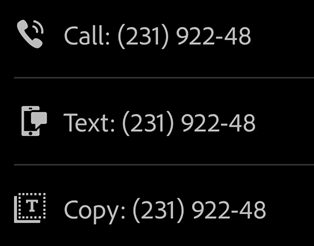
Perform quick actions
Adobe Scan now allows you to perform common actions from your scans. For example, when the app recognizes an email address or a phone number, the capture screen provides you with options to directly email, call, or copy the captured text. You can also use this feature to quickly contact a person from your business card scans.
To perform quick actions:
Scan a document with text. The scan type can be set to Document, Whiteboard, or Form. If the Scan app recognizes and email address or phone number, buttons appear on the capture screen.
Tap one of the quick action buttons: email, call, select text, or more.
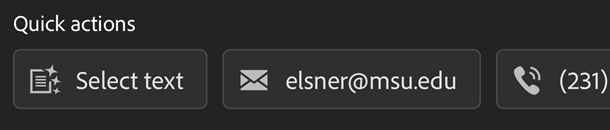
Choose an action. You can invoke a call or send an email.
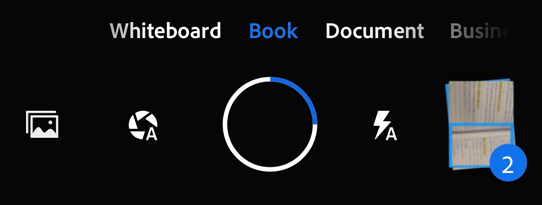
Customize scan capture
Use the options on the capture screen to control how you scan :
Item |
Description |
|---|---|
Scan type |
Streamline your workflow by selecting one of the Document types. |
|
If your device has a flash, you can set it to always on |
|
Toggle auto capture on |
|
Add an existing photo or document to your current scan collection |
|
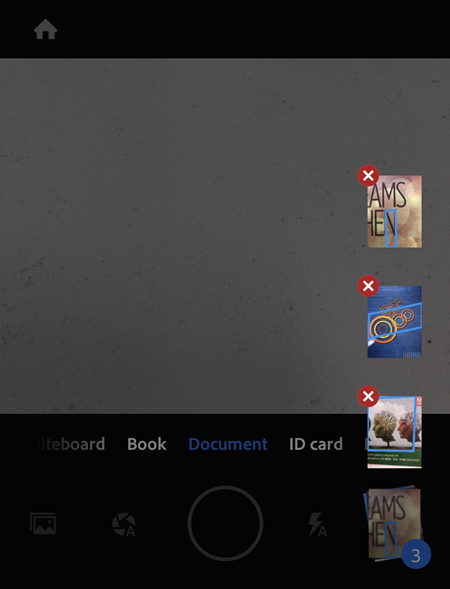
Long press the thumbnail to view your last 3 scan thumbnails–you can delete these captures now or later. Tap the thumbnail to end your scan session and modify the file. |
 , or auto
  (only use in dark settings).
Create scan from digital photos or documents
Scan’s integration with the device photo library allows you to create scans from existing photos or digital documents. Scan uses the document detection feature to distinguish documents from selfies, artwork, and other non-document photos.
To create scans from photos or documents:
Tap
 . It opens the image gallery.
Tap one or more images to select them.
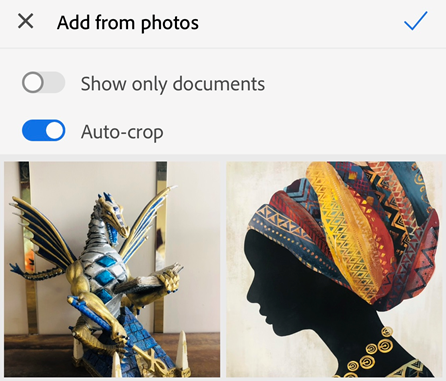
Optionally, enable Show only documents to view only the documents. Tap one or more documents to select them.
Optionally, disable Auto-crop to import the original photos or documents without cropping. By default the app auto-crops the imported photos or documents.
Tap
 to capture the image/images as scan.
Modify the scan if required and tap Save PDF.
You can also directly import images from your gallery. To do so, open your gallery, tap  , and then tap
  . When the image opens in the scan app, modify, rename, and save your scan as usual.
Document types
Selecting a scan type changes the scan name as well as how the app captures the scan. For example, the app captures the entire camera view for a whiteboard but uses boundary detection when capturing a business card.
The default menu options available on the preview screen and document thumbnails may vary by context. For example, a document shows the Save as JPEG menu item while a business card shows the Save to Contacts menu item.

Note
You can configure the default file name from the app’s preferences screen.
Whiteboard:
File name: Whiteboard + <date>
Full screen capture
 Edit text shown as 2nd option
Save as JPEG shown as the 3rd option on file card
Book:
File name: Book + <date>
Boundary detection
- Edit text shown as 2nd option
Save as JPEG shown as the 3rd option on file card
Form:
File name: Adobe Scan + <date>
Boundary detection
- Edit text shown as 2nd option
 shown as the 3rd option on file card
Document:
File name: Adobe Scan + <date>
Boundary detection
- Edit text shown as 2nd option
Save as JPEG shown as the 3rd option on file card
ID Card:
File name: ID card + <date>
Boundary detection
Set password
 shown as the 2nd option on file card
Save as JPEG shown as the 3rd option on file card
Business Card:
File name: Business Card + <date>
Boundary detection
- Edit text shown as 2nd option
 shown as the 3rd option on file card