Change settings
Adobe Scan works in tandem with your device settings to help you pre-configure scan workflows and get better scans.
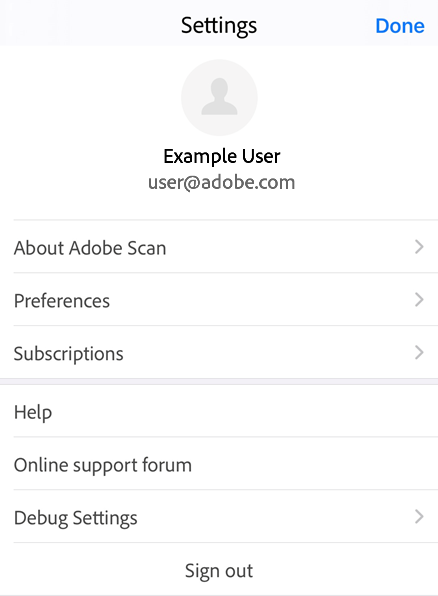
Configure app settings
You can access the Adobe Scan Settings page from the  on the top-left corner. You may need to tap the
  to dismiss the capture screen. To change settings, go to the desired settings under About Adobe Scan and/or Preferences.
Disable cellular data
By default, cellular data usage is enabled on devices with cellular access. To disable cellular data, tap  > Preferences > Allow Cellular Data Usage.
When the device’s settings screen opens, disable/enable Scan’s ability to use cell data.
Change text recognition settings (OCR)
By default, the app automatically converts image text in scans to actual text using the Optical Character Recognition (OCR) feature. The default text recognition language is set to the language of your device. Automatic text recognition allows you to save, edit, markup, and do more with text.
To change OCR settings:
Tap
> Preferences.Disable Run Text Recognition.
To change text recognition language, tap Text recognition language and tap a desired language.
Supported languages include: English, Dutch, Japanese, Finnish, Norwegian, Swedish, French, Spanish, Brazilian Portuguese, Italian, German, Traditional Chinese, Simplified Chinese, Korean, Turkish, Russian, Czech, and Polish.
Note
OCR does not run on scans longer than 25 pages for general users. However, with paid subscription, you can run OCR for scans up to 100 pages

Save scans to image gallery
You can automatically save scans (images) on your device. To do so:
Tap
> Preferences.Enable Save originals to Photos.
Adjust borders
You can configure the capture workflow business cards so that the border adjustment handles appear after each capture. When enabled, the crop handles appear, and you can crop the image on-the-fly prior to another scan or reviewing the entire scan.
Tap
> Preferences.Enable Let me adjust borders after each scan.
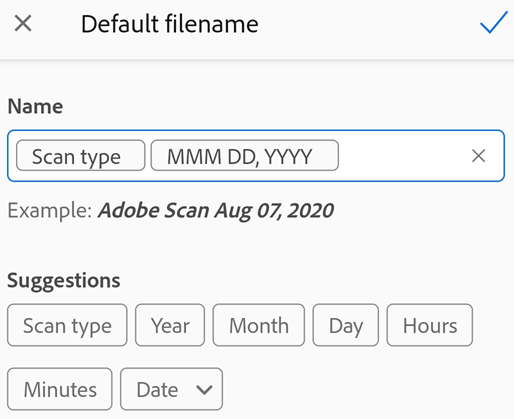
Set the default filename
The scan app names all files as “Adobe Scan (current date)” by default. However, you can change the title, date format, and add any string as needed. Custom names can help you organize and find files.
Tap
> Preferences.Tap Default file name.
Tap the Name text field and delete or add text.Tap any item from Suggestions to automatically add that item.
Tap
 to finalize your decision.
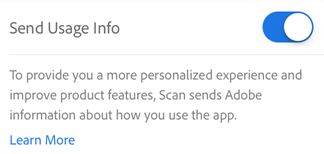
Send usage data
By default, the app sends usage data to Adobe so that the engineering team can improve the product and provide you with a more personalized experience. To unenroll:
Tap
> About Adobe Scan.Disable Send usage info.
Share a review
Reviews help us learn what we’re doing right or wrong. Feedback is always welcome. To write a review:
Tap
> About Adobe Scan.Tap the text: “If you enjoy using Adobe Scan…”
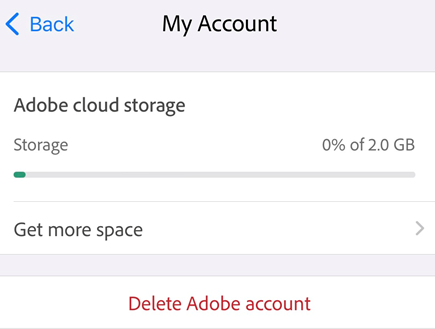
Delete user account
Adobe Scan now allows you to delete user accounts and all the associated files. You must cancel all subsriptions associated with an account before deleting the account. To delete a user account:
Tap
Tap the arrow near the Account details.
In the My Account page that opens, select Delete Adobe Account.
- In the dialog that opens, select Continue.
It opens a Privacy and personal data form.
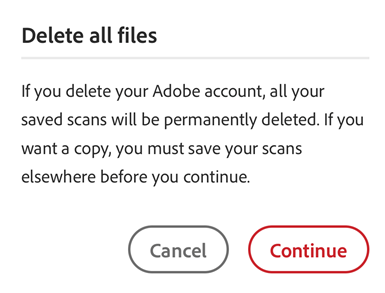
Read through the details and select Continue again.
You may be requested to cancel any active plans and leave organization. Follow through the process to permanently delete your account.
Configure device settings
Allow access to device features
Adobe Scan requires access to your camera. After you install the app, you’ll be prompted to allow camera access as well as whether or not you’d like to receive push notifications. However, you can configure permissions at a later time.
To set permissions:
Go to your device’s settings.
Scroll to Adobe Scan.
Tap the feature you want to configure.
Note
For Siri configuration details, see Siri settings.

Connect an email app
If you’ve set up an email account on your iOS device, an email option appears as one of the share options in the file context menu.
To configure an email account:
Go to your device settings.
Tap Accounts and Passwords > Add Account.
Complete the account setup workflow.

Note
The  appears only when you email account is connected to Adobe Scan app. Installing an email app is same as connecting an account. The method varies depending on your iOS. On V 14.0 and above, go to Contacts > Accounts > Add Account.
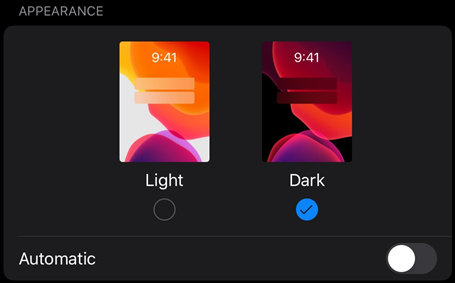
Enable dark mode
iOS version 13 and later supports dark mode. Dark mode’s high contrast display may improve readability in low light environments as well as extend battery life. For some users, dark mode is an important accessibility feature that maintains color meaning and preserves image representation better than the night mode feature.
Go to your device’s settings screen.
Tap Display & Brightness.
Choose Light or Dark mode.
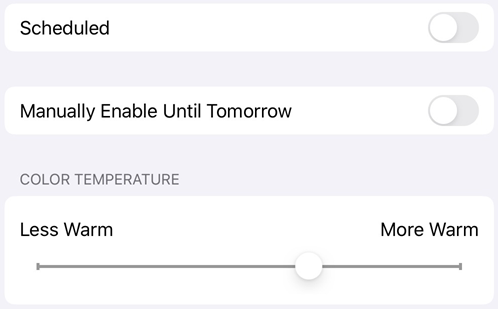
Enable night shift
You can use your device’s night shift feature to improve readability in low light conditions. Doing so reduces eye strain and extends battery life.
Go to your device’s settings screen.
Tap Display and Brightness.
Tap Night Shift.

Configure the settings. Depending on your OS version, you can schedule night shift mode, manually enable the feature, and control the overall hue.
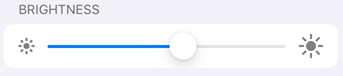
Set display brightness
Set your display’s brightness to enhance readability as needed.
Go to your device’s settings screen.
Tap Display and Brightness.
Set the brightness level.
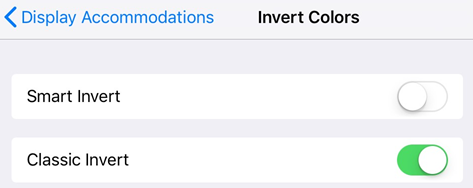
Invert colors
To invert colors:
Tap Settings > Accessibility.
Tap Display & Text Size.
Choose one:
Enable Smart Invert to invert most colors but leave images, media, and some apps in their original state.
Enable Classic Invert to reverse the colors of the display.
Note
You can also change the contrast, text size, and other display features from this screen.
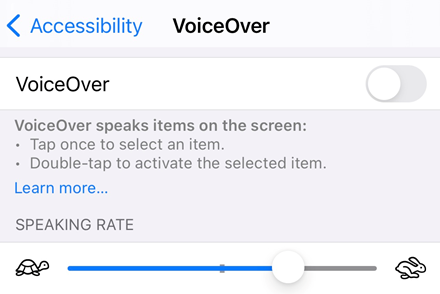
Enable voiceover
The app supports VoiceOver, an iOS built-in screen reader. VoiceOver allows someone with a visual impairment to use simple gestures to hear PDF content. To enable VoiceOver:
Go to your device’s settings screen.
Tap Accessibility.
Tap VoiceOver and enable the feature.
Enable gesture features
The app supports the standard VoiceOver gestures as described in Apple support documentation.