Configure Adobe Acrobat Sign
You can use Adobe Acrobat Sign settings to pre-configure workflow features, document access, cellular data usage, and more.
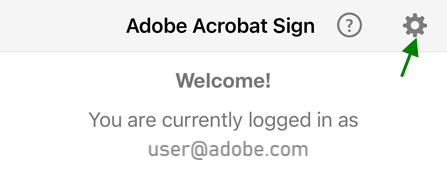
To change your settings:
Open the app and log in.
Tap
 in the top right corner.
Enable cellular data
The cellular data usage is disabled by default. To use cellular data:
Tap
Enable Downloads over Cellular.
Access documents offline
You can download documents from Adobe Acrobat Sign to view and sign them when you’re offline. Adobe Acrobat Sign allows you to control the number of documents that you can download, where the default threshold is 100. Raise this number if you have a large number of documents to sign while you’re offline. Alternatively, limit the number of downloads if you are concerned about the device storage space.
The online documents are highlighted with a gray font and a download arrow icon to the right, whereas local files appear in a black font. You can click the download arrow to get a file on your device.
If you change the number of maximum offline documents, the downloaded documents are unaffected even if the setting is lower than the number of files you already have. After you change a document, the file is added to your outbox.

When you click on the exclamation mark next to the outbox banner, you see the complete list of files that are waiting for synchronization. When you go online, these changed documents are uploaded and the new threshold takes effect. In other words, the setting only applies to new downloads that occur while you are online.
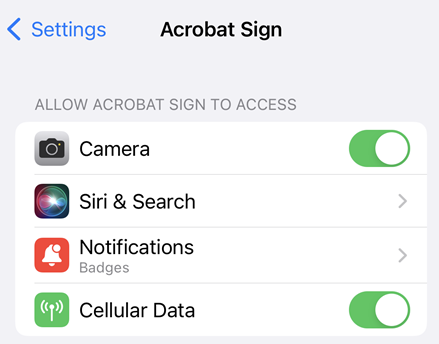
Allow access to camera, photos, and more
You can share access to your location, photos, camera, and other device features to streamline Adobe Acrobat Sign workflows. The first time you try to use a feature requiring one of these features, you are prompted to provide access. You may turn the access off and on as needed. To share access:
Go to the Settings screen on your device.
Scroll to Acrobat Sign.
Tap the contacts, photos, or camera toggles to change the setting.
Contacts: Contact access allows you to select document recipients and signers from your contacts.
Photos: Photo access allows you to use an existing photo or image as your signature.
Camera: Camera access allows you to take a photo and use it as your signature on-the-fly.
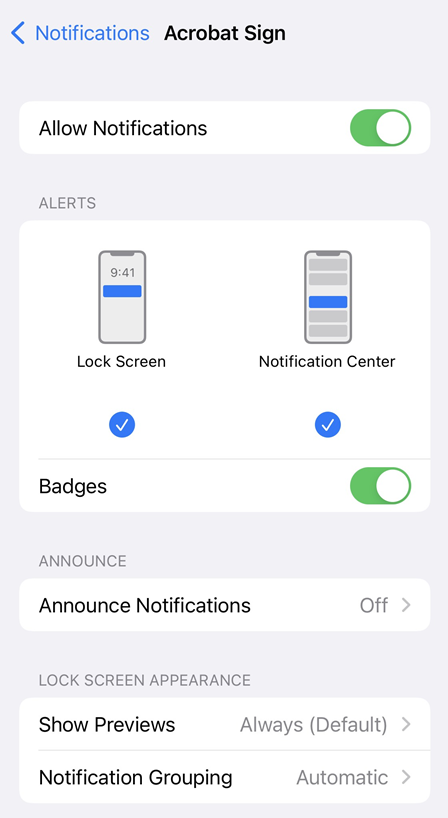
Change notification settings
You can receive email and app notifications about your document’s signing status to help you streamline your signing workflows.
To change the settings:
Go to your device’s settings.
Scroll to Acrobat Sign.
Tap Notifications.
Tap Allow Notifications to toggle the feature on and off.
Tap each of sub toggles to customize settings when notifications are allowed.
Enable app widget
You can add Adobe Acrobat Sign widget to your home screen to get timely notifications about pending signing tasks and sign or initiate signing workflows directly from the widget. The widget does not appear automatically after an install or update, so you must add it manually.
To enable the Adobe Acrobat Sign widget:
Verify your device is updated to iOS 10 or above.
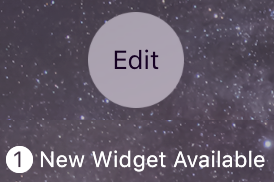
From the notifications or home screen, swipe left or right from the side (the method may vary based on the device).
It displays your widgets along with an Edit button and a notification saying there are new widgets available.
Tap the Adobe Acrobat Sign widget.
Long press
 and drag Adobe Acrobat Sign to the desired display location.
Tap Done.
The widget appears on your home screen. Note the following:
The app has two tabs: Waiting for You and Waiting for Others. Selecting either displays that document list.
You can send a document for signature or get a document signed in person.
Tapping an agreement takes you directly to the signing workflow.
If you are not signed in, the widget prompts you to sign in.
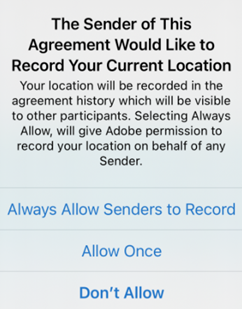
Add location data to signed documents
With an agreement sender’s permission, Adobe Acrobat Sign includes the signing location in the audit trail by leveraging the device’s GPS feature to determine the signer’s location. Access to the signing location is available only when the app or one of its features is visible on screen. When you send, sign, or interact with a document, the location is recorded in the document’s history and is available to other participants. You must have a Wi-Fi or cellular connection for Adobe Acrobat Sign to record the signer’s location.

To change the setting:
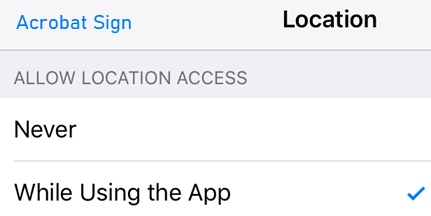
Go to your device Settings.
Scroll to Acrobat Sign.
Tap Location.
Tap Never or While Using the App.
When a document is sent for signature, the recipient is asked whether they would like their location recorded, and they can choose Don’t Allow or OK. When getting a signature in person or when the device owner is signing, the signer has the option to choose Allow Once or Don’t Allow.
Adobe Acrobat Sign’s location data is most accurate when the device has direct access to GPS satellites as well as Wi-Fi and cellular connections (cellular data must be enabled). The second best option is to use GPS and cellular data connections together. You must have a Wi-Fi or cellular connection otherwise Adobe Acrobat Sign will not collect any location data. Relying on only one of the three will tend to produce less accurate location data. In all cases, accuracy varies with a device’s capabilities as well as the number of visible GPS satellites. For more information, see https://support.apple.com/en-us/HT202339.
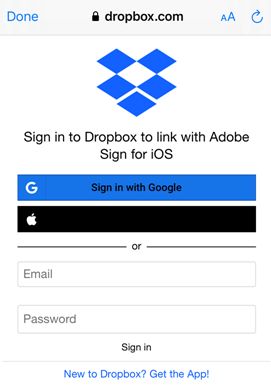
Connect cloud storage providers
Adobe Acrobat Sign integrates with several 3rd party cloud storage providers. By connecting those accounts with Adobe Acrobat Sign, you can create signature workflows that seamlessly integrate documents residing in different locations. In addition to Adobe’s Document Cloud (enabled by default), you can connect to providers such as Dropbox, Box, and Google Drive.
To connect an account:
Tap
Enable the cloud storage provider that you want to connect.
In the sign-in screen that appears, provide the log in details.
When prompted to allow the connection, choose Allow.
Configure single sign-on
If your organization uses Single Sign-On, an account admin should provide you with a subdomain name. To enter the name:
Tap
Tap Configure Single Sign On (SSO).
Enter your SAML subdomain.
Tap OK.
The identity federation standard Security Assertion Markup Language (SAML) 2.0 enables the secure exchange of user authentication data between web applications and identity service providers.
Send usage data
By default, Adobe Acrobat Sign sends non-personal and anonymous data to Adobe so that the engineering team can improve the product based on usage data. To un-enroll:
Tap
Uncheck the Provide Usage Data checkbox.
Rate the app
Tap
Uncheck the Rate this app on the App Store.