In this video, you will learn how to replace skies in Photoshop.
To follow along, you can download the sample files from the Adobe page for this tutorial.
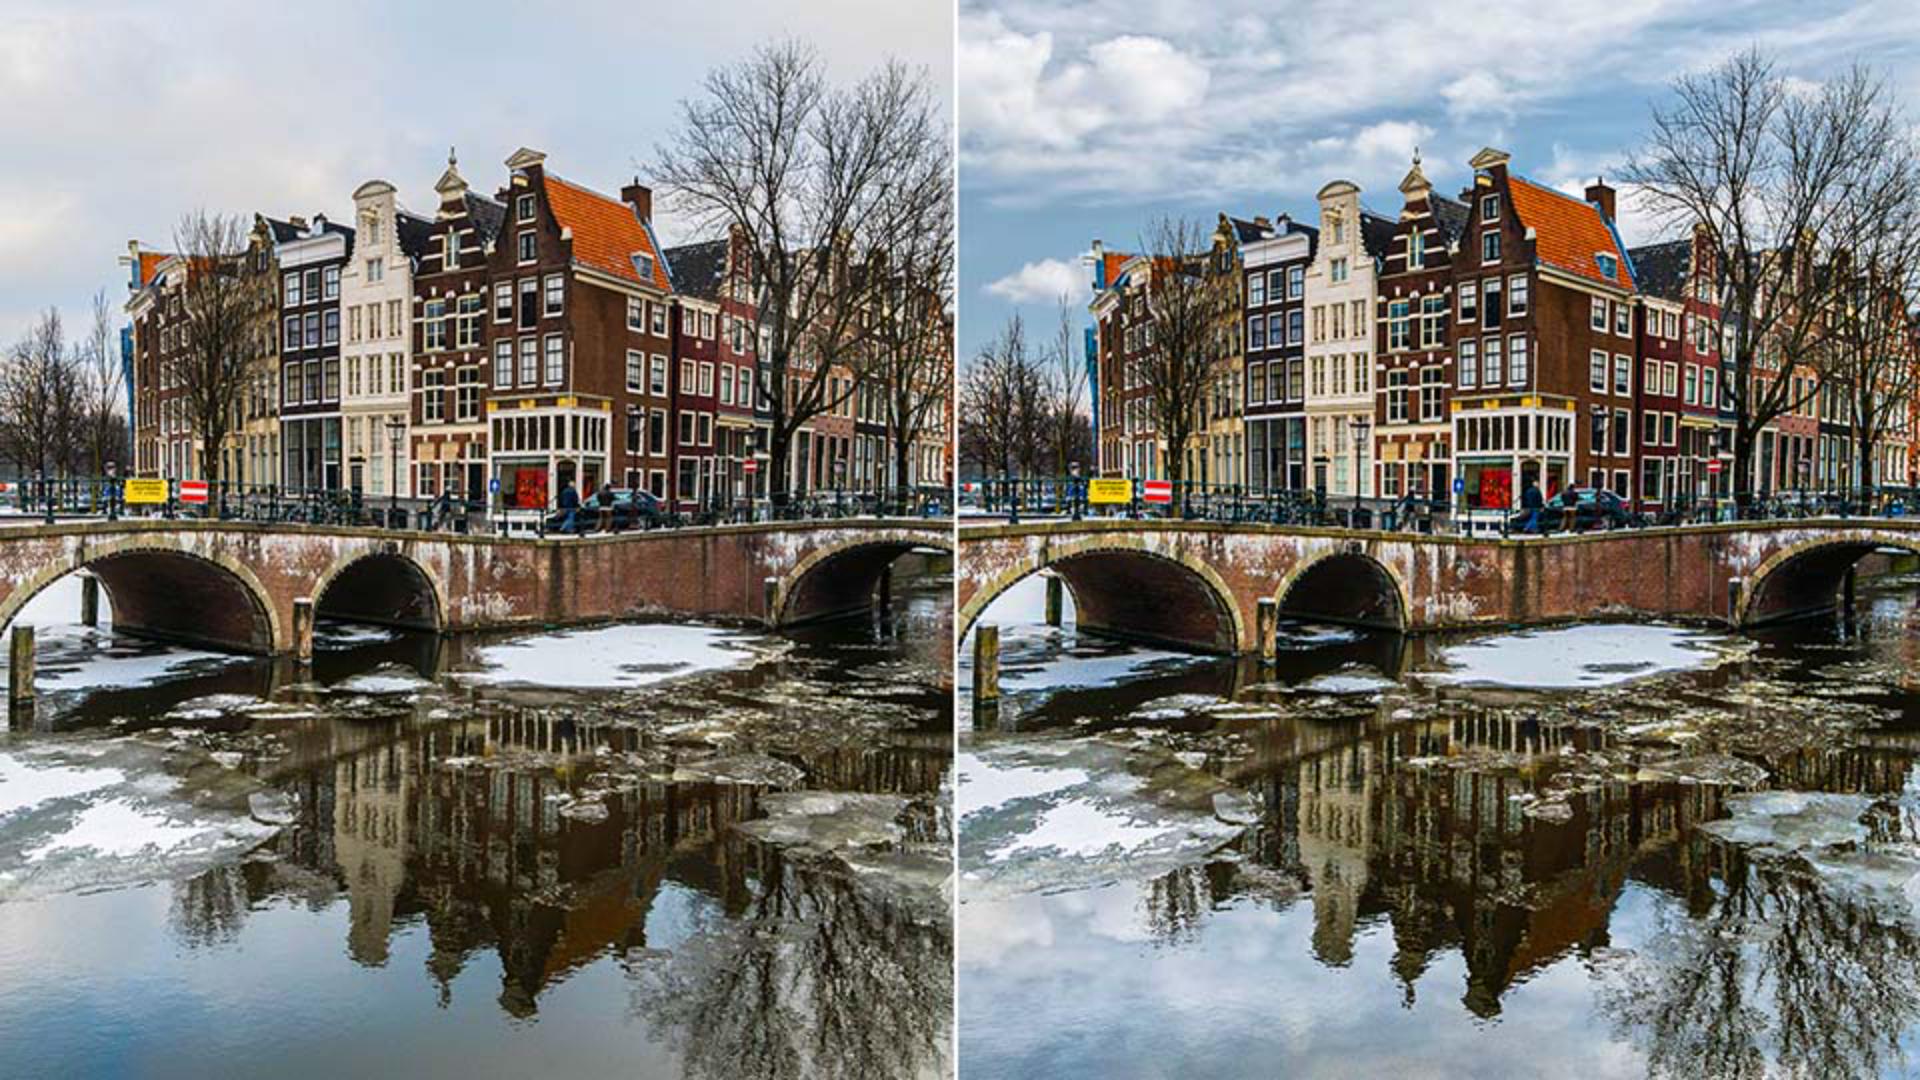
These are the images.
To replace the sky, we will use the Blend If sliders found in the Layer Style dialog.
Before we get into that, let's look at the RGB channels in the background image.
I'll disable the Sky layer, then I'll go into Window and Channels.
In this panel, you will see the three Channels that make up this image.
The combination of light in the Red, Green, and Blue channels make up all the colors that you see in this photo.
You can use these channels to create a mask or use their luminosity as a reference to hide or show pixels with the Blend If command.
Notice that the Blue channel has more contrast between the sky in the foreground elements than the other channels.
The sky is bright, almost white and the foreground elements are dark.
Keep this in mind because the dark and bright points in the Blend If command will reference the brightness of this channel.
Click on RGB and then go back into the Layers panel and we will start working on the new sky and the reflection on the water.
Enable the Sky layer and from the Toolbar, select the Rectangular Marquee Tool and click and drag down from the top left corner to select the Sky.
Make sure that the Sky layer is active, and click on the layer mask icon to hide the areas that were not selected.
Then, select the Move tool and click and drag the Sky layer up until it is about where the sky in the background is.
Now, create the layer that will become the reflection of the sky on the water.
Duplicate the layer by pressing Control J on Windows, Command J on the Mac, then flip it upside down by pressing Control T, Command T on the Mac to transform and right-click and select Flip Vertical.
Then, drag the inverted Sky layer down until it lines up at the bottom of the original Sky layer.
Now let's work on hiding the sky from the Background layer.
First, drag the Background layer above the two Sky layers, then click on the fx icon from the Layers panel and select Blending Options... to bring up the Layer Style window.
From here, you can use the Blend If sliders to show or reveal pixels based on the image luminosity or the luminosity of each RGB channel.
Remember that the Blue channel has the strongest contrast between the sky in the foreground.
The sky is almost white and the foreground elements are dark.
So, we will select Blue from the dropdown.
If you drag the white point to the left, you will hide the areas that were bright in the Blue channel.
Notice how the sky starts disappearing because it was bright in the Blue channel and it reveals the image below.
To create a smoother transition between visible and invisible pixels, you can hold old Alt on Windows, Option on the Mac and click on the white point to split it in half, then drag the left half further to the left to create a smoother transition.
When you're happy with the blend, press OK.
It is very important to note that Blend If is not just hiding blue objects in the photo, Blend If is hiding anything that is bright in the Blue channel, which is why Blend If affected the buildings, the bridge, and the ice on the water.
To bring back those areas in any other area that you want to keep, duplicate the background layer by pressing Control J on Windows, Command J on the Mac, then remove the Blend If from this layer by right-clicking on the double square icon to the right of the layer and selecting Clear Layer Style.
Then, from the Toolbar, select the Quick Selection Tool and select areas that you want to keep.
You don't have to be precise.
You can fine-tune later.
In some areas, you will have to tap on the left bracket key to make the brush smaller and select the finer details.
Make sure that you select the buildings reflected on the water because you don't want the clouds to go over them.
Also, select the icy areas on the sides.
When you're done, click on the Layer Mask icon to create a mask, which will keep only the areas that you selected and hide everything else.
The only problem now is that the new sky is much darker than the original.
The sky is what illuminates everything in the scene, and when you replace the sky, the new sky will probably not match the luminosity of your photo and you will need to adjust it.
To do so, click on the top sky copy and from the New Adjustment Layer icon, select Levels… From the Properties panel, you can drag the black point to the right to brighten the new sky to match the brightness of the original sky.
Then, you can use the midpoint slider to adjust the contrast.
At this point, you can fine-tune the Blend If, the Layer Mask, or the Levels Adjustment to get a better result.
Now that you know how to replace skies in Photoshop, go ahead and try this Blend If technique on your photos.