One of the most effective ways to combine images in Photoshop CC is to use a layer mask to determine which parts of a layer will be visible in the composite.
In this tutorial we'll explore how you can create a layer mask using the Brush Tool and also from a selection of a specific area.
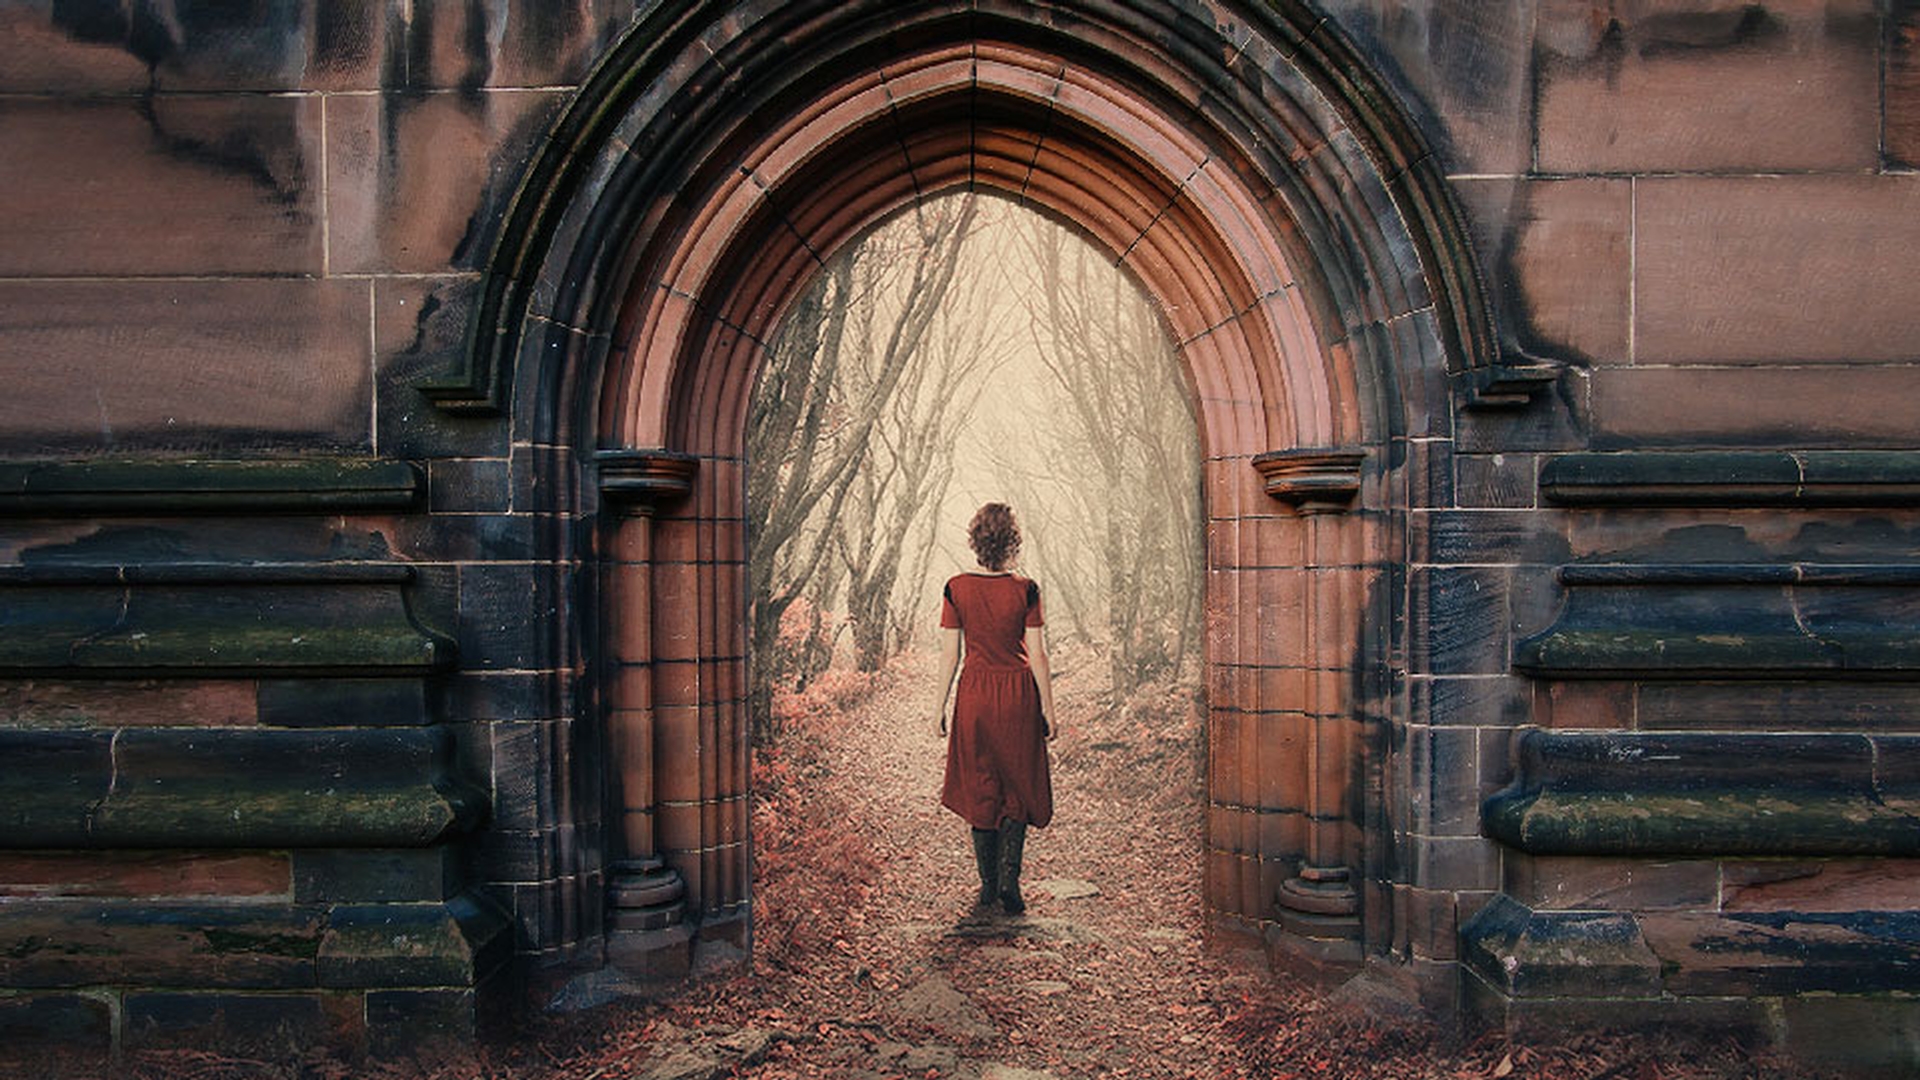
I'm going to start off by adding a layer mask to the Door layer in this image.
I'll do that by coming down to the bottom of the Layers panel and clicking on the Add layer mask button.
Next, I'll come over to the Tools panel and I'll make the Brush Tool active.
Down at the bottom of the Tools panel I want to make sure that black is in my foreground color swatch here.
If black is in the background swatch, as is the case here, you can easily exchange these colors just by tapping X on the keyboard.
Next, I want to increase the size of my brush.
I'll do that with a really useful shortcut by tapping repeatedly on the right bracket key to make the brush bigger.
If you tap several times on the left bracket key it'll make the brush smaller.
Now, before I begin painting, I want to make sure that I'm going to be painting on the layer mask and not on the actual photo layer.
So over here in the Layers panel I'm going to make sure that there's a highlight border around the thumbnail of the layer mask that indicates that it's active.
When in doubt you can just click on the mask to make sure it's active.
Now I will come back over the image and I will paint over the doorway to reveal the image of the woman walking along the forest path that's on the underlying layer and that looks really cool.
If you look at the thumbnail of the layer mask you can see that the black areas correspond to where I just painted with the brush.
Now, if you accidentally paint too much on the mask and hide too much of the layer, you can always bring it back by painting with white on the layer mask.
So, I'm going to tap X on my keyboard which will place white in the foreground swatch over here and now I can paint with white on the layer mask and bring back that layer that I accidentally hit with the brush stroke a moment ago.
Now this is a really important concept when you're working with layer masks in Photoshop CC.
White reveals the layer and black conceals it allowing you to see through to the layer underneath.
Let's try out a more precise way of applying a layer mask to the door using a selection.
I'm going to drag the thumbnail of the layer mask down to the trash can at the bottom of the Layers panel and I'll click Delete.
Next, I'll go over the Tool panel and I'll make the Quick Selection Tool active.
I'm going to begin my selection by clicking and dragging over the archway that surrounds the door.
Now the nice thing about the Quick Selection Tool is that once you click and start dragging the selection it automatically switches into the Add to mode, so you can just continue dragging over the areas that you want to add into the selection.
All right.
That looks pretty good.
I’ll come back to the Layers panel and I'll come down and click that Add layer mask button again.
This creates a layer mask that is based on that selection.
Now, if you look at the tones in the layer mask you can see that the white areas correspond to what was selected, and the black areas represent the areas that were not selected.
So far, this composite is looking pretty good, but I want to refine it using the Brush Tool, so I'll make sure that the layer mask is active.
I'll come over and get that Brush Tool, I am going tap the left bracket key a couple times to make my brush smaller.
And finally, I'll tap X on the keyboard to place black in the foreground swatch and I'm just going to brush a little bit along the bottom edge of the doorway here to make it look as if these leaves are kind of piled up and it's a little bit more wild and untidy looking.
There we go.
So, one more thing is I'm going to come up to the Options bar for the Brush Tool and change my Opacity down to about 45% or 50% and I'm going to brush over the layer mask.
And that's going to partially reveal the forest and partially conceal the door and you can see that represented in the gray tones in a layer mask right here. layer masks are one of the most essential techniques that you have in your Photoshop CC compositing tool kit.
Because they mask parts of an image instead of actually erasing detail, they're very flexible and they allow you precise control over which parts of a layer are visible in your composite image.