Introduction
[Lightroom displays a grid of musician photos in the Library workspace.]
[Glyn Dewis]: Assisted Culling in Lightroom uses AI to automatically detect issues with our images, such as being out of focus, eyes not being open, exposure issues, and more.
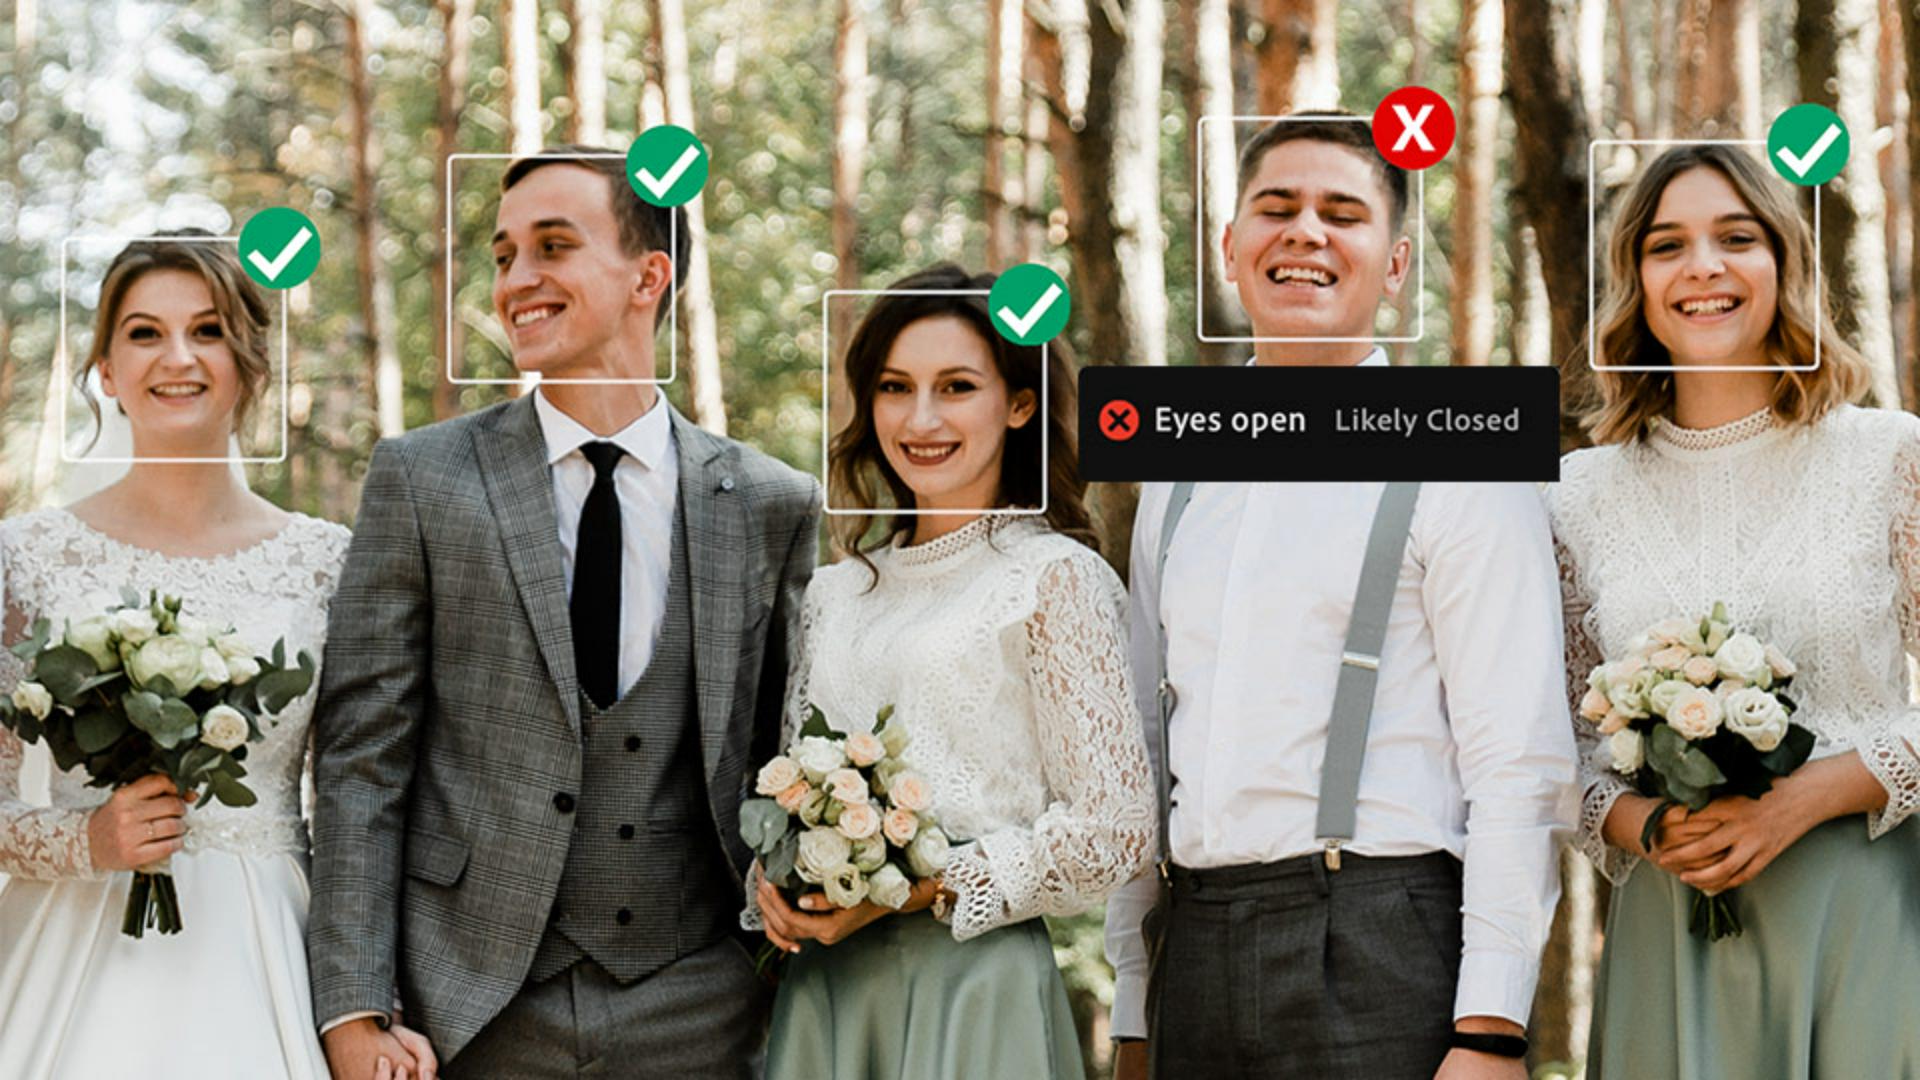
It even works with group photos, analyzing individual faces in an image to identify the qualities that you specify.
[A group wedding portrait opens in a larger preview.]
And all this means we no longer have to scroll through and manually check potentially hundreds, if not thousands, of images.
[The view returns to the photo grid, with multiple wedding images visible as thumbnails.]
Choose specific settings to analyze photos
[Cut to Glyn Dewis speaking on camera.]
Hi, I'm Glyn Dewis, and in the next few minutes, I'm going to show you how you can use the Assisted Culling feature in both Lightroom and Lightroom Classic to automatically identify and deal with problem images, potentially saving you a ton of time.
[Back in Lightroom, a grid of portrait images fills the center of the workspace.]
Here I am in Lightroom, and Assisted Culling is located in the top left of the screen, in both the Cloud and Local tabs.
The controls for Assisted Culling are here on the left, but the Assisted Culling Info panel is over here on the right.
[The view switches to another folder containing rows of wedding images.]
In Lightroom Classic, both panels are located together on the right side of the Library module.
Adjust criteria for selected and rejected images
Inside of the Assisted Culling, we see the Select options of Select Subject sharpness, Eye sharpness, and Eyes open.
I'll click Subject sharpness, and Lightroom analyzes the images, [The displayed results narrow to only a few selected portrait thumbnails.] sorting each as a Select or a Reject based on the sharpness.
[The full portrait grid returns as the culling criteria are adjusted.]
The Scoring slider runs from 0 to 100, with 100 being the sharpest, and it defaults to 50.
Think of it as a scorecard that you set [Several thumbnails are highlighted while the Assisted Culling panel remains open.] - selects meet your score, rejects fall below it.
In the Assisted Culling Info on the right, you can see the Scores for the currently selected photo.
Out of this folder of 45 images, we have 43 Selects and 2 Rejects.
I'll click on Rejects in the Review section, [Lightroom displays two portrait photos side by side in the workspace.] and there they are.
Dragging the Subject sharpness marker to the right, raises the required score, so more images become rejects.
[The view changes to a grid of portrait thumbnails.]
And dragging to the left, means fewer images are rejected.
[A single portrait of a man opens in a larger preview.]
Eye sharpness works the same way, but scores how sharp the eyes are, [The view returns to a larger grid containing several similar portraits of the man.] with an option to reject photos without people's eyes.
So, maybe someone wearing sunglasses where the eyes aren't visible, but you still want the image.
Lastly, Eyes open.
[The grid updates, showing additional variations from the portrait session.]
No slider this time because eyes are either open or they're closed, though you can also reject images where Lightroom can't tell.
Review results & override rejected images
If image is marked as a reject that you actually want, [The displayed results narrow to a small group of selected portraits.] simply click the icon in the upper right of the thumbnail to override it.
You're the photographer; you get the final say.
These options can also be combined.
So, for example, Subject sharpness and Eyes open.
[The selection changes again, leaving several preferred portraits in the grid.]
In the Reject section, we have options for Lightroom to automatically reject images if they're Documents and receipts, if an image appears to be a Misfire, or if there are Exposure issues.
Organize the Assisted Culling results
And in the Organize Results section, we can mark up all our Selects or Rejects at once with a flag, [A settings dialog opens over the Lightroom workspace.] a star rating, or a color label, and then add them to an album or, in the case of Rejects, remove them entirely.
[The dialog closes, switching to a grid of outdoor wedding group photos.]
Use Assisted Culling with group photos
Now for the big new addition: Groups.
These images are from a wedding, and most have several people in the frame.
Previously, Assisted Culling was all about a single subject, but it now uses the improved Select subject detection to identify different people, meaning it analyzes every person in the shot.
I'll turn on Eyes open, and Lightroom sorts the images as before.
[The selected images are rearranged into a compact group for review.]
But here's the clever part: double-clicking on an image shows the results.
[A wedding group portrait opens in a large preview with boxes outlining the people's faces.]
This image was rejected because of these two guests whose eyes are shown as likely closed.
If we click directly on a face, such as the one that has been marked as a reject, Lightroom zooms in [The view zooms tightly into a smiling woman's face in the group portrait.] so that we can take a closer look for ourselves, and we even see the Score that Assisted Culling gave.
Doing this clearly shows the eyes as they are on this person, [The view zooms back out to show the full wedding group.] and also this person is all part of their expression.
So rather than rejecting this one, I'll press G to go to the Grid view, [The view returns to a row of selected wedding thumbnails.] then click on the red Reject icon in the upper right of the thumbnail, and then Mark as Select.
Speed up the review of large photo shoots
You could be thinking, if I still have to check the rejects, where's the time saving?
Well, out of this entire shoot, only a handful of images were flagged.
[The selected set is reduced to a few similar group portraits.]
So rather than checking every face in every frame, I'm only reviewing those few.
But imagine if this was a photo shoot containing hundreds, if not thousands, of images; the time saving would be massive.
[Cut to Glyn Dewis speaking on camera.]
That's the improved Assisted Culling feature available in both Lightroom and Lightroom Classic, an incredibly useful feature for speeding up your workflow, helping you to get to the images that you want quickly and efficiently, whether you're photographing one person or a whole group.
Now go give it a try on your own images and see for yourself how much time it could save you.
Enjoy.