Let's look at some of the more advanced ways to work with track headers in Adobe Premiere Pro CC.
Track heights
Here I've got a sequence with quite a few clips in it.
And because there's so many tracks it can make it more difficult to navigate just because I've got so much media to look at.
You'll notice that I can double click on a track header to toggle the height of the track between two standard heights.
I can also scroll with my mouse wheel with the Alt key held down, that's Option on Mac OS. and I can use the Shift key to scroll all of a particular type of track.
So, I can see all the waveforms or none.
There are some really useful keyboard shortcuts for modifying the heights of tracks without using the mouse.
If you press Shift =, you'll toggle all of the tracks in the sequence tool and Shift -, or - symbol makes them all short.
If you hold Control or Command on Mac OS and press the = sign you'll make the video tracks taller, the - or - sign makes them shorter.
And if you use Alt or Option on Mac OS the same thing applies to the audio tracks.
It's the = symbol or the - sign.
Although they're technically the = symbol and the - really most people see them as the + symbol which is above the = symbol on most keyboards and -, so bigger and smaller.
If I hold the Shift key while double-clicking on a track header, in this case on double-clicking on a video track.
It's making all of the tracks taller.
And I'm just going to double-click on the panel title here to fill the screen with the Timeline panel.
It'll make it a bit easier for us to see what we're doing here.
If I Shift double-click on a track header for an audio track you can see all of the audio tracks expand as well.
Just double click to flatten those down.
Track height presets
We also have the option to create Track Height presets.
Let's say for example that I decide I want my Audio 1 and Audio 2 tracks to be large perhaps because I'm working on a Dialog edit.
I'm going to begin by using the scroll wheel here with the Alt key to set these to a height that I want.
And let's imagine that this is a track height preset that I want to keep.
So, I'm going to go to my Settings menu for the Timeline panel and I'm going to choose Save Preset...
You have a couple of options here for minimizing all and expanding all tracks as well.
I'll name this Big A1 and A2 and I'm going to assign this Track Height Preset 1 and click OK.
Now I'll just flatten these down holding the shift key to make them shorter and I'll go back to the Settings menu and you can see I've got my Big A1 and A2 option listed.
If I go into Manage Presets... you can see really, I've just got the option to specify which keyboard shortcut I'm going to use and to decide if I want to delete the preset.
But what I need to do now is allocate that keyboard shortcut.
So, I'll Cancel this.
I'm going to go to Edit here on Windows and choose Keyboard Shortcuts...
This would be under the Adobe Premiere Pro CC menu on Mac OS and I'm just going to do a quick search for the words "track" and "height" There we go.
Track Height Preset 1.
None of these are allocated by default.
You need to add a keyboard shortcut.
Just to illustrate this I'm going to hold down all of the modifier keys, that's Shift Alt Control here in Windows or Shift Option Command in Mac OS.
So, I've got lots of available keyboard shortcuts and I can see that A is available.
So, I'll just click in the blank space to add a shortcut, press those keys and I've now got that keyboard shortcut assigned.
I'll click OK.
And now anytime I want to jump into that Track Height Preset I can press my keyboard shortcut and there we are.
Because you can configure up to 10 Track Height Presets you can quickly jump between multiple views while editing.
And of course, Video Track Heights work too.
Track header controls
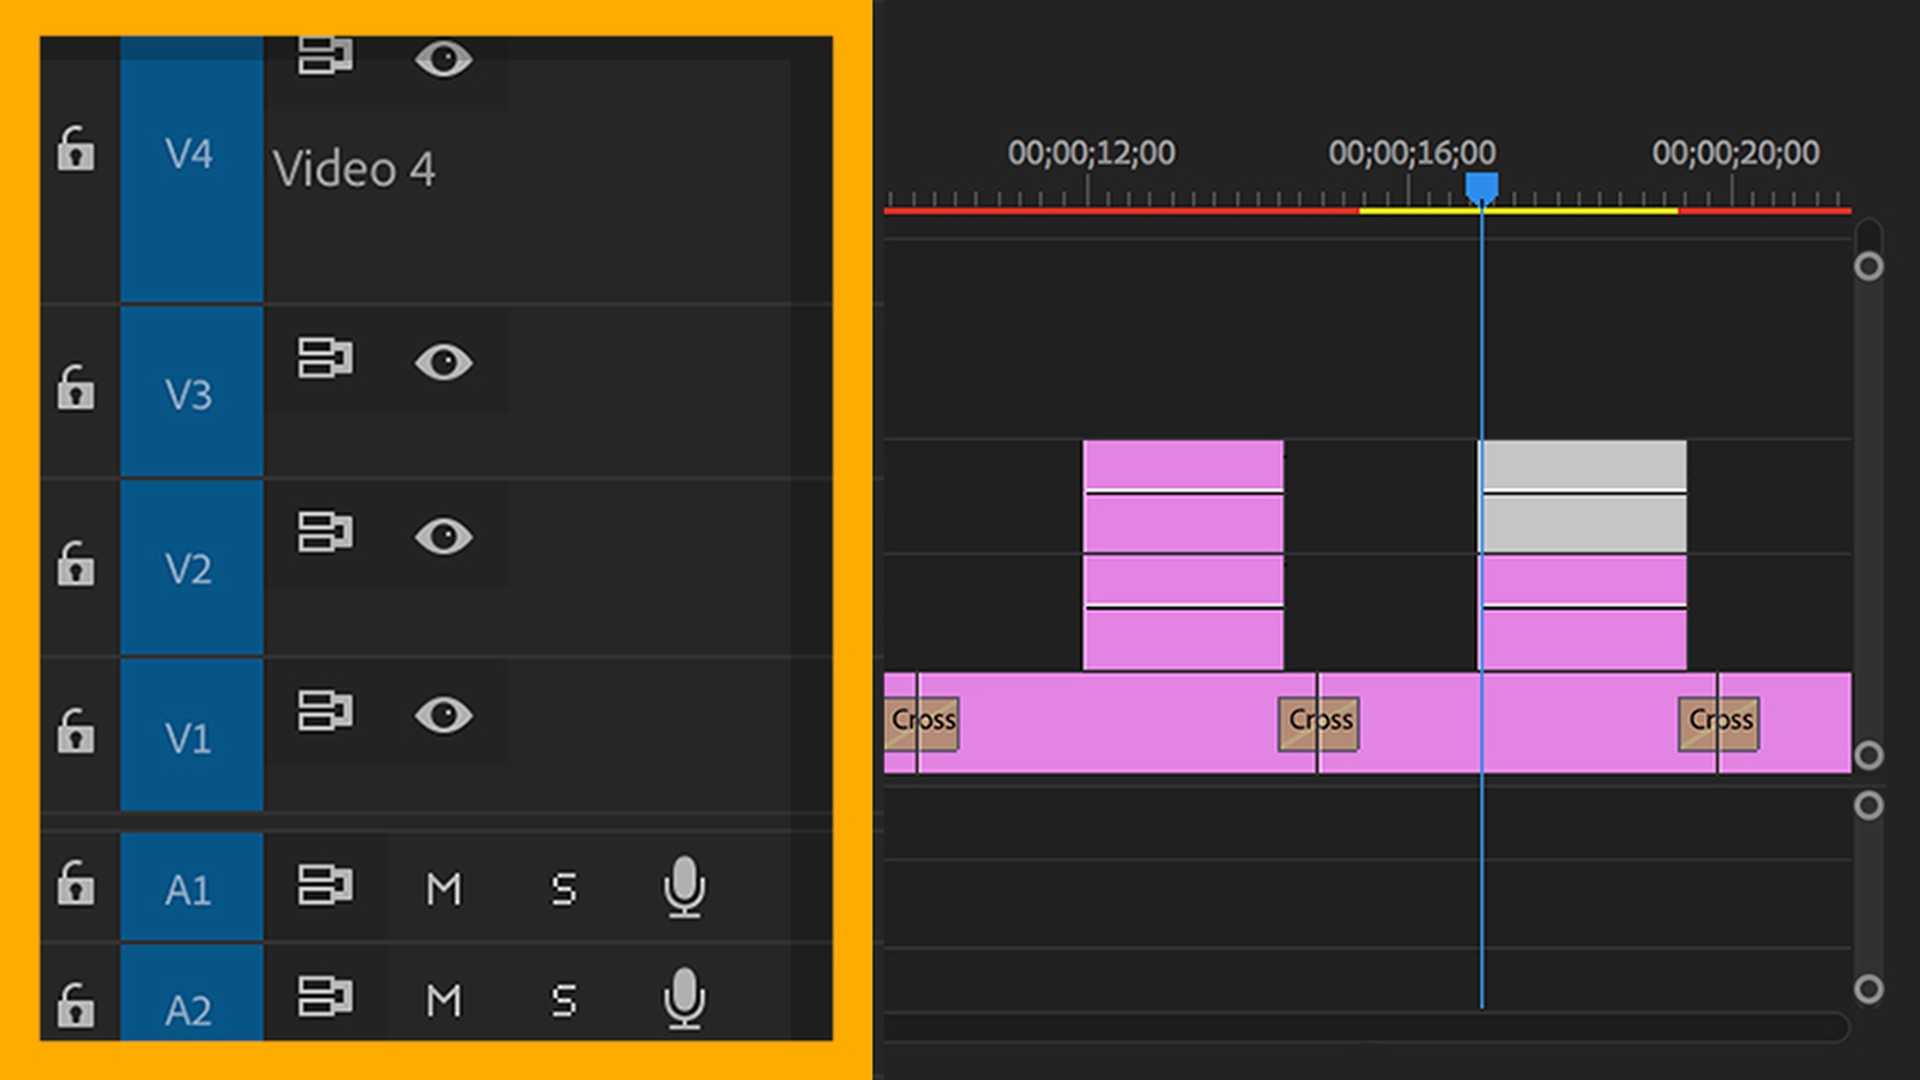
If I just change the height of this video track, we can see that we've got a few controls here by default.
We've got our Previous Keyframe and Next Keyframe control which doesn't do anything until we have some keyframes assigned to these clips using the rubber band.
We have our Sync Lock, our Toggle Track Output, we've got the name for the track in an abbreviated form.
It's V1 here for Video1 and the Track Lock.
Down on my audio tracks I have the same options for locking the track and Sync Locks.
But of course, now I've got the option to mute the track and not hear the audio on it or Solo the track and only hear the audio on it.
And by default, we've got this option to record a Voice-over straight into our sequence.
Track renaming
If you want to rename a track, it's pretty easy to do.
I'm going to right-click on this Video 1 track and Rename it and let's call this Camera A.
I'm pressing Enter.
It's worth noting that the track needs to be tall enough for you to see the track name before the rename options available.
You see here I'm right-clicking on Video 2 and it's grayed out because I don't actually have the name on show.
You can do the same thing with audio tracks.
I can right-click here and choose Rename, but also if I come out of full screen with the Timeline panel here, I'm going to double-click on the name and I'm going to go to the Audio Clip Mixer.
You'll notice that all of the audio tracks are named at the bottom of the mixer.
So, if I wanted to call Audio 1 "Dialogue", I'm just pressing Enter, you can see that updates in the Timeline panel automatically.
These two really are linked together.
Customizing track headers
I can also modify the options available on the tracks.
Now for video track headers this is really a feature that allows you to remove buttons to clean up the display if that's what you want to do.
But we have some more interesting options for the audio headers.
I've clicked here on the Settings menu and I'm going to choose Customize Audio Header...
And you can see for example I've got the option to add a Track Meter.
Let's drag this down on to my Audio 1 track and I'll click OK.
I'm going to use the Shift key to scroll until my track head is tall enough to show that audio meter.
And you'll notice that now all of my audio tracks have the meter.
So, you modify one track header and all of the track headers are changed.
So now if we play the sequence we get some level on the VU meter.
I'll just go full screen again, so you can see the audio accompanying this. <i>What's been going on with me?
</i> <i>I'm trying to get over someone.</i> I'm going to go back to the Settings menu in the Timeline panel and into Customize Audio Header... and I'm going to choose to Reset Layout to put this back to default and I'll click OK.
Adjusting video keyframes
Another important feature of the Timeline panel is you can use a rubber band control to apply keyframe adjustments to your video clips, just as you can adjust audio level or pan on your audio clips.
I'm going back to the Settings menu here and I'm going to turn on Show Video Keyframes.
This enables the Sequence Clip Level Control sometimes called the rubber band which by default controls the opacity for the clip.
I just line up my playhead here and I've got the option to hold down Control, that'll be Command on Mac OS and add keyframes to adjust the opacity.
If you right-click on the effects badge for a clip you can specify what that rubber band controls.
You can see by default it's controlling the Opacity, but I could also control things like the Scale.
Most people just use this control for opacity adjustments, but you do have the option to adjust any effect that's keyframe able.
Not displaying the rubber band on video clips can make it easier to select a clip particularly when you're zoomed out without accidentally adding keyframes.
So, it's pretty common for editors to leave this option turned off.
Head & tail thumbnails
We also have the option to view more thumbnails on our clips.
Here for example by default we're getting the first frame of the clip.
But if I go to the Timeline panel menu I've also got the option to view Continuous Video Thumbnails.
So, it's a little like a filmstrip.
There's also Video Head and Tail Thumbnails which gives me both the first and last frame of the clip.
This can make it a little bit easier to navigate your content and find the exact shot you're looking for in a sequence.
So that's some of the more advanced Timeline track controls in Adobe Premiere Pro CC.


