Introduction
So, in this video, I want to show you how to use layer effects.
And what's really cool about layer effects is that before we can only apply these effects or filters to the instances of movie clips.
But now we can apply them to layers, which means that anything that resides inside a layer can have an effect applied to them.
So, to demonstrate this, I have a graphic symbol
Understanding layer effects and use cases
that contains a nested animation of a walk cycle.
So, let's say, we want to add a realistic shadow to this character.
We can do that through the use of layer effects.
So, what I'm going to do is,
Creating a shadow layer from existing animation
right-click over the layer containing our animation, and I'm going to duplicate the layer.
I want to drag this layer below the original layer.
And let's rename it Walkcycle_Shadow.
So, now I'm going to lock the top layer and I'm also going to convert it to outlines just so it's easier to see the layer underneath and what I'm doing.
I'm going to select the instance on the stage and grab the Free Transform Tool and I'm going to position the center point down here.
And this is just going to allow me to then scale the artwork like this.
And maybe even skew it over like this.
Now what we want to do is just click on the frame in this layer.
Applying and refining drop shadow layer effects
And now you'll notice in the Properties panel we can apply filters.
So, using the drop-down menu, I'm going to select Drop Shadow.
If I scrub the Timeline, you'll notice that this effect is applied to the entire layer.
And so, for this shadow to look convincing, we're going to need to actually play around some of these settings.
So, the first thing we want to do is Hide object.
This will actually hide the original artwork and just show us the drop shadow.
You might want to apply just a subtle amount of Blur, so maybe a value of 3 px will work really well.
Strength, if you reduce the amount of strength, will lower the opacity of the shadow itself.
And this is great if you have say a background that has lots of different colors and things like that, you want them to show through.
Quality is up to you if you want to set it to Low, Medium, or High.
I'm going to keep it at Medium.
I typically just set the Distance to 0 px.
And so now, when we scrub our Timeline, you can see just how realistic this shadow looks.
And if for whatever reason, you want to play around with the perspective of the shadow it's easy to do.
Just click on the symbol in this layer, select the Free Transform Tool and adjust as necessary.
But you're not limited to just adding drop shadows for characters.
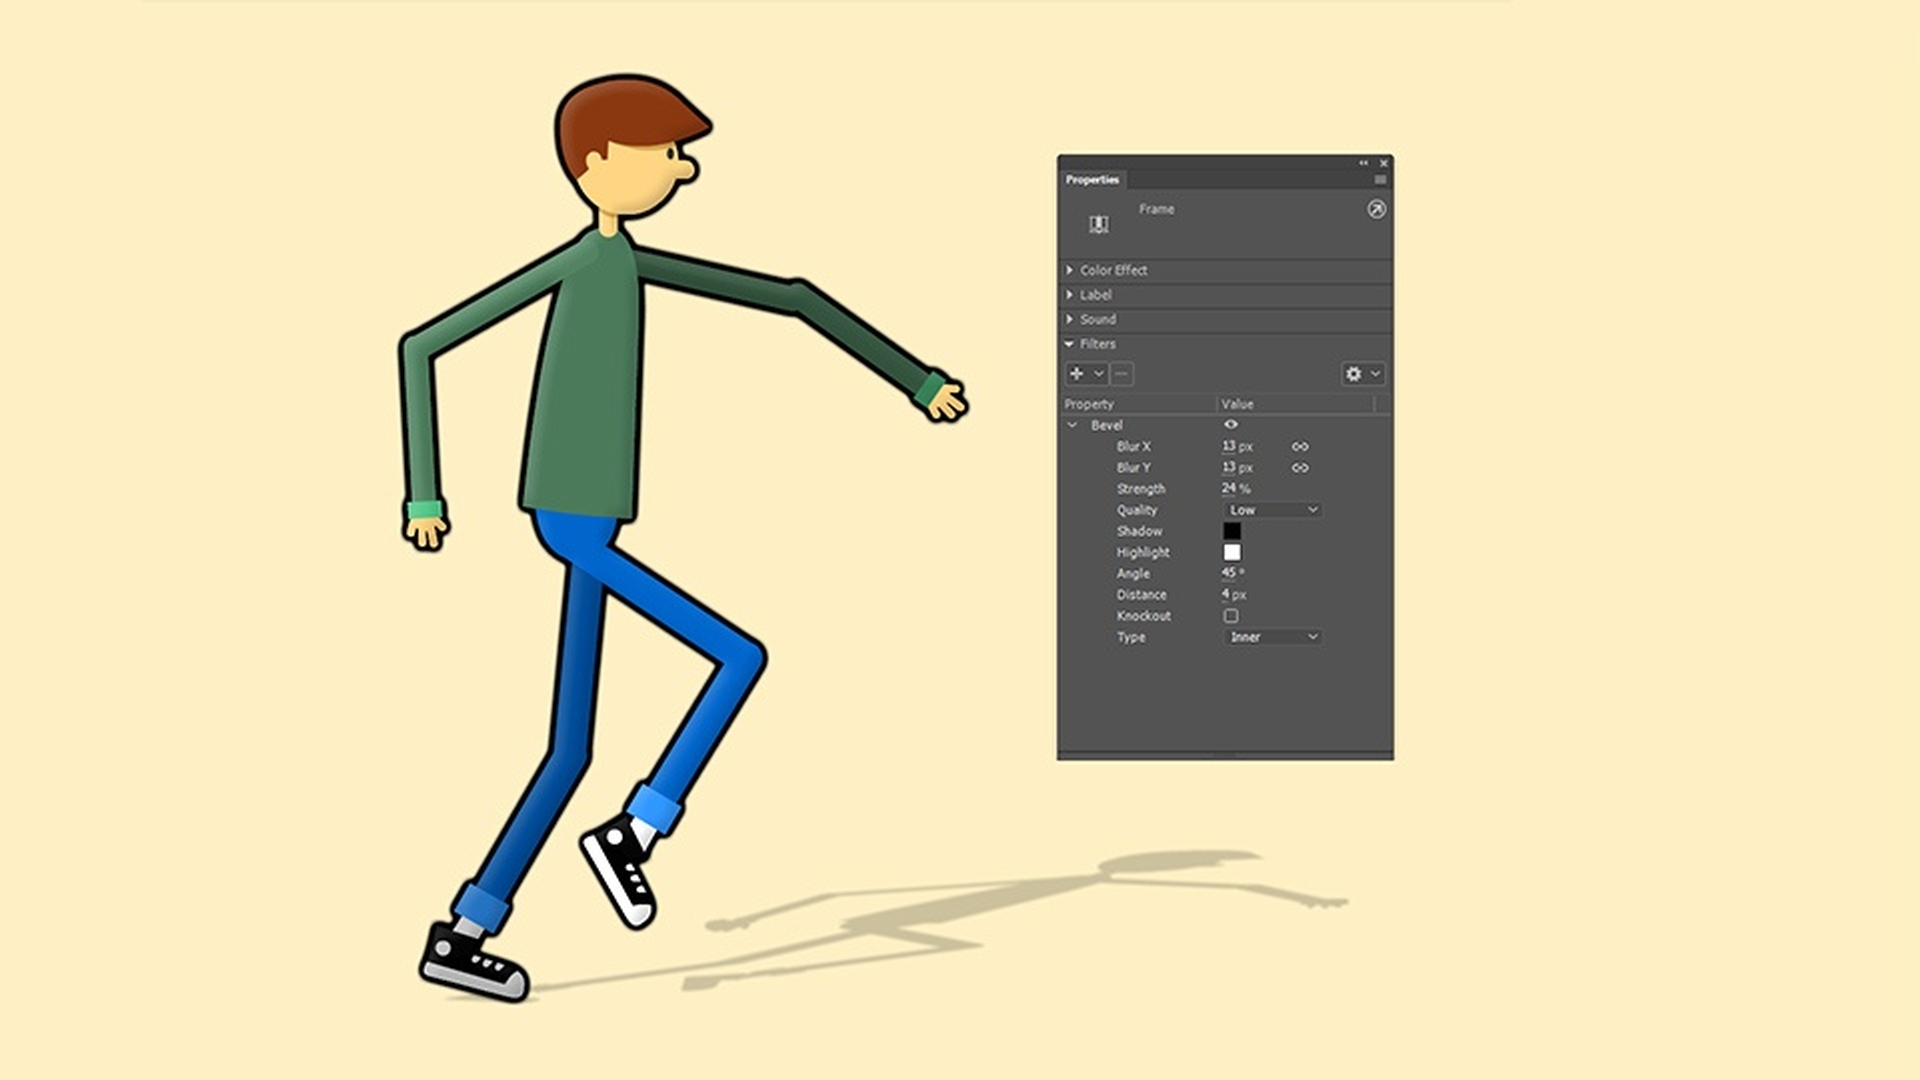
Let's add a bevel to our character.
Adding depth with bevel and glow effects
So, with the default settings, this is what the bevel looks like, but let's soften that a little bit.
So, I am going to lower the Strength to a value of around 29 or 30 percent.
I'm also going to adjust the amount of Blur.
By adding blur, you can give your character or whatever resides in this layer a nice sense of depth.
And again, if you want to make any kind of adjustments, just select a frame in this layer and make whatever adjustments you need.
If you want, you can even change the colors of the Shadows and the Highlights.
Another cool effect you can add, let's say, you want to create an outline for your character.
I'm going to select the Glow effect.
And so, for this glow effect, I'm going to change the actual glow color to black because I want this character to have a black outline to it.
And I'm going to increase the Strength to about 1000.
And the Blur, I'm going to set to about 5 px.
So, that in combination with beveling and the shadow, really adds a nice touch of dimension to our character.
And to show you just one more cool effect,
Changing character appearance with color adjustments
I'm going to select Adjust Color.
And by adjusting some of these values for Saturation and Hue, we can completely change the look of our character.
And those are just some of the things you can do using frame effects in Adobe Animate.