In Adobe Illustrator, there are lots of different types of colors we can create.
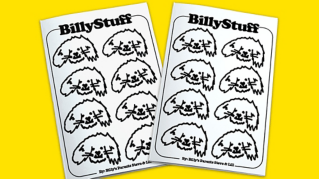
For instance, in this logo you can see a darker orange color here.
But here and here, you see what look like lighter versions of the same color.
This lighter color gives the isometric artwork dimension.
These lighter colors are called tints of the original orange color.
Tints are lighter, less intense versions of an original color.
Now, in this lesson you'll create fill shapes on the right with an orange color.
Then you'll make a tint or lighter version of the orange to apply to some other shapes.
So, let's start by making and saving a color.
To start with, you'll select this shape.
So, select the Selection Tool on the left and click the shape.
To change the fill color, in the Properties panel on the right, click the Fill color.
And in the panel that appears with the Swatch options selected, we could apply a default color called a swatch to the artwork, but in this case, we'll create a new color by mixing it.
Click the Color Mixer button at the top.
You can mix a color using the Color sliders here, which for this document represent the typical inks used for printing.
And those are Cyan, Magenta, Yellow and Black.
Now, if you want to select a color you can also do so in the Color Spectrum at the bottom.
Click in the Color Spectrum to select and apply a color.
Every time you click, you select the color and you could see how much of each Cyan, Magenta, Yellow and Black are used to make the color.
With the color applied, next you'll save it as a swatch, so you can reuse it elsewhere.
So, click the Swatches button at the top, to see the default color swatches that come with the document.
To save the color you just made, click the New Swatch button down here.
In the New Swatch dialog box that opens, you can give it a name like Icon.
Now, in order to create a tint or a lighter version of this color the Global option needs to be selected, which it is by default.
A global color is automatically updated throughout your artwork when you edit it.
Click OK, to save the color.
With the color now saved as a swatch, you can apply it to artwork.
So, click the shape to select it.
And then to select a few more shapes, press the Shift key and click these.
When they're selected, you can release the Shift key.
Now, to change the Fill color, click the Fill color on the right, and select the Icon swatch.
Now, you'll create a tint or a lighter version of the Icon swatch.
First, you select the artwork you want to apply the tint to.
So, click this shape, and then Shift Click this shape to select it as well.
To apply the Icon Orange, click the Fill color and select the same swatch.
Now, to make a lighter version of this color, click the Color Mixer button up here, and this time you'll see a single slider for tints labelled T.
Drag the slider to the left and make the color lighter.
I'll do around 35 or so.
The tint ranges from 0 to 100%, and the lower the number the lighter the color will be.
You can now save the tint as a swatch, so you can use it again.
Click the swatches icon up here.
And to save it, click the New Swatch button at the bottom.
You can now see a new tint swatch in the panel.
If you move the pointer over it, you can see the name and the tint percentage.
Now, if you were to change the original icon color any tints that are based on that original color will also change.
So, let's try that.
Click this shape to select it.
To edit the Fill color, click the Fill color on the right.
And with the swatches showing, double click the Icon swatch to edit it.
In the dialog box that appears, you can select Preview so you can see any changes.
And try dragging a Color slider to change the color.
You can see that the tint you saved, that's based on the original Icon's swatch also changed.
Click OK.
Now, if you want to practice a little bit, try applying the Icon color to these white shapes.
Then try creating a new tint.
Saving colors and tints as swatches can be a great way to open up new ways to be creative with your artwork.