Use assets in the Gelato Scene CC Library to follow along with this tutorial. Click Save to copy the library into your own account so you can access assets directly in Dimension.
Note: You need to be signed into your Adobe Creative Cloud account with your Adobe ID to copy assets. Get anAdobe ID if you don’t have one.
1
Set up your scene in Adobe Dimension CC
Launch Adobe Dimension. Click Open Project in the Start Screen and open the sample file you downloaded, “GatsbyGelato_TutorialStart.dn.”
The background image is from Adobe Stock. You canlicense it for your own use.
2
Import a 3D model and customize its appearance
Add a 3D model of a gelato container. Choose File > Import > 3D model and locate “GelatoPint.”
The model appears in the scene already aligned to the camera perspective. Click anywhere on the model and drag to reposition the container along the ground plane using the onscreen widget. (You can also use the magenta handle on the widget to do this.)
Select GelatoPint in the Scene panel on the right, and then click the Blue Plastic material in the Materials panel on the left.
To refine the container’s appearance, expand GelatoPint in the Scene panel. Select Blue Plastic. You can change material attributes such as Base Color, Glow, and Roughness in the Properties panel below the Scene panel.
Next, you’ll apply a gold metallic foil effect to the container lid. With the Magic Wand tool (W), click the band on the lid to select it, and then click Damaged Gold in the Materials panel.
Note:
There are two additional models in this document — GlassCup and Spoon. You can practice applying materials and repositioning them.
3
Wrap 2D art around your container
Open the Gelato Scene library in the Creative Cloud Libraries panel. Drag the “Gatsby Label” art and hover over the bottom portion of the gelato container until it’s highlighted. Then drop in place to apply the label artwork.
Note: We created the label artwork in Adobe Illustrator CC and saved it in the PNG format. Then we added it to a CC library to be accessible in other apps.
With the Select and Move tool (V), carefully position the label on the gelato container:
Press Shift and drag a square handle to scale the label art proportionally.
Drag the top handle to rotate the label art.
Click the center point and drag to move the label art around the gelato container model.
You can use the same technique to add the “Gelato Logo” artwork to the lid.
To refine the decal’s appearance, select “decal” in the Scene panel and adjust its properties. We increased the Metallic property and the Roughness to make it stand out.
There are a couple of additional ways to use your own 2D artwork as a decal or logo.
With the specific part of the model selected in the Scene panel:
Choose File > Import >
Place Graphic as Decal, and select a PNG, JPEG, SVG, or PSD image.
Open the Actions panel and click the Place Graphic as Decal icon.
4
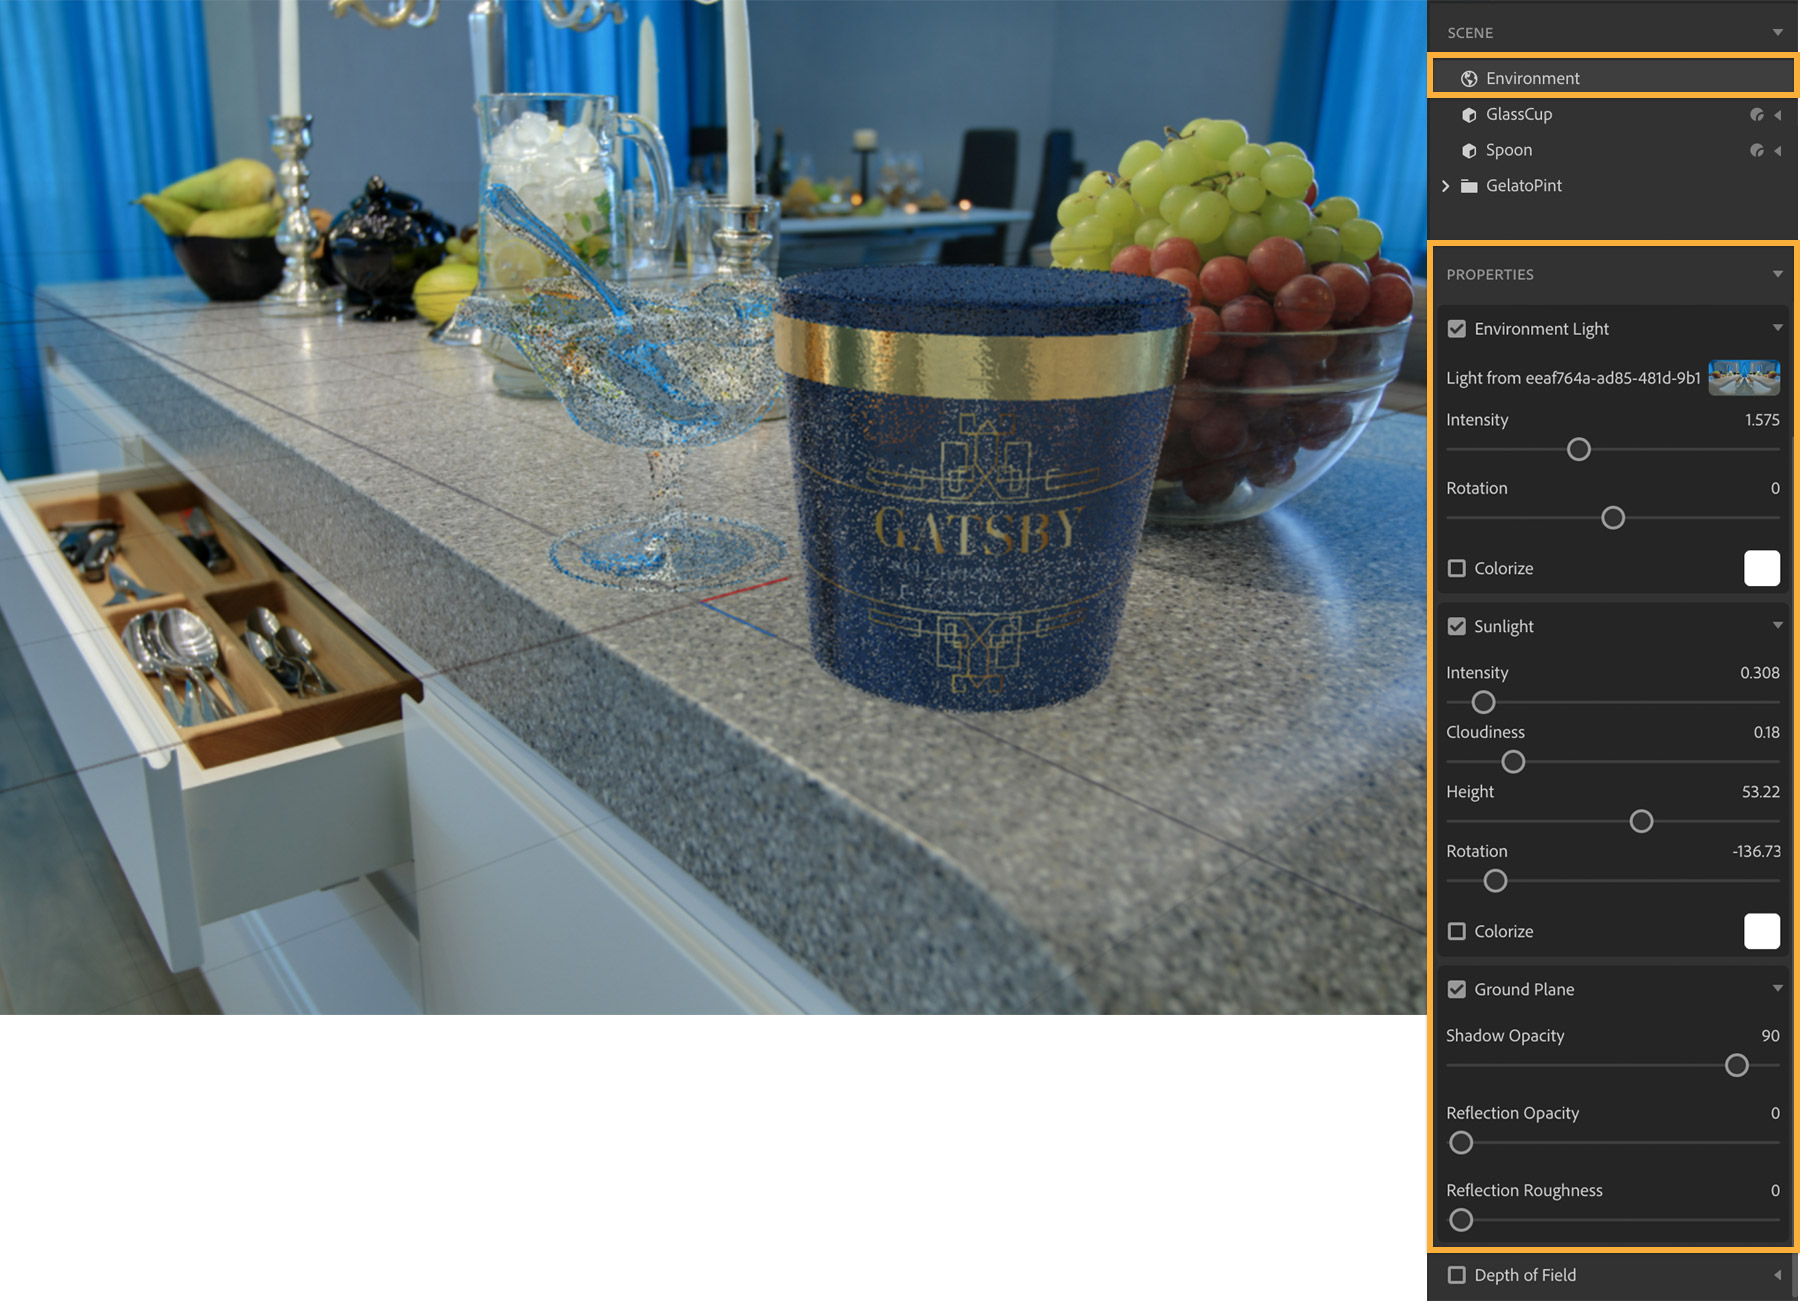
Add realistic lighting and shadows
Click Environment in the Scene panel. The scene is already lit with a panoramic image-based light that uses the background photo as its source. You can edit some of its properties by adjusting the Intensity and Rotation. Additionally, select Sunlight to adjust the light direction and intensity that affect shadows, and edit the Ground Plane properties to fine-tune the shadows.
Click the Render Preview toggle at the top to quickly preview the effect of lighting and shadows before fully rendering your image in the next step. Close the Render Preview window when you’re done.
5
Render your final image
Click the Render tab at the top. Specify the quality setting, choose an export format, and add a destination for the file. Click Render. We selected Low (Fast) quality and the PSD format. When the rendering is complete, click Open in Photoshop.
Note: Rendering can take some time depending on the scene complexity and the quality setting you choose, but getting photorealistic lighting and shadows in the rendered image is worth the wait.
6
Finish the composite image in Photoshop
The final rendering opens in Adobe Photoshop CC. If you selected PSD format, the artwork is organized in layers, which makes it easy to edit and refine elements separately in Photoshop.
The rendered image and the background image are placed on separate layers. The Additional Layers group includes mask layers for Depth and other types of selections.
To add an illusion of depth, we converted the Background layer to a Smart Object (right-click and select Convert to Smart Object). With the layer selected, we added a blur (choose Filter > Blur Gallery > Tilt Shift). Additionally, we duplicated the Rendered Image layer and applied a Soft Light Blend Mode at 50% opacity to make the gelato container stand out.
When you’re satisfied with your composite image, save it as a PDF, or quickly share it with others by clicking the Share an image button in the Options bar. See theDimension CC feature summary to learn more about the features shown in this tutorial. VisitAdobe Stock for additional 3D models, materials, and lights to use in Dimension.
You can control how Adobe websites use cookies and similar technologies by making choices below. But note that if you disable cookies and similar technologies entirely, Adobe websites may not function properly.
Cookies are small text files stored by your web browser when you use websites. There are also other technologies that can be used for similar purposes like HTML5 Local Storage and local shared objects, web beacons, and embedded scripts. These technologies help us do things like remembering you and your preferences when you return to our sites, measure how you use the website, conduct market research, and gather information about the ads you see and interact with.
You can make choices in the menu below about what cookies and other technologies you want us to use on Adobe sites when you visit them from this browser. You can always change those choices later by clicking on the Cookie Preferences link at the bottom of the page.
If enabled:
We can improve your experience by tailoring the site and the content to things we think might be of interest
We can better keep track of your preferences — like what language you prefer to use
We will better understand your likely interests so we can provide you more relevant Adobe ads and content on non-Adobe websites and in non-Adobe apps
It will help us improve the performance of our website and those of our partners who use the Adobe Experience Cloud
If disabled:
We won’t be able to remember you from session to session so the experience may not be tailored to your interests
You’ll still have access to the content of the site but certain features that depend on cookies may not function
You’ll still see ads, they just may not be as relevant to you
General information
You can control how Adobe websites use cookies and similar technologies by making choices below. But note that if you disable cookies and similar technologies entirely, Adobe websites may not function properly.
Cookies are small text files stored by your web browser when you use websites. There are also other technologies that can be used for similar purposes like HTML5 Local Storage, web beacons, and embedded scripts. These technologies help us do things like remembering you and your preferences when you return to our sites, measure how you use the website, conduct market research, and gather information about the ads you see and interact with.
You can make choices in the menu below about what cookies and other technologies you want us to use on Adobe sites when you visit them from this browser. You can always change those choices later by clicking on the Cookie Preferences link at the bottom of the page.
If enabled:
We can improve your experience by tailoring the site and the content to things we think might be of interest
We can better keep track of your preferences — like what language you prefer to use
We will better understand your likely interests so we can provide you more relevant Adobe ads and content on non-Adobe websites and in non-Adobe apps
It will help us improve the performance of our website and those of our partners who use the Adobe Experience Cloud
If disabled:
We won’t be able to remember you from session to session so the experience may not be tailored to your interests
We’ll still count your use of our site and services
You’ll still have access to the content of the site but certain features that depend on cookies may not function
You’ll still see ads, they just may not be as relevant to you
Operate the site and core servicesOperate site and measure engagement
Always active
These cookies are required, and they are used to enable the site and related services core functionality. Without them the site could not operate, so they cannot be disabled.
These cookies enable the site and related services’ core functionality and collect statistics about user engagement, such as counting active use to help us understand trends. These cookies cannot be disabled.
Measure performance
These cookies are used to analyze site usage to measure and improve performance. Without them Adobe cannot know what content is most valued and how often unique visitors return to the site, making it hard to improve information we offer to you.
These cookies are used to analyze site usage to measure and improve performance. Without them Adobe cannot know what content is most valued, making it hard to improve information we offer to you.
Extend functionality
These cookies are used to enhance the functionality of Adobe sites such as remembering your settings and preferences to deliver a personalized experience; for example, your username, your repeated visits, preferred language, your country, or any other saved preference.
Personalize advertising
These cookies are used to enable Adobe and our partners to serve ads more relevant to your interests. Without them you will still see ads, but they might not be as relevant to you.
Personalize advertising
These cookies are used to enable Adobe and our partners to serve ads more relevant to your interests. Without them you will still see ads, but they might not be as relevant to you.