Introduction
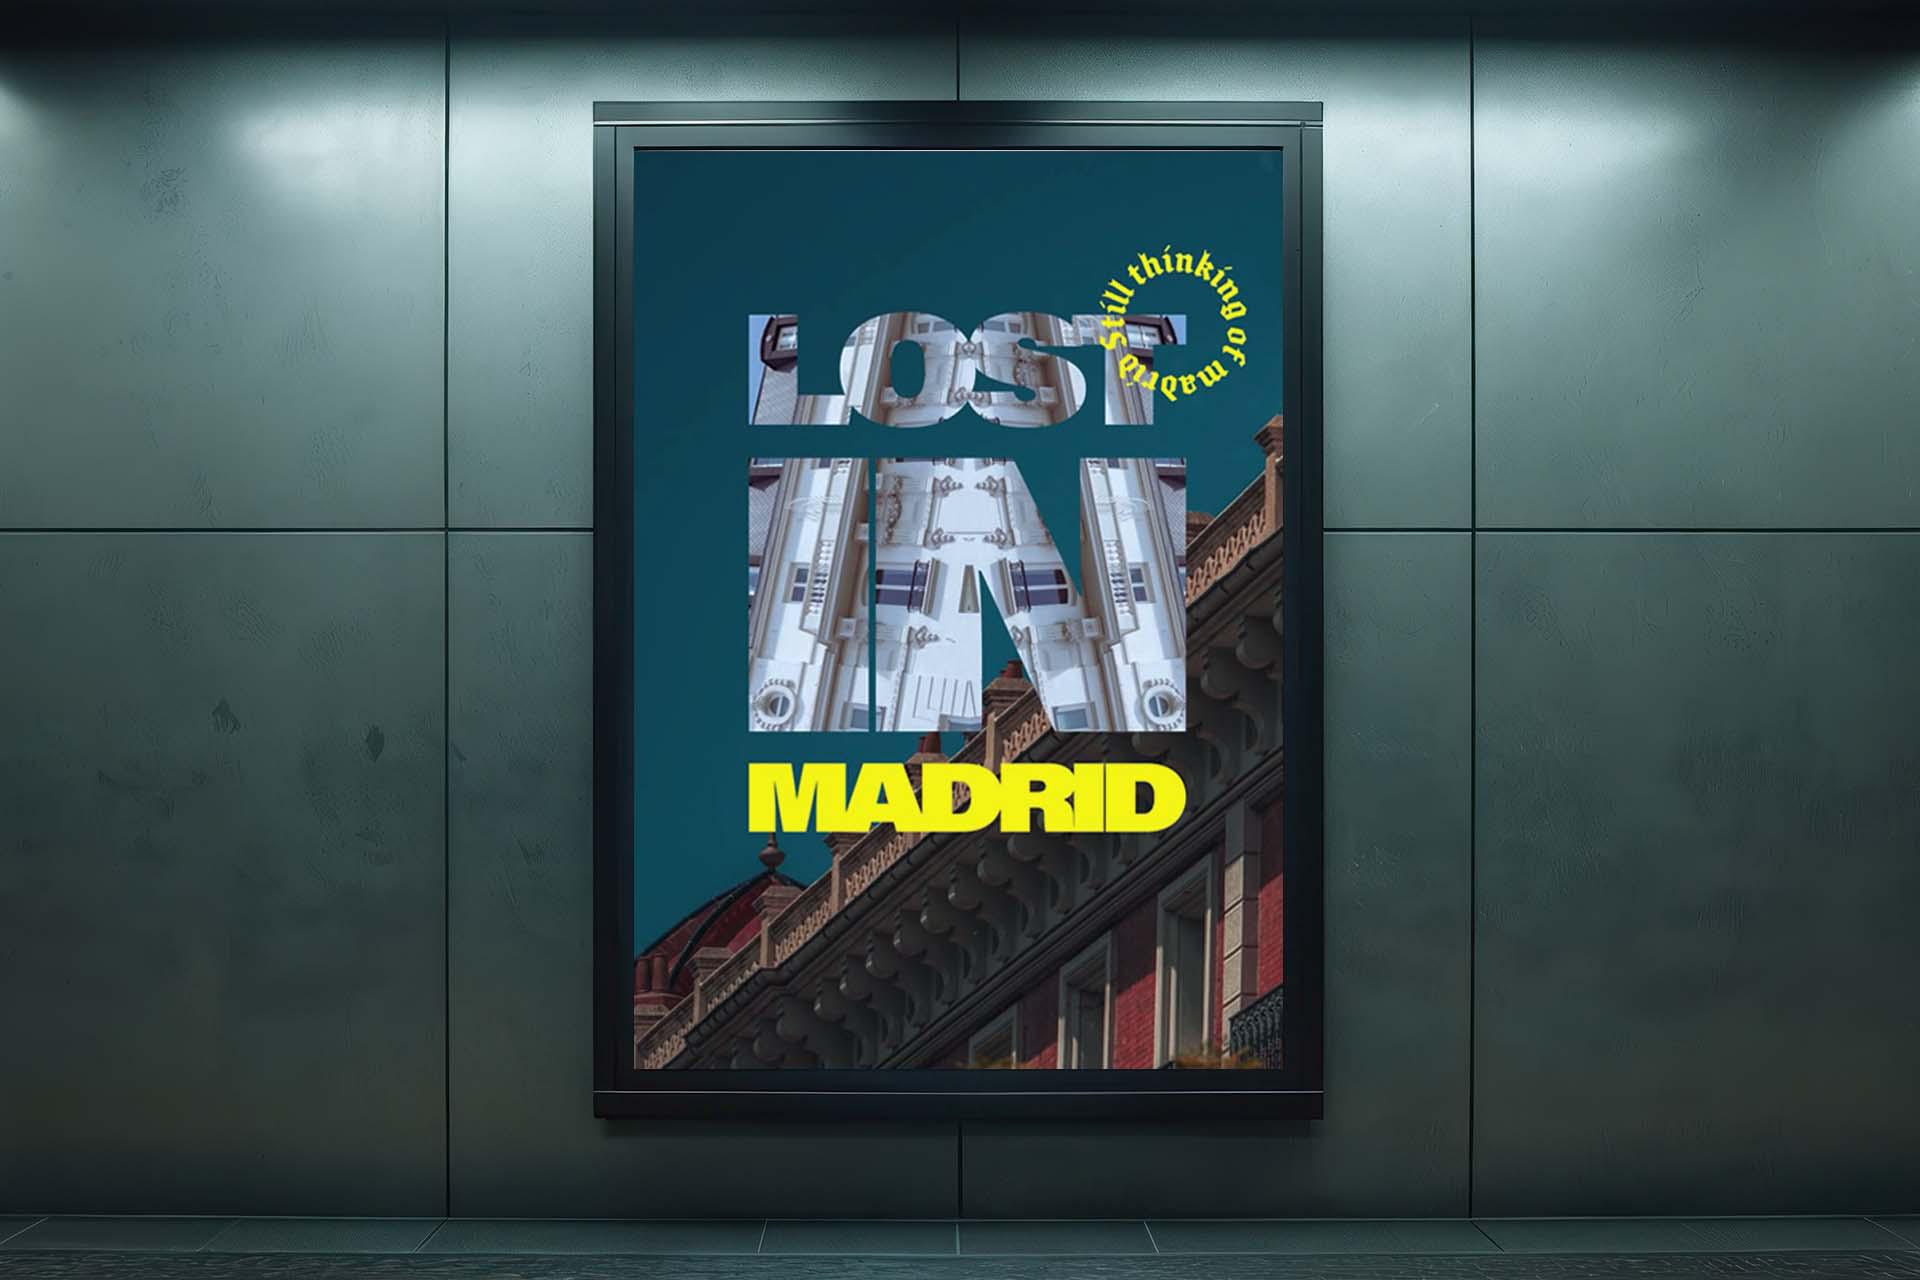
[Cyn Lagos]: Have you ever come back from a trip [Silhouette of Cyn Lagos looking out a window, cutting to poster designs featuring "LOST IN MADRID" over mirrored building photos.] and just wanted to relive that memory?
When I came back to Spain recently, I honestly thought I was just bringing back memories.
[Cyn Lagos speaks into a microphone.
Inset clips show a camera lens, Cyn reviewing a tablet, and photos of Madrid architecture.]
But while reviewing the photos, I noticed something special: a lot of these images felt like miniature worlds, tiny emotional scenes, [Three poster designs of building facades appear, then the outer ones slide behind the "LOST IN MADRID" title layout.] and they deserved movie titles worthy of that feeling.
Hi, I'm Cyn Lagos, [Cut to Cyn.
Text next to Cyn: "I'M CYNLAGOS."] your visual mentor, helping you bridge design, photography, and video.
And today I want to show you how I turn simple travel photos from Spain [Two photos of Madrid buildings display side by side, cutting to Cyn speaking into the microphone, then showing the "LOST IN MADRID" poster.] into cinematic posters using dynamic text in Photoshop.
So first, type your title in Photoshop.
[Photoshop workspace with "LOST IN MADRID" selected on a maroon canvas.]
Once your text is active, look for the Dynamic Text icon
Shape your title into a bold visual statement
in the Contextual Task Bar.
Click it and you'll find a variety of shapes to experiment with [Cyn toggles through the Dynamic Text shape options, warping "LOST IN MADRID" into a circle, an arch, and a block stack.] that can help set the mood of the image.
[The text arranges into a vertical block and is scaled up to fill the canvas.]
For this one, I've chosen the block option.
This way I create a bold statement that can later have an effect, like having a photo behind the letters.
[A brief preview shows the completed poster design with photos filled inside the letters.]
Add a smaller line of text for emotional depth
Next, I'm adding this tiny diary-style text, [Back on the maroon canvas, script text reading "STILL THINKING OF MADRID" is placed above the yellow title.] which adds this level of vulnerability that makes the image feel more impactful.
[A brief cut to Cyn returns to Photoshop as script text is placed above the title block.]
That tiny diary-style sentence, like "Still thinking of Madrid," can completely reframe the emotion of the image.
[Cyn cycles through the different Dynamic Text presets, previewing each layout on screen.]
Experiment with all the shapes that Dynamic Text has to offer.
I'll pick a circle for this one and continue to add typography [The title block is tilted, and script text reading "FLOATING IN A NEW WORLD" is added at the bottom.] to add more character to my poster design.
[After a brief cut to Cyn, she cycles through different Dynamic Text shapes on the bottom text line.]
And here's a pro tip: after you explore the different shapes and Dynamic Text, you can take it one step further - go to Edit,
Skew your text to fit around your subject, and keep it fully editable
choose Free Transform, right-click and select Skew.
[The arced text is angled diagonally across the lower right corner.]
Now you can move the corners manually to shape the text around your subject.
This helps the typography feel like it belongs inside the image instead of just floating on top of it.
[Cut back to Cyn speaking into the microphone.]
[The brown canvas background is replaced with a photo of building architecture against a blue sky.]
And the best part?
Even after transforming it, the text remains editable, so I can rewrite the sentence, swap the title, or repurpose the same layer for completely different poster ideas.
[Cut back to Cyn with the poster design shown beside her on screen.]
[Back in Photoshop, the architectural photo is masked inside the giant title letters.]
Finally, I like to use a clipping mask on my headlines.
Fill your title with an image using a clipping mask
I place an image or texture above the layer, and I clip it into the typography to create this cinematic fill text effect.
[A preview of the architectural photo covers the canvas as it is shifted into position.]
Now right-click the image above the text layer and select Create Clipping Mask.
This will create an image text effect.
[The architectural photo fills only the inside of the bold title letters against the brown background.]
And what I love most is that it's always adjustable to my liking.
I want to place the image inside the words, because I want the viewer to get lost in the architecture first.
[The background changes to a photo of red brick building facades under a deep blue sky.]
That design choice reinforces the story.
So instead of getting lost in menus, [Cut back to Cyn as a picture-in-picture insert shows the yellow script text cycling through different preset shapes before settling into a circle.]
I can just follow the feeling of the image while testing different variations.
[The text layers disappear, leaving only the mirrored photo background, before each text element reappears one by one to reveal the completed poster design.]
Honestly, the biggest surprise wasn't learning this Photoshop feature, it was realizing how much storytelling was already inside my photos.
Dynamic Text just helped me get there a little faster.
[Cut back to Cyn.
In the insert box beside her, the bold title text cycles through different Dynamic Text presets before the poster graphic disappears entirely.]
Sometimes the difference between a photo and a cinematic world [Cyn showcases additional poster variations using Dynamic Text curves and image fills.] is simply giving the image permission to speak louder.
So try it yourself in Photoshop desktop and treat the moment like it's a film. [laughs]