In this video I'm going to show you how you can easily stitch together photos into a panorama using Photoshop's Photomerge feature.
I love how this process allows me to create wider and taller images than my camera can capture, as well as very high resolution images that I can print large.
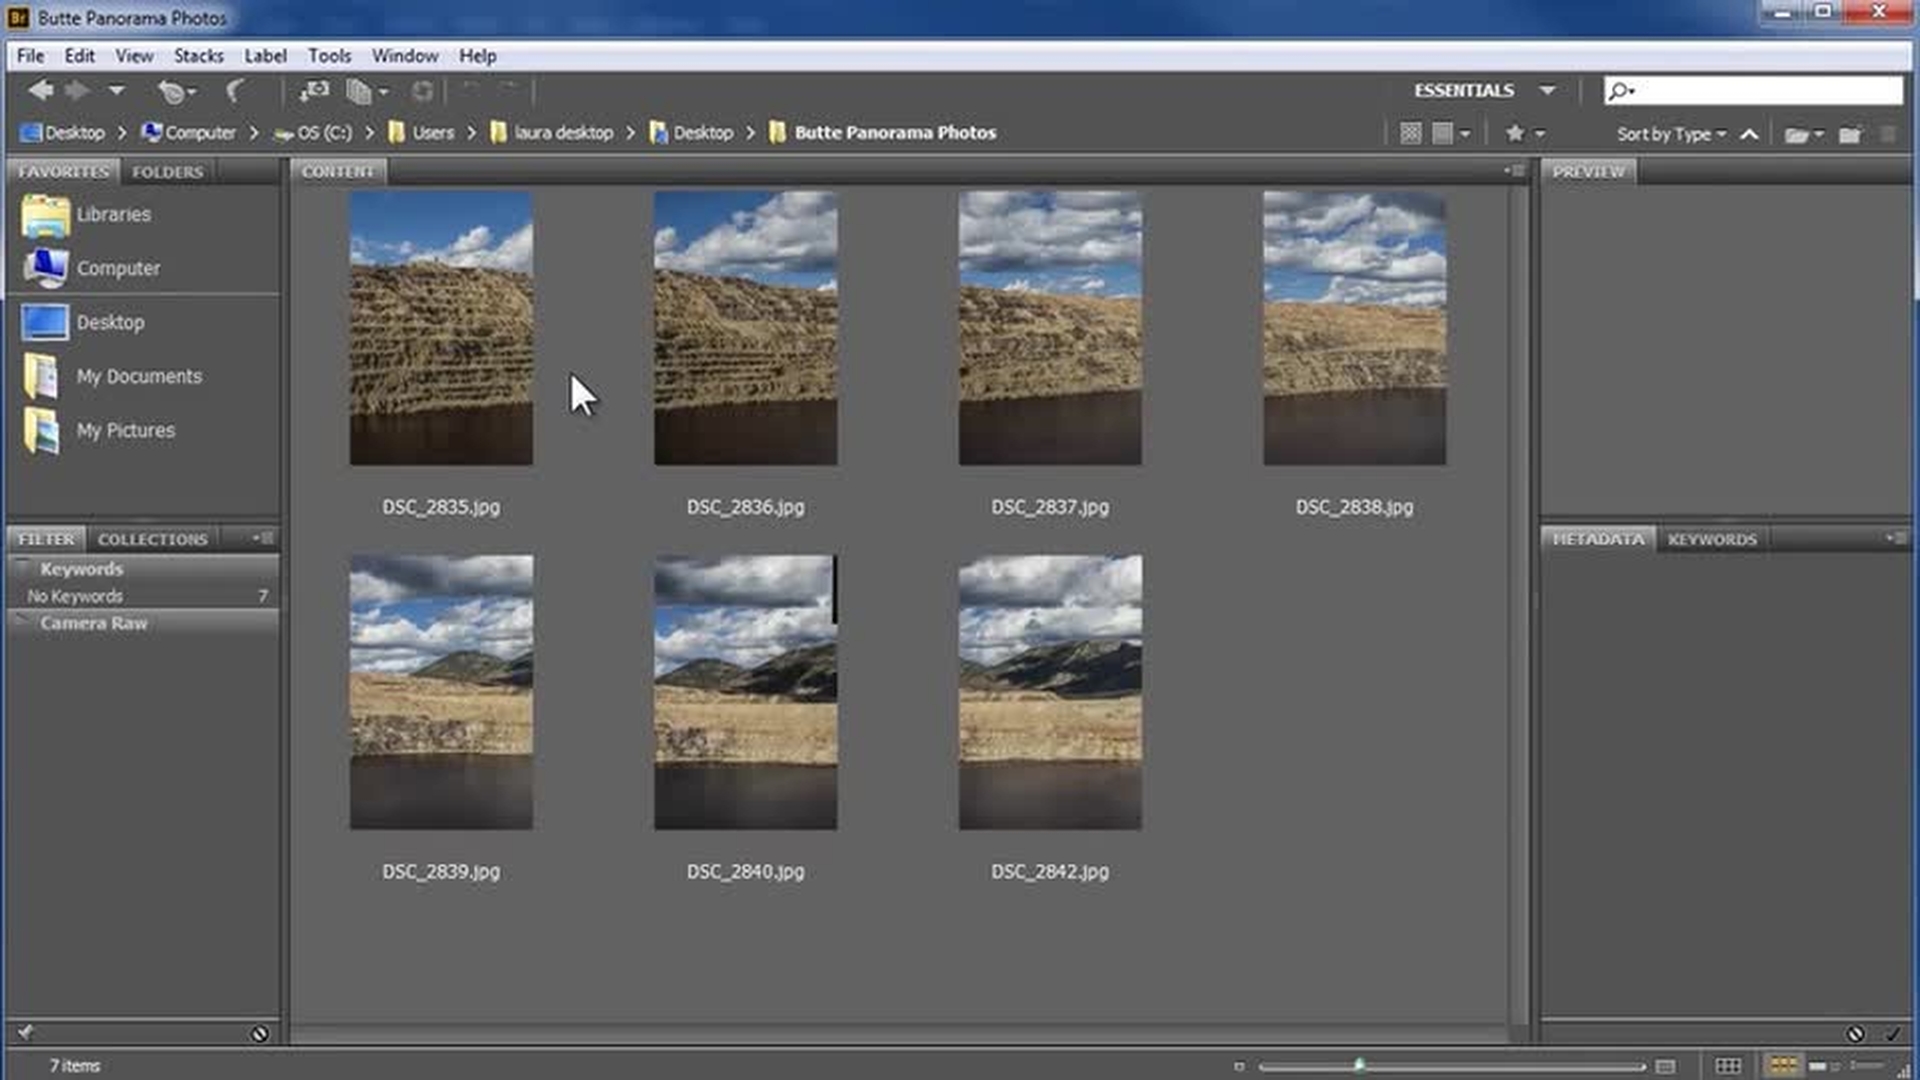
I'm starting here in Adobe Bridge.
I'll also tell you how to start from within Lightroom and from within Photoshop.
I'll merge these seven photos of the mining pit in Butte, Montana.
Notice that there's substantial overlap of content in the photos.
[Overlap 25-40%] As you're photographing, I recommend you overlap your frames 25% to 40%.
[Stand in one spot] Also stand in one spot as you take your photos, [Use a constant focal length] keep the focal length of your lens constant, meaning don't zoom in or out in between photos, [Keep the camera level]and do your best to keep the camera level.
A tripod makes this easier, but it's not required.
I'll select my photos here in Bridge by clicking on the first and then holding the shift key down as I click on the last.
Next I'll go to Tools, Photoshop, Photomerge.
Note that if you're working from Lightroom rather than Bridge, select your photos, right click in one of them, and choose Edit In [Lightroom: Edit In...
Merge to Panorama in Photoshop] and then Merge to Panorama in Photoshop.
If you're working instead from inside Photoshop, [Photoshop: File...
Automate...
Photomerge] you can go to File, Automate, Photomerge.
All three options pass the files into this Photomerge dialogue, and you can see my files listed here.
The first thing we'll do is choose a layout option.
These are different approaches to aligning and distorting the photos to seaamlessly fit them together.
If you have a center subject in your scene and the scene is relatively flat, like a building, as you turn your camera to capture the side frames in your panorama, your camera is at an angle to your subject.
The perspective option corrects your side photos for this perspective distortion.
On the other hand, if your scene doesn't have a center subject or it wraps around you all or part of the way, then this correction isn't needed and cylindrical is a better option.
Spherical maps the photos into a sphere and is often best for 360-degree panoramas.
If it's not clear to me which option to use, I'll often choose Auto and let Photomerge analyze my photos and choose the best method from these top three.
If I don't like the results, I'll experiment with the others.
Now Collage and Reposition won't stretch or distort your photos, so you most likely won't get a seamless result.
They're intended for creative collages.
In this case I'll choose Cylindrical.
I'll choose to blend the images together so that I don't see harsh edges between the photos.
If I'm photographing with a wide-angle lens that darkens the corners of my photos, I'll remove these vignettes, and I'll also correct for any lens distortion.
If in doubt, I would check these boxes.
I'll hit OK and let Photomerge get started.
Now you can merge a single vertical or horizontal strip of photos, as I have here, or you can merge a whole matrix of photos.
How many photos you can merge will be dependent on how large your files are and how much memory your computer has.
In the Layers Panel, each photo is being put on its own layer and then aligned and distorted as needed and then blended together.
And as you can see, this really works amazingly well.
I'm always impressed by this tool.
Now I'm going to turn on each layer individually to show you what we're actually using from each photo.
I'll Alt or Option click on the top layer eyeball here so that the others are turned off.
So of this left photo, this is what we're actually using.
This is determined by the Layer Mask that Photoshop built.
Whatever is black on the mask is turned off, and whatever is white is turned on.
Next I'll Alt or Option click on the next one, and I'll continue down through the layers.
Finally I'll Alt or Option click again to turn them all back on.
To see why these Layer Masks have been built, I'll disable this top one temporarily by Shift clicking on it.
Notice that we see the entire left-hand photo sitting on top of the next one.
There's a harsh edge because one is slightly darker than the other.
By choosing the Blending option in the Photomerge dialogue, Photoshop has determined where to make the split so that we can't see any fall-off.
I'll turn the Layer Mask back on by Shift clicking on it, but watch over here on the photo as that edge magically melts away.
I want to give you a few more tips for photographing panoramas so that yours blend together as well as this one does.
[Manual focus] It's important to use manual focus rather than auto focus so that what you're focusing on doesn't shift between shots.
[Constant depth of field/aperture] Similarly, keep your depth of field or aperture constant [Constant exposure] as well as your exposure, if possible. [(manual mode or aperture priority)] Shoot in manual exposure mode if you can.
If not use aperture priority.
Finally so that your white balance doesn't shift between shots, [Don't use Auto White Balance] don't use Auto White Balance mode.
Okay, to finish this image I'll crop in on the top and sides, and then so that I have as much water as possible I'll fill in this bottom gap with more water.
I'll grab the Crop tool, and then I'll click and drag in from the edges.
And then I'll click on the check mark to complete the crop.
Now my plan is to use Content Aware Fill to fill in the water.
I need to work on all of the layers together, so I'll flatten them into one layer by going to Layer, Flatten Image.
Next, I'll select this gap by using the Magic Wand tool.
I'll click in the gap and we can see the selection made here.
For Content Aware Fill, I need to expand the selection just a little bit into the water.
So I'll go up to Select, Modify, Expand, and I'll expand by 5 pixels.
I'll say OK, and now I'm ready to use Content Aware Fill.
I'll go up to Edit, Fill, and from the drop-down here I'll choose Content Aware.
And I'll say OK.
Photoshop analyzes the surrounding area and fills in the selection to match it.
If I deselect this area by going up to Select, Deselect, you can see that again it's done a wonderful job.
After creating a panorama, I would then continue to develop it.
For example, I'd brighten the left side of this image.
I could do it here in Photoshop or I could save this and go to Lightroom to complete the work.
Okay, I hope you've enjoyed this video on using Photomerge to easily create panoramas.


