Introduction
Hi there!
In this tutorial we're going to look at working more effectively with your team, now that Git is integrated directly into Dreamweaver.
Git integration works with any Git service provider like GitHub or Bitbucket helping us manage open source projects.
And it's great for safely tracking and managing changes in our own projects with version control.
Okay, before we get started in Dreamweaver,
Setting up Git integration and repository options
you'll need to install a Git client for Mac or PC.
You'll also need to sign up for an account at a Git Repository or use an existing one.
In my case, I'm going to be using GitHub.
Now, we connect Dreamweaver to our Git Repository here on Site.
And we either use the New Site... or we manage an existing site.
And all I have to do here to get started with Git is this Associate a Git Repository with this site.
So, I'm going to click that.
And you've got 2 options.
The first, Initialize as a Git Repository, just means I'm going to use my local copy as the initial starting point.
This other option here that says Clone existing Git Repository using URL, it just means that the source files that we're going to be using already exist on something like Bitbucket or GitHub.
And we want to clone it and bring it down to our machine to start working on it.
So, whichever works for you.
I'm going to Initialize as a Git Repository.
And click Save.
Now, working with Git inside Dreamweaver
Staging and committing files in Dreamweaver
we have this option over here.
And it allows me to switch from Files and look at my site in Git view.
The first thing you'll notice is that some of the files are green.
And that indicates they haven't been committed to the repository yet; and they're not being tracked.
You can still work with Git from the files panel here.
You can right-click options here.
And there's this option here, which allows me to Stage and commit my changes.
I'm going to work in this Git view.
So, when we get started we need to do an initial commit, make sure all of our files are checked in and ready to go.
To do that we need to do 2 steps.
We need to stage our files.
And then we need to commit them.
To stage them all, see this little check-box here next to Status, that will allow me to check them all.
So, these are all staged and ready to go.
To commit them, I use this little icon here.
I can commit these Staged Files.
And during the staging here, I can go through and I can have a look at my files.
I'll open up my index.html page here, twirl it down.
And you'll notice that all the code here is green.
Green here indicates this is all new for the repository.
So, I'm going to close it down.
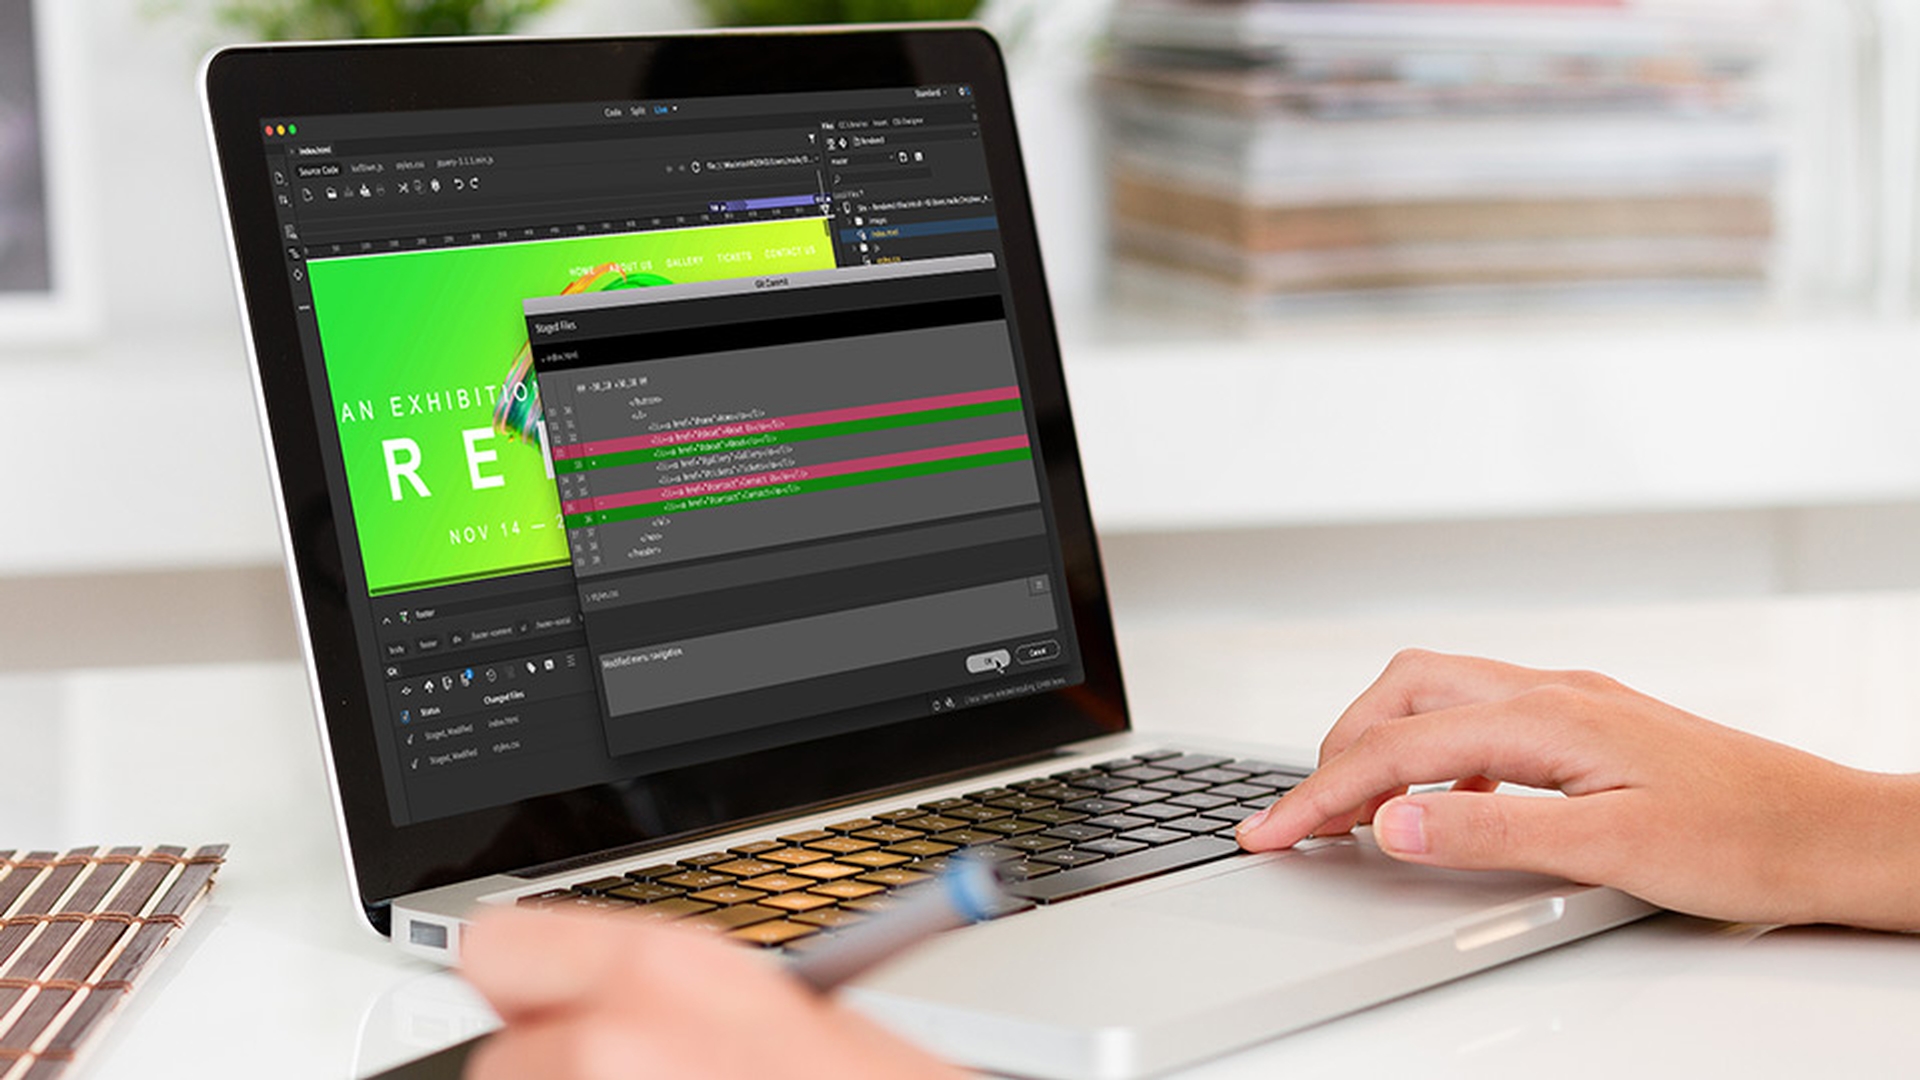
And I'm going to add a commit message here.
This is just my First Commit.
Let's click OK.
You can see down here in my Git panel.
Everything is up to date.
And you can see over here in my files panel as well, they've gone white.
It means everything's up to date.
And remember green means there is stuff still to commit.
So, let's go and make some amends.
Tracking changes and reviewing file differences
We're going to use this index.html file I've got here.
Let's say I've been asked to make a change, do a nice simple one.
I'm going to change this 'About' to 'About Us'.
I'm going to hit Save.
And you'll notice that we get this gutter mark over here.
And this little gutter mark here is a visual indicator that a change is being made.
And it hasn't been committed to the repository.
I can click on it.
And it shows me my before and after.
You can also see down here that my index.html file has been modified.
If I want to see what the changes are after modified, remember I can click the gutter mark.
Or I can click on this Diff button here.
And I click on Diff.
It gives me maybe a clearer indication of what's happened.
You can see that this has been removed.
And this has been added, our 'About Us'.
If I decide that was a change I didn't want, there's a revert button down here in my Git panel as well.
This last icon here.
I'm going to tick on my modified document.
I'm going to click Commit.
And I'm going to add a good message for myself so... ...you can see in here.
Again, if I twirl it down, highlights what I'm changing nice and clear.
I'm going to click OK.
So, that's been pushed to my local repository.
The little gutter marker's gone.
And it's been removed from my Git panel.
Now, we've been working from our master branch.
Managing branches and working with remote repositories
You can switch between different branches by going up the top here.
There's a little drop-down menu.
You can create new branches or manage existing ones by going to this drop down here and pick Manage Branches...
Let's say I want to add a new one.
I'm going to work on an iphone-bug-nav that's in the nav.
I click OK. and I've generated a new branch.
Also in this window it allows me to merge branches.
So, I can fold it back into my master.
So, up until now we've been using a local repository.
Let's say we want to use a remote one, something like Bitbucket or GitHub.
You can connect them by clicking this Create Remote.
Give it a name.
Enter the URL, Username and Password.
Click OK.
And now you can see down here in my Git panel, I have the Push, Pull and Fetch icons.
So, I can make a quick little change here.
Save it.
Commit it locally.
Leave a note.
You can see there's a handy little icon, saying there's one file to be pushed.
Click OK.
And off it goes to GitHub.
All super easy from the Dreamweaver CC UI.
One of my favorite options down here is this Git Repository History.
Using repository history for collaboration
You can see here this is my First Commit that I did, plus lots of other changes that I've done.
What's really cool is that you can see what other team members have done.
You can see their name there.
And you can check their comments and their code changes.
So, you can see how good this is when you are collaborating with others.
Now, this is just a quick overview of Git integration.
There's a lot more detailed information that's in the help document that is linked to from this tutorial page.
So, Dreamweaver CC has made it really easy to collaborate with your team.
And I hope, like me, it gets you more excited about using Git in your workflow.
Thanks Dreamweaver CC.