TUTORIAL ARTICLE
Advanced
5 min
Slow down footage
Draw attention to the details in action video sequences with time remapping in Adobe Premiere Pro.

Download sample files
This sample file is an Adobe Stock asset you can use to practice what you learn in this tutorial. If you want to use the sample file beyond this tutorial, you can purchase a license onAdobe Stock . Check out the ReadMe file in the folder for the terms that apply to your use of this sample file. Any reference to the athlete in the example is for demonstration purposes only and is not intended to refer to any actual organization, products, services, or creative work.
Starting in the Editing workspace, place your clip in a sequence and zoom in slightly on the clip in the Timeline panel. Hold Command/Control and press the plus key a few times to increase the height of the V track. For best results, your footage should be shot at a high frame rate.

Right-click the clip and choose Show Clip Keyframes > Time Remapping > Speed. Move your mouse pointer to the horizontal line in the middle of the clip until the large black arrow changes to a black arrowhead with a small vertical double-arrow next to it.

Drag the line downward slightly. A tooltip shows the percentage change. After you release the mouse, the clip length extends because decreasing the clip’s speed increases its overall running time.

Press Command/Control so the pointer turns white with a plus sign next to it. Click to add a time remapping keyframe. Drag the line down on the right side of the keyframe to make the action suddenly slow down.

Drag both keyframe handles apart to generate a more gradual ramping down to the slower speed. Move the Bezier handle to smooth the speed adjustment. Click in between the keyframe handles (pointer shows a horizontal double-arrow) to move the ramp range elsewhere in the clip. Play the sequence. At dramatic reductions in speed (10% and lower), the slowed action looks noticeably choppy.

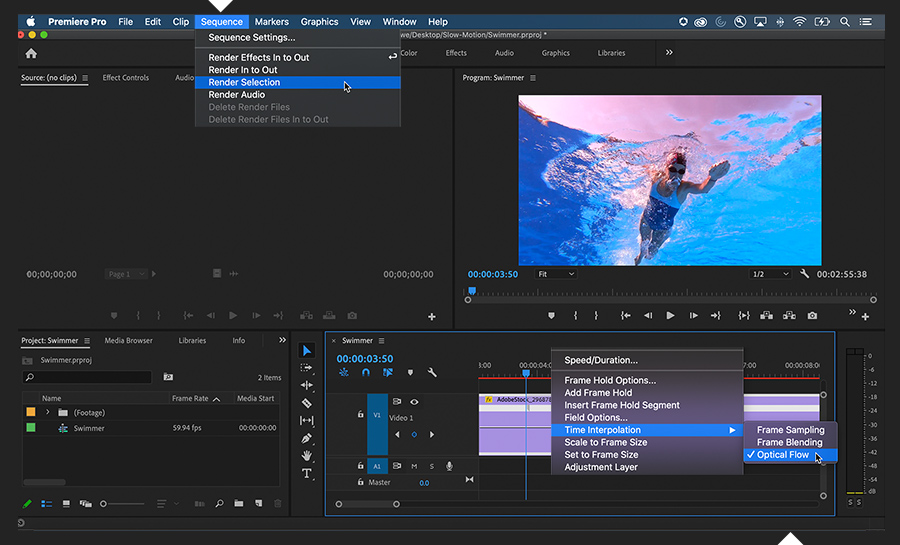
Right-click the clip and choose Time Interpolation > Optical Flow. From the main menu, choose Sequence > Render In to Out or Render Selection, whatever is appropriate for your sequence.
After the rendering process completes — this could take some time — the slowed clip will play back much more smoothly.

Play around with speed ramping. Add a second Time Remapping keyframe so you can ramp down even more or bring the clip back up to normal speed.
With Adobe Stock, you have access to more than 100 million high-quality, royalty-free images including photos, graphics, videos, and templates to jump-start your creative projects. TryAdobe Stock and get 10 free images.


