Learn how to colorize
black-and-white photos.
Artists have added color to photos since the earliest days of photography. Explore how to colorize old photos with modern tools.
Why add color?
People seek realism in their photos. They want to capture life, not just in light and shadow, but also in full color. “When you see something in color, there’s definitely an immediacy. It elicits an emotional response, and people relate to it in a way they couldn’t before,” says Jordan Lloyd, professional photo colorist.
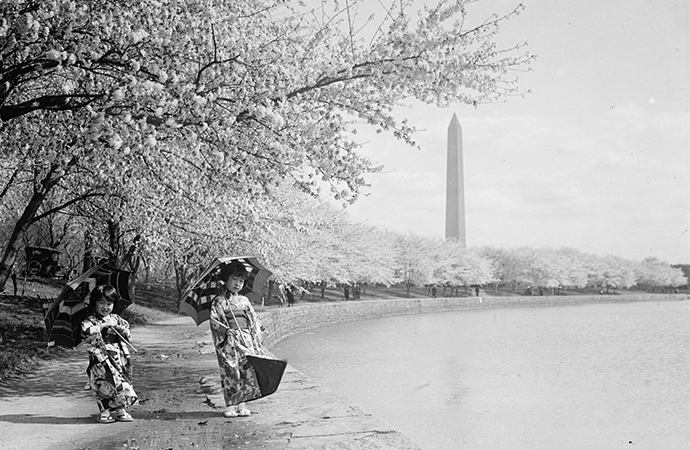
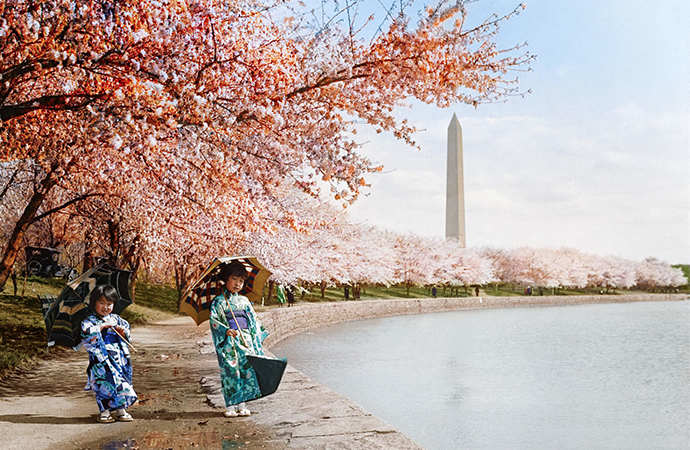
Images by Jordan Lloyd
In the 19th century most photographs were monochromatic, so people hand-colored them, often for purely aesthetic reasons. Photos with color just looked nicer on the mantle. Contemporary artists still add color for those reasons. Tina Tryforos, artist and teacher, began hand-coloring photos early in her career before going digital. Painting by hand, she worked with a limited color palette, and she still prefers that simplicity. “I really like the more painterly, nostalgic look, rather than trying to make it look accurate,” she says.
Photographer Kenton Waltz loves colorizing black-and-white photos because he can choose which colors to include in an image and which to leave out. “The elegance of the photo is the simplicity of the color,” he says. “You appreciate the quality of light and dark.”
The first steps to colorize images.
Whatever your motivation for colorizing, the basics are generally the same.
1. Create a new layer.
Get in the habit of creating a new layer before you touch your source image, so you always have the original. Then you can use layer masks to add the right colors to every part of the image.
If you’re working with an old photo, the first thing you should do is clean up the image. You can do this easily by making slight adjustments to the Radius and Threshold levels until the little flecks are gone. If that doesn’t remove all of them, you can always create a layer mask to paint over any remaining flaws.
3. Neutralize the color and adjust the contrast.
If the photo is sepia-toned, add a Black & White adjustment layer to neutralize the color and a Levels adjustment layer to fix the contrast.


Images by Debra Hammond
A few (of the many) techniques for adding color.
Option A: Use the brush with Solid Color adjustment layers.
This method involves adding a Solid Color adjustment layer for every aspect of the photo you want to paint. Change the blending mode to Color so the details of the original image show through the paint. Invert the layer mask to black and use the brush to paint over the part of the image you want to colorize.

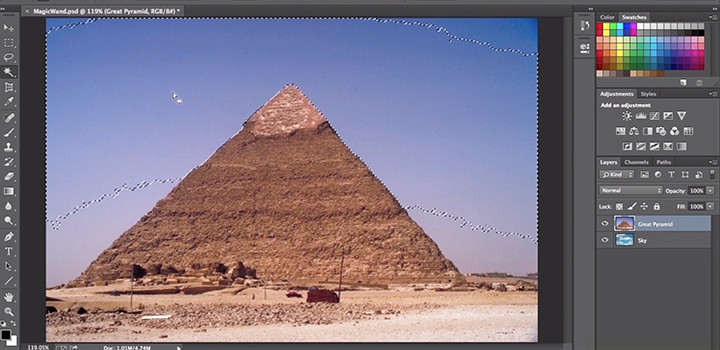
Option B: Use the Quick Selection tool with Solid Color layers.
Once you’ve created a new layer, use the Quick Selection tool to outline the area you want to color. You might need to zoom in to fix any areas selected accidentally. Click the Refine Edge button to smooth the edges of your selection. (The Refine Edge tool is also great for colorizing fine details like hair.) Then add a new Solid Color Fill layer, choose the color, and set the blend mode to Color. Then you can simply adjust the color until it looks right. Repeat this process for each element in the image. Quick Mask mode can help you quickly remove areas you don’t want to paint (like buttons or eyes) inside of a larger selection.
Option C: Use Curve adjustment layers.
You can also add color by creating a Curve adjustment layer. Find the color you want by adjusting the cyan, magenta, and yellow curves, and then use the brush to paint. Create a new layer for each color.

A few tips before you begin.
Learn keyboard shortcuts.
Save yourself hours by memorizing these keyboard shortcuts for the brush and painting tools in Adobe Photoshop.
Try a graphics tablet.
Every artist has their preferred style of work. Tryforos uses a trackpad, as she has throughout her career, which she says works fine if you have a large screen. If you’re doing a lot of colorization, Lloyd recommends using a tablet. As photographer Martin Evening famously wrote, “Once you have experienced working with a pen, using the mouse is like trying to draw while wearing boxing gloves.”
Do some research.
If you want to make educated guesses about the colors the photographer saw through the viewfinder, do some digging. For his historical photos, Jordan Lloyd consults with experts on everything from soft-drink history to Egyptology to pulp fiction from 1920 to 1950. When you do have to guess, Lloyd says, “if it doesn’t look right, it probably isn’t right. Winston Churchill did not wear a purple jacket.”
Cultivate patience.
Colorization is a time-consuming, labor-intensive process. Realistically capturing undertones in skin is especially difficult. You may have to add subtle layers of pink, orange, yellow, or blue. Experts recommend finding a color photo featuring similar skin tones to use as a reference.
There are abundant online tutorials to help you learn how to colorize photos. “It’s actually a low barrier to entry,” Lloyd says. “Find the right photograph, follow the technique, and you’ll have a pretty good result. Beyond that, it’s just a case of experimenting.”
How do you know you’re done? “When all the bits have been filled,” Lloyd says.
Contributors
Do more with Adobe Photoshop.
Create beautiful images with Photoshop brushes, Content-Aware Fill, Photo effects, Neural Filter, Sky replacement and the many tools photographers rely on.
Explore the Photoshop family of apps.
You might also be interested in…
Building a great landscape photo.
Explore ways to artistically capture scenic views with tips on landscape photography.
Creating great portrait photography.
Take a step closer to perfect portraits with tips and advice from professional photographers.

How to become a professional illustrator.
Get tips on portfolio creation and art presentation to help you kick off a new career.

Exploring watercolour techniques.
Capture the flowing brush strokes and rich texture of watercolours with these tips.
Get Photoshop
Image editing and compositing.
7 days free, then NZ$ 44.51/mo incl. GST.