How to draw a skull step by step.
Follow along with this drawing tutorial to depict a realistic skull at a three-quarter view. Then get tips on how to create well-proportioned skulls at other angles.

The human skull: We’ve all got one.
Skulls are the original memento mori and have been used as decor for thousands of years. However, it can be difficult to illustrate them well without some research. Learn about the basic anatomy of the human head by starting with a reference photo and an outline. Once you have the proportions down, you can decide how cartoonish or natural you want your skull to look. Develop your own style and then take on any type of skull — tough-looking skull and crossbones, spooky Halloween decorations, colourful sugar skulls for Day of the Dead and more.
The skull’s perfect combination of simple and complex geometric shapes can teach useful lessons about illustration and the human form. With practice, you’ll understand how each shape and line relates to the next. “One of my favourite things about skulls is you get to see how everything flows into one another,” says illustrator Lucas Elliott. “You have the eye sockets, then the ridge where the eyebrows rest and then you have your temple, which curtsies right into the cheekbones.”
Step-by-step instructions to draw a skull.
Follow these steps to draw a three-quarter view of a realistic skull.
Images by Ben House
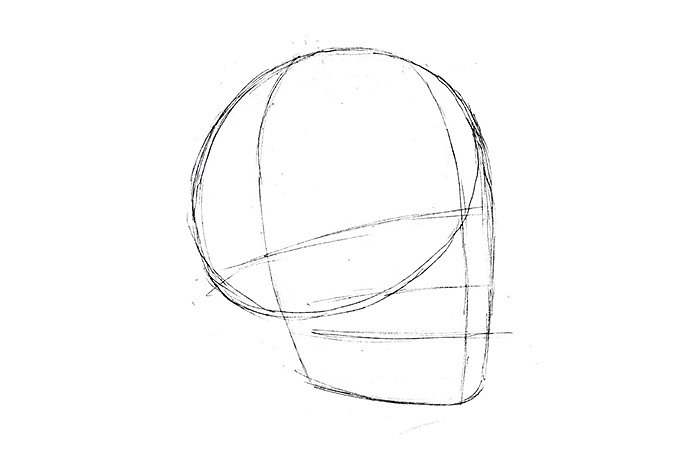
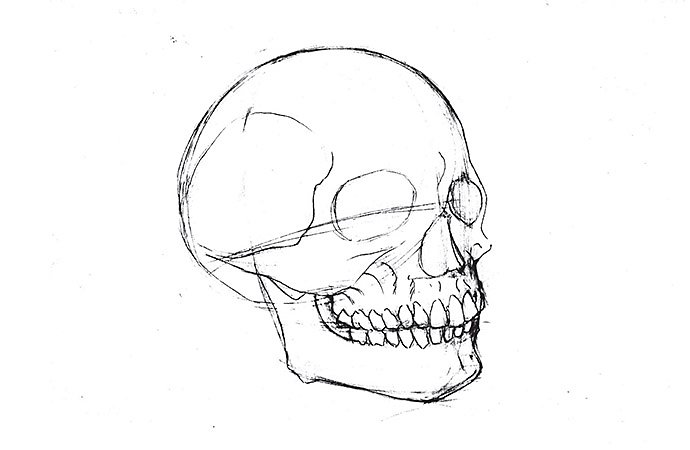
Step 1: Start with the basic shapes and lines.
Draw a wide oval to represent the top portion of the skull. Then add lines that show where the jawbones come down to form the bottom of the skull. Add a vertical line down the centre of the face, where the nasal cavity is. Keep in mind, this will not fall in the centre of your drawing since the skull faces toward the side. Add horizontal lines to indicate the centre of the eyeline, the bottom of the nasal cavity and the centre of the mouth. “Reference lines are like leaving yourself a map,” explains illustrator Ben House. “If you’ve left yourself a roadmap, you don’t have to keep looking at your reference photos and you can have some fun.”
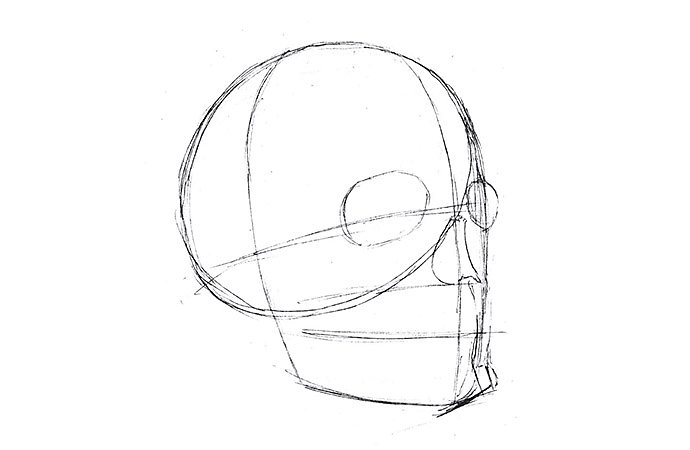
Step 2: Draw your eye sockets and nasal cavity.
Draw in your eye sockets and the cavern where the nose would be. “The nice thing with the skull is that the nose just gets to be a big hole in the face,” says House. The bottom of the nasal cavity should hit right where the round upper half of the skull meets the lower portion. Use your lines as a guide to place your eye holes both vertically and horizontally. The vertical centre line of the face will be important for this step. “Without a centre line, things can end up off-kilter,” says House.
Images by Ben House
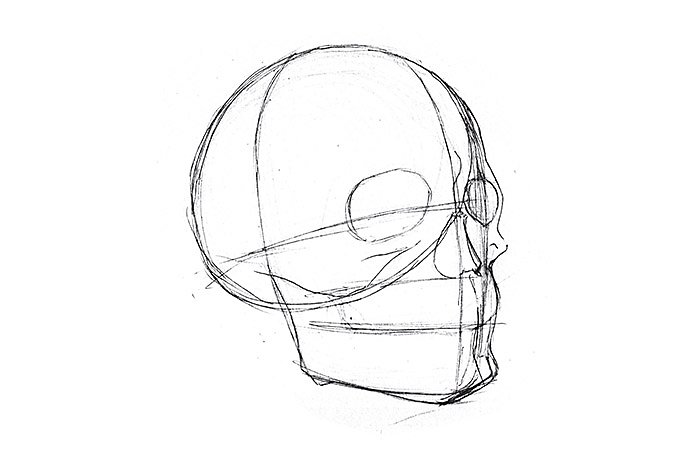
Step 3: Define the cheekbones and jawline.
Add more defined lines to the outer shape of the skull. The three-quarter view will highlight the contours of the temple, cheek and jaw on the side of the skull that is partially obscured from view. Curves should jut out of the skull at the temple, cheekbone, upper jaw where the teeth are and the bottom of the lower jaw or chin. “You’re going to find that you draw these lines a few times before you get them right,” says House.
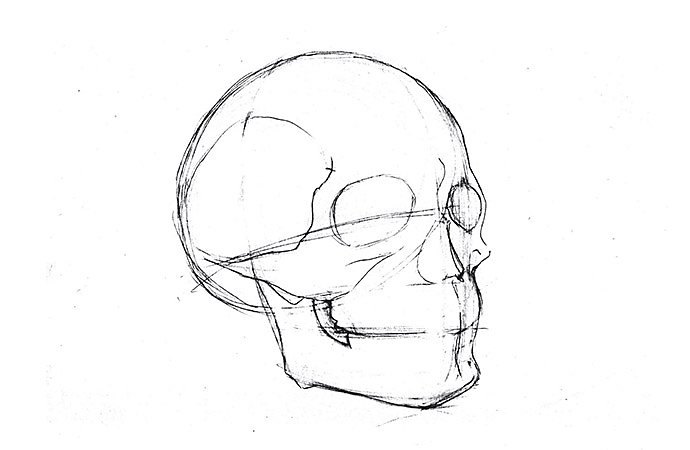
Step 4: Add more detail to the top of the skull.
Add some more contour lines to the upper part of the skull. On a human skull, the temple line next to the eye socket curves around toward the back to outline an indented area on the side of the head. This should resemble a large, backward and imperfectly shaped C. New curved lines can also be added to show where the right cheekbone is distinguished from the upper jaw and where the upper browline curves outward from between the eyes.
Images by Ben House
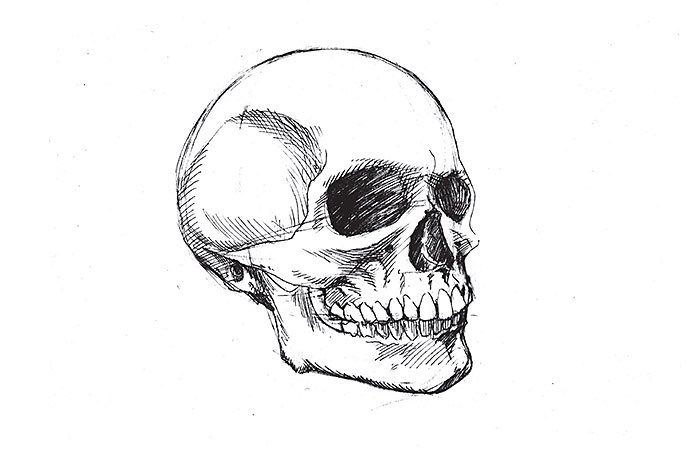
Step 5: Outline the teeth.
Draw in teeth and your skull will start to look eerily real. A reference photo can help, especially for the upper teeth, since most of us don’t usually draw the top part of teeth. If there’s an overbite, the tops of the lower teeth may be hidden. Remember to centre your teeth with the same line of symmetry as when you placed the nose and eyes. Start with the front two teeth and build out from there. Imperfections and inconsistencies in shape will help here. “Teeth are not all uniform,” says House. “If you make them that way, it’ll look weird.”
Step 6: Add shading and final touches.
With the teeth in place, it’s time to add shading and more definition to your most important lines. The darkest areas on your skull should be the caves of the eye and nose, followed by the empty space underneath the cheekbones, where the jaws connect to the upper part of the skull. “Shading is where everything just pops to life,” says House. “You can get as detailed as you want.”
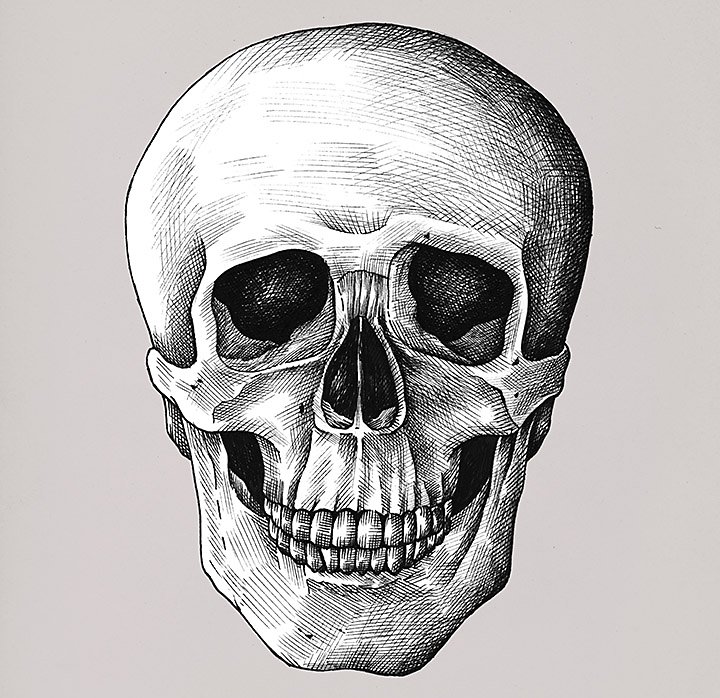
Draw skulls from different angles.
Practice drawing skulls from other views, like a true front view or side view, to get fully acquainted with the anatomy. When drawing a full profile of a skull, it can be important to remember that the spine doesn’t end at the bottom of the jaw; it goes up to the bottom of the back of the skull. “Everything connects to that little spot at the base of the skull,” says Elliott. “If you run your finger up the back of your neck, you can feel where it all connects.”
Use reference photos to practice.
A photo can be extra helpful when drawing from a new angle. “I can draw a skull out of my head and do a pretty decent one. But I use reference photos as much as possible,” says House. Try finding reference photos in unique places, like old anatomy books. “I have a whole room in my basement that is nothing but magazines,” he says. “Especially these days, if you’re just going through Google images, you’re using the same reference photos that everybody else is.”
Drawing skulls digitally.
A digital drawing app like Adobe Fresco can make it easy to practice sketching hundreds of skulls without wearing down your rubber. Get to know Adobe Fresco to learn how to start your first drawing and add things like reference photos or guideline sketches as layers to trace over.
Try comic book style illustration.
Follow along with this tutorial to create a comic book style portrait. Then use those techniques to experiment with a colourful, comic-style skull drawing.
Skulls can be a challenge to illustrate, but don’t let that scare you. Once you’ve built a talent for them, they can be a fun feature in everything from classic still life art to colourful pop art and graphics for albums, band posters or seasonal events. Try your hand at sketching skulls today.
Contributors
You might also be interested in…

Take your skills to the next level with drawing exercises and advice from professional illustrators.
Honing your ability to draw faces and heads.
Get tips for drawing better facial features, from realistic portraits to cartoons.

How to draw a wolf.
Capture the wild spirit of the wolf with these drawing tips.

How to draw an eyes.
Simple tips for crafting realistic eyes can help you to get better at drawing this emotive feature.