How to draw an ear step by step.
While ears are some of the most intricate human features, they don’t have to be difficult to draw. Here’s how to make an ear drawing in five simple steps.
Lend an ear for some pre-drawing tips.
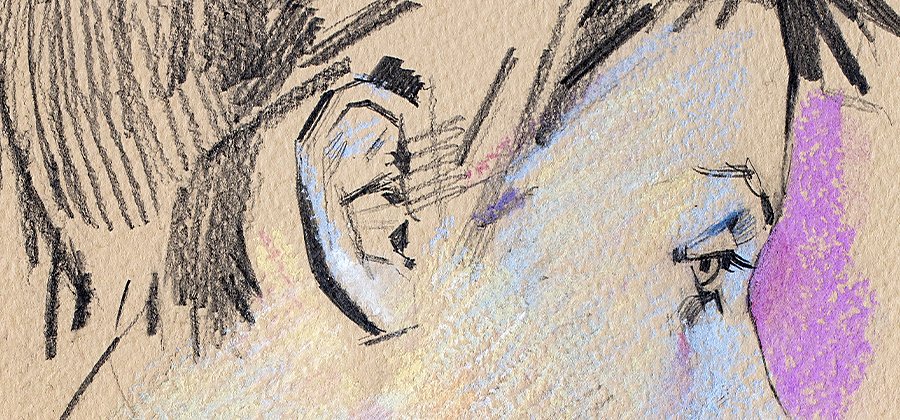
Nothing stretches your drawing skills like the human ear. So before you put pen to paper, there are a few things you should remember. “One of the most important functions of the ear is how it helps the artist understand the orientation and direction of the head,” says sketch artist Jonathan Dockery. How you position the ears will help your viewer understand the position of the head and other facial features. Keep this in mind if you plan to draw your ear as part of a whole face or figure.

Next, grab a reference photo. “A lot of artists feel like they’re cheating if they use a reference, but I use one all the time,” says illustrator Guy Wolek. “The ears are part of a person’s character too. You can’t just have a generic ear.” Ears are very distinct from one person to the next. Spend some time thinking about how the shape of the ear reflects your character or pick a reference image that reflects these features.
Five steps to an exceptional ear.
Follow along as expert artists guide you through the steps of sketching and shading an ear.
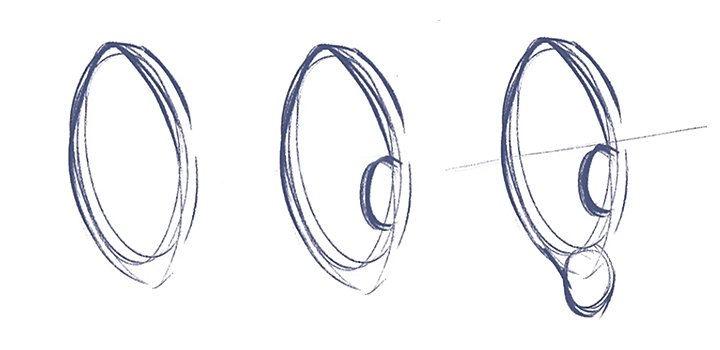
Image by Guy Wolek
1. Create the basic outline.
Sketch a curve like a C that follows the outer rim, from the top of the ear to where it curls in at the ear lobe. Keep it simple and don’t worry if you don’t get the perfect curved line right away. “Everything is based on a shape,” says Wolek. “When I draw an ear, I think of it as a small, flat bowl. And in the middle it looks like you took that bowl and just dropped an egg in it.”
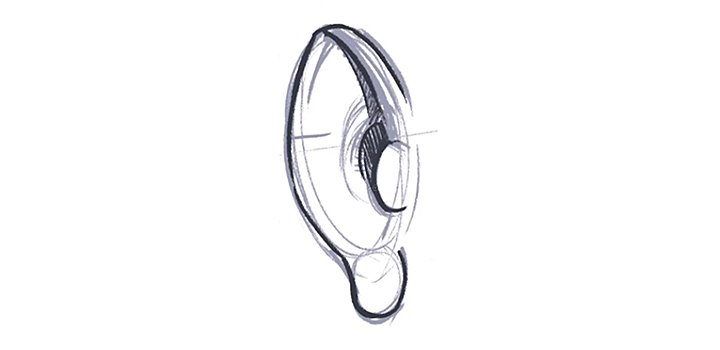
Image by Guy Wolek
2. Draw the helix.
To create the helix, the raised outer rim of the ear, follow the outline you just created by drawing a smaller curve that fits inside this outer line. For some, the helix stops about halfway down the ear; for others you’ll want to extend the line almost to the lobe. The ear should have a somewhat rolled or tubelike appearance now.
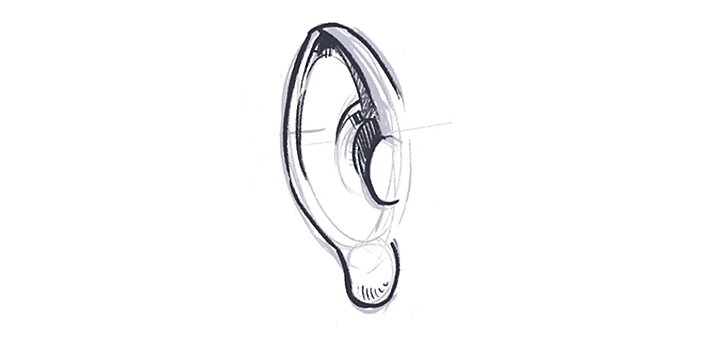
Image by Guy Wolek
3. Add the antihelix.
The antihelix is the cartilage formation closer to the center of the ear. It is often the most prominent bump inside the ear. While this part of the ear looks different from person to person, Dockery advises drawing a Y shape inside the helix to create the dimensional appearance of the antihelix. The outer edge of the Y should loop down and create the inner hole of the ear, called the concha.

Image by Guy Wolek
4. Sketch the tragus and antitragus.
The tragus is the small cartilage bump on the side of the ear attached to the head. The antitragus also looks like a small bump of cartilage, but it resides on the opposite side of the ear, just above the lobe. Draw these two features to complete the major shape and features of the ear.

Image by Guy Wolek
5. Fill in the shading.
Now that you have the general form of the ear in place, shade it to give it dimension. This is an important part of bringing a realistic ear to life. “Always think about where the light is,” says Wolek. This will help you determine where to shade and how much. “The helix and antihelix are cylindrical in shape,” adds Dockery. “You’re going to see light and shadow affect these areas just like a cylinder would be.”
The deepest shading will be in the ear canal, the concha. But Wolek recommends shading this part to only 60 to 70% of the true darkness. If you’re drawing a face, a dark canal can overpower and pull attention from the eye, which should be the focal point of the human face.

Practice makes perfect.
As with any subject, repetition is key if you want to get comfortable drawing ears. “Have a good reference to look at, simplify it, and do it a few times over until you find the simplest shape for that ear,” says Wolek. Draw from different angles to better understand the anatomy of an ear. Experiment with side view and front view references to get more comfortable with perspective and foreshortening. With time you’ll find that it’s not as daunting as it looks.
While this drawing tutorial is a good universal guide, keep in mind that every ear is different, and you’ll have to vary your technique to suit each unique shape. So whether you make sketchbook pencil drawings or manga-style inked illustrations, drawing apps like Adobe Freso can support sketching styles of all kinds, from first stroke to finishing touch.
Contributor
You might also be interested in…

Take your skills to the next level with drawing exercises and advice from professional illustrators.

Get tips on how to draw this challenging bit of human anatomy.

How to draw a nose.
Get tips from the pros on drawing a basic nose.

Honing your ability to draw faces and heads.
Get tips for drawing better facial features, from realistic portraits to cartoons.