Create scroll-stopping social media graphics.
Create bold, eye-catching images for your social media promotional posts with our easy-to-follow Photoshop guide and templates.
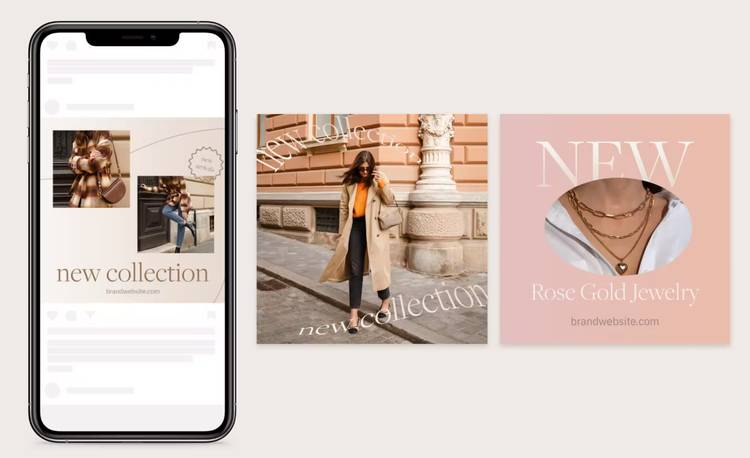
Stop audiences in their tracks with great social media graphics.
Getting real attention from potential customers on social media is a real art. Interruptions, demanding schedules, and decreased attention spans mean you’ve got just an instant to create a compelling impression when someone is scrolling through their social media feed.
Bold, eye-catching visuals are the most immediate way to create impact in a fast-paced media environment — and they’re simple to design with the right approach. Use the step-by-step instructions in this tutorial and the templates below to create a beautiful post in minutes.
Creating on the go? Design your project on the web with Adobe Express.
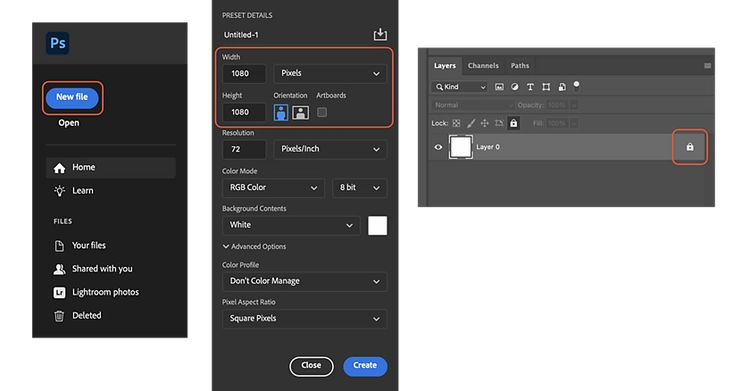
Open a new file to get started.
Photoshop has a couple of ways to create a new document.
- Click the Create New button on the left side of the page, or
- Select File at the top of the page, then New > Document
Choose your presets.
Your new document will prompt you to select some parameters. Most social media feeds today work well with square (1:1 aspect ratio) images. Let’s use an Instagram post as an example — post size will be 1080 x 1080px. Select a resolution of 72 pixels per inch, then click on the blue Create button at the bottom of the window. A higher resolution (150 or 300 pixels per inch) is fine as long as you make sure your canvas is a square 1:1 ratio. You can do this by selecting 1:1 (Square) from the drop-down menu on the top left of your screen. Click the small checkbox at the top of your screen to set your canvas size.
Next, unlock your background. If you don’t see the layers panel, go to the menu at the top of your screen and choose Window > Layers in the drop-down menu. Once you have the Layers panel open, click the lock icon to open up the background layer.
You’ve covered the basics and are now ready to start. Choose a file name and save it as a .PSD file so you can have full editing capabilities later.
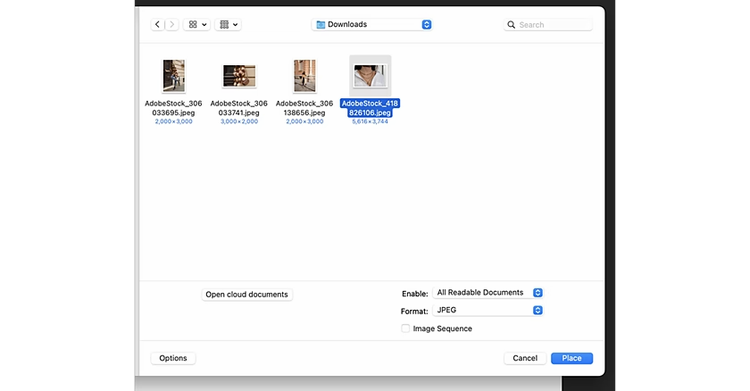
Pull in a bold image.
Choose which image you’d like to feature in your post, whether it’s a photo, an illustration, a product shot, or a bold background pattern or texture. (Not sure what image to use? Find a great graphic for your campaign on Adobe Stock). In the menu at the top of your screen select File
Open, then select your image from your computer. Once you’ve grabbed the right file, select Open at the bottom of the window to add your image onto your canvas.
Need help resizing your image to fit your post dimensions? Watch this video.
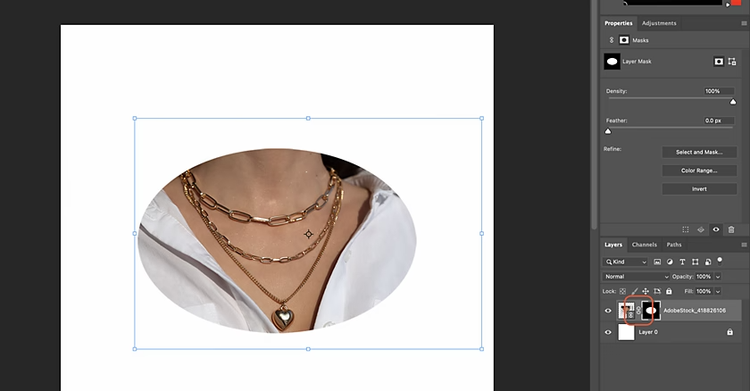
Mask the image.
Put a circular marquee around your image for emphasis.
- Right-click the Rectangular Marquee tool to select the Elliptical Marquee from the drop-down menu.
- Drag your cursor to make an oval over the image.
- In the Layers panel, click Add Vector Mask to mask the image to your shape.
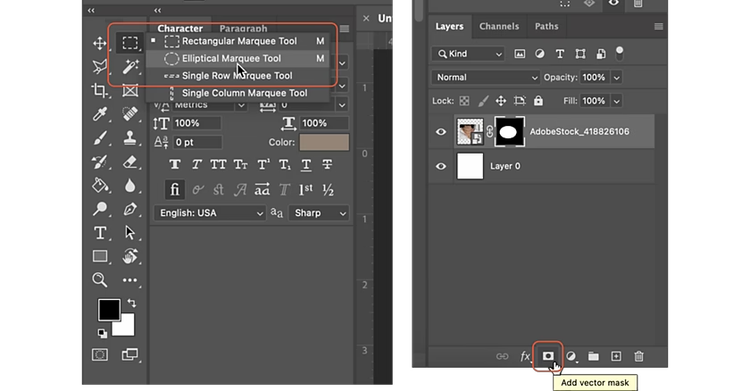
To adjust the position of your image, click on the image in the Layers panel. To adjust the mask, click on the mask in the Layers panel. By unlinking the two, you can adjust the mask only or image only.
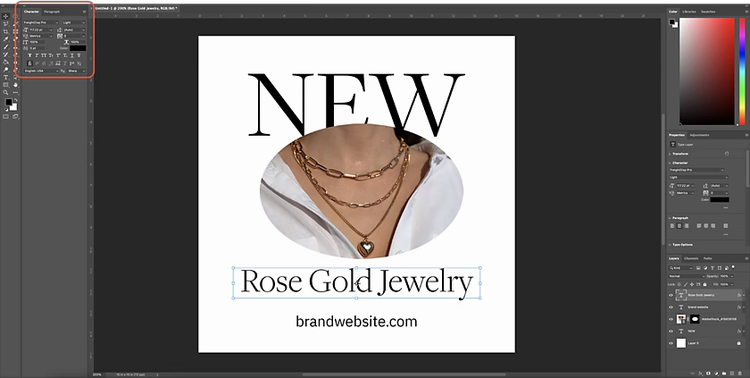
Add compelling copy.
To add copy to your post, click the Text icon in the left toolbar and select your font style and size at the top of the screen. Type your text, then drag your text box into the rectangle. If you’ve chosen dark fill colors, try white or light text to keep contrast high.
Experiment with complementary text to increase emphasis. For example, if you use a bold vintage serif font for your title or headline, try a more subdued sans-serif font for the rest of your text.
Try adding promotional details like discounts or event times directly on your image with high-contrast font colors.
Polish and perfect it.
Try different graphics, shapes, and fonts, and experiment with a range of layouts until you’ve got a striking graphic you want to share with your followers.
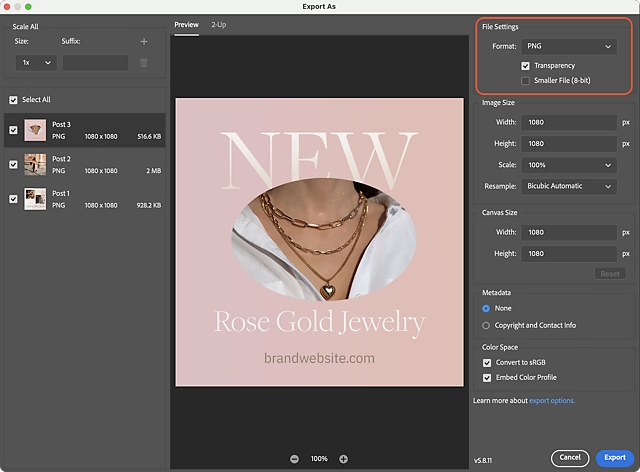
Export your final post graphics by choosing File > Export > Export As. In the Format window, choose PNG, JPEG, or GIF depending on your project needs and social platform requirements. This will save a copy of your design without overwriting your original file. Make sure to also save your .PSD file so you can go back and make edits to it later. Now you’re ready to share your creation online and dazzle your fans.
Get the support you need to succeed with Creative Cloud Pro for teams.
Need additional help getting your next creative project off the ground? Visit the Adobe Help Center for additional how-tos and documentation, or check out an upcoming Adobe Live session.
Explore related how-tos

How-to
Edit images for use in marketing campaigns.
Quickly edit images for web or print marketing campaigns with this simple step-by-step Adobe Photoshop guide.

How-to
Symmetry in Photoshop: Learn the rules, then break them.
Learn the basics of visual language in Photoshop from Adobe designer Kathleen Martin.

How-to
Design compelling Facebook ads.
Cut through the noise of crowded inboxes with effective email newsletters that offer real value to your customers.

