Setting up a home recording studio.
When it comes to recording vocals and music at home, creating great audio starts by making a space for it.
Setting up a home studio for podcasting or music production.
A good recording studio can prevent audio problems before they begin. “There’s this notorious saying in music, ‘Fix it in the mix,’” says sound engineer and music producer Gus Berry. “That’s such a bad mentality. Your issue will only get worse as you go along.” Instead of fixing problems like poor tones or ambient noise later, prevent them from happening with a well-constructed home studio.
Choosing a room for a home studio.
The first thing to look at when determining where to build a home recording studio is the shape of the room. Steer clear of flat surfaces and parallel walls that reflect sound. “A square box is not ideal,” says Berry. These types of rooms will give you more problems to fix in post, and the goal is to avoid that. A larger room that isn’t square or rectangular is a good place to start.
Noise pollution is another consideration in home studio location. Look for a room apart from the rest of your house. Ideally, it shouldn’t be close to noises from machinery like washers and dryers, traffic, or other residents.
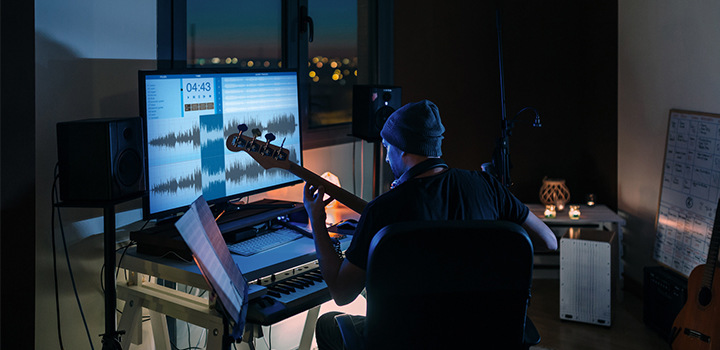
The room also has to work as a creative space. Producers spend a lot of time in their studio, either recording, collaborating, or on the DAW (digital audio workstation). Choosing a space that allows you to flourish as a creative professional is essential, so make sure to build out a studio you’d enjoy spending time in.
Home studios are often public-facing spaces. If you’re planning on bringing in podcast guests, musical collaborators, or clients, it should be an environment that projects the professional image you want to convey, even as it’s also optimized for technical considerations. With that in mind, approach creating a home studio with the same professionalism you’d put into creating a professional home office.
Acoustic treatments for home studios.
While limiting exterior noise like traffic, people, and planes is ideal, setting up a room for better sound doesn’t mean soundproofing it — a process that requires building another room within a room. It’s about optimizing the sound within your room. This process, called sound treatment, requires finding the most troublesome parts of your recording space and covering them with something that absorbs sound waves.
If you have a particularly large and reflective flat surface, like a concrete wall or linoleum floor, consider covering it with some kind of acoustic treatment. Hard corners can distort lower frequencies. Bass traps are large foam units that fit in corners and prevent low-end echoes and distortions.
You don’t have to cover every surface with soundproofing foam, though. Plenty of common household items can help dampen sound — the less empty a room is the more sound it can soak up. Carpets, blankets, and pillows all help to reduce echoes. Shelves full of books will produce less echo than a flat wall, and curtains can cut down on the vibrations coming from windows.
If you’re recording sounds coming out of mounted guitar amps or other speakers, the sound is going to consistently hit particular points on a wall. Finding those points might seem hard, but veteran audio producers find those points of reflection with what’s known as the “mirror trick.”
“If you’re looking at your speakers, have a friend get a mirror and hold it on the wall,” says Berry. “At your eye level, move the mirror along the wall until you see the speaker. That’s what’s called the “first reflection point,” meaning when the sound comes out of the speaker it’s going to hit that part of that wall right after it hits your ear and causes an echo.” You want to hear the sound originating from the speaker, not the reflection, so that first reflection point is where you want to place an absorptive panel to soak up the sound jumping off the wall.

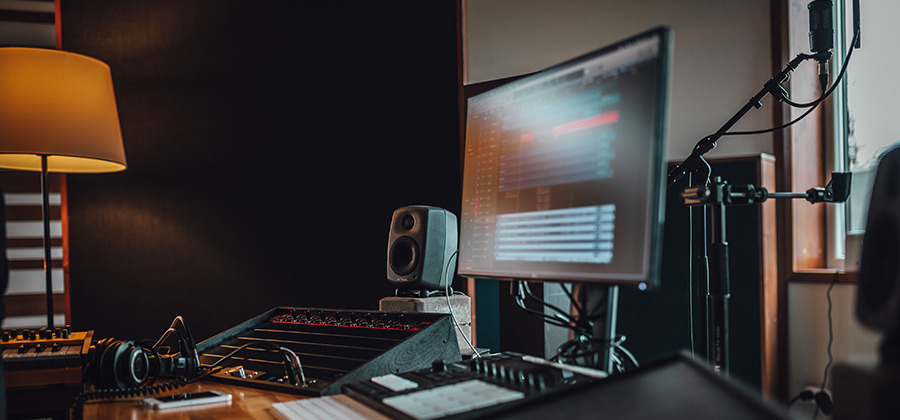
Placement and optimization of your audio equipment.
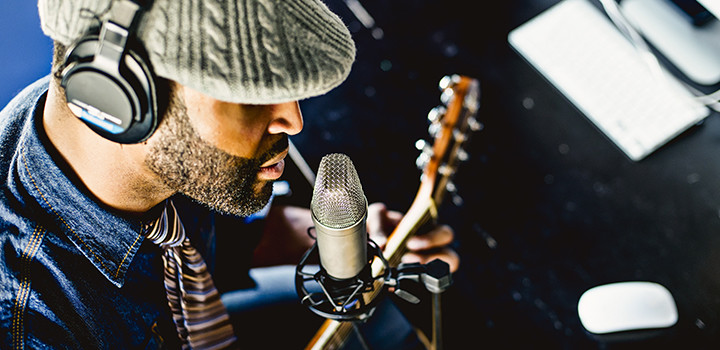
The most important equipment for home studios are high-quality microphones and preamplifiers. Investing in both will go a long way to improving the quality of a recording. “Get a decent mic and preamp that will have a low noise floor,” says Berry, referring to the noise that audio gear itself can make. This is especially true for USB mics, which can give a podcast a low hum that’s a dead giveaway for amateur production. You don’t want to optimize your studio and then have to put up with a buzz coming from inside your audio equipment.
Regardless of the microphones you use, you’ll need a pop filter to mitigate the sounds of breathing or the impact of plosives and sibilants. This is especially true when you record vocals. Hitting your listener in the ear with every “B” or “S” sound can take your audience out of the experience, especially if they’re wearing headphones or earbuds.
Amps and speakers, if you’re using them, should not go on top of desks or tables. “Decoupling your speaker from your desk is really important,” says Berry. “It will keep the bass frequencies from infiltrating the surface they’re on. If your speakers are on your desk, and you’re playing something with a lot of low end (bass), your desk is basically going to start resonating it.” If putting amps or speakers on top of a desk is unavoidable in your space, ISO pucks can help. These small, circular objects are designed to hold audio equipment and prevent frequencies from oozing into whatever’s below them.
Be sure not to overcrowd your studio. Even though empty space is often the enemy of good audio production, you still need enough room to optimally position your mic stands. Mic positioning will vary based on what you’re recording, but nothing sounds good with a microphone too close to it.
Unless you have a particular love for old technology, stick to digital audio. Even though old recording styles have a mystique, they are not cost-effective, nor are they what clients will expect. Converting from digital to analog can be an involved and costly process — analog recording tape costs more in the long run than even the best digital audio workstation. “Many people who long for the days of analog are nostalgic about something that they never had to deal with,” says producer and mixing engineer Peter Rodocker.
What’s important isn’t always the most high quality.
There’s no end to how elaborate a home studio can be, and no end to the equipment you can buy. There’s always another pair of studio headphones or better XLR cables. While equipment and optimization matter, they can easily become distractions. When creating a home studio, you don’t truly know what you need until you start recording.
“There’s a lot to be learned by listening.”
Podcast host and producer Jamie Jeffers put a lot of time into adding warmth and depth to his vocal recordings. But, this sometimes isn’t in the best interest of his podcast or his audience. “You can sound so warm you put people to sleep with your nice, soothing NPR voice,” he says. “You have to balance that with your audience being able to actually hear you, especially in the car where many people listen to podcasts.” When you sit down with your equipment and recording software, remember the listener. Consider how they’re listening and what experience they’ll want.
“There’s a lot to be learned by listening,” says Jeffers. “It’s helpful to have somebody who isn’t an audiophile do a final pass on what you’re recording. You can end up down this rabbit hole where it’s just never perfect — perfect becomes the enemy of good.”
A home studio is a way for you to connect with your audience. To help focus your mission, remember what you’re trying to create and keep the person on the other end of the headphones in mind when you set up a home recording studio.
Contributors
You might also be interested in…

Learn about the dynamic range of your camera and how to manipulate it to create the images you want.

Establishing shots are crucial because they tell us where, and often when, the action is happening.
Learn how this helpful device can help you capture great, stable footage.

See how this technique can help bring a stylized and evocative effect to your work.
Get Adobe Audition.
Create, mix, and design sound effects with the industry’s best digital audio editing software.
7 days free, then NIS 81.00/mo.