A simple fish drawing lesson.
Follow this step-by-step drawing tutorial to create everything from a cartoon fish to a watercolour tuna.
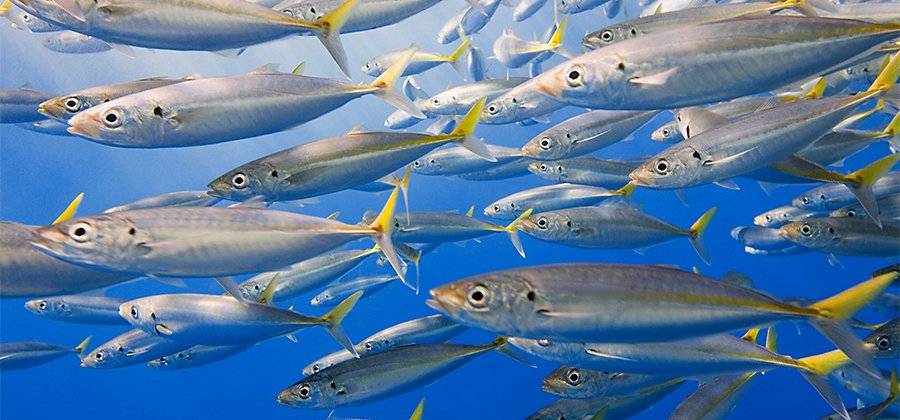
Dive into fishes drawing.
Fish and other ocean animals are among the most beautiful and strange creatures on the planet, which makes them great subjects for drawings. While the perceived simplicity of fishes can make them seem like subjects for an easy drawing, the differences between species of fishes make attention to detail essential. Before you begin your fish drawing, decide what kind of fishes you’d like to make. Is it cartilaginous (made of cartilage) like a shark, skate or ray or is it a bony fish like a koi or tuna? Bony fish have covered gills, while the gills on a cartilaginous fish are slitted. Bony fish also tend to have symmetrical tails, while the tails of cartilaginous fish have upper lobes larger than the lower lobes.
Once you know what species of fishes you want to draw, whether you want to draw a realistic fish or an animated one, gather a few reference images to help you to get the important details right.
Draw a simple fish.
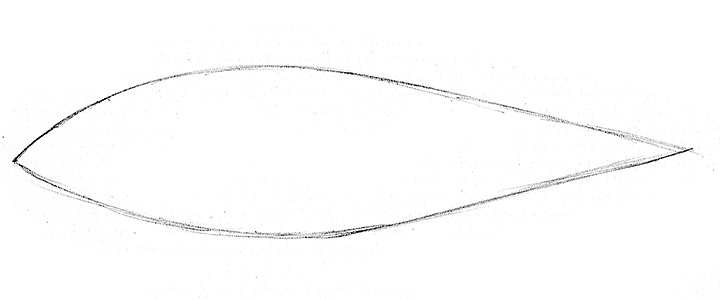
Image by Terryl Whitlatch
Start with shapes.
Begin with the simple step you would for any animal drawing: break down the fish’s body into basic shapes. If you’re drawing a tuna in profile, the overall body shape is a spindle or a teardrop laid on its side. One end should be wide for the face of the fish and the opposite end should come to a point for the tail. “Some fish, like sunfish or angel fish, will have wider spindles and eels will have really thin and long spindles,” notes artist Terryl Whitlatch.
If you’re drawing a shorter fish like the Moorish idol — made famous by the character Gill in Finding Nemo — artist Alex Braun recommends starting with a circle to capture the main shape of the body. Then draw a small oval outside the circle for the mouth.
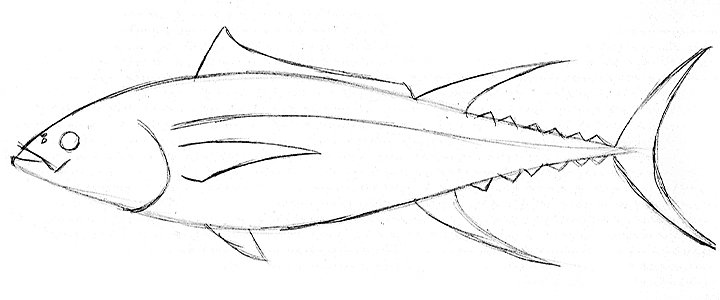
Image by Terryl Whitlatch
Add basic features.
Add the eye, nostril openings and mouth. Note that bony fish tend to have lower jaws that jut out past the upper jaws, the opposite of sharks. For a tuna in profile, add a vertical curve to represent the gill cover and a lateral line from head to tail. This line represents the swim bladder, which helps the fish orient itself and maintain depth in the water.
Use your reference photos to help you to add fins. On a tuna, the pectoral fins directly behind the gill covers are like the arms. Draw the ventral fin on the chest area right below the pectoral fin and the long, spiny first dorsal fin on the top of the tuna. Then draw the second dorsal fin, which looks like the top half of a boomerang. Then add the bottom half of that boomerang, the anal fin, on the underside.
Tuna also have a ridge of small triangular fins that go from those dorsal fins to the tail, so make sure that you draw those. Finally, draw the tail, which is shaped like a crescent moon with symmetrical lobes.
If you’re sketching a tropical fish like the Moorish idol, you have fewer features to worry about. To build on the basic circular shape of the idol’s body, Braun suggests adding some loose, rounded triangles to the top and bottom, adding two triangles for the tail and, of course, a small oval for the eye.
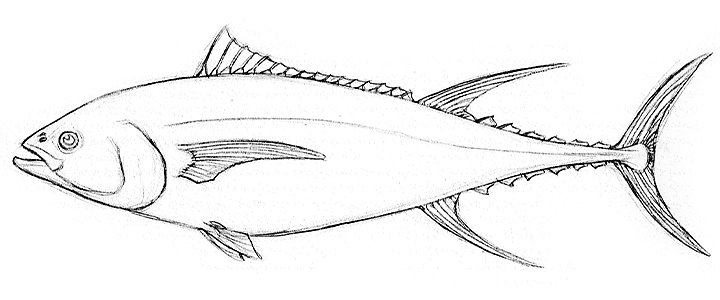
Image by Terryl Whitlatch
Add details.
If you’re drawing digitally, you can create a new layer and refine the lines of your fish as you fill in more details. For example, Whitlatch adjusted the top of the tuna’s head above the eye. “I added the spines to that front part of the dorsal fin. Those are very sharp spines and the fish can raise and lower the dorsal fin using those spines,” Whitlatch says.
For her tuna, Whitlatch added more soft lines to give texture to the other fins and detail to the triangular spines. She also adjusted the fish’s mouth by adding detail to the lips and drawing another curved line to represent the cheek. For his Moorish idol, Braun extended the dorsal fin triangle to a long point trailing behind the fish. To represent the delicate, transparent fins, Braun lowered the opacity of his brush to around 40 or 50% to achieve that look.
If you want to capture the individual scales of a fish, study your reference images. You’ll find that fish scales vary in size, shape and colour. Remember that they overlap and follow the contours of the fish’s body, with scales near the head larger than those near the tail.

Image by Terryl Whitlatch
Add colour.
The brightest goldfish and the muddiest catfish can come to life with a bit of colour. Whitlatch added a bright yellow along the lateral line of the tuna, a blue-grey along the top of the fish’s body and a yellow-orange for the fins. For his Moorish idol, Braun lowered the opacity of the base sketch and filled the body in with yellow paint. Then he placed a layer mask on top of the yellow base and used a soft navy to draw the fish’s stripes. The mask keeps the navy colour inside the outline of the fish. Braun then created another layer to add a light yellow colour to give the body more shape underneath the stripes.
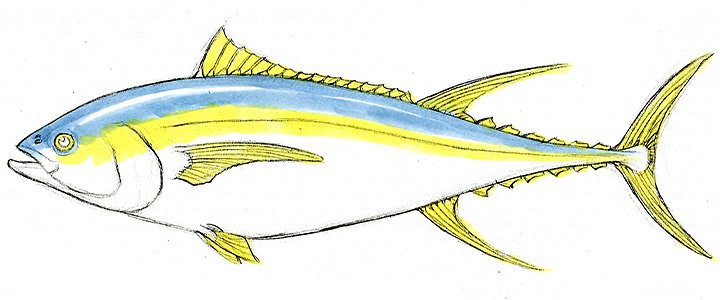
Image by Terryl Whitlatch
Add highlights and shadow.
Make your fish stand out with highlights. Whitlatch leaves a thin white stripe unpainted along the top of the tuna’s body, which suggests reflected light. For his Moorish idol highlights, Braun added turquoise around the edge of the tail and around the belly.
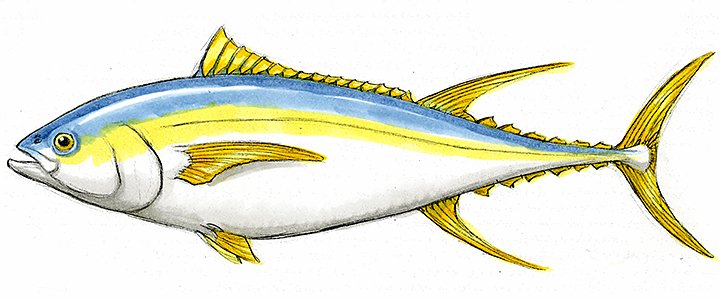
Image by Terryl Whitlatch
Shadows can go a long way to giving a fish the appearance of three-dimensionality. Whitlatch’s tuna gains more heft with shading along the bottom of its body and under its pectoral fins. For his shadows, Braun created a new layer and set the blending mode to Multiply. This causes new paint to blend with the paint already on your canvas. Reducing the opacity of his brush to around a 50 or 60%, Braun brushed some shading on the side of the fish opposite the direction of the light, as well as under the fins.
Draw and paint in Adobe Fresco.
With Adobe Fresco, you can create a whole sea of fishes. Explore live brushes that behave like real oil paints or watercolours. Check out this short tutorial on painting watercolour jellyfish and other sea animals and pick up tips for using live brushes and creatively erasing.
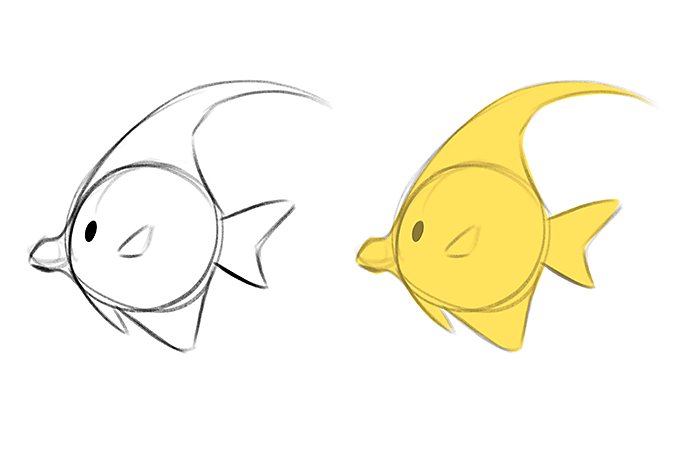

Image by Alex Braun
Contributors
You might also be interested in…

Take your skills to the next level with drawing exercises and advice from professional illustrators.

Exploring watercolour techniques.
Capture the flowing brush strokes and rich texture of watercolours with these tips.
Explore the art of sequential storytelling and learn how to hone your skills to work in this exciting medium.
How to become a professional illustrator.
Get tips on portfolio creation and art presentation to help you kick off a new career.