Brighten underexposed photos to bring out their details.
See how to use your photo editor as an image brightener to make manual tweaks or advanced auto adjustments.

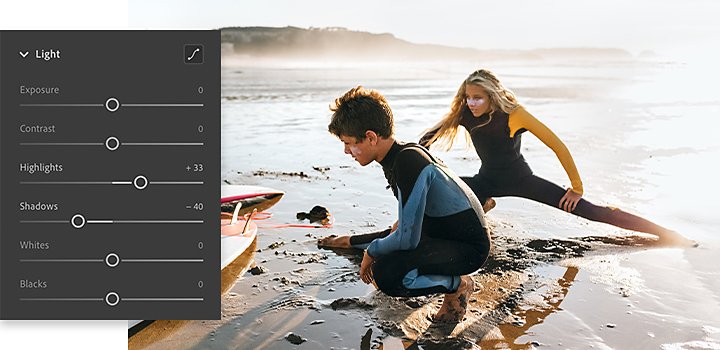
Adjust the light in your images with Adobe Photoshop Lightroom.
Brightening digital photos is easy with the editing tools in Adobe Lightroom. There are four main ways to turn up the brightness in underexposed images — from simple one-click adjustments to more nuanced custom edits. You can increase exposure to bring more light into your entire image, adjust shadows and highlights individually and fine-tune the black and white tones to add a professional pop to your photos. Or hit the Auto button powered by Adobe Sensei — Adobe’s AI technology — and let Lightroom automatically improve the tones, contrast and even remove unwanted lens distortion all with one click.
A few different ways to brighten your photos.
You can manually adjust the light in photos using the sliders for Exposure, Highlights and Shadows and Blacks and Whites. Or you can use the Auto button, then customise each setting from there.
Adjust Exposure to affect the overall brightness.
The Exposure slider in the Light panel is the master slider when it comes to the light and tonal data in your image. Slide it to the right to let more light into your entire photo, slide it to the left to darken it.
Individually edit Highlights and Shadows.
The Highlights and Shadows sliders allow you to brighten or dim the lighter parts or darker parts of an image separately. For example, bring the shadows up to show the detail in a black cat’s fur without losing the detail in its light-coloured eyes. Or, bring the highlights down to reveal the detail in a bride’s white dress without losing the detail in a groom’s black tuxedo.
Fine-tune the black and white tones in your image.
As the finishing touch, use the Blacks and Whites sliders to increase or decrease the tones in your image that approach pure white or pure black. For example, if you have a photo of a sky dappled with white clouds, you may want to increase the exposure for overall brightening, yet reduce the Whites slider to show more detail in the clouds.
Use the Auto button for instant enhancement.
At the top of the Edit panel, click Auto to have Lightroom automatically apply the best edits using Adobe’s innovative image intelligence. Auto will adjust several slider controls from the Light panel at once: Exposure, Contrast, Highlights, Shadows, Whites, Blacks, Saturation and Vibrance. It will also apply automatic lens correction to remove unwanted distortion.
How to use Lightroom’s Auto function as an image brightener.
Upload your image to Lightroom.
Open the Edit options by clicking the sliders icon in the upper-right corner.
Click Auto to automatically enhance your photo.
If needed, go through the individual sliders in the Light panel to further adjust Exposure, Contrast, Highlights, Shadows, Whites, Blacks, Saturation, Vibrance and more.
Save your edits or even create a customised preset to apply to other photos.
See brightening tips in action with these photo editing tutorials.
Follow along as professional photo editors show you how they use the powerful tools in Lightroom to make photos more dynamic and visually striking.
Take a quick tour of Lightroom’s brightening tools.
Watch how to quickly adjust the brightness of your photos using every tool in the Light panel.
Edit photos like a pro on Lightroom for mobile.
Get insider tips on using the Light and Colour panels as well as making other touch-ups on mobile.
Using a free online tool to brighten your photos may be tempting, but Lightroom’s advanced machine learning provides easily customisable settings for perfecting the light in any image. Plus, find countless tutorials right within the app, so you can learn new skills while you edit.
Do more with Adobe Photoshop Lightroom.
Edit photos easily with Lightroom presets, Super Resolution, easily share photos from any device and access your projects anywhere with cloud photo storage management.
You might also be interested in…

How to enhance photos.
Balance the contrast, shadow, temperature and clarity of your photos with these photo enhancing techniques.
What is ISO?
Discover the role this pillar of the exposure triangle plays in photography.

Adjusting white balance settings to improve photos.
Understand white balance and how to enhance the look of images using colour balance tips.
Night Photography.
Low light doesn’t have to equal low quality with these tips for successful nighttime photos.
Get Photoshop Lightroom.
Edit, organise, store and share photos from anywhere.
7 days free, then US$11,49/mo.