Registry
The Registry feature allows you to leverage existing installs and simplify new ones by simultaneously displaying the registry from the host machine (called the “source”) next to the registry provided by the installer (called the “target”). This feature allows you to copy existing installation settings directly into the new installer. Where installations are highly customized, the Registry feature can save time, prevent errors, and assure consistency across installations. The following is supported:
Dragging and dropping individual keys from the source computer to the target computer.
Dragging and dropping entire cabs (directories).
Adding, modifying, and deleting any key or cab.
Viewing a summary of changes prior to deployment.
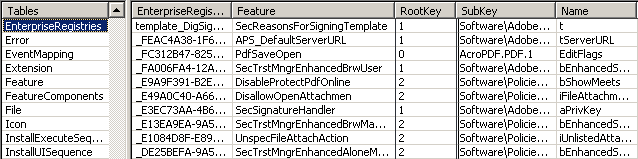
Any changes you make are recorded in the EnterpriseRegistries table. The table contains an Action field with the following possible field:
0: Skip record, do nothing
1: Add file or registry value to the end-user machine
2: Backup original file and add new file to end-user machine. The backup file has extension “aiwbf”
3: Restore backup file
4: Remove file or registry value from the end-user machine
All controls are initially displayed with the Adobe default values and the corresponding table records show the Action field with a value of 0 (if the record exists by default). Modifications update the Action field with the requisite value or add a new record if required.
The RootKey field of the EnterpriseRegistries table specifies the OS Registry Root as follows:
-1: HKCU if per-user installation; HKEY_LOCAL_MACHINE if per-machine installation (Acrobat products supports per-machine installation only)
0: HKEY_CLASSES_ROOT
1: HKCU
2: HKEY_LOCAL_MACHINE
3: HKEY_USERS
Installer table modifications: Enterprise Registry
Registry workflow overview
While the Wizard’s user interface provides a visual way to configure the registry, it does have limitations. It only provides basic configuration options, its UI is not identical to the product UI, and using the Wizard’s UI to set preferences will result in overwriting existing registry settings that you might drag and drop from your template application.
For these reasons, power users familiar with the product’s advanced features may want to configure an installed product via its UI and then leverage that configuration via the Wizard to customize the installer prior to deployment.
To do so:
Install the new application (or use an already configured existing installation).
Configure the application via its user interface. In particular, go through the menus under Edit > Preferences.
Lock down features so that settings can not be changed by end users.
Use the Wizard to drag and drop the configured template registry to the installer. You can copy individual keys or entire cabs (directories) of keys. Please note that there are differences in
View the Summary tab to inspect a list of your changes.
Use the Wizard to configure application preferences that are not already configured manually.
Registry modifications: drag and drop
Add keys
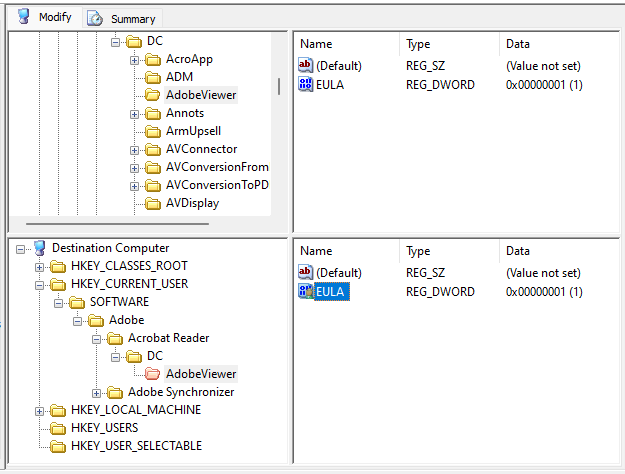
Copy an existing registry
The main work area contains four panes. The upper-left pane contains the directory tree containing the registry keys on the source computer. The lower-left pane contains the directory tree for the registry hives to be installed by the installer on the destination system.
Choose the Modify tab.
Navigate to a directory in the upper-left pane to view its contents in the upper-right pane.
Verify you can see the keys you want to add in the upper-right pane.
Select one or more keys from the source directory, and drag them to the destination directory.
Add new registry keys
To add a new registry key to the destination directory:
Choose the Modify tab.
Select a location in the requisite registry hive in the lower left-hand panel.
Optional: If you’re creating a new folder, right-click and choose New and enter a name.
The added items will appear as red icons and will be itemized in the Summary tab.
Highlight the hive in which you will add the new key.
In the right pane, right-click and choose New > <data type> Value.
Create a value with the required name.
Right-click on the new value.
Choose Modify.
Set Value Data as required.
Choose OK.
To see a list of changes that you have made, click the Summary tab.
Modify existing preferences
The Wizard provides a context menu that’s identical to the Window’s registry. To modify a new or existing registry key:
Right-click the key name.
In the context menu, select Rename, Delete, or Modify.
Make your modifications.
Choose OK.
Note
To see a list of changes that you have made, click the Summary tab.
Summary of registry changes
The Summary tab contains a list of registry keys you have added, modified, or removed from the destination directory.
Choose the Summary tab. Your list of registry changes appears.
Optional: To change a key, right-click the key, and select Modify. In the Modify record dialog box, you can rename keys and add or remove them from the installation list.
More preference information
While some registry details appear in this guide, see the Preference Reference for complete details.