Refresh old photos by removing texture.
Discover how Adobe Photoshop can help improve the quality of older pictures during the photo restoration process with these editing techniques.
Smooth it out.
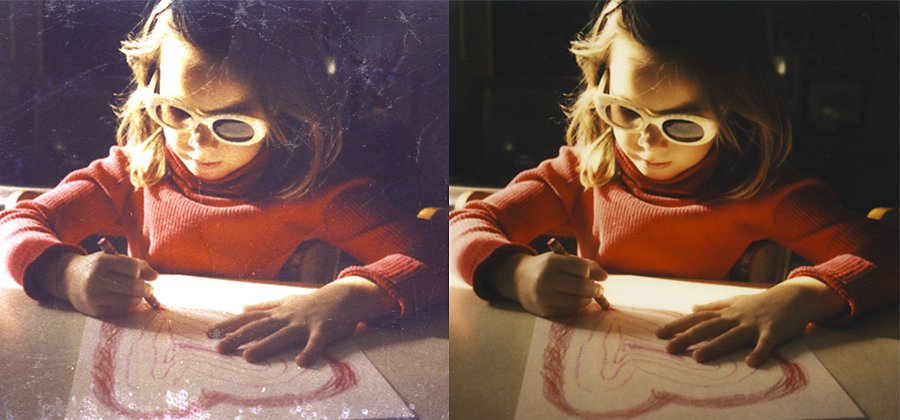
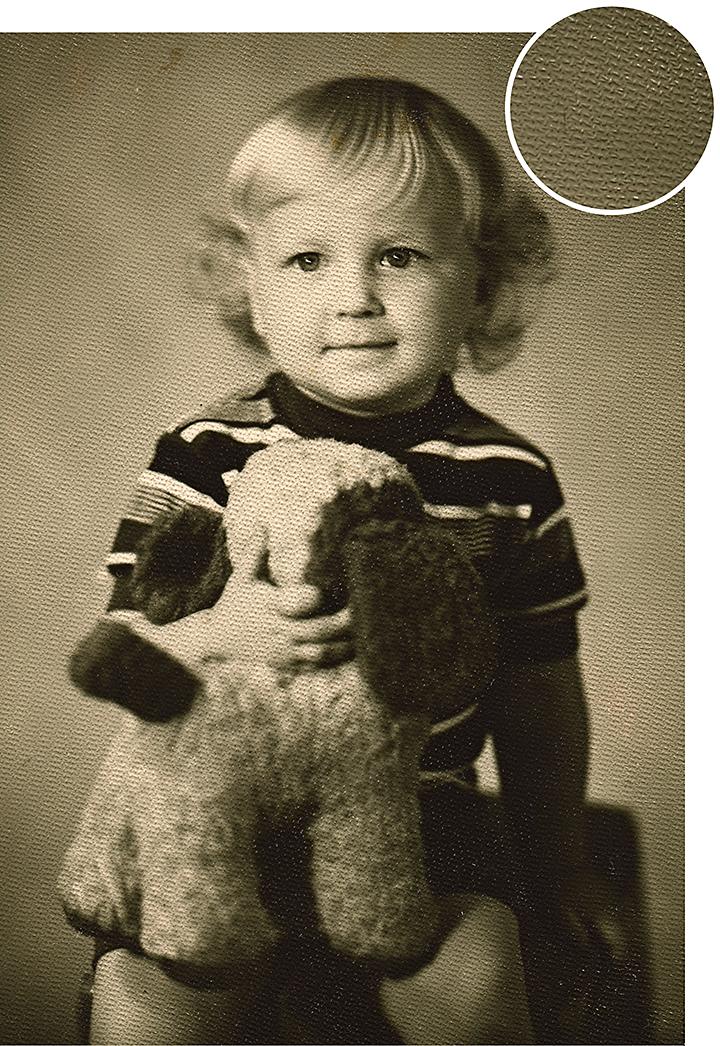
If you’ve ever scanned old black-and-white photos, you’ve seen the honeycomb pattern that often shows up on images. This paper texture appears because of the silk finish on old photos. While some editing methods — like the Despeckle filter and the Gaussian Blur blend modes — can smooth out the image, it can come at the cost of obscuring details. But with the right editing tools, you can quickly remove textures from older images while keeping more of the image intact.
Bring your photo collection into the modern era.
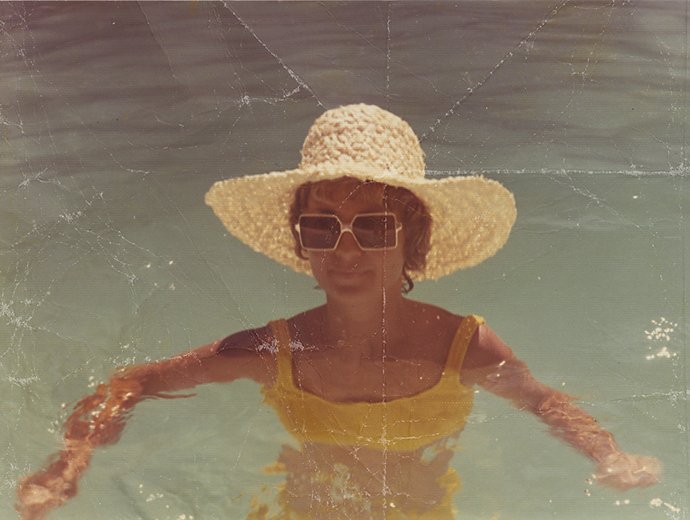
Age, in the form of marks and print photo textures, often shows on older photos, and when you scan them in, they will show up on the digital file, too. But you can remove unwanted elements with editing tools in Adobe Photoshop.
Noise in photography is another term for texture. Noise reduction, which removes grain and background pattern from images, is important for modernizing scanned photos. You can get rid of that vintage grain effect, add some color, darken your image with a transparent overlay, or smooth out scratches and other imperfections that may have popped up over the years or exist due to more antiquated photography and development methods.
Keep it clean with nondestructive edits.
Take advantage of the Layers panel in Photoshop to preserve — and sharpen — images from the past without sacrificing details or getting stuck with changes you can’t edit. Make nondestructive edits with features like adjustment layers and Smart Objects, so you can experiment with different effects and filters without permanently altering the pixels of the original photo and bring your photos into the present. Pictures are worth a thousand words, and you can make the message of your old photos loud and clear with noise reduction.
Smart objects give you a way to test your effects on a top layer while you preserve the source image. “A smart object is a container that holds multiple layers,” says professional photo editor Jesús Ramirez. “It allows you to apply nondestructive adjustments, distortions, filters, and transformations. Destructive means when you make a change, you’re stuck with it. Nondestructive means you can come back and change it or completely remove the adjustment.”
With nondestructive edits, you can upsize or downsize your photo, rotate it, change perspectives, and more, all while keeping the original photo intact. Use a linked layer mask so all instances of your smart object update automatically whenever you edit.
How to remove texture from old photos.
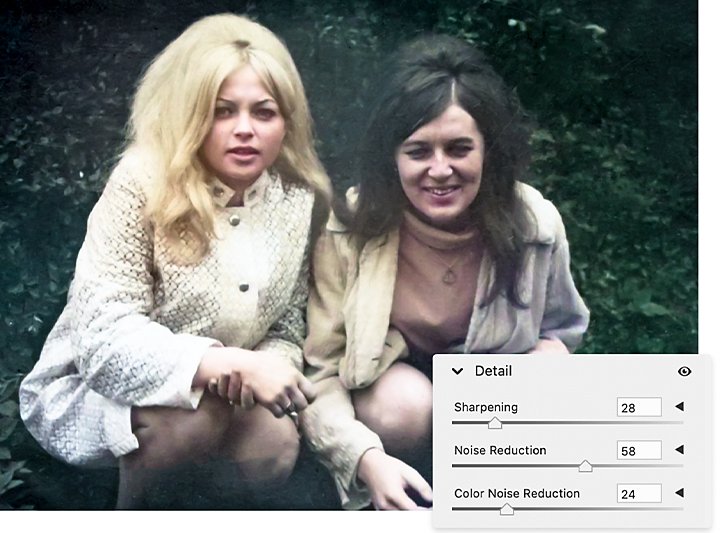
Use the Noise Reduction slider in Adobe Camera Raw within Photoshop to remove the photo paper texture from your scan:
1. Import or drag and drop your image into Photoshop.
2. Use the Crop tool with the left side toolbar to trim or expand the picture to your liking.
3. In the right control panel, click on the image and scroll down to Convert to Smart Object.
4. In the upper navigation toolbar, click Filter › Camera Raw Filter.
5. On the right side, click Detail › Noise Reduction, and move the slider until the photo becomes smooth.
Fine-tune your edit.
After you reduce noise, you can play around with the other sliders like Clarity, Exposure, and Saturation to further polish your image.
Try other modes for texture removal.
If your scanned images have hard-to-remove nicks and scratches, give these other pixel-blending methods a shot to make your shots smoother.
Mask to selectively re-sharpen.
The Sharpening tool under the Camera Raw filter can enhance sharpness that may have been obscured by hiding the unwanted texture. Press Alt on Windows or Option on Mac and slide the Masking slider to the right until the areas you don’t want to re-sharpen are covered in black.
“White reveals and black conceals,” says Ramirez. “As you push the Masking slider to the right, Photoshop starts finding the edges in the image. So any area that is black now will not have the sharpening effect applied to it. You can fine-tune this masking slider and just make sure that it really doesn’t touch the background.”
Find the blur for you.
There are a number of blur modes that can smooth out images to remove textures. Blur, Blur More, and Lens Blur all keep subjects in focus while obscuring background details. The Surface Blur filter preserves edges while blurring an image.
Go to Filters and select the blur you want. A new dialog box will appear with sliders for any additional adjustments. Start with low numbers and then slide to the right, until the tool is blurring only as much of the unwanted texture as necessary.
Perfect your imperfections.
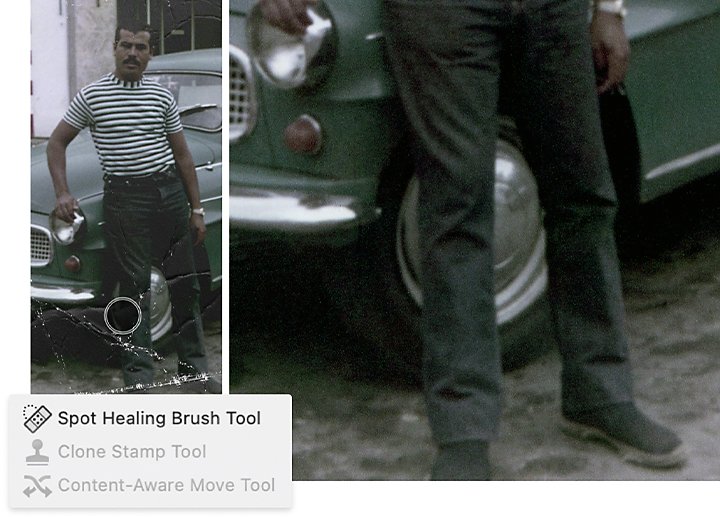
To remove other hard-to-edit scratches and marks that might have collected on your pictures over the years, you can use a slightly different retouching approach. Open your image in Photoshop and create a new layer to apply your edits. Depending on the type of corrections you want to make, use one of three tools to gussy it up:
Go with the reliable Spot Healing Brush tool.
The default healing mechanism of Photoshop is the Spot Healing Brush tool. Either heal the entire area you select or target specific values like size, hardness, and spacing, depending on what you are trying to adjust, to remove spots.
Paint precise corrections with the Clone Stamp tool.
This tool allows you to copy pixels from one area and paint over another area with those pixels. Hold the Alt key on Windows or the Option key on a Mac and click on the area you wish to copy, then paint your desired texture wherever it needs to go.
Hide large imperfections with the Content-Aware Patch.
Hold down the Spot Healing Brush to select the Patch tool, which you can use to cover larger objects, scratches, or marks. Choose the Content-Aware option under Patch, select the area you’d like to hide, and then draw your selection around the pixels you want to change. Drag it over to the area with the pixels you’d like to replace it with.
Photoshop is filled with helpful tools to make vintage or textured photos frame-worthy, no matter how long they’ve been gathering dust in the attic. Scan in some old favorites, dive into the past, and add a modern touch to your favorite sentimental images.
Contributor
Do more with Adobe Photoshop Lightroom.
Edit photos easily with Lightroom presets, Super Resolution, easily share photos from any device, and access your projects anywhere with cloud photo storage management.
You might also be interested in…

Bring the past to life with vintage photography.
Explore the history of photography to make the past come alive with your own vintage photographs.
Get nostalgic with a vintage aesthetic.
Explore a range of vintage photo effects and learn how to apply a retro vibe to your own images.

A guide to basic photography terms.
Explore basic photography terms from A-Z.
Go analog with film photography.
Explore the roots of analog photography and learn how to shoot, develop, and print your photos.