Honing your ability to draw faces and heads.
Whether you’re drawing portraits or doodling cartoons, understanding how to sketch facial features will help your work. Learn more with this step-by-step tutorial.

Drawing faces begins by understanding basic proportions.
Every artist struggles with certain aspects of anatomical drawing. Heads and faces, with everything from eyelashes to cheekbones, can be particularly intimidating. There’s a lot of crucial detail in every feature. Understanding the most basic proportions of the head is key, and will pay dividends when you get to finer details like the tip of the nose or the top of the ear.
Fortunately, learning these proportions is a very manageable task. Begin by reducing the complexity of the human face to a few essential landmarks. Once you understand those basics, you can apply them to your own drawings to create stunning portraiture or to fill your latest sketchbook.
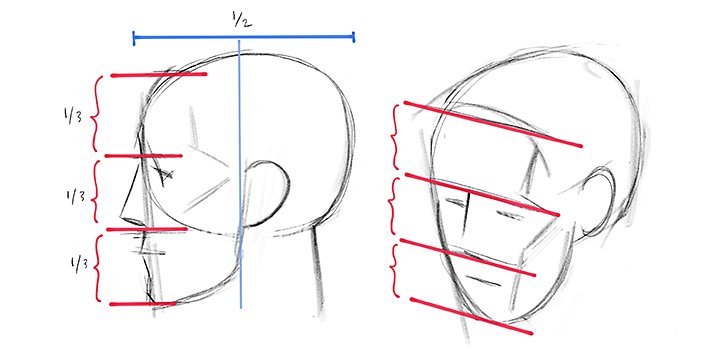
Establish the landmarks of a human face.
When you observe a human face, you can see that it’s divided roughly into thirds from the hairline to the brow, the brow to the bottom of the nose (where it meets the very top of the philtrum), and the bottom of the nose to the bottom of the jaw. You can measure these distances on your own face and you will find them to be surprisingly similar. Dividing the face into these thirds is a great place to begin portrait drawing.
Remember, the hairline is not the top of the head. The very top of the cranium sits a little higher than the hairline. Also notice that, from the profile or side view, the ear begins at about the halfway point between the front of the forehead and the back of the head. A common mistake is to draw ears too far forward on the head. If you view them looking at the side of the head, you’ll see ears start halfway back and continue moving backward from there.
Step-by-step instructions for drawing faces.
To perfect your face-drawing skills, follow this drawing tutorial. The more you practice this simple exercise, the more easily you will be able to complete and make corrections to head drawings in the future.
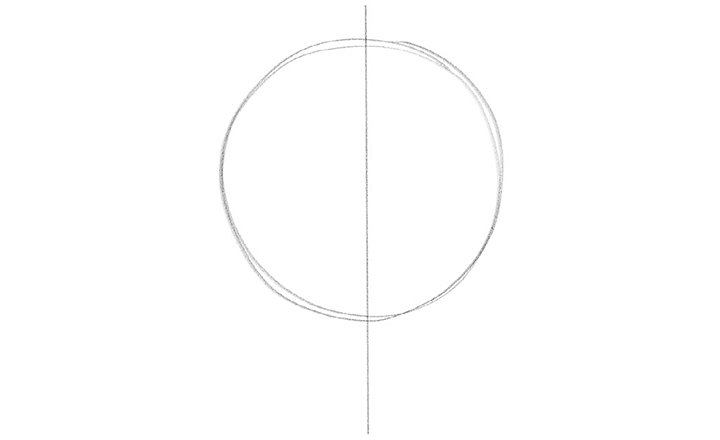
1. Begin by drawing a simple circle or oval shape. This is your head. Bisect it vertically, allowing the vertical line to drop below the bottom of the circle.

2. Bisect the circle horizontally. This line will serve as the rough indication of the brow.

3. Sketch a horizontal line just under the top of the circle to represent the hairline. Note the distance between the hairline and the brow line, and reproduce it twice more — moving downwards — to create the thirds of the face. Then, draw two vertical lines that carve through the extreme left and right boundaries of the circle, angling slightly inwards from top to bottom (the pink lines in the image). These represent the side planes of the head.
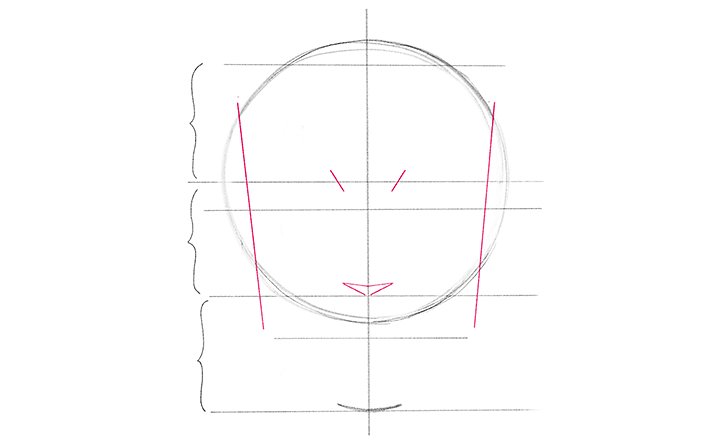
4. Draw the pink lines shown in this next illustration: two short diagonal lines, crossing through the brow line, moving inwards toward the center from top to bottom. Draw a compressed, inverted triangle representing the bottom plane — the underside — of the nose.

5. Draw a horizontal line about 1/4 the distance between the brow and the bottom of the nose, just under the brow line. This represents the eye line. Draw two more short diagonal lines — the pink lines, near the right and left extreme boundaries of the head. These lines move outward, from top to bottom on either side, and represent the outside edges of the ocular cavities — or the holes in the skull where the eyeballs reside, also known as eye sockets. Draw these diagonal lines between the brow line and the newly placed eye line. They should end inside the left and right extreme borders of the head.
6. Traveling along the eye line, look at the distance between the newly drawn diagonals and the vertical center line of the face — the green vertical lines in the illustration. Bisect these distances with two vertical lines on either side of the face, as shown by the blue lines in the illustration. The line of the mouth is then drawn about 1/3 of the way down between the bottom of the nose and the bottom of the jaw.

7. You now have the precise locations for the corners of the mouth and the center of the eyes’ irises. Look at the circles that are drawn in the illustration to give yourself a rough idea of the correct size for drawing irises. The ears fall roughly between the top of the eyes and the bottom of the nose.
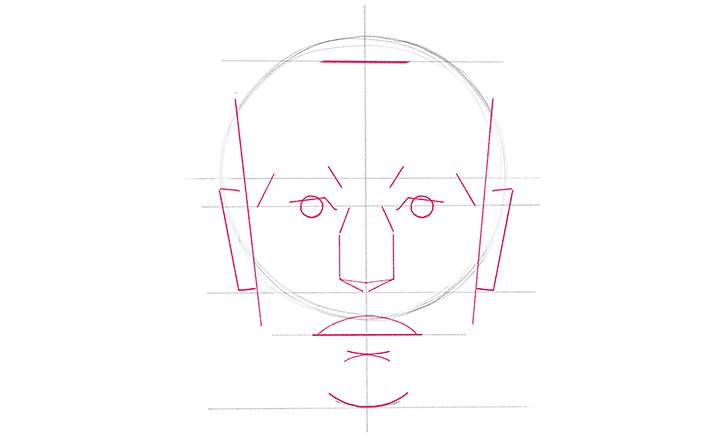
8. The line of the mouth gives you room to draw a shallow arc for the upper lip, as well as the two opposite-facing short curvilinear lines for the bottom lip and the top of the ball of the chin. Add lines, as shown, for the structure of the nose. (These lines are meant to represent the extreme left and right boundaries of the nose, not the plane of the bridge of the nose. As you will see in the examples of finished face drawings, the bridge is one of the features that is very specific to the individual, and there is no need to indicate it at this stage.)
9. Draw the lines for the upper lids of the eyes. They should cut through the tops of the circles drawn for the irises of the eye. These lines should not be too narrow or wide. Look carefully at their placement and proportions in the illustration.

10. You now have three proportional bases for face drawing. Use your own or feel free to copy this image and use it as a guide to trace over in Adobe Fresco to draw different faces. See the examples below, featuring different hairstyles and other features, for how the base can be used.
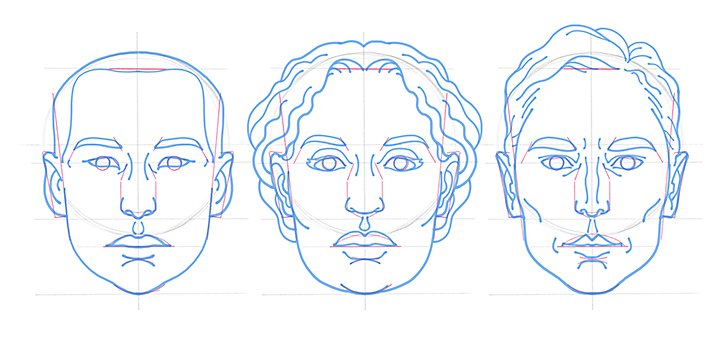
By making adjustments to the shapes of the eyes, the nose, the lips, and the jawline, as well as to the thickness and angles of the eyebrows, you can draw any number of unique faces over this base. You can also use these steps on different head shapes to draw realistic faces or exaggerated caricatures, as well as edit and revise faces you’ve drawn that don’t look quite right. And take your skills even further by following along with many live drawing lessons on Behance.

Contributors
You might also be interested in…

Get an introduction to the illustration style of Japanese comics.

Learn how to draw horses.
Discover tips to take on the challenge of drawing these big, beautiful creatures.

Explore the art of sequential storytelling and learn how to hone your skills to work in this exciting medium.

Take your skills to the next level with drawing exercises and advice from professional illustrators.