Preparing a Zbrush Tiling Stone Wall to send to Designer
During a production, Substance 3D Designer and Painter can be very efficient for material creation - both for a regular surface (like plaster) or a patterned one (you know, brick walls!).
Those materials are applied on a surface to provide detail that didn’t exist on the geometry in the first place.
But sometimes, the opposite can happen, and it would make more sense to need and have to sculpt those details. When making a stone wall, it is necessary to work with a 3D object, if we want to break it or introduce some rubble at its base.
How to take advantage of the iterative freedom of Substance Designer and Painter while working with a hand-sculpted input? First part
The secret here is
not sculpting everything at the same time but keeping some features, like fine stone noise, for the next step that we’ll do in Designer.
Indeed, in a production environment, the final look of an asset might vary a lot. Sometimes you can be asked for a last minute change and you need a fast and efficient way to modify your creation. What would you do if your art director asked for a different style? With an everything-sculpted approach, you would have to resculpt every single detail.
That’s why we are going to split the creation process between our sculpting software and Substance Designer / Painter. Once again using a sculpting software is justified as we need a 3D blocking to define our asset.
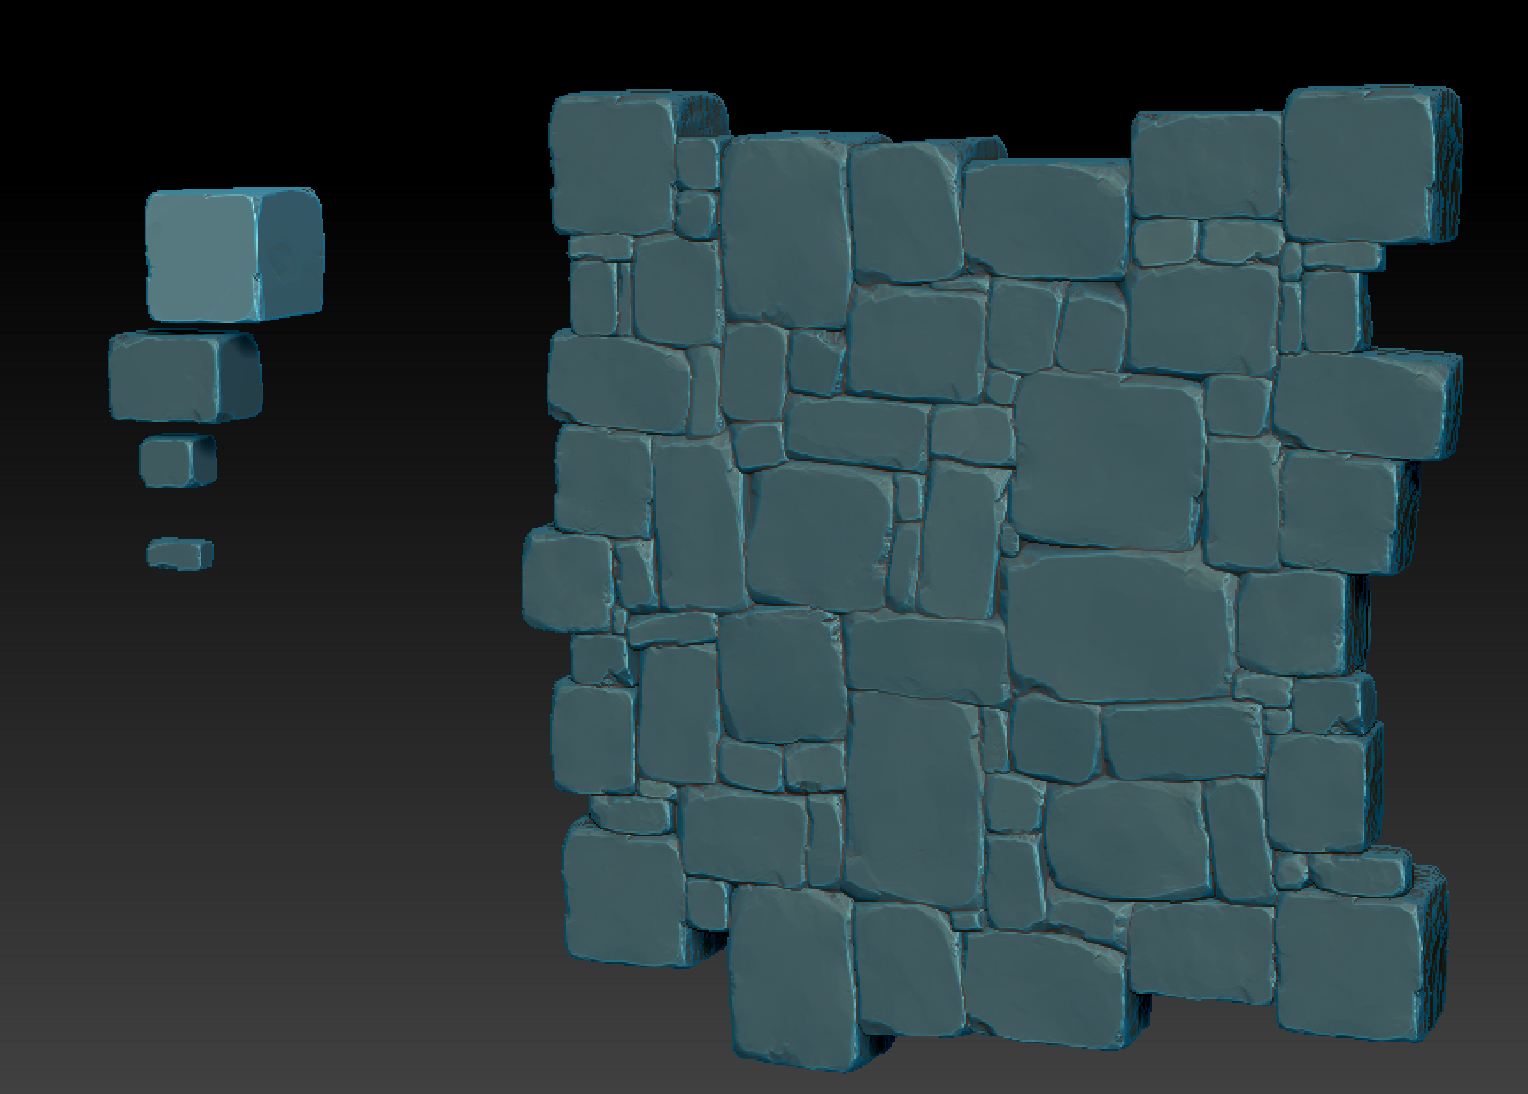
The stone wall has already been made with the “library” of sculpted stones you see on the left, as well as the reference plan for the Frame of the scene. You can find them as an attachement on this tutorial so you can make them your own and follow the tutorial along.
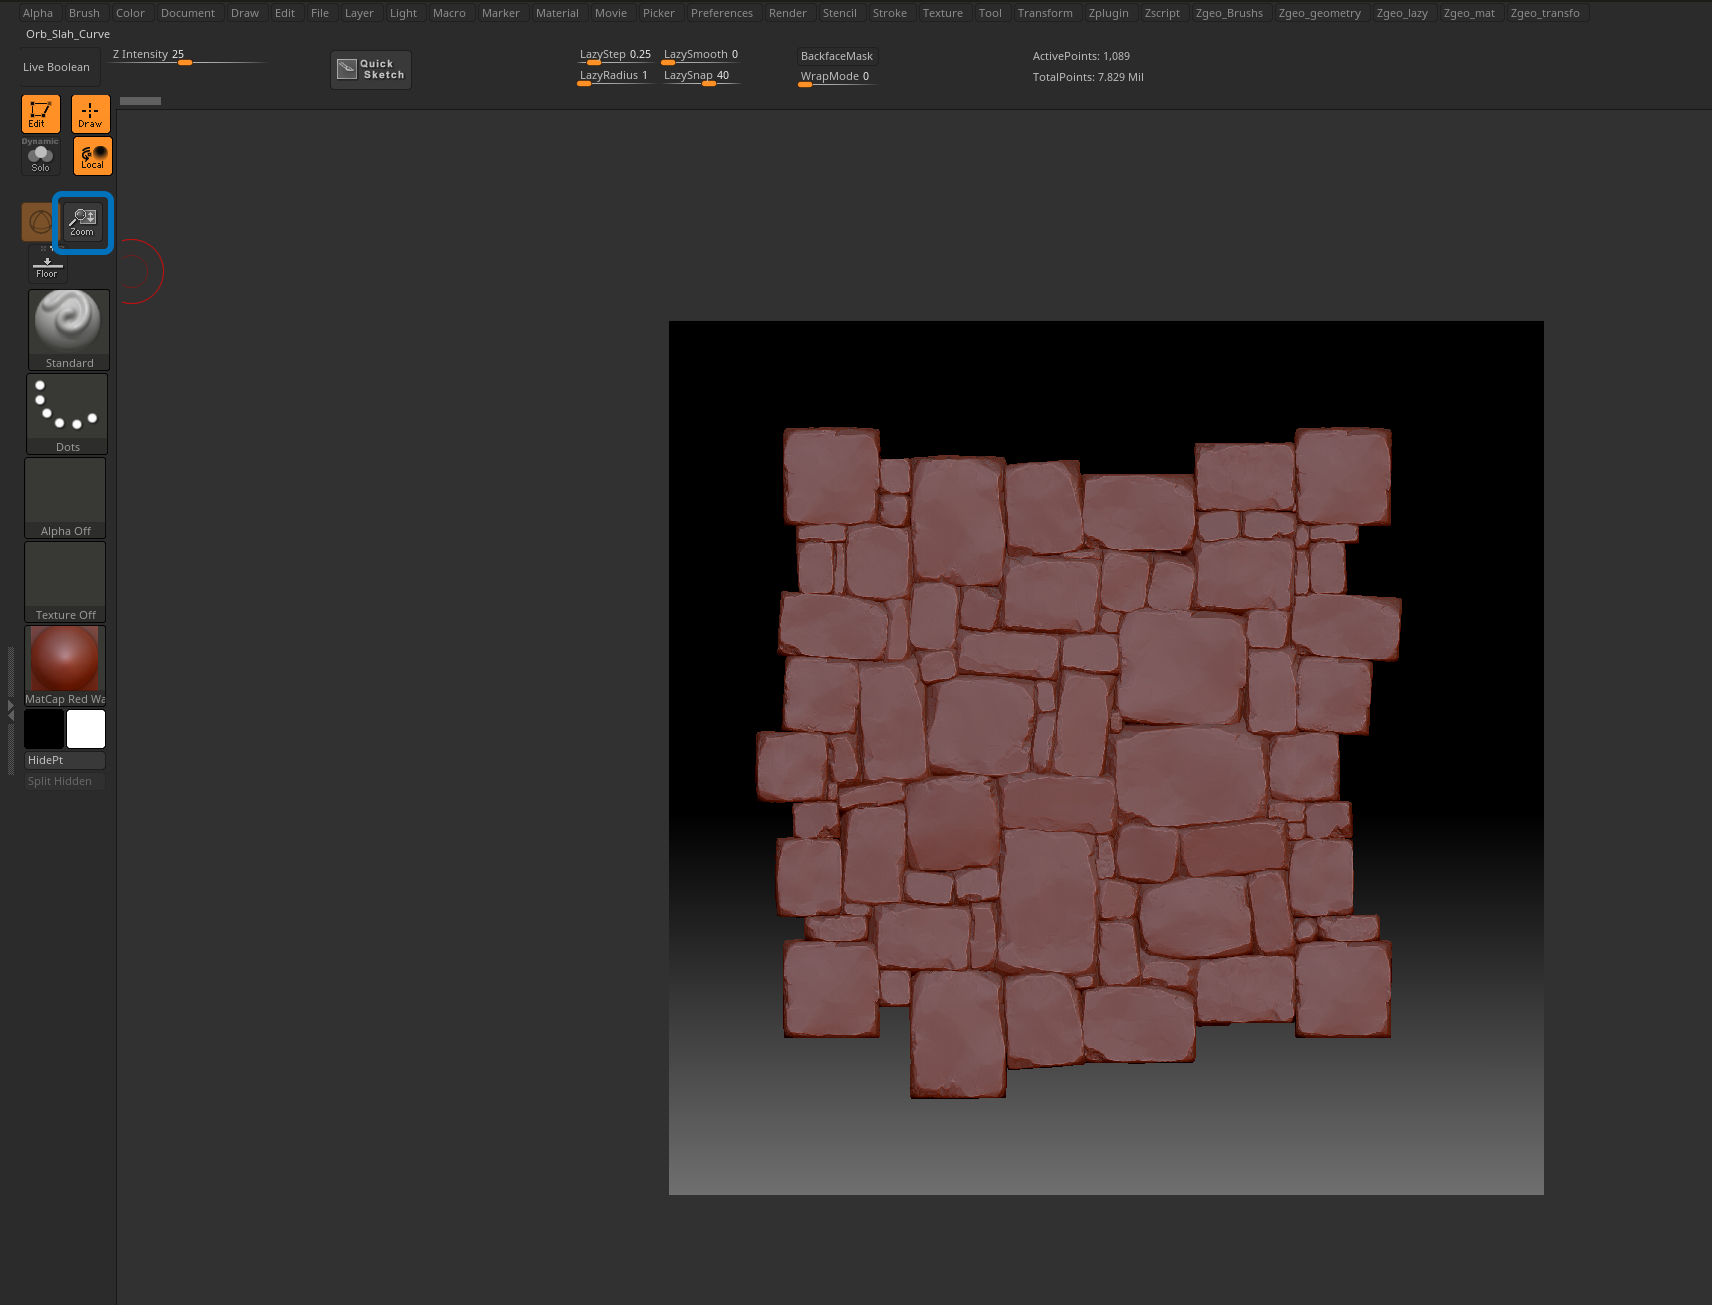
To achieve this stone wall look, we need to follow a few guidelines: * Don’t sculpt anything else than the actual silhouette; * 3 or 4 different rocks is enough to get some variations. Each face can become a unique stone, so you just need to rotate them using a 90° step; * Make sure the tiling works (Image A).
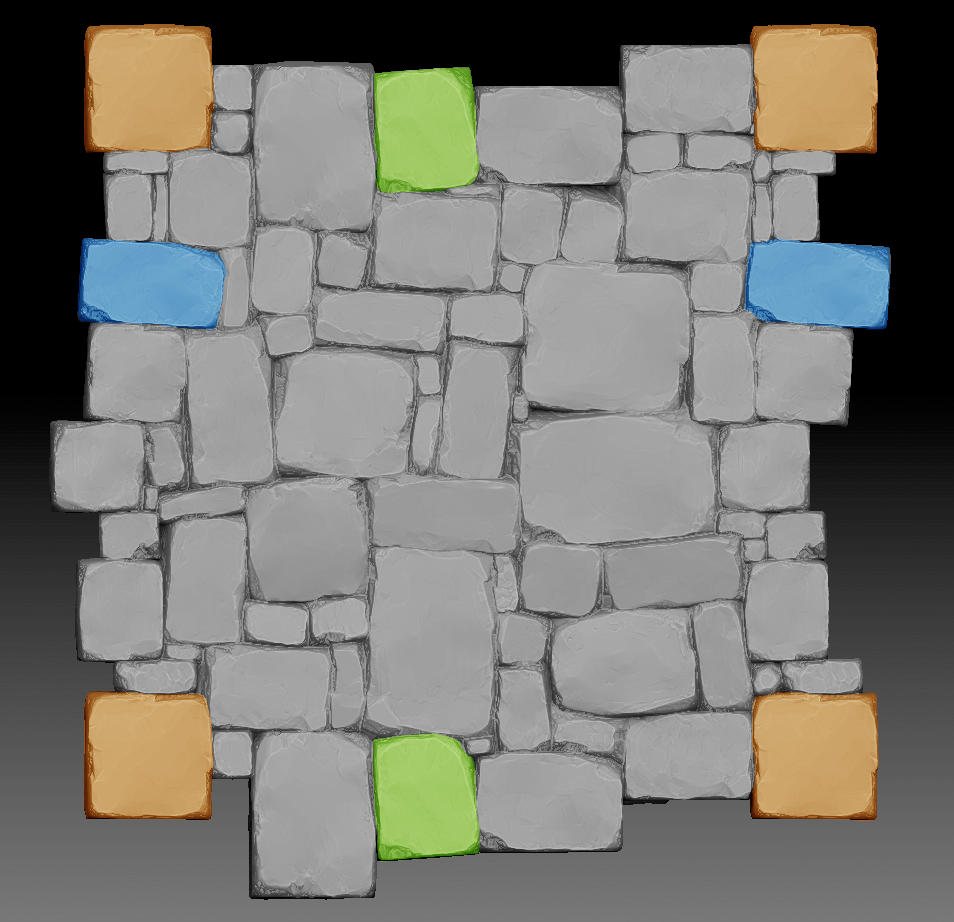
Apply a random color on each stone. The color for each stone has to be different from its neighbor ( You can do so by applying a Polypaint By Polygroup if you want) (Image B);
How to export your output
Once we’ve completed all the instructions correctly, how do we export our output ? We could export everything and bake the result on a plane to get the desired maps (AO, Normal …), but it would take a lot of time to rework in case we need any more iterations in the future. Instead of exporting a 3D mesh, we are going to directly export maps that Zbrush can generate. To do so, we are going to need masks and topological informations, so we can scatter our extra-details correctly (mortar, dirt and dust …), including :
Ambient Occlusion
Normal map
Curvature
Height
ID map
However … Is it really necessary to export all these maps ? * Ambient Occlusion can be generated from the Height map; * So can the normal map; * Then the curvature map can be generated from the Normal map. In the end, we can export** only 2 textures** from our sculpting software: the height and th ID map.
How to correctly setup your document
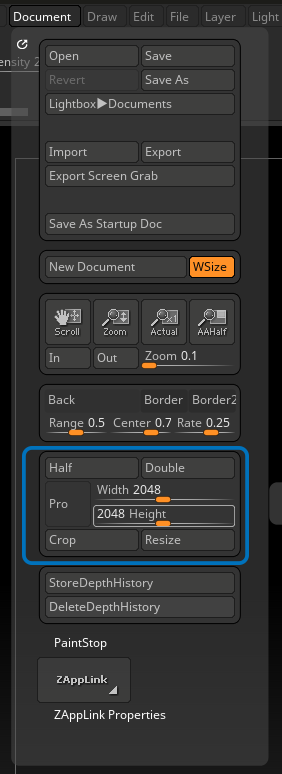
In order to correctly export our height and ID map, we need to make sure our document size is correct. By default, the viewport format is set to non-square (which prevents us from baking the area we need). Here are the steps to obtain the right format:
Go to the document tab and disable “Constraint Proportion” (“Pro” button) and set your resolution (in our case : 2048x2048);
Then click on the “Crop” button to update the copping area. By doing so, you just baked the scene as 2.5D;
Cleanup your viewport by pressing Ctrl + N so you are not bothered by the 2.5D scene, and then drag and drop your new tool back into the viewport (you can now edit it again).
Feel free to zoom out in your scene so you can see the gray frame around your document. If you keep it full screen, the output format won’t be square.
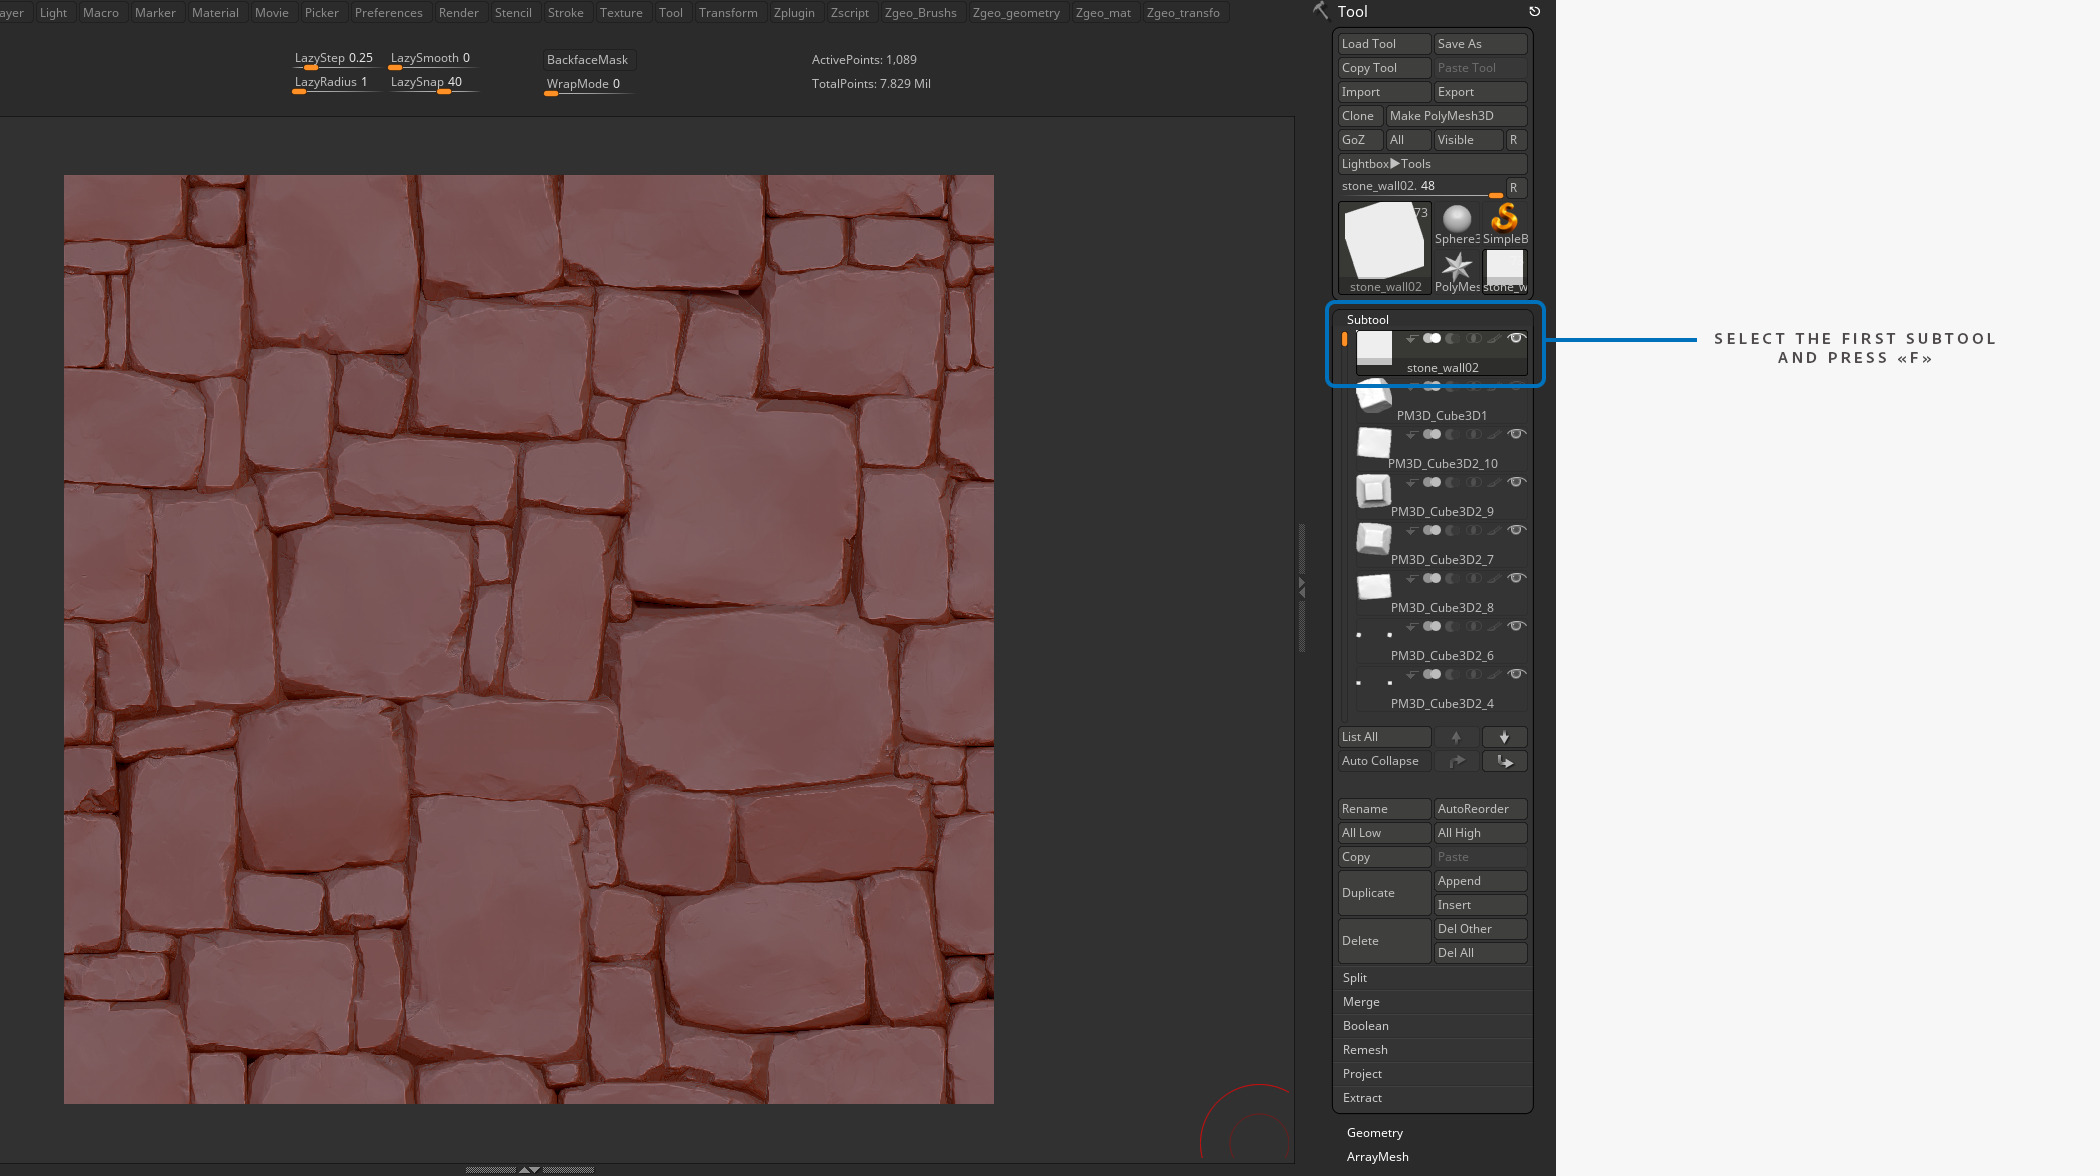
Once the document is set up correctly, select the first Subtool (Stone_wall01) then “frame” it twice (F key). The first “frame” will frame all of the subtools, whereas the second will only frame the active subtool.
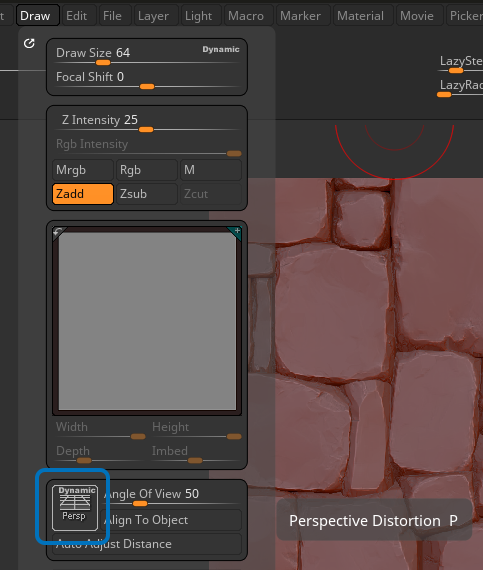
Make sure that Perspective Distortion is inactive (P key) so we actually have an orthogonal projection.
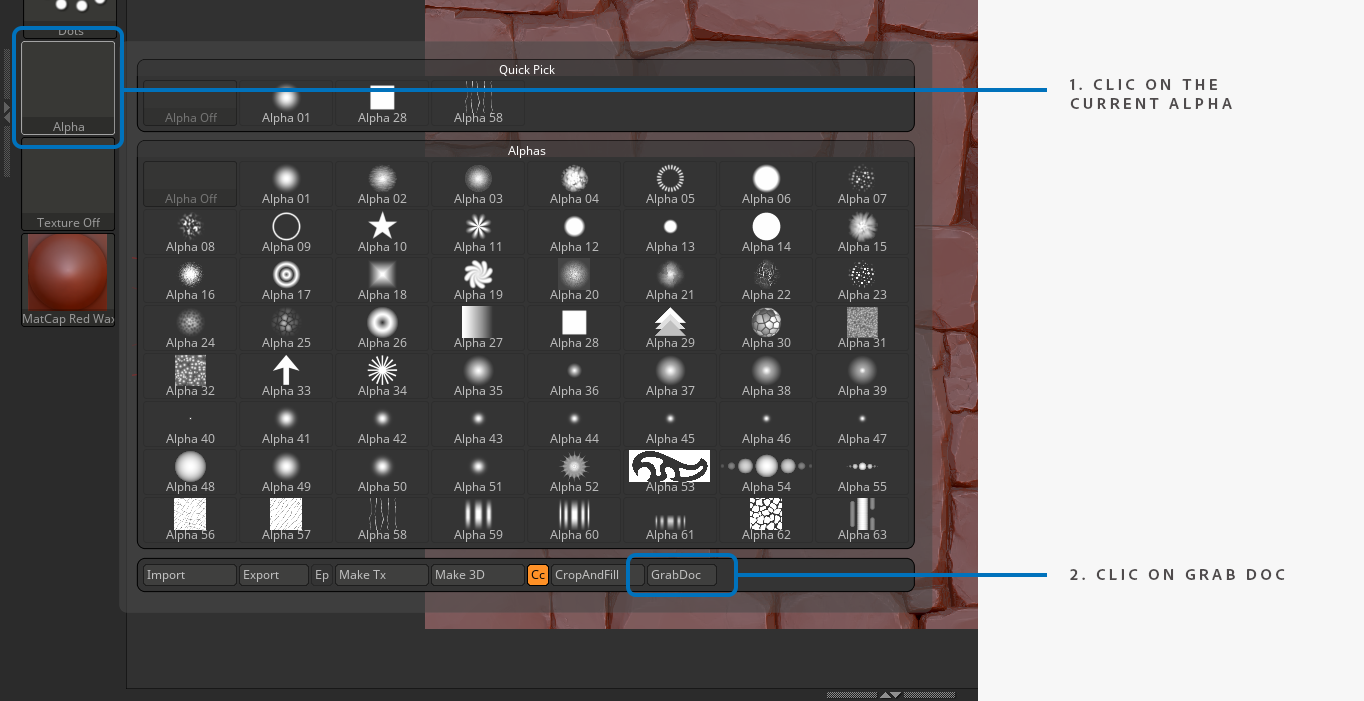
Finally! We can begin extracting the Height and the ID map :)
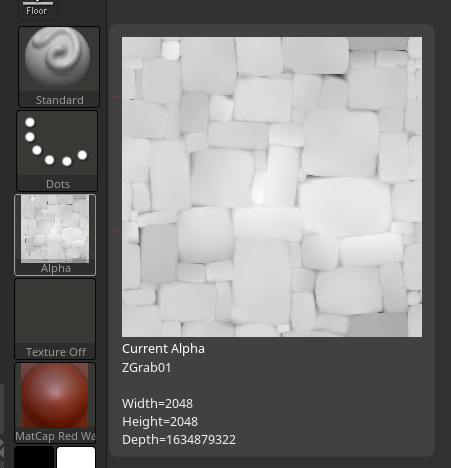
Click on Alpha, then Grab Doc, and lastly Export. The PSD format will allow us to not lose any quality.
A magnificent Height should appear when we hover the mouse over the Alpha section.
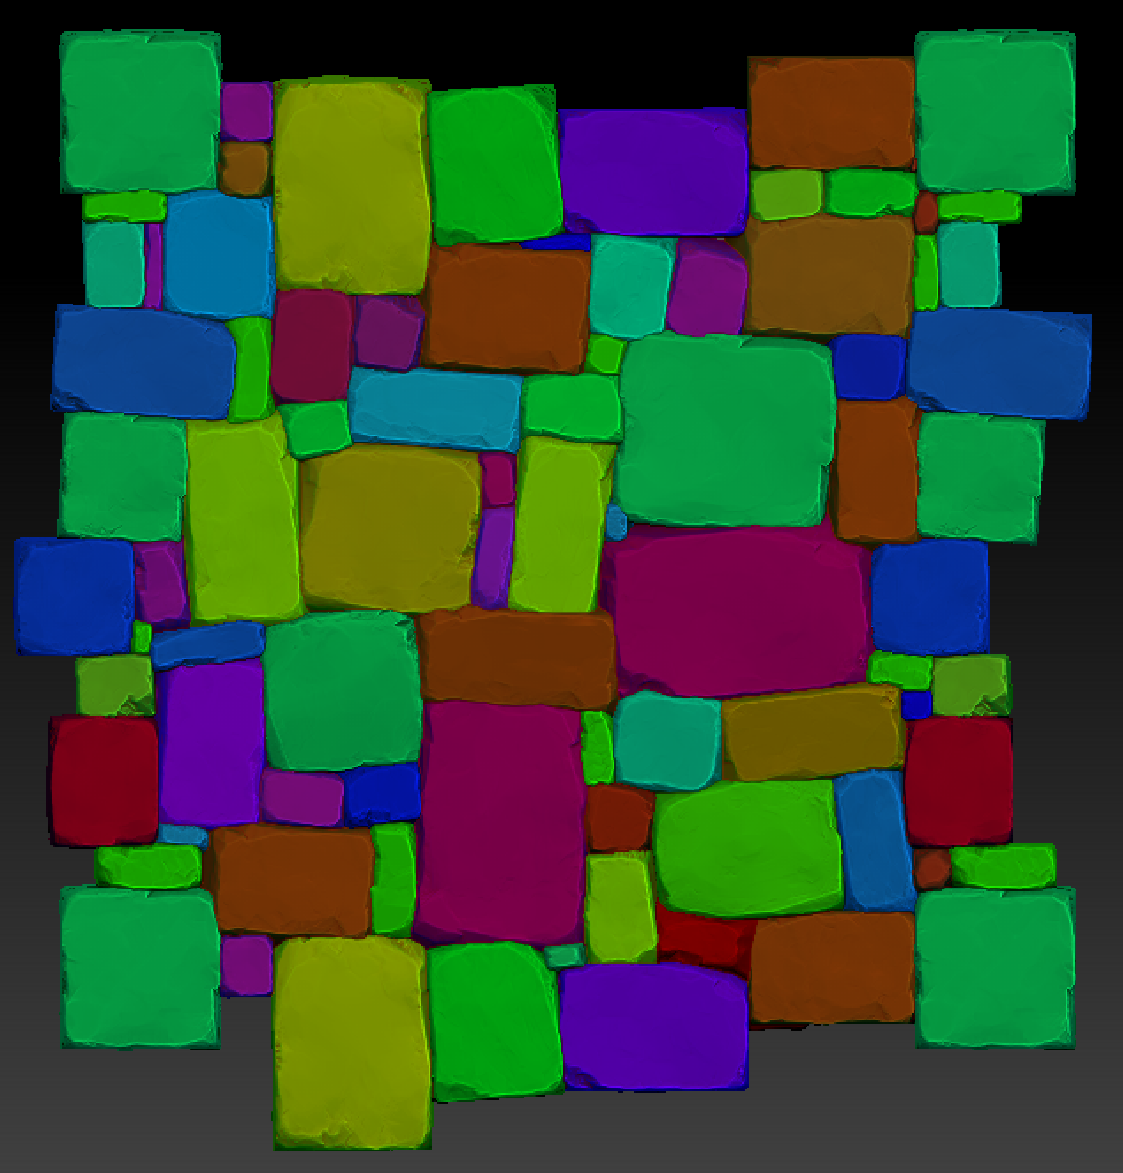
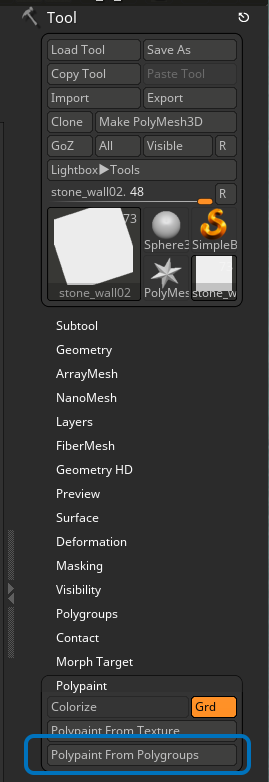
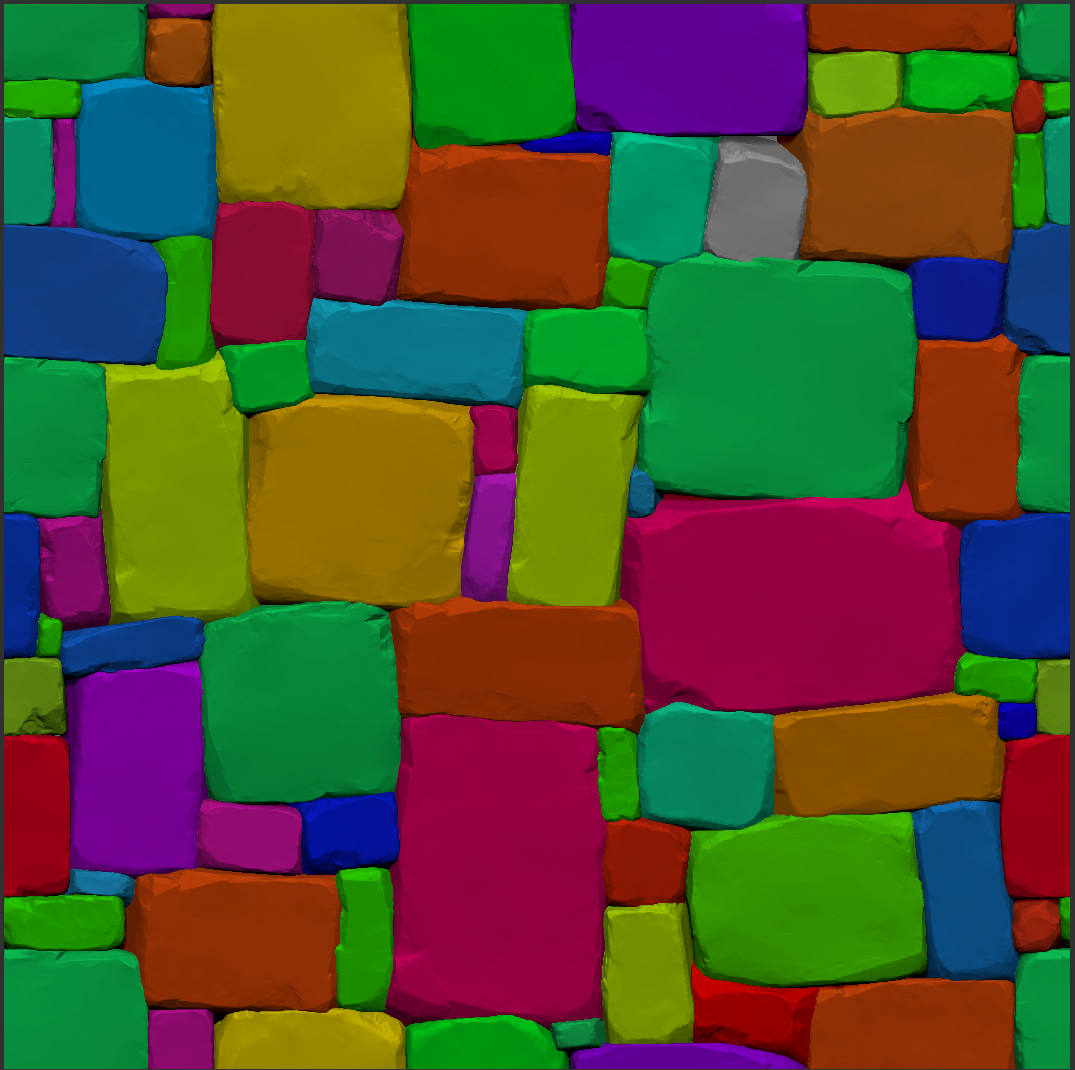
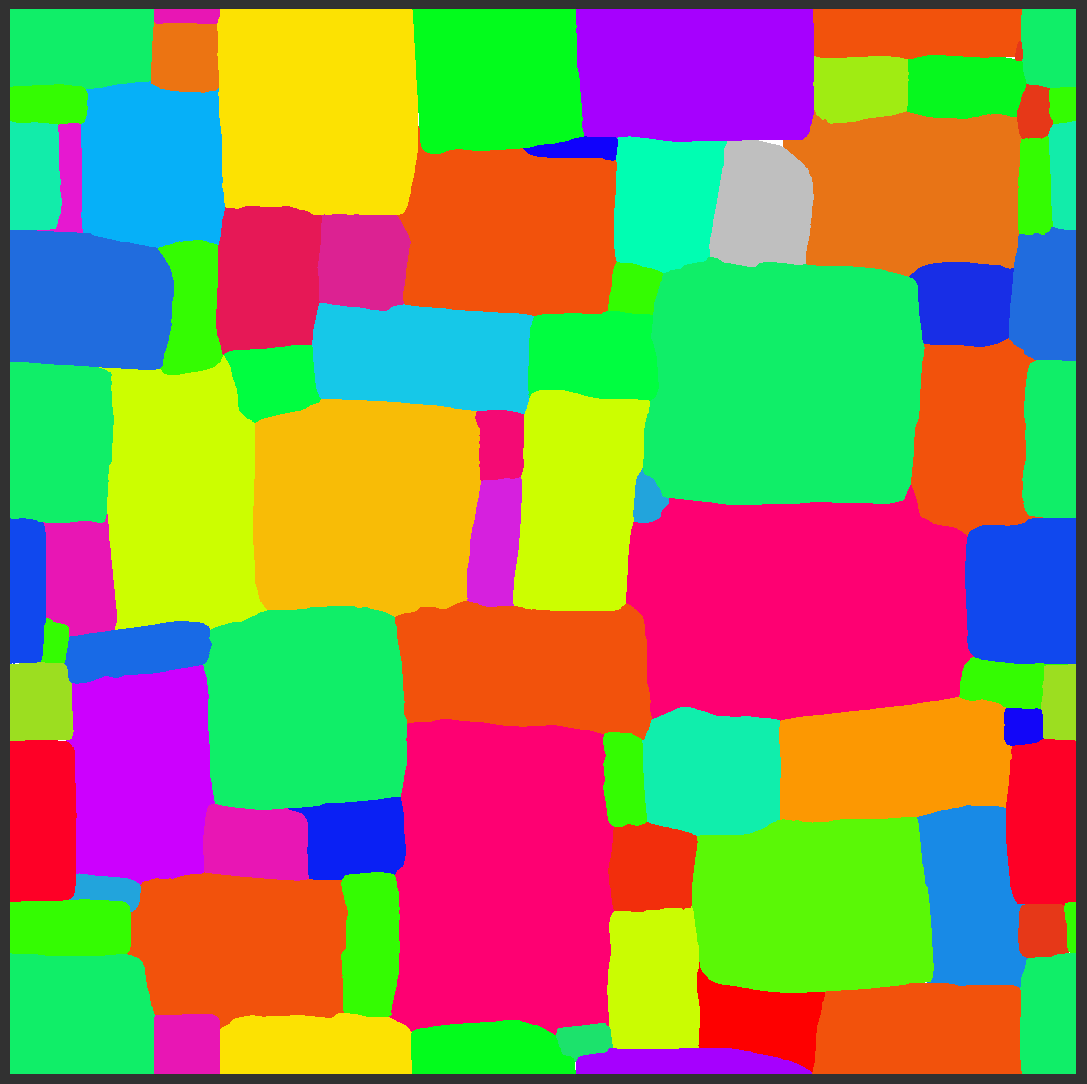
Now it’s the ID map’s turn. The idea is to apply a different color (via polypaint) onto each stone in order to get an ID map, with the help of which every stone can be independently selected.
One possible method is to use the “Polypaint by polygroup” feature, which allows to quickly change the applied color by block by generating a new polygroup by Topology Continuity (Auto Group).
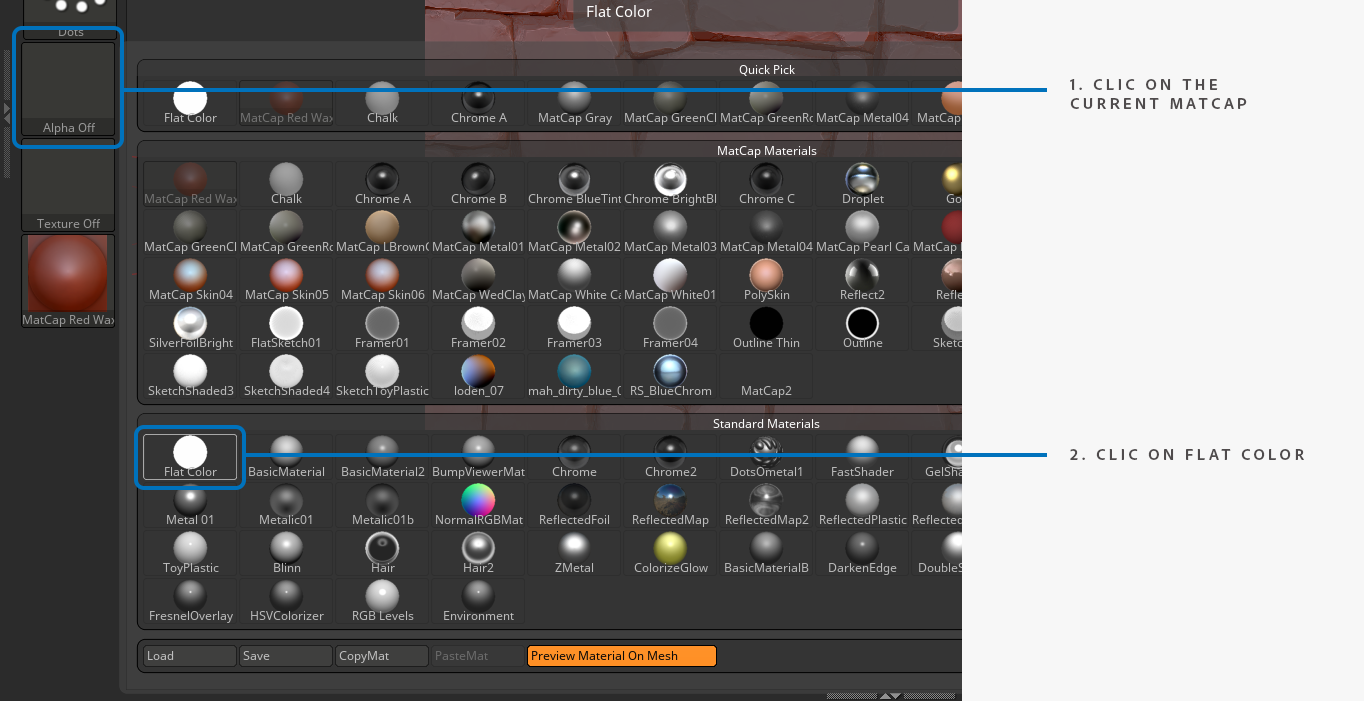
By default it is impossible to efficiently use existing information because of the current matcap shader.
But if we make use of matcap “Flat Color” (Figure 1), we can exclude unnecessary information (Figure 2).
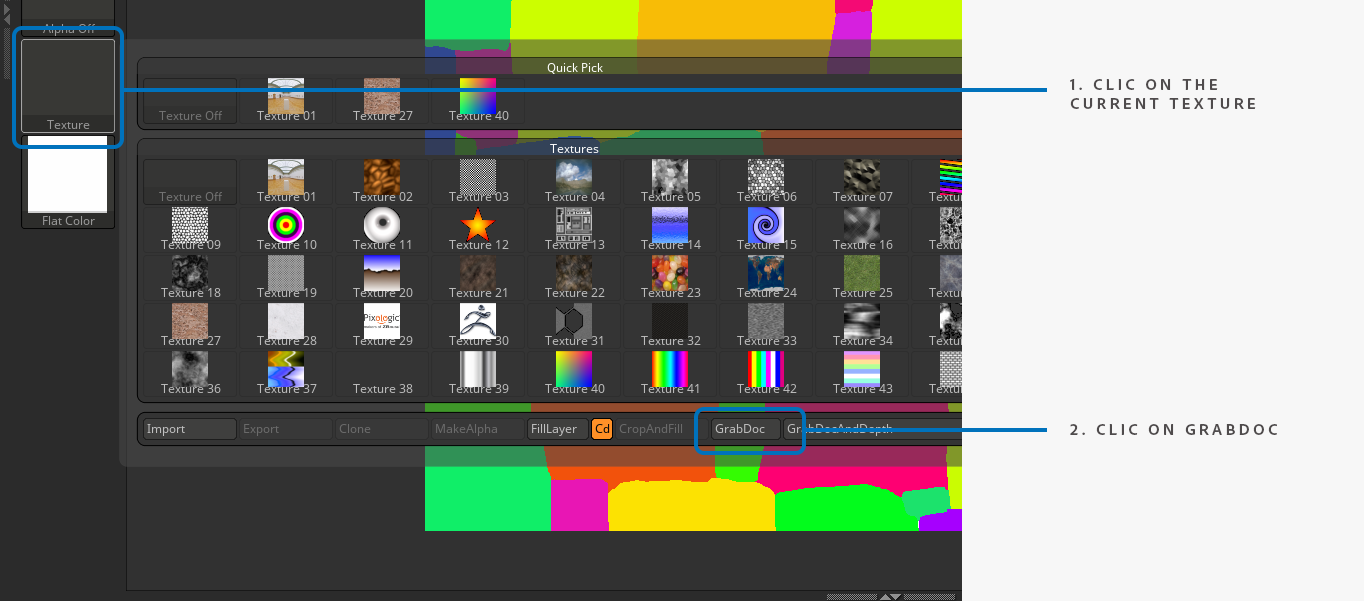
Next, just as for the Height, it is time to fetch our beautiful new ID map! Click on Alpha, then Grab Doc, and lastly Export (PSD).
Congrats, you completed the Zbrush part! Now let’s launch Substance 3D Designer for some serious business now.
You can control how Adobe websites use cookies and similar technologies by making choices below. But note that if you disable cookies and similar technologies entirely, Adobe websites may not function properly.
Cookies are small text files stored by your web browser when you use websites. There are also other technologies that can be used for similar purposes like HTML5 Local Storage and local shared objects, web beacons, and embedded scripts. These technologies help us do things like remembering you and your preferences when you return to our sites, measure how you use the website, conduct market research, and gather information about the ads you see and interact with.
You can make choices in the menu below about what cookies and other technologies you want us to use on Adobe sites when you visit them from this browser. You can always change those choices later by clicking on the Cookie Preferences link at the bottom of the page.
If enabled:
We can improve your experience by tailoring the site and the content to things we think might be of interest
We can better keep track of your preferences — like what language you prefer to use
We will better understand your likely interests so we can provide you more relevant Adobe ads and content on non-Adobe websites and in non-Adobe apps
It will help us improve the performance of our website and those of our partners who use the Adobe Experience Cloud
If disabled:
We won’t be able to remember you from session to session so the experience may not be tailored to your interests
You’ll still have access to the content of the site but certain features that depend on cookies may not function
You’ll still see ads, they just may not be as relevant to you
General information
You can control how Adobe websites use cookies and similar technologies by making choices below. But note that if you disable cookies and similar technologies entirely, Adobe websites may not function properly.
Cookies are small text files stored by your web browser when you use websites. There are also other technologies that can be used for similar purposes like HTML5 Local Storage, web beacons, and embedded scripts. These technologies help us do things like remembering you and your preferences when you return to our sites, measure how you use the website, conduct market research, and gather information about the ads you see and interact with.
You can make choices in the menu below about what cookies and other technologies you want us to use on Adobe sites when you visit them from this browser. You can always change those choices later by clicking on the Cookie Preferences link at the bottom of the page.
If enabled:
We can improve your experience by tailoring the site and the content to things we think might be of interest
We can better keep track of your preferences — like what language you prefer to use
We will better understand your likely interests so we can provide you more relevant Adobe ads and content on non-Adobe websites and in non-Adobe apps
It will help us improve the performance of our website and those of our partners who use the Adobe Experience Cloud
If disabled:
We won’t be able to remember you from session to session so the experience may not be tailored to your interests
We’ll still count your use of our site and services
You’ll still have access to the content of the site but certain features that depend on cookies may not function
You’ll still see ads, they just may not be as relevant to you
Operate the site and core servicesOperate site and measure engagement
Always active
These cookies are required, and they are used to enable the site and related services core functionality. Without them the site could not operate, so they cannot be disabled.
These cookies enable the site and related services’ core functionality and collect statistics about user engagement, such as counting active use to help us understand trends. These cookies cannot be disabled.
Measure performance
These cookies are used to analyze site usage to measure and improve performance. Without them Adobe cannot know what content is most valued and how often unique visitors return to the site, making it hard to improve information we offer to you.
These cookies are used to analyze site usage to measure and improve performance. Without them Adobe cannot know what content is most valued, making it hard to improve information we offer to you.
Extend functionality
These cookies are used to enhance the functionality of Adobe sites such as remembering your settings and preferences to deliver a personalized experience; for example, your username, your repeated visits, preferred language, your country, or any other saved preference.
Personalize advertising
These cookies are used to enable Adobe and our partners to serve ads more relevant to your interests. Without them you will still see ads, but they might not be as relevant to you.
Personalize advertising
These cookies are used to enable Adobe and our partners to serve ads more relevant to your interests. Without them you will still see ads, but they might not be as relevant to you.