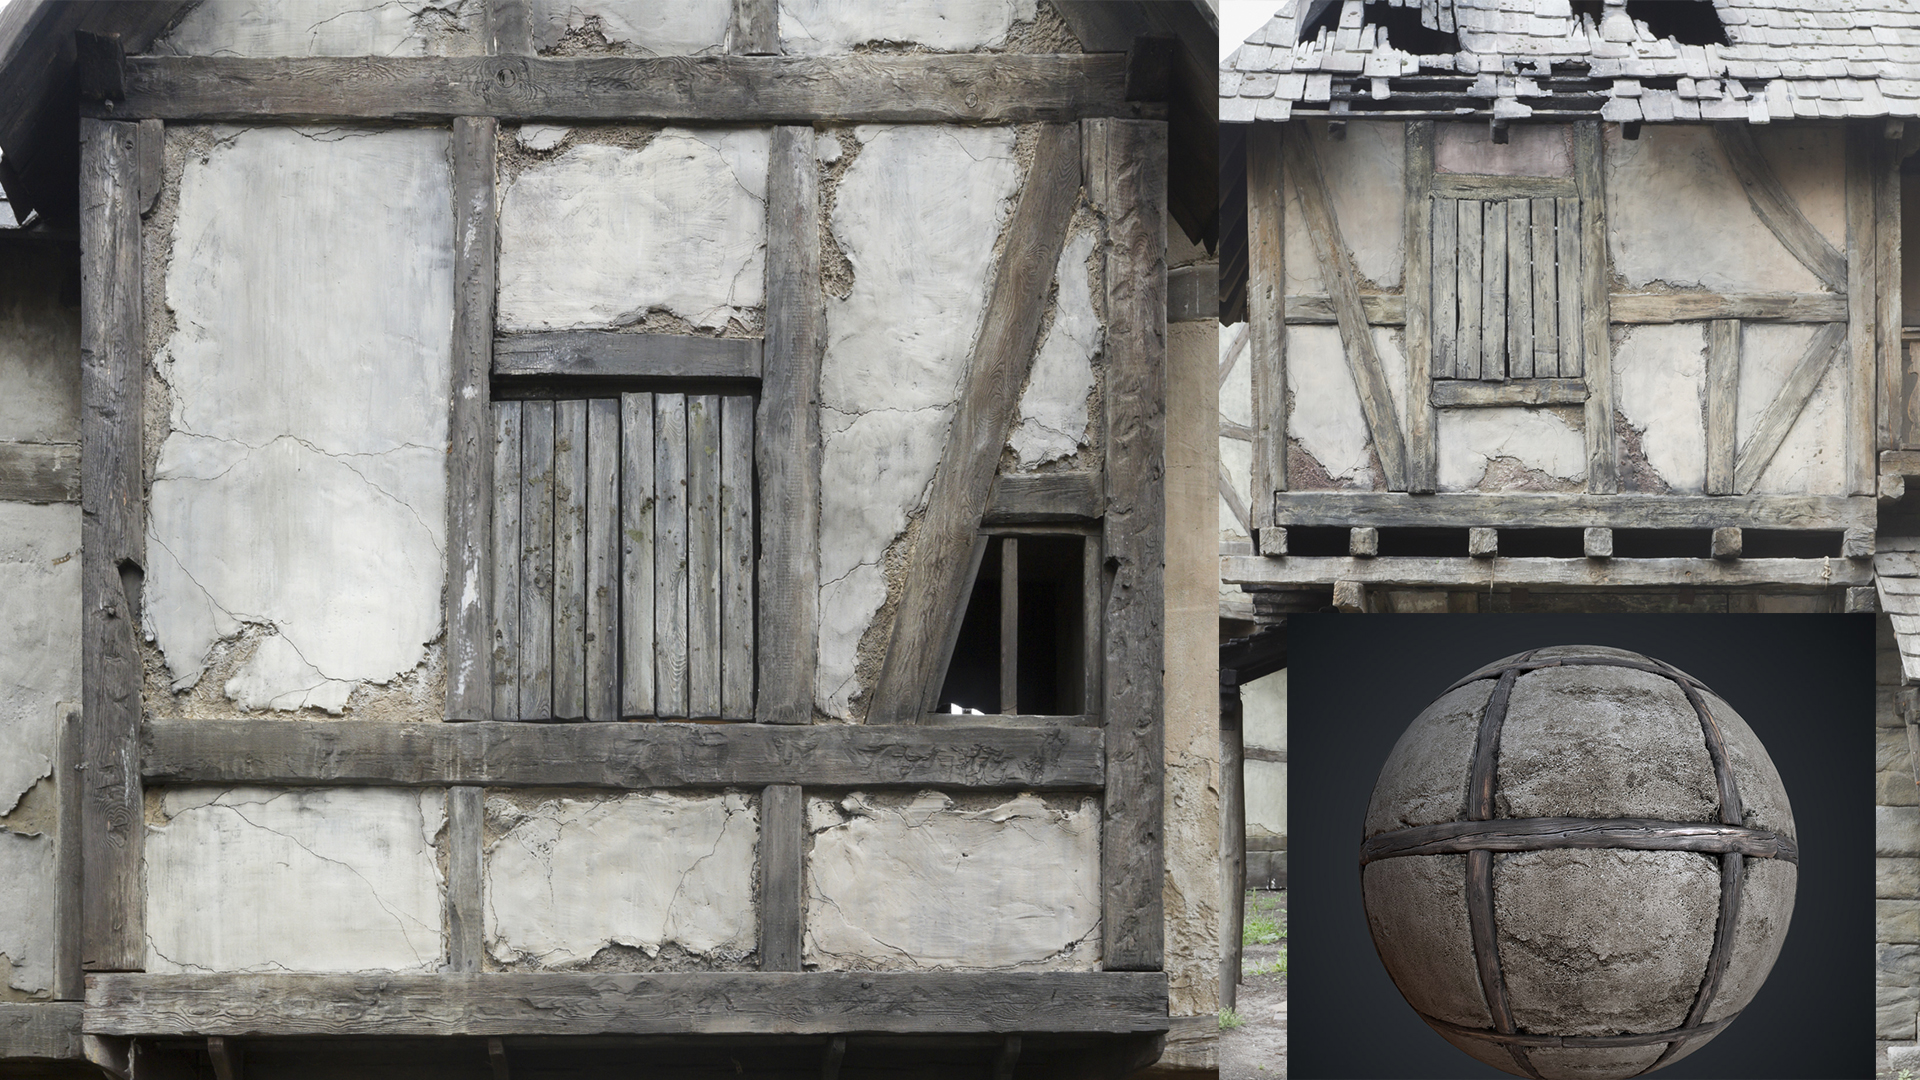
In this tutorial, Enrico Tammekänd will be doing an overview of a Tudor House wall texture.
He is a 23-year old self-thought 3D & Texture Artist from Estonia, currently working at Ubisoft Barcelona, and has started his own company Enthelity Studios that specializes in texturing.
He will be going through the entire graph on how to create the Wood Grain, Wood Pattern Generator and the final Tudor House Wall.
You can download the .sbs file to follow along.
The material was first created during a live streaming. You can find Enrico's Twitchhere .
So, before we start, I want to encourage to always try and have fun with your projects. Especially with personal ones. The more fun you have, the better outcome you will have and you will enjoy the whole process. Also, I know that it is said a lot, but references do play a key part in material creation. You don’t need tons of them but enough to help you build the required aesthetic details.
Just a quick overview on the way I approach textures is to try and break them apart layer by layer. Depending on the material, you either start from the bigger shapes that define the overall look and then work your way up until micro detailing or make generators that help creating the defining shapes of your material. A good example of that is if you make a rock generator for your cliff material. We will be using the same technique in this tutorial as well, where we build our way up from wood grain to wooden beams with plaster. Since the project files are also included, I tried to do my best to organize everything so it would be easy to understand and to follow along.
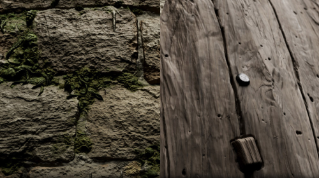
References
There is no need of more than a few reference images if you have a fairly clear mindset of what you want to create. These images help define the small details that make the texture feel more organic. Even though it is good to have a lot of references for each part, try not to get too caught up on them. Don’t be afraid to use your own imagination mixed with references.
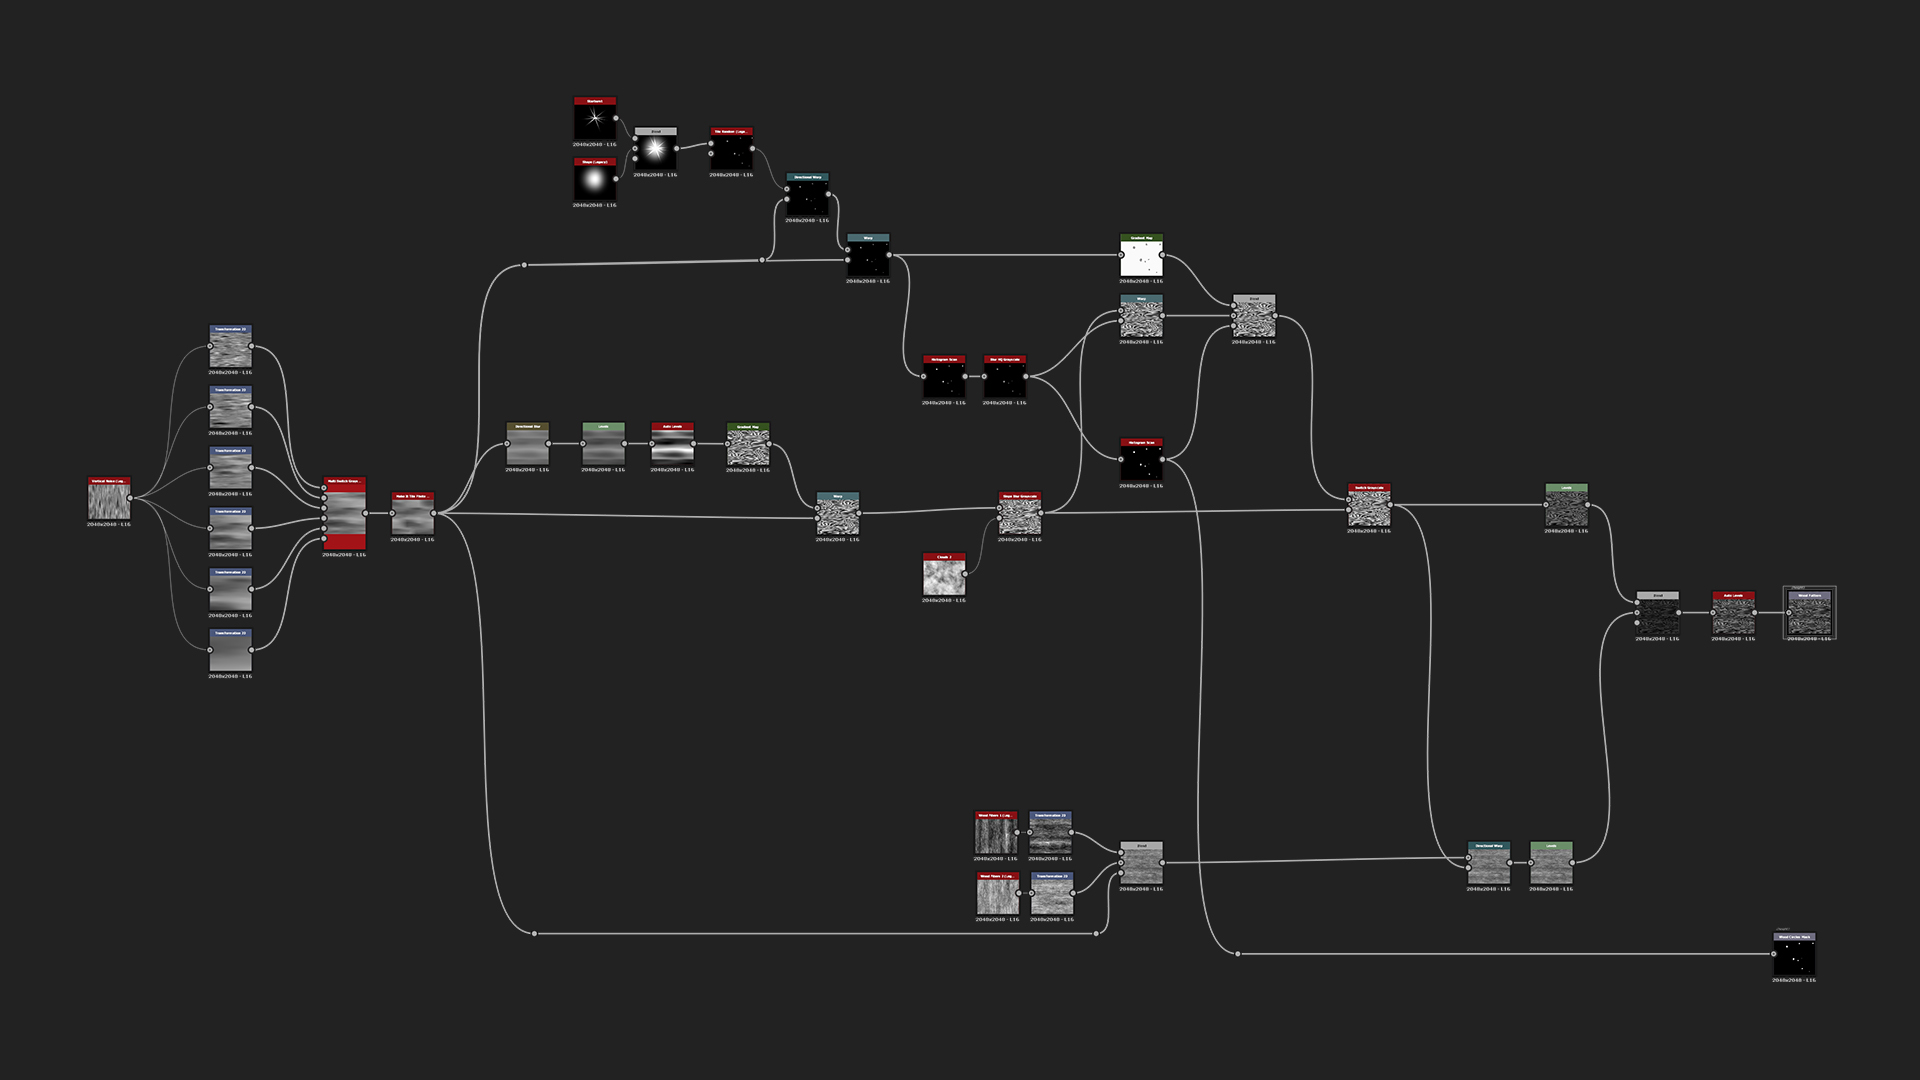
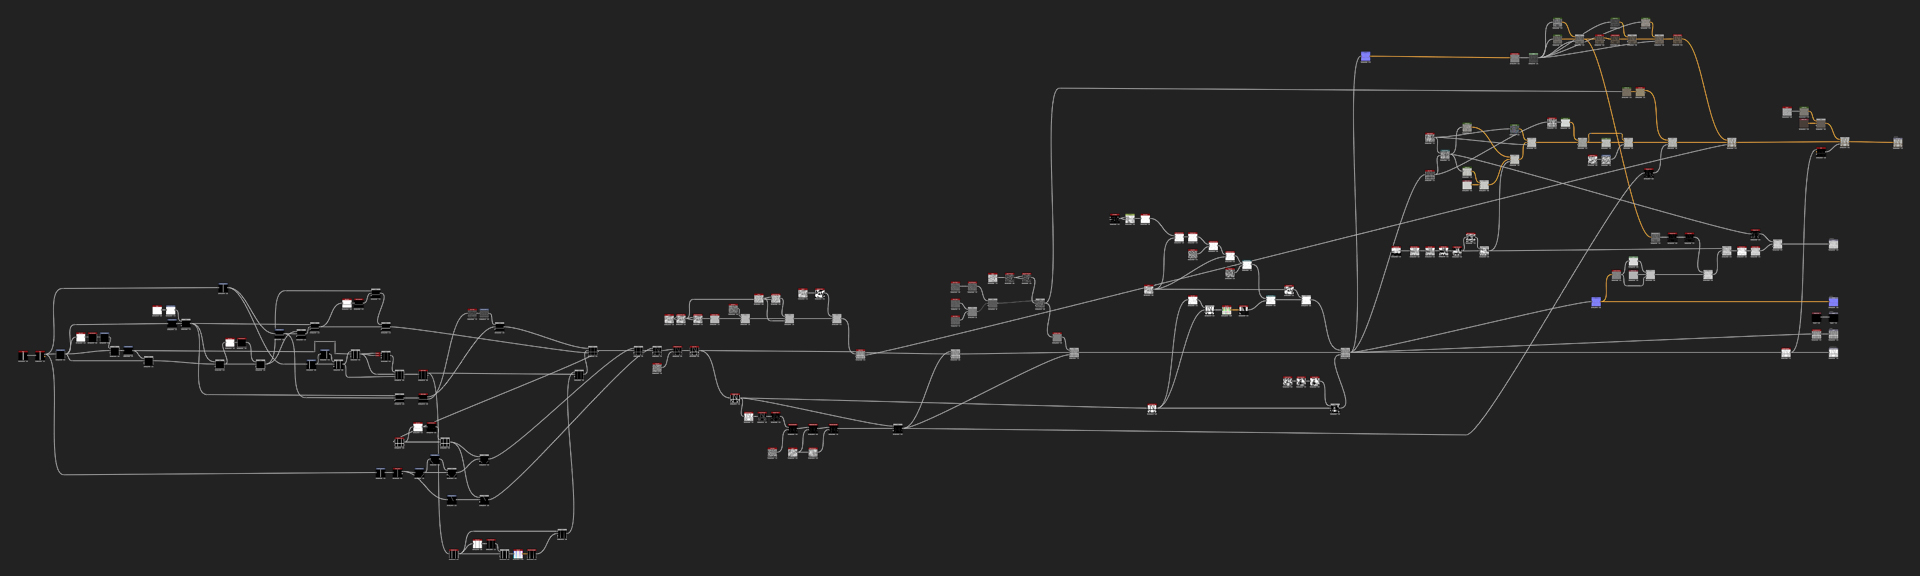
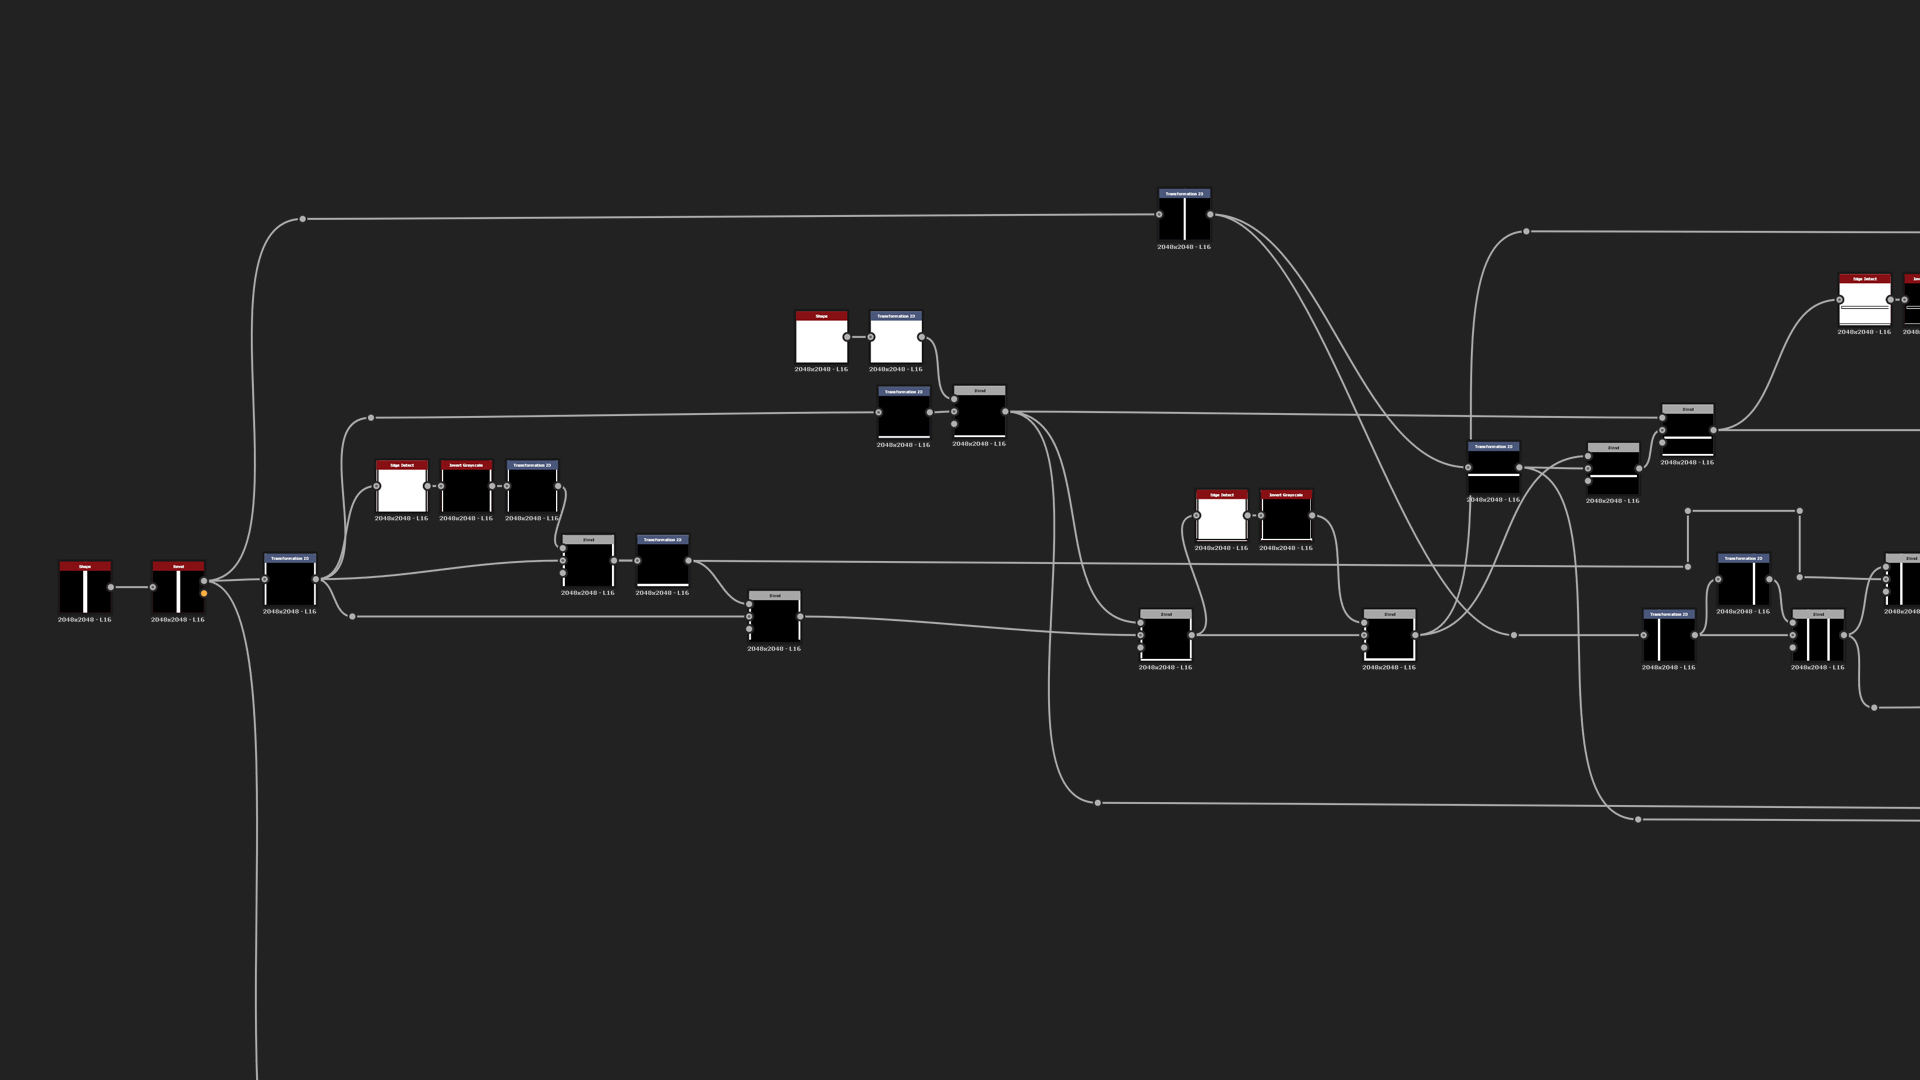
The Wood Grain
Fortunately the first graph is fairly easy to read, so let’s jump into it!
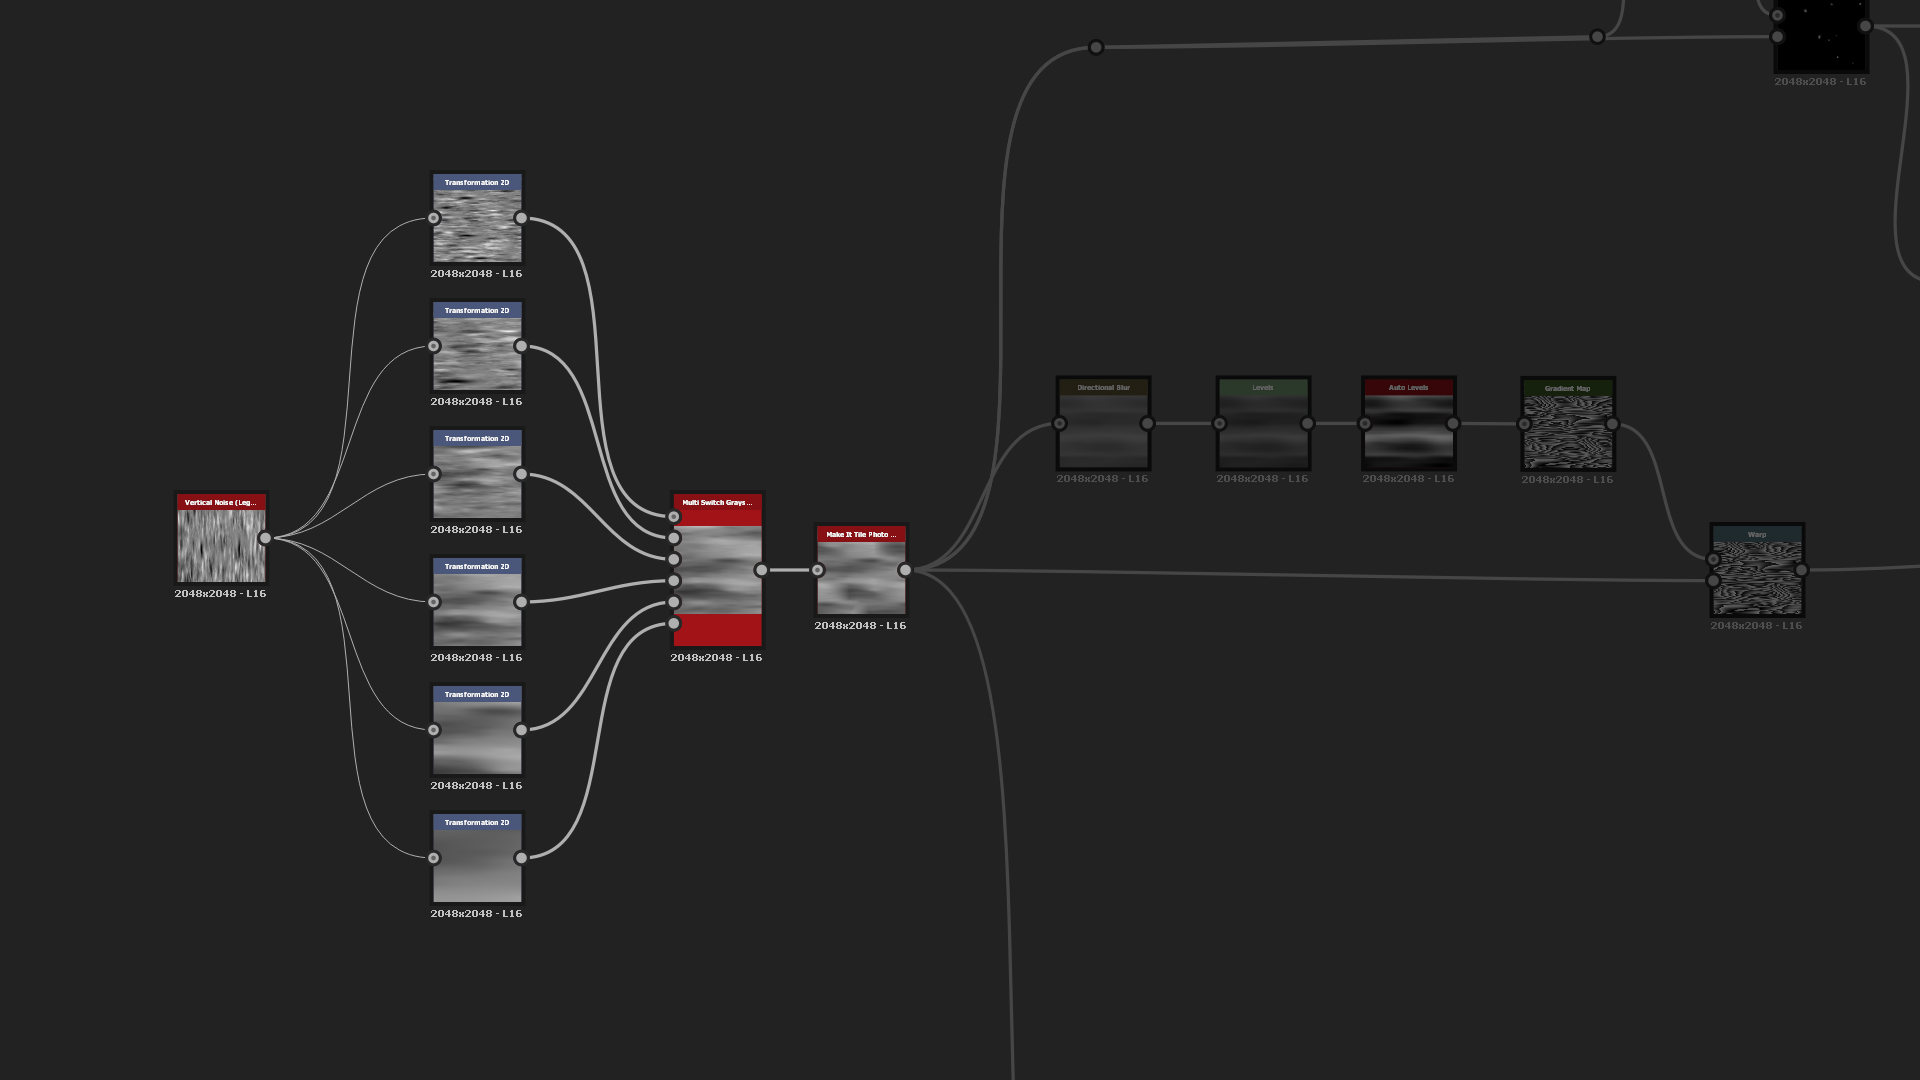
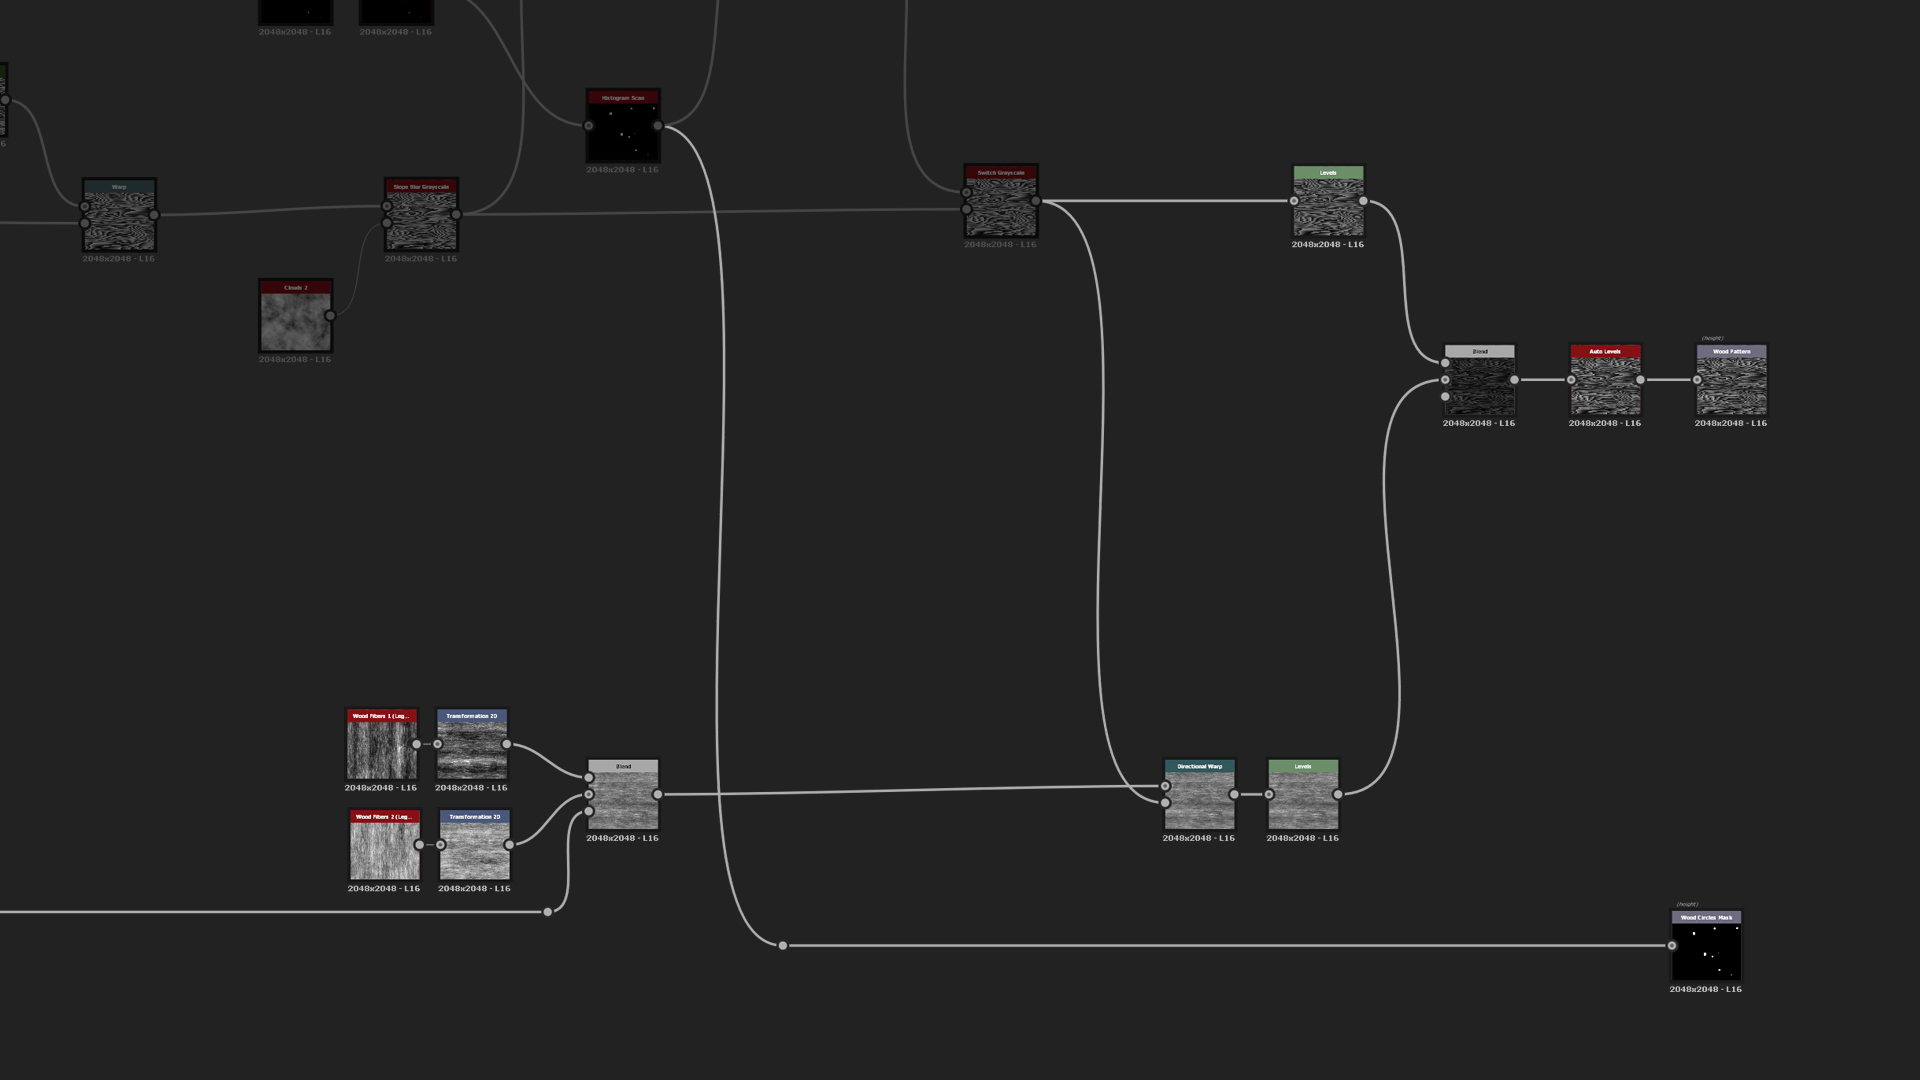
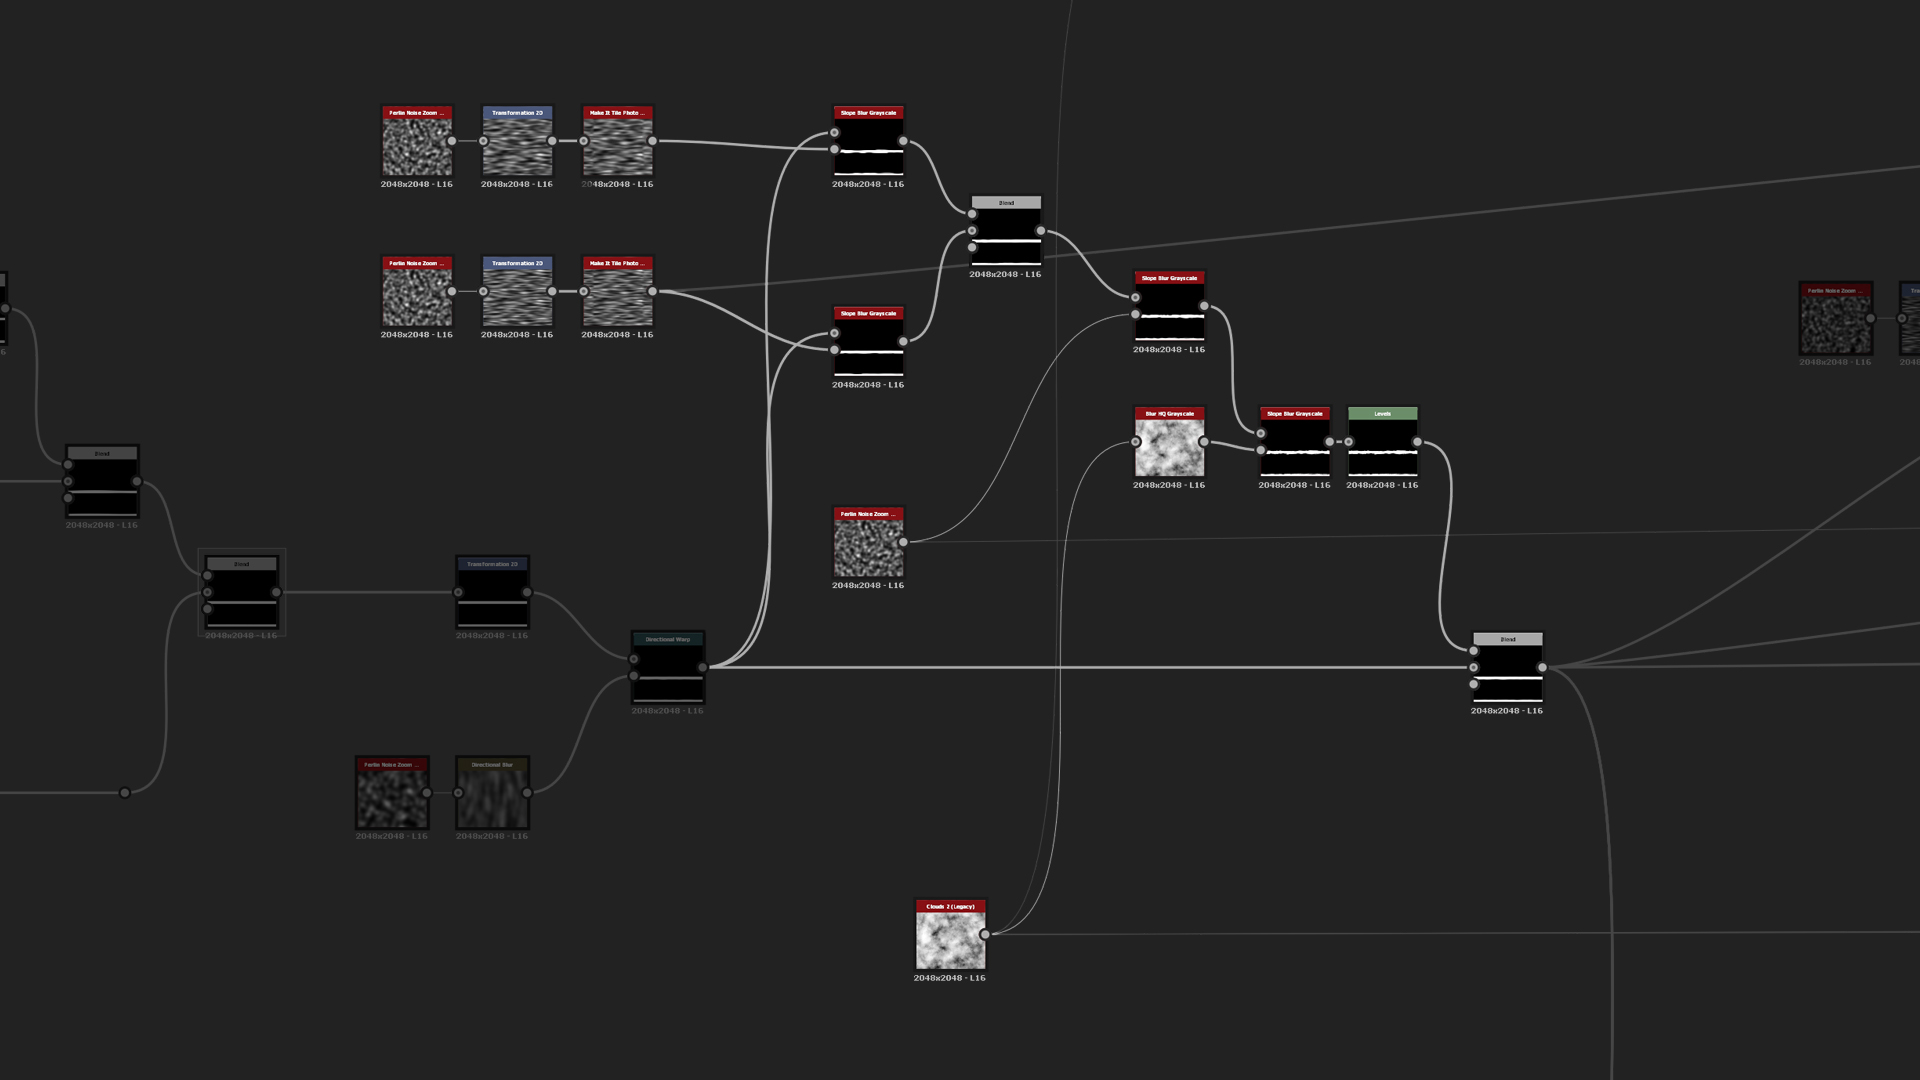
The first step of this texture is to create Vertical Noise, and to use Transform2D to expand and rotate it horizontally. There is no actual need to rotate it, it can be more practical to work that way and see the pattern horizontally rather than vertically. You can then use multiple Transform 2D nodes to change the scale of the wood pattern and Multi Switch that was Exposed to be able to change the pattern scale later on if needed. Because of Transform 2D, the pattern was not tileable anymore, so use Make It Tile Photo after Multi Switch.
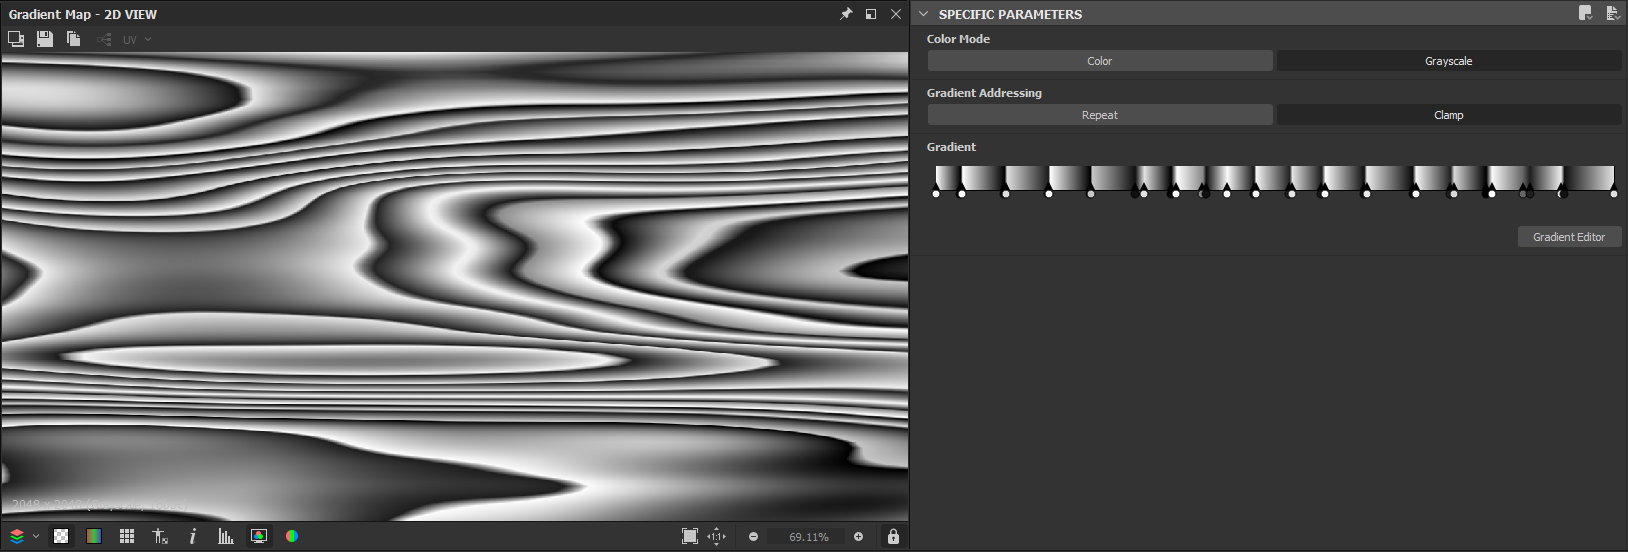
You can then use Directional Blur, Levels, and Auto Levels to clamp the values of the horizontal lines. And now run it through Gradient to be able to manually assign gradients to different slopes of the horizontal lines and create the Wood Pattern. To finalize the pattern, use Warp and Slope Blur with very low intensity, just to add some extra details and warpings to make it look more organic with small wood splinters.
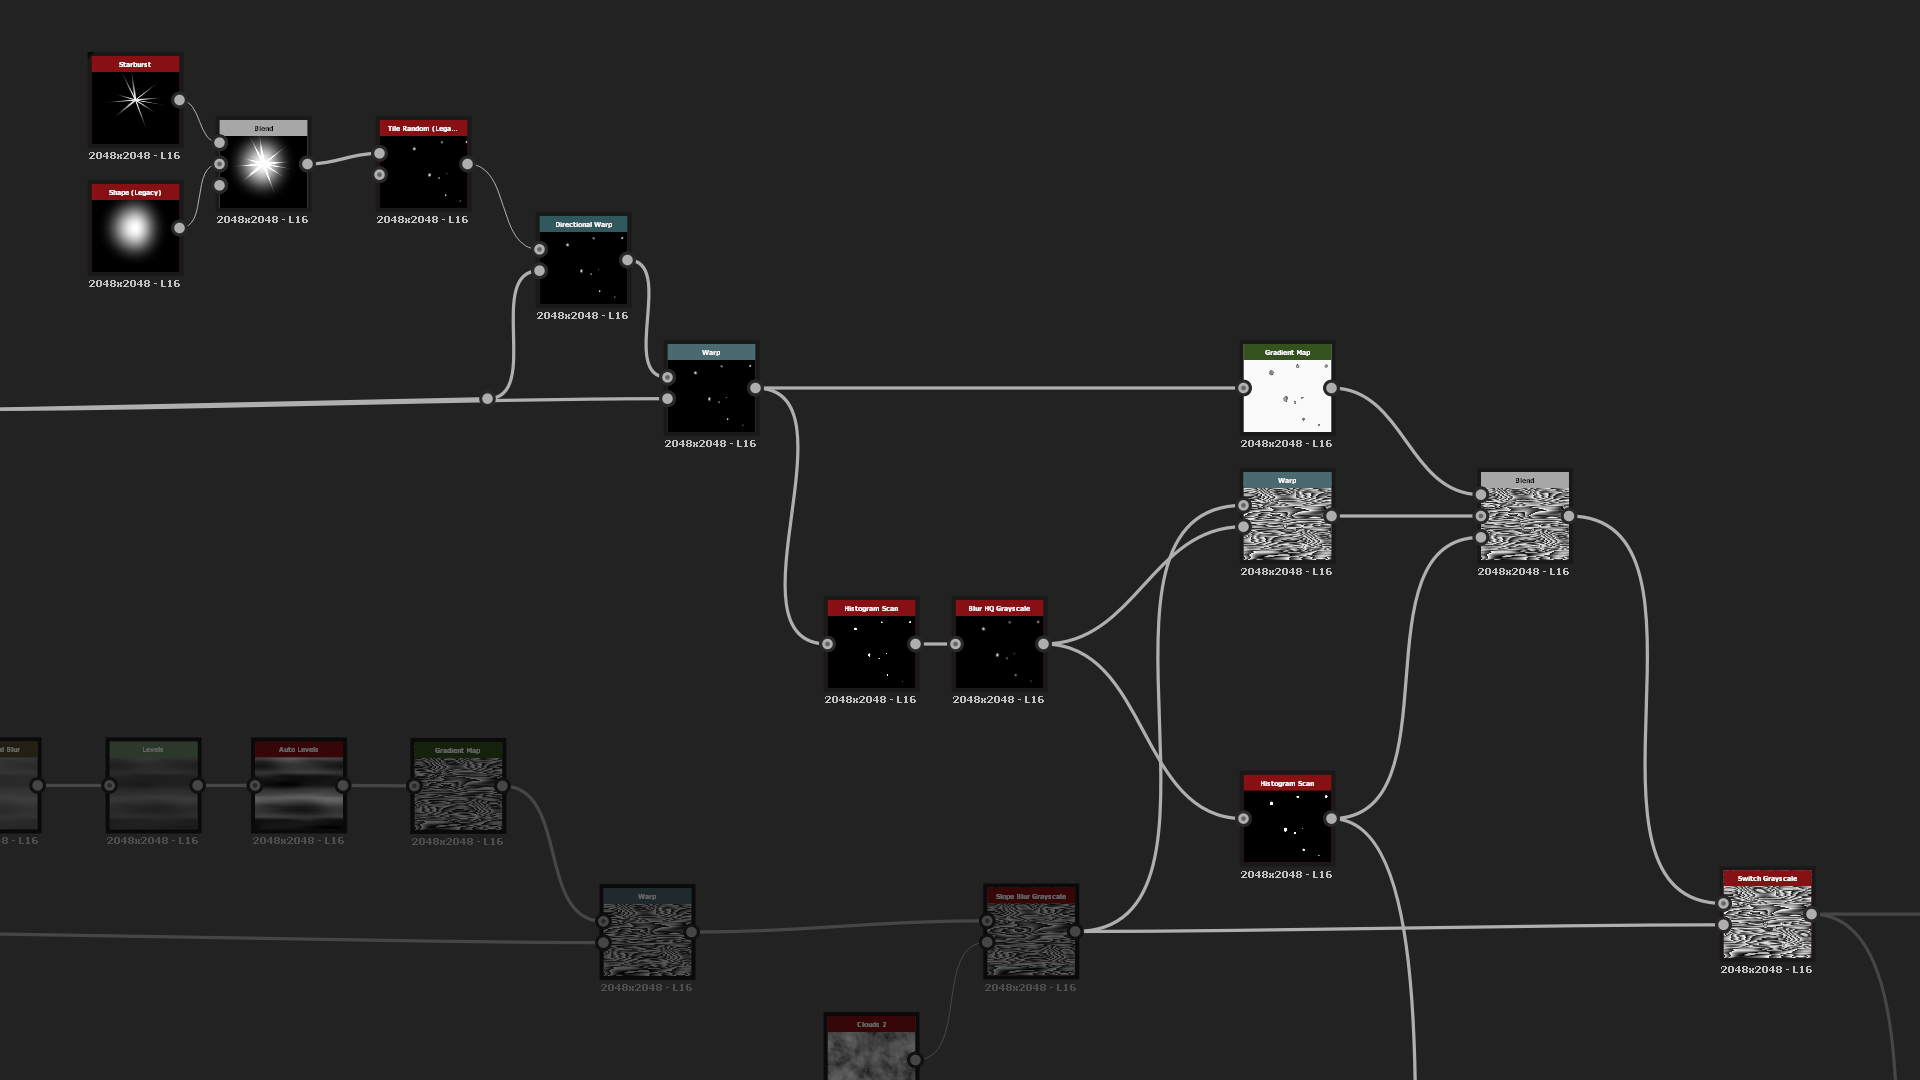
In order to add the wood circle patterns, start out with a simple Shape of Half Bell and Starburst, and blend them together with Add. After that run it through Tile Random and warp them to flow more to the overall wood pattern. you can use the same Gradient map and blend both the Wood Pattern and the Wood Circles together using the mask made by Histogram Scan. After that, add Switch node so you can turn the circles on and off depending on the need.
Final step for the wood pattern is the micro details. There use the Directional Noises (or Wood Grain from legacy), warp them to the horizontal lines and blend both the wood detail grain and pattern together using Multiply blend mode. After that you can add Auto Levels to clamp from maximum black to white. Then add two outputs - one for the main Height and second for the Wood Circles mask which can come handy when they are needed to be colorized differently.
Wood Pattern
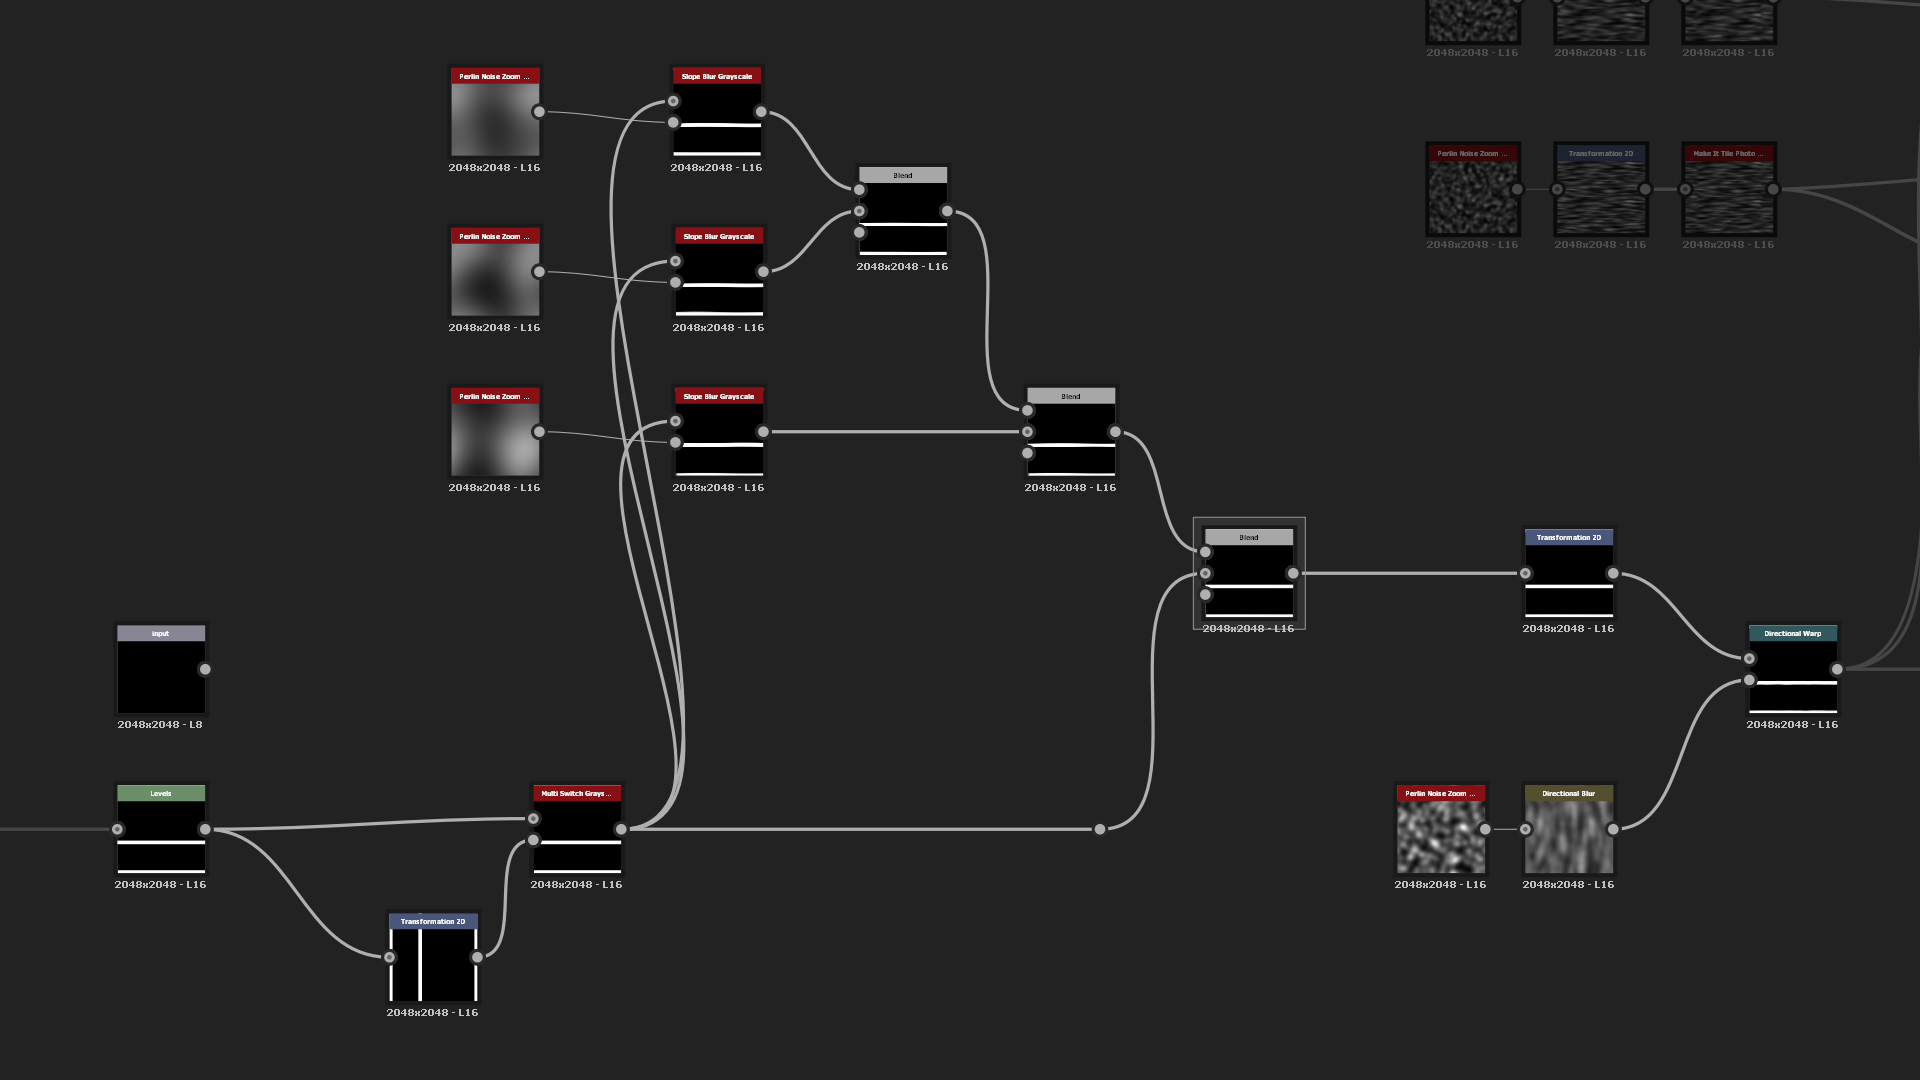
We will then create a Wood Pattern generator that adds edge wear, irregularity and wood grain details to the input. For the inputs, use the final Wooden Beams, then you will only have to make a square shape and the generator makes all the details needed for the beams. That way you will be able to use Transform2D in any way you want and just have to run it through the generator and all the details will be transformed the same way. Good example about it is if you imagine 45 degree plank and adding wood grain, edge wear and details to that. Rather than rotating multiple nodes if changes are needed, then you will be able to do that with only one node. It saves time and your graph will be well organized so it will have better readability.
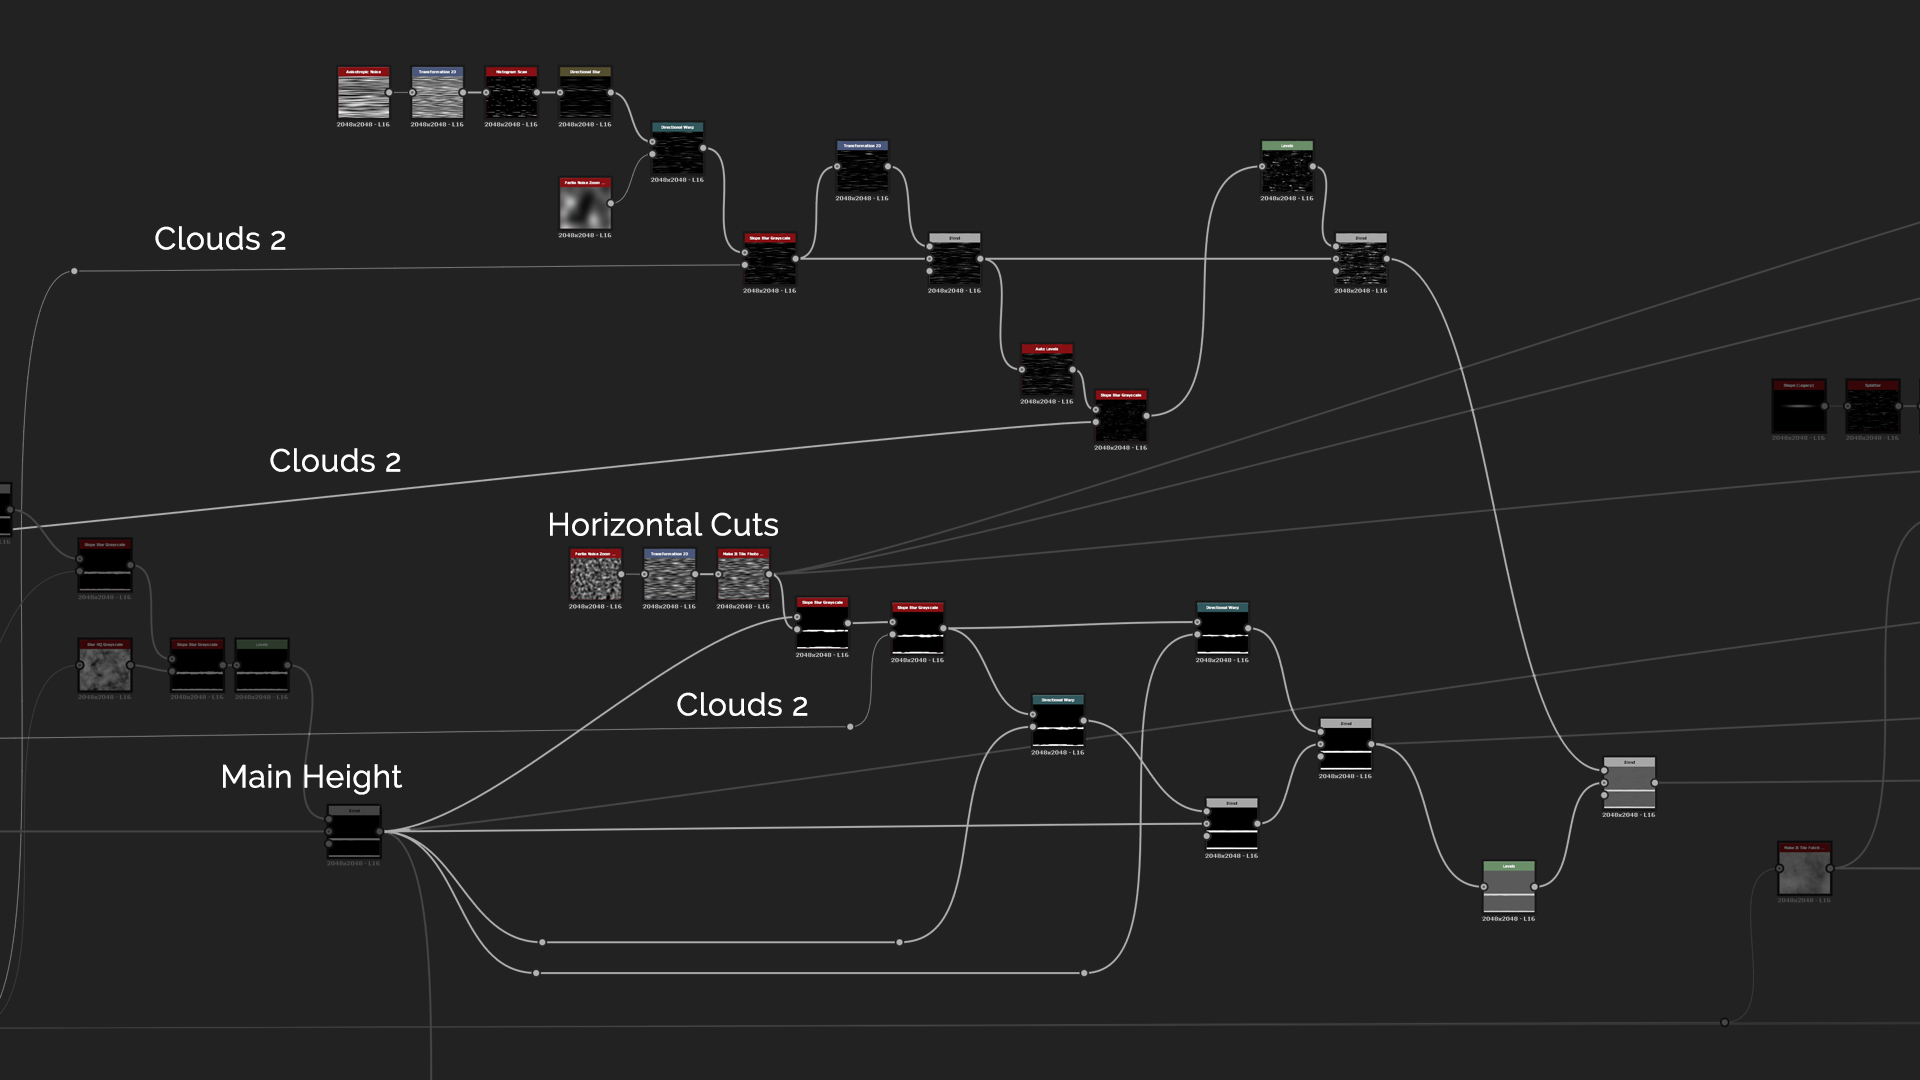
To better illustrate the generator, you can add a basic Shape of a tiled box in the input which will be warped and transformed to the final Wooden Beam. The first thing to do is to create an Input node and Multi Switch so you can switch between horizontal and vertical shapes. After that, use Slope Blur with Min mode and Perlin Noise to cut some shapes into the beams and blend them together using Multiply mode. Because some of the shapes will be cut from edge to edge, use Transform 2D and stretch them horizontally a little bit. Once that is done add Directional Warp to make the beams more irregular.
Here add more intensive edge wear using Slope Blur again with Perlin Noise that has been stretched horizontally. This edge wear is meant for the upper layer of the wood and not the whole way through so the warping can be much stronger. Once that is done, blend it in using Multiply mode with fairly low intensity of 0.18 so only some of the edge damage will be shown.
Then, you can name the "Main Height" blend node as it will be used later on and might be too confusing to explain where it stands in the graph. In the first blend node add more horizontal edge wear since the previous one was using more as a cut-in wear effect. You can use the same technique with Vertical Noise and Slope Blur that was just used. And of course also add some Directional Warping so the details will flow correctly to the Main Height. After that we want to add some horizontal cuts along the beams. Start again with Vertical Noise, rotate it to be horizontal, separate few lines using Histogram Scan and stretch them using Directional Blur. To add some warping use Slope Blur and blend them in by using Subtract mode with very low intensity of 0.05. These parameters could be Exposed so you can tweak them to the corresponding material as needed.
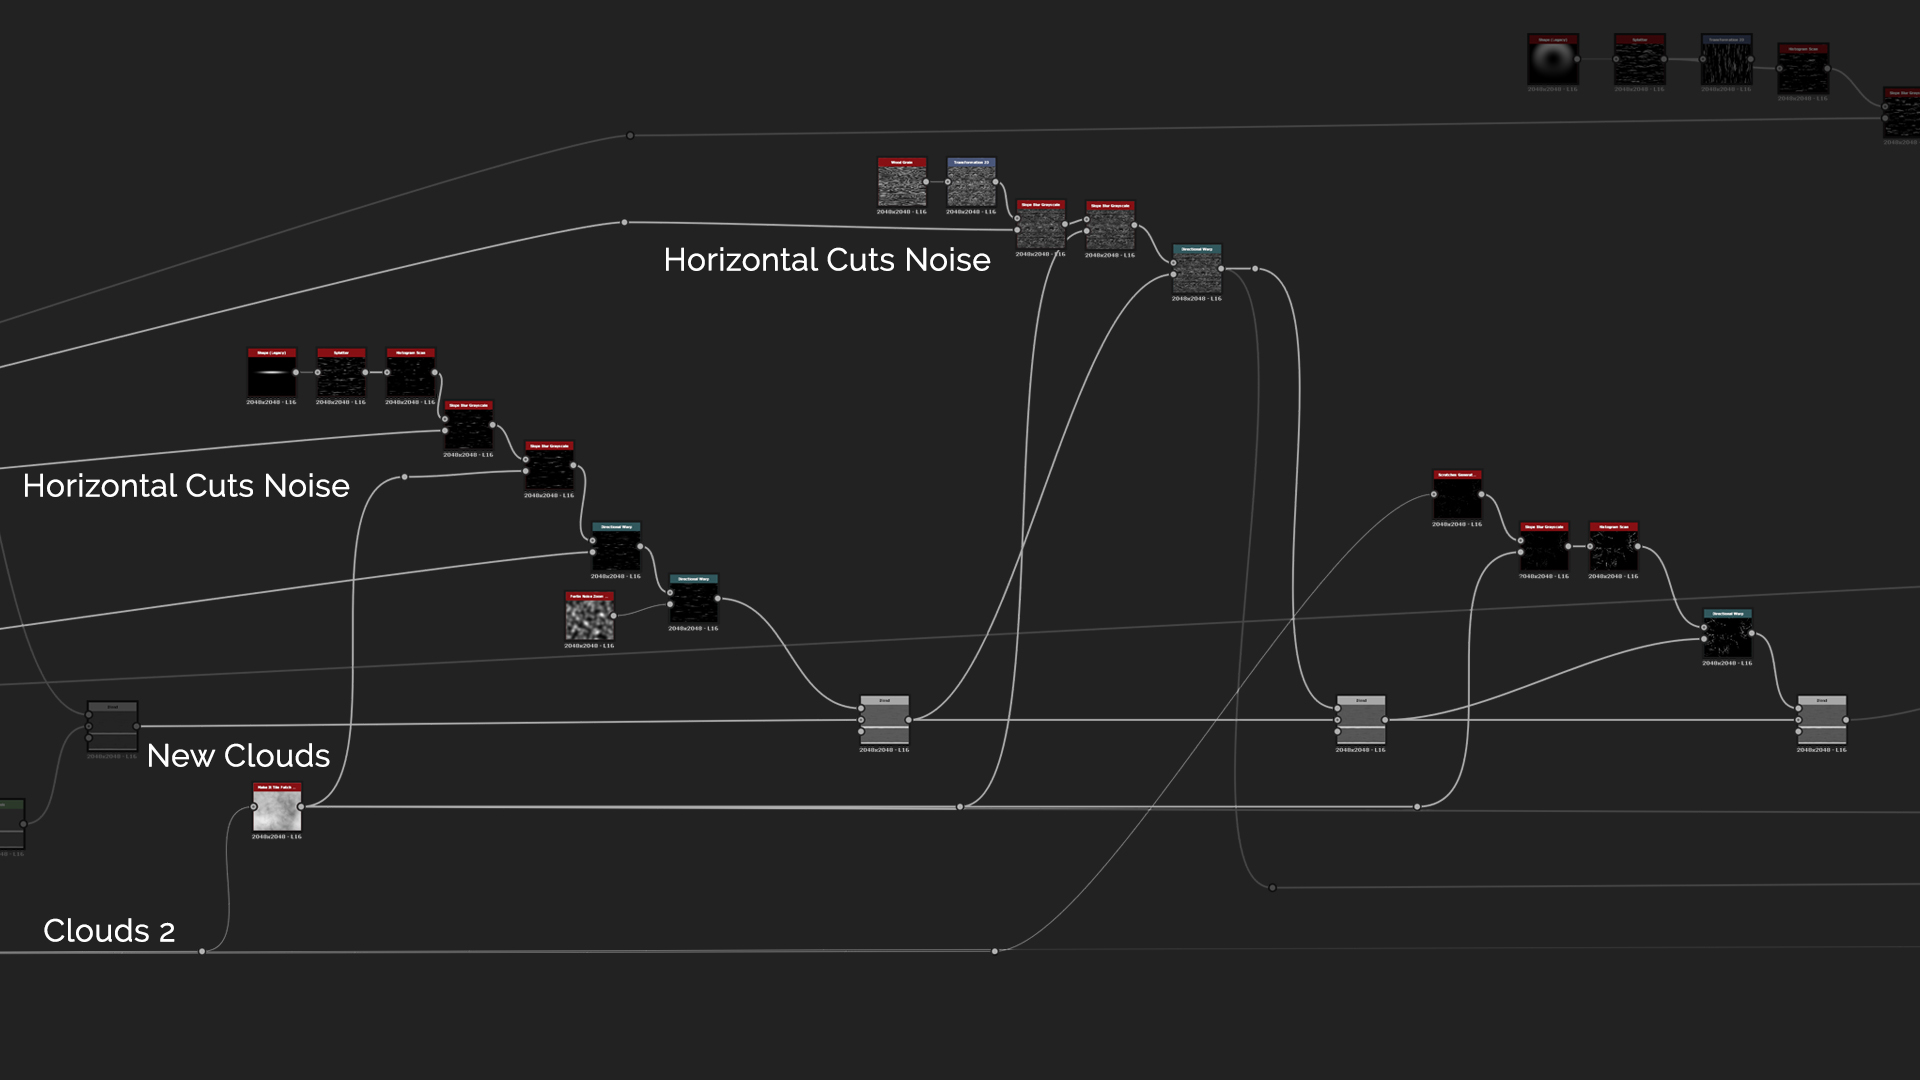
Since I started to like the idea of having cuts in the wood as if it was really dry, I wanted to emphasize that. Make a Shape of Ridged Bell and reduce the X size. After that plug it into Splatter and use Histogram Scan to mask out some of them. Then use Slope Blur with the Horizontal Cuts noise and Clouds 2 to add some wearing effect to the cuts. Clouds 2 went through Make It Tile node to reduce the noise pattern which is quite heavy. You can then end the cuts by warping them to the Main Height and Perlin Noise to randomize them a bit more.
And now comes in our Wood Grain that we made. Use Transform 2D to tile them more and in order to make them feel really worn out so that even the wood grain isn’t that well distinguishable, use Slope Blur again and end it by warping it to the height and blending it in using Subtract with intensity of 0.05.
After the Wood Grain details and cuts we want to add some irregularity dents into the wood. But before that we can make a simple Scratch Generator node where we use New Clouds as a mask and generate few scratches that go through Slope Blur for some wear effects.
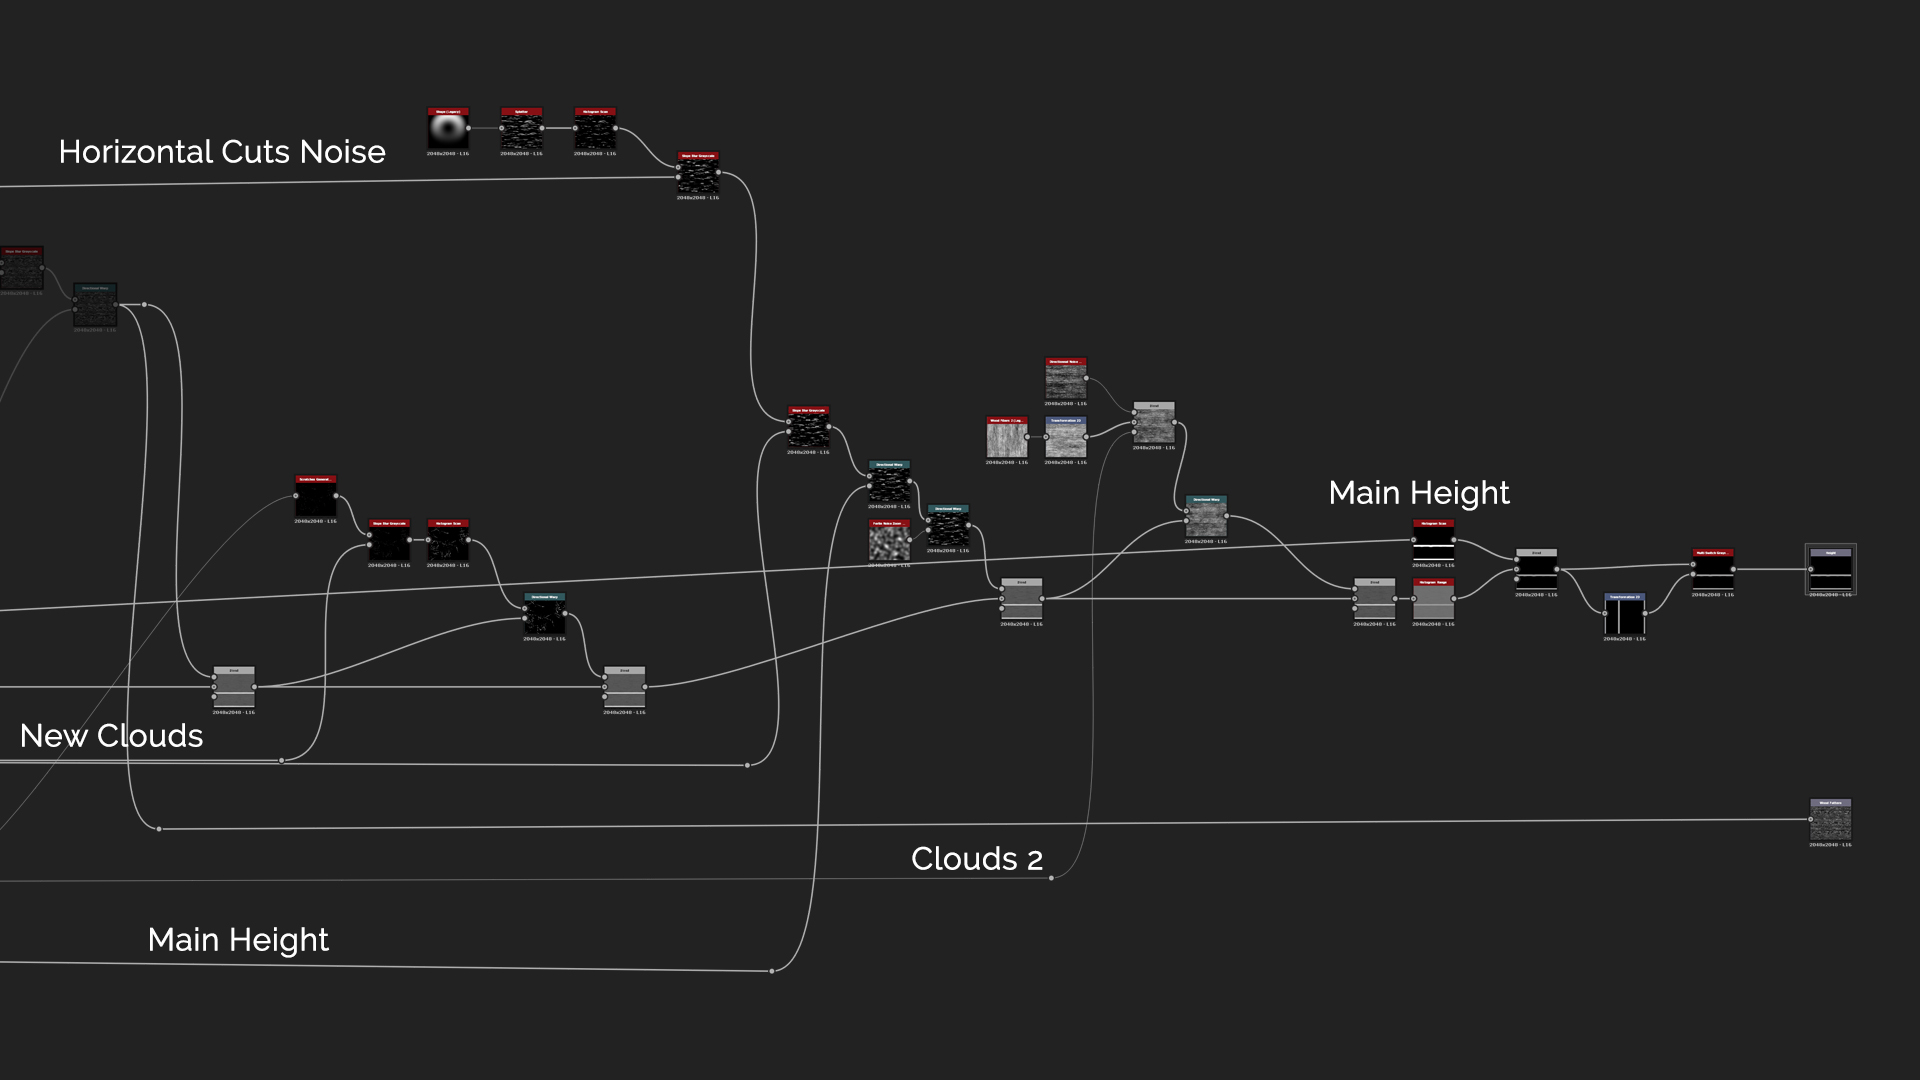
The dents were created by using Shape node with Crescent as the pattern. Again use Splatter and Histogram Scan to randomly tile them around and seperate just some of them. Then use Slope Blur as we've been using it throughout the whole graph and warp it by using some Perlin Noise with the Main Height.
For micro detailing use the Vertical Noises that were used in the Wood Grain too. Then blend them in very softly with a Subtract at 0.02 intensity. As the details are still too strong so add Histogram Range to reduce some of them. And finally use the Main Height to extract a mask and Multiply it over the Histogram Range heightmap to keep the details as they were but get black background to properly blend them together later. At the end is the same rotation setup that was in the beginning so the details don't have to be rotated but the whole input will be rotated and in the end rotated back to the original. Then you can add a second Output with the Wood Grain that was warped to the Main Height that can be used to generate Base Color for the wood.
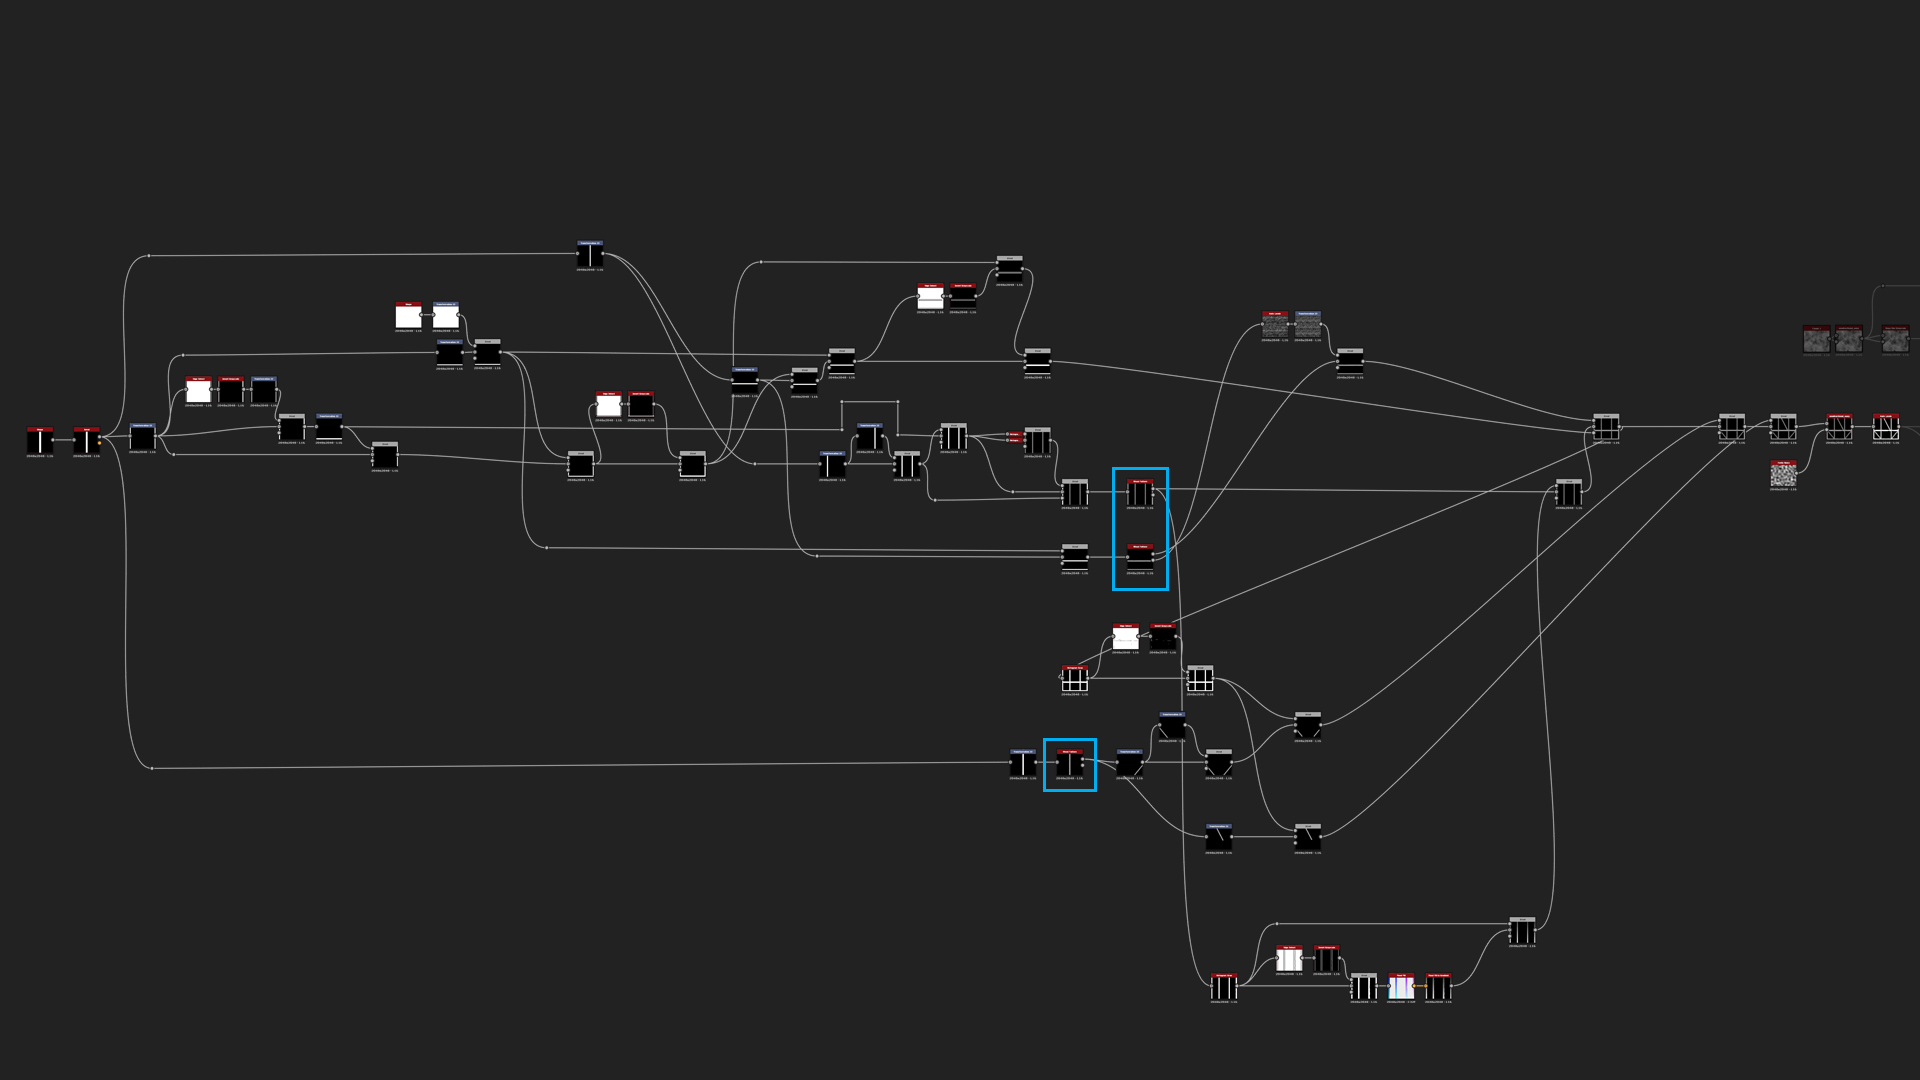
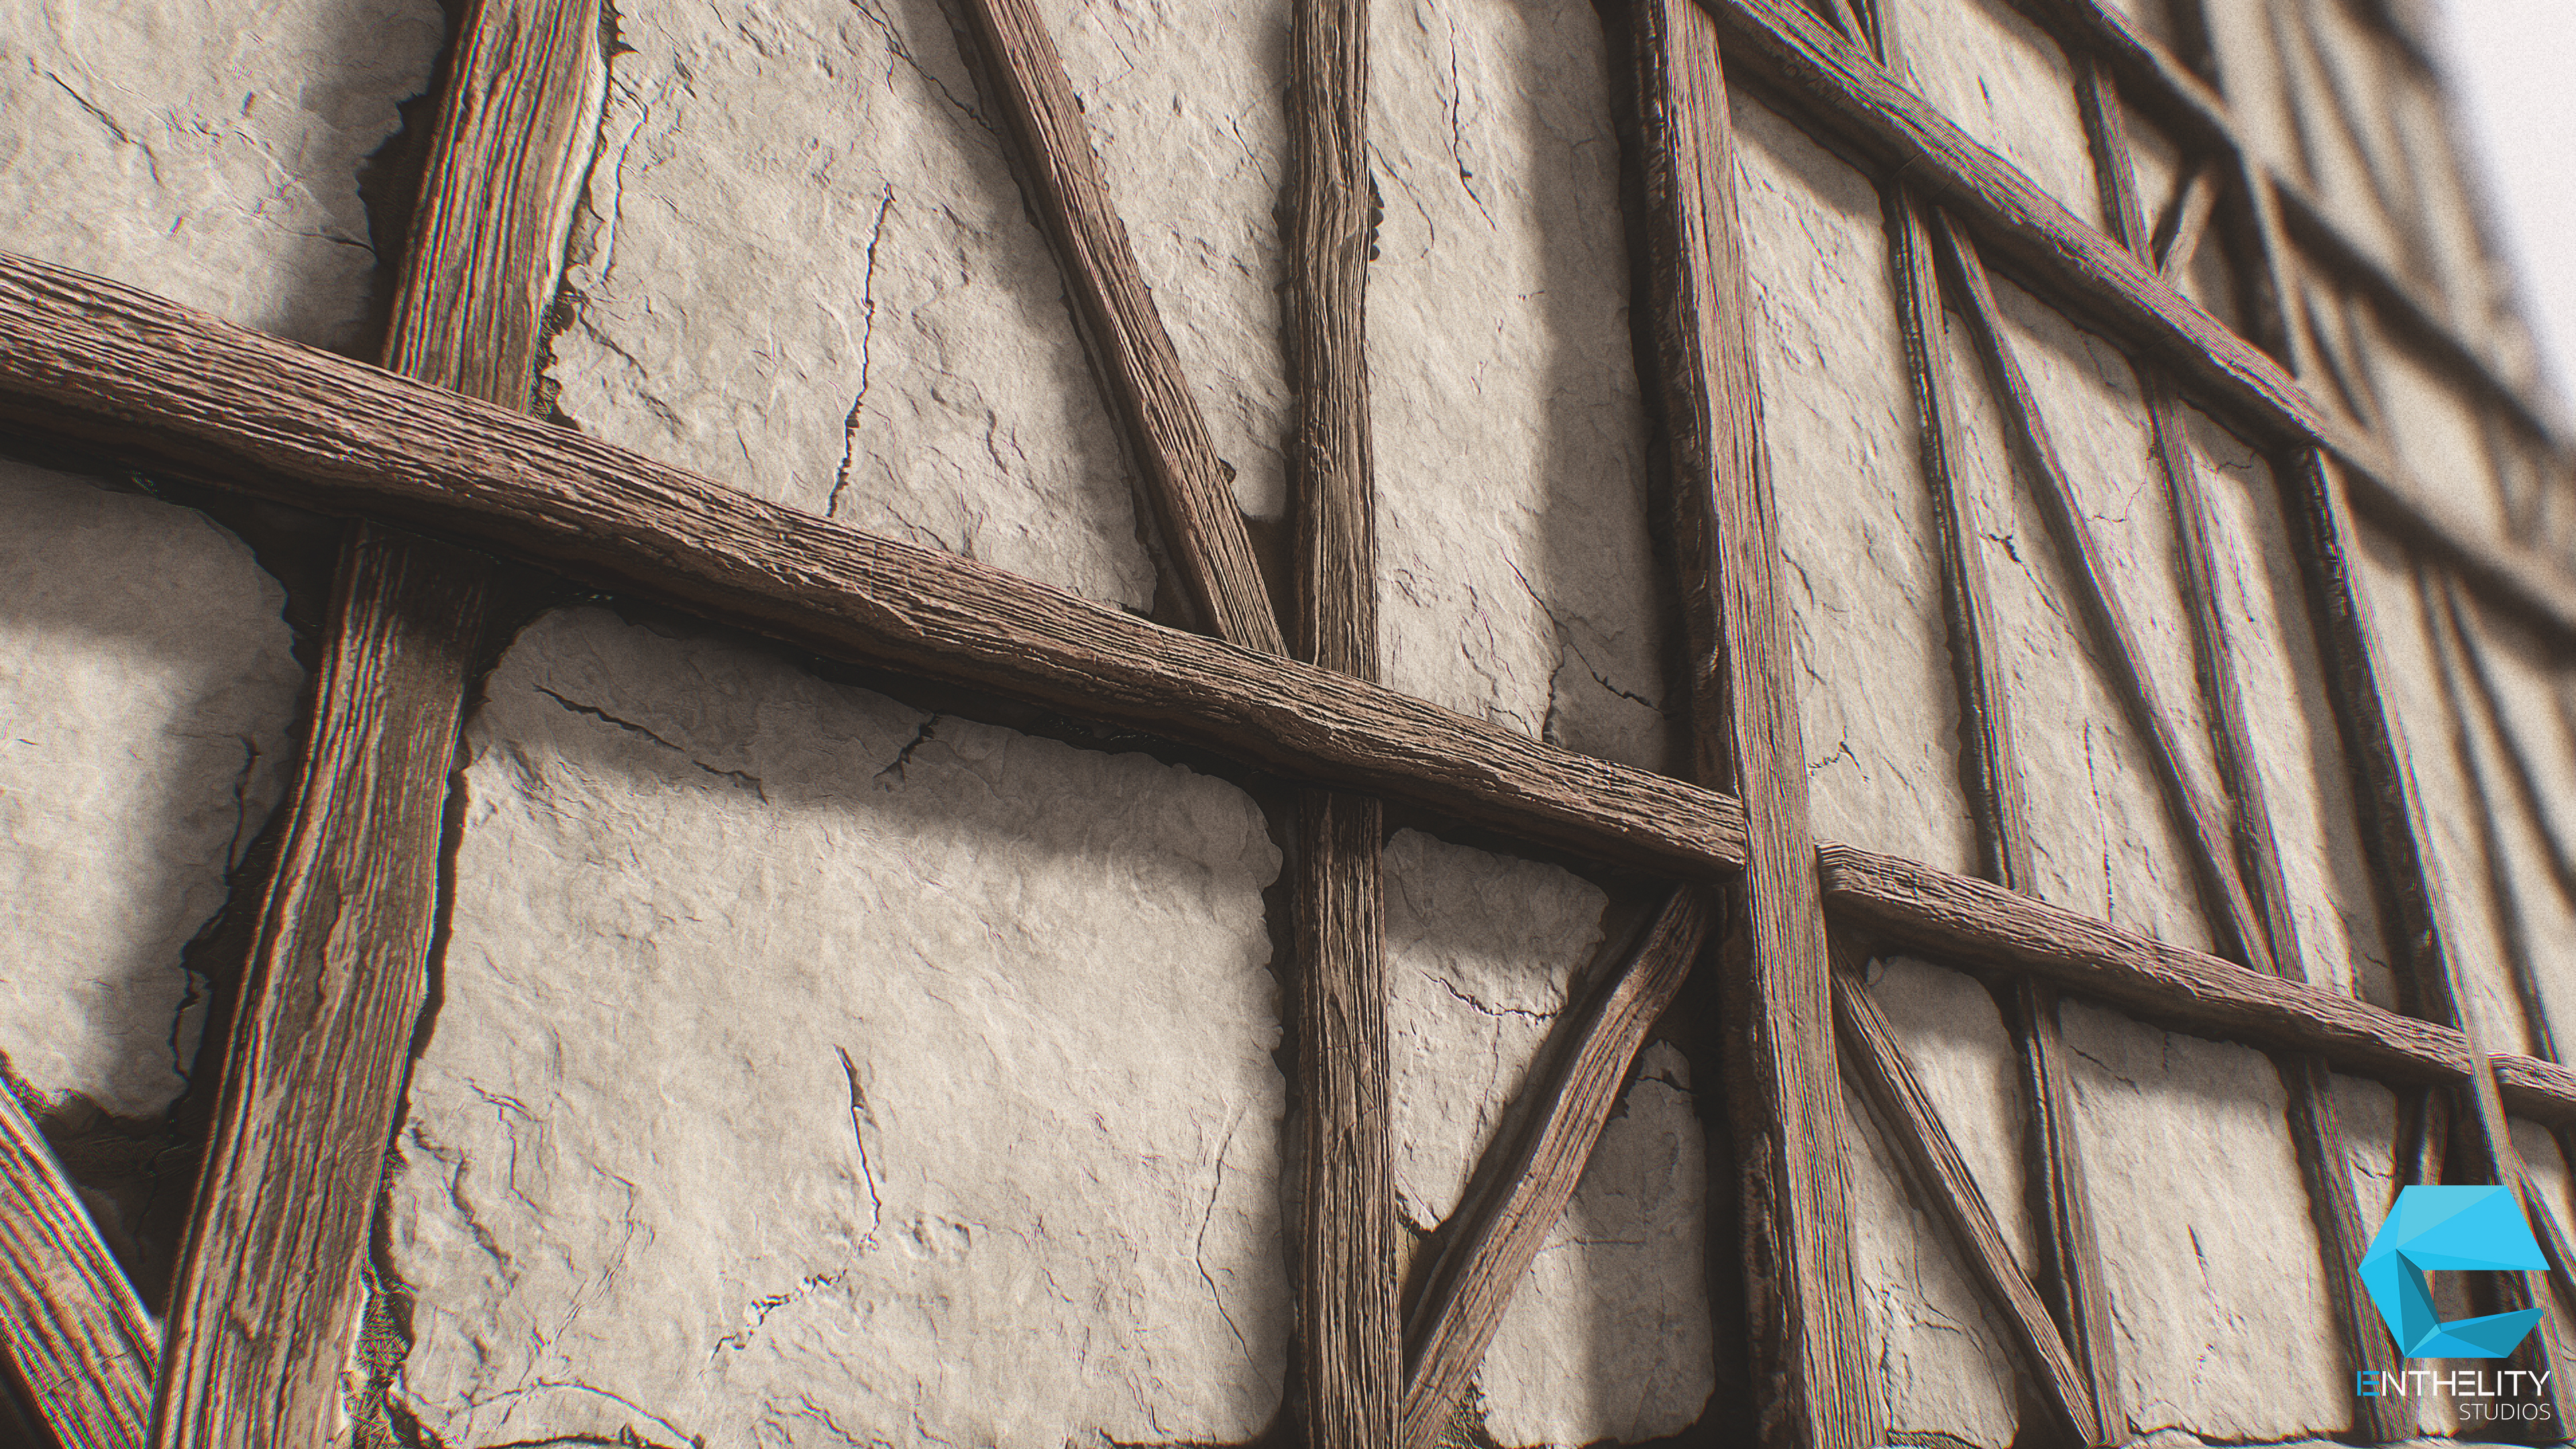
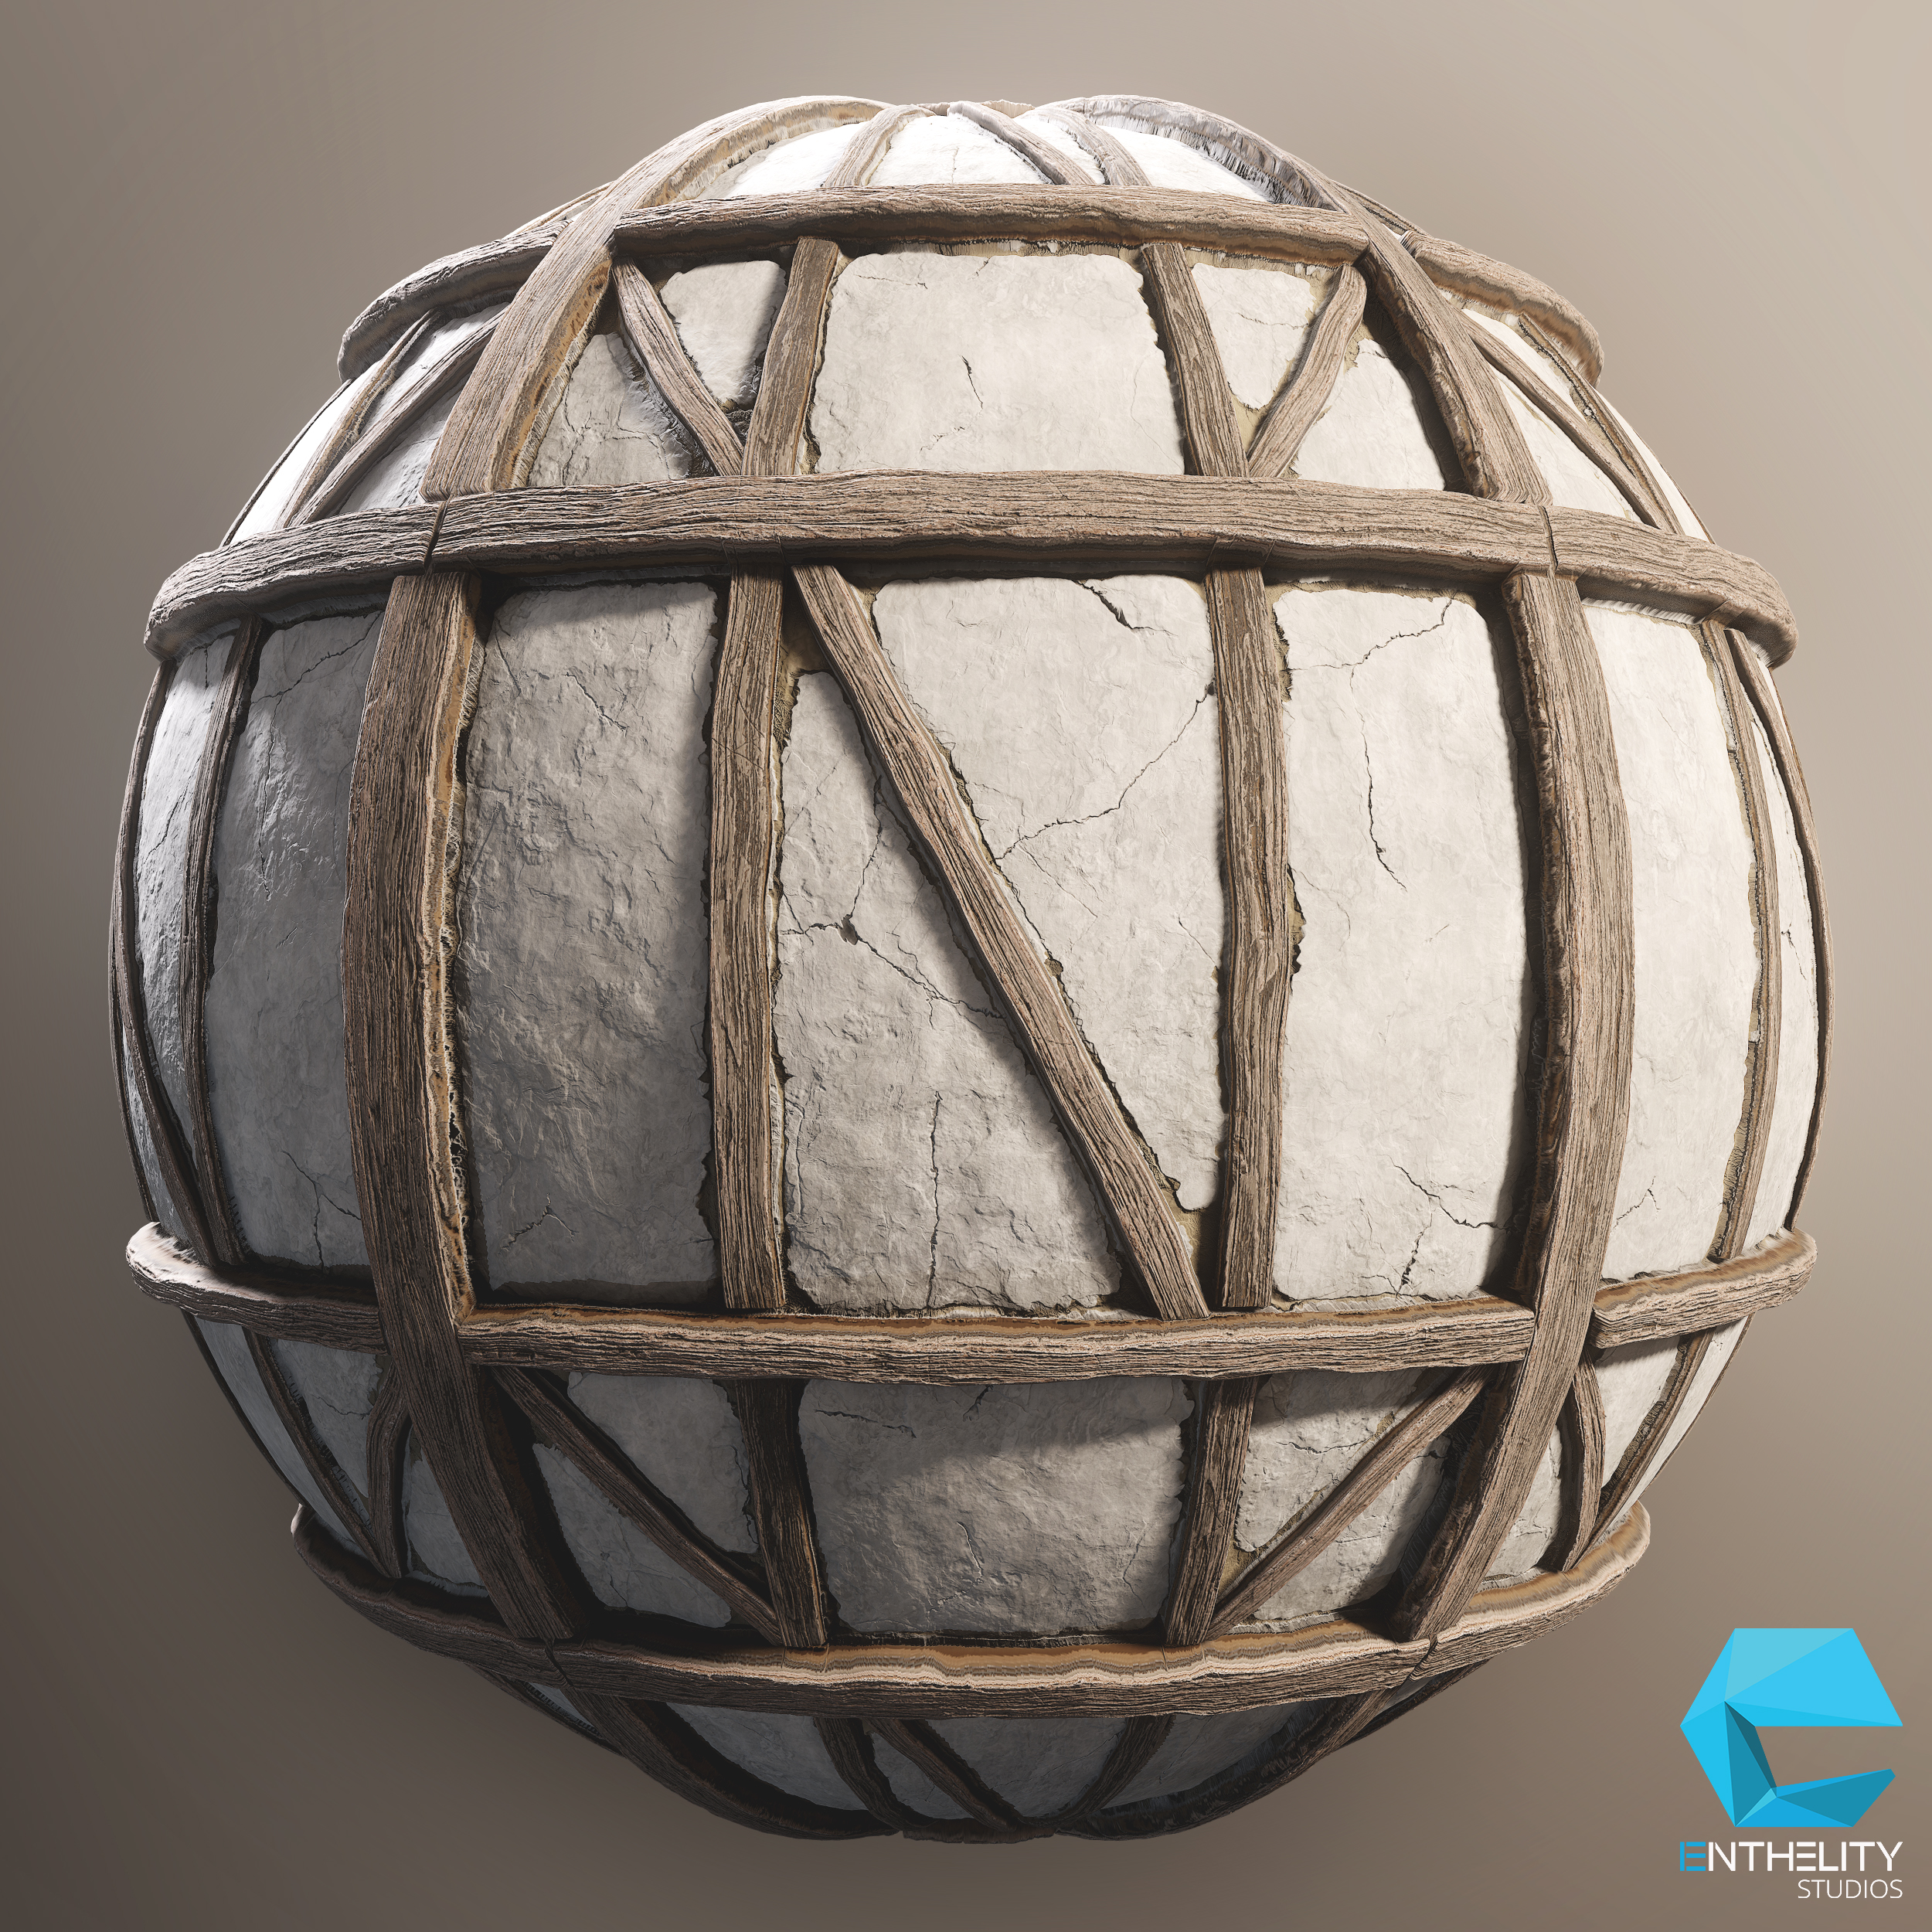
Tudor House Wall
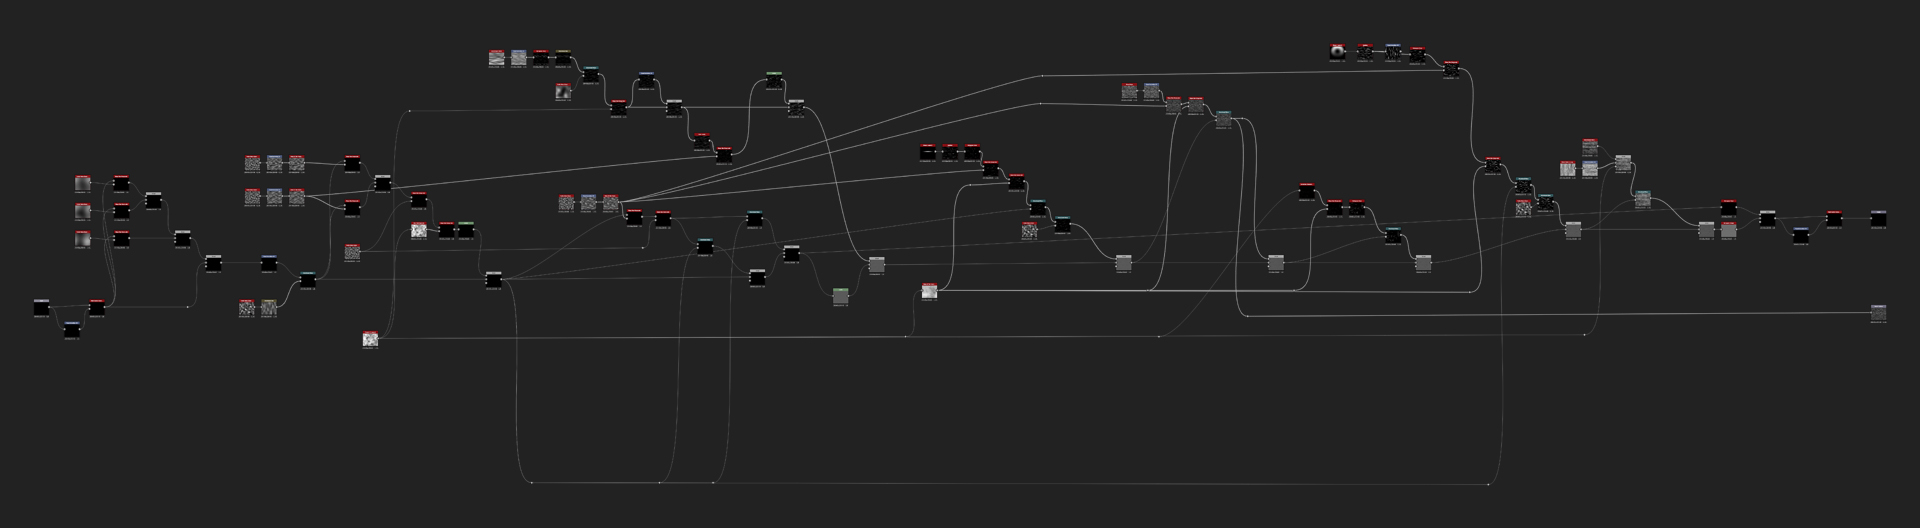
Even if the graph looks a bit scary and crazy, it is actually fairly simple. Mostly there are Transform 2D's that create the house wall pattern and masks made using Histogram Scan. And since we now have the Wood Pattern generator, we just need to plug the square planks shapes into the generator and end up with our wooden beams.
You can see that we just started with a Square Shape with 0.07 on Size X, added Bevel node without bevel itself but with 1.17 Smoothing intensity so that the height map will not be distorted. After that we start creating the whole shape using the most basic nodes like Transform 2D, blending with Add and Invert node. Yeah, I know, very advanced level for creating the pattern.
Once the shapes are done, add our Wood Pattern generator at the end of the shapes, that can be seen in the blue boxes, and that generates our final Wooden Beams with the needed details. You can even add a very subtle angel variation with Flood Fill to the inner beams. At the end you can see that I added a Non-Directional Warp just to break the uniform look and make it look more organic. And finally add an Auto Levels node to get the most out of the height.
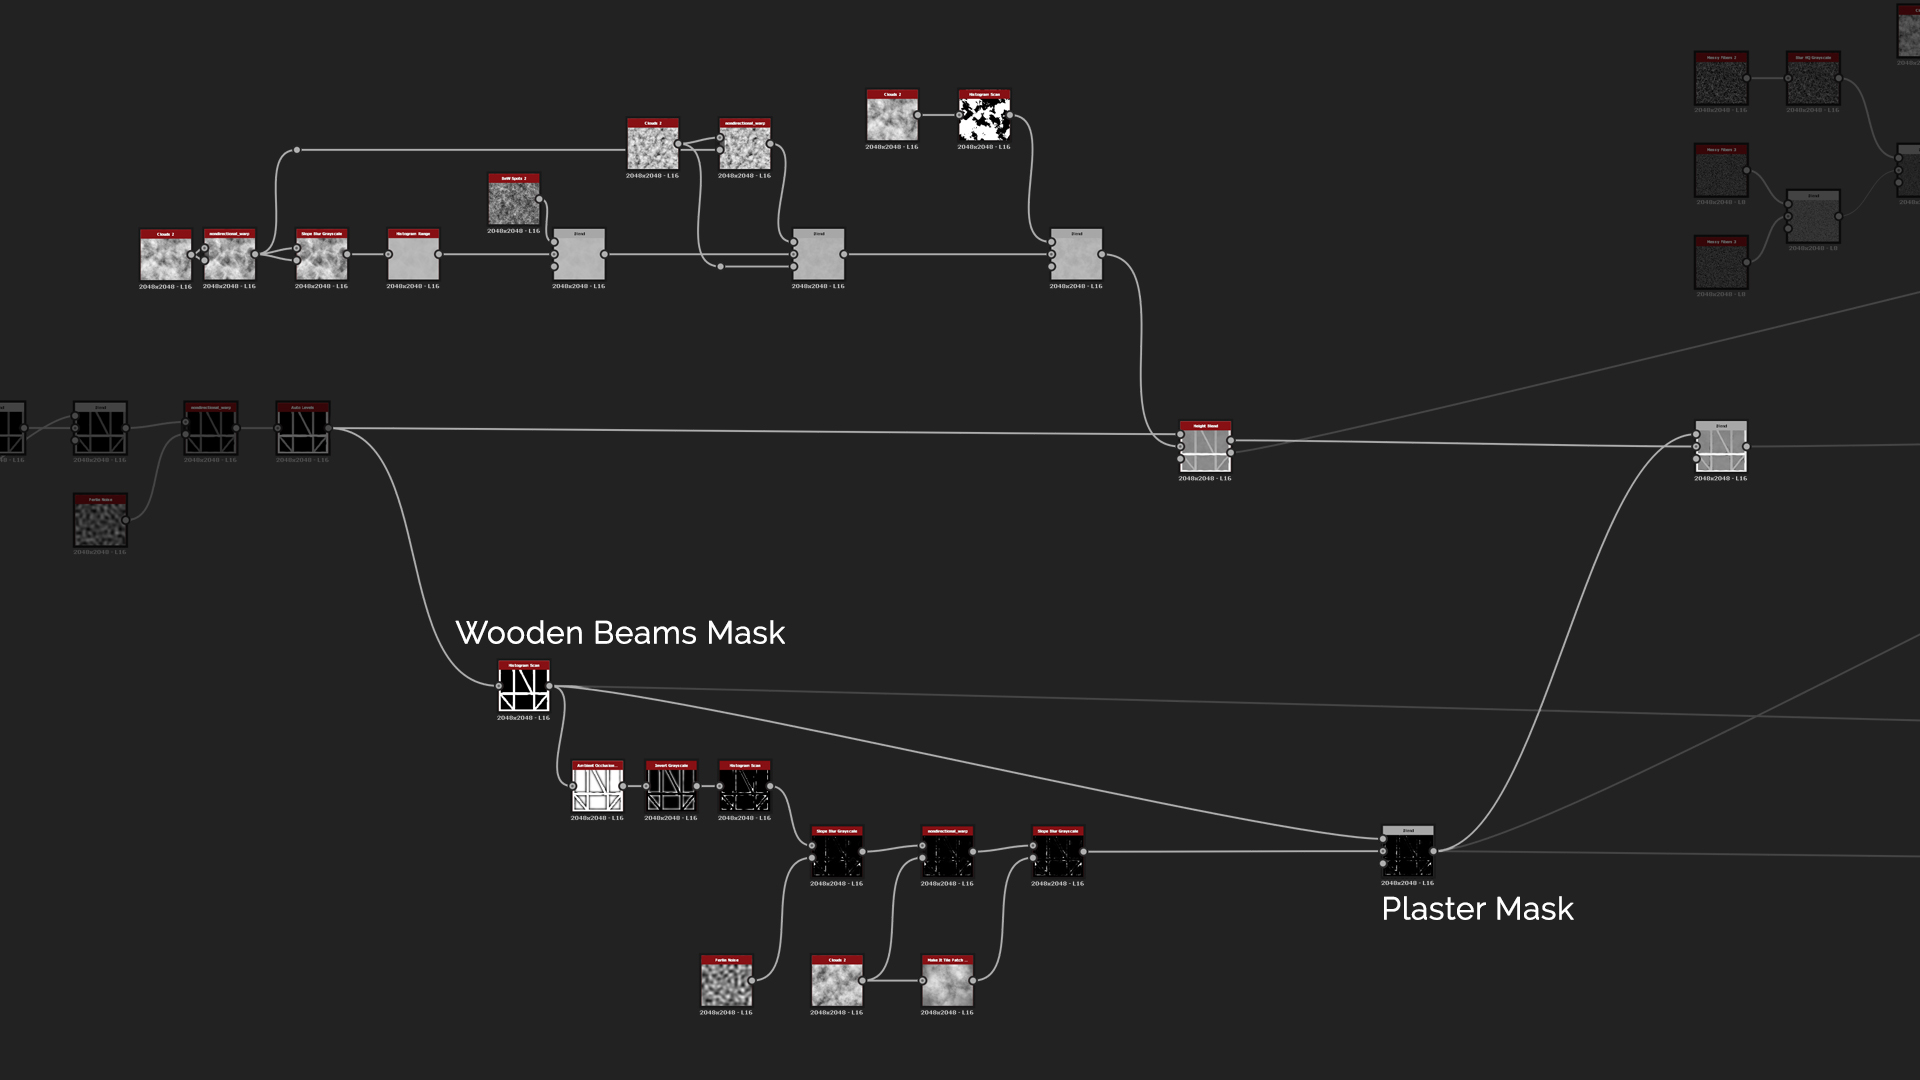
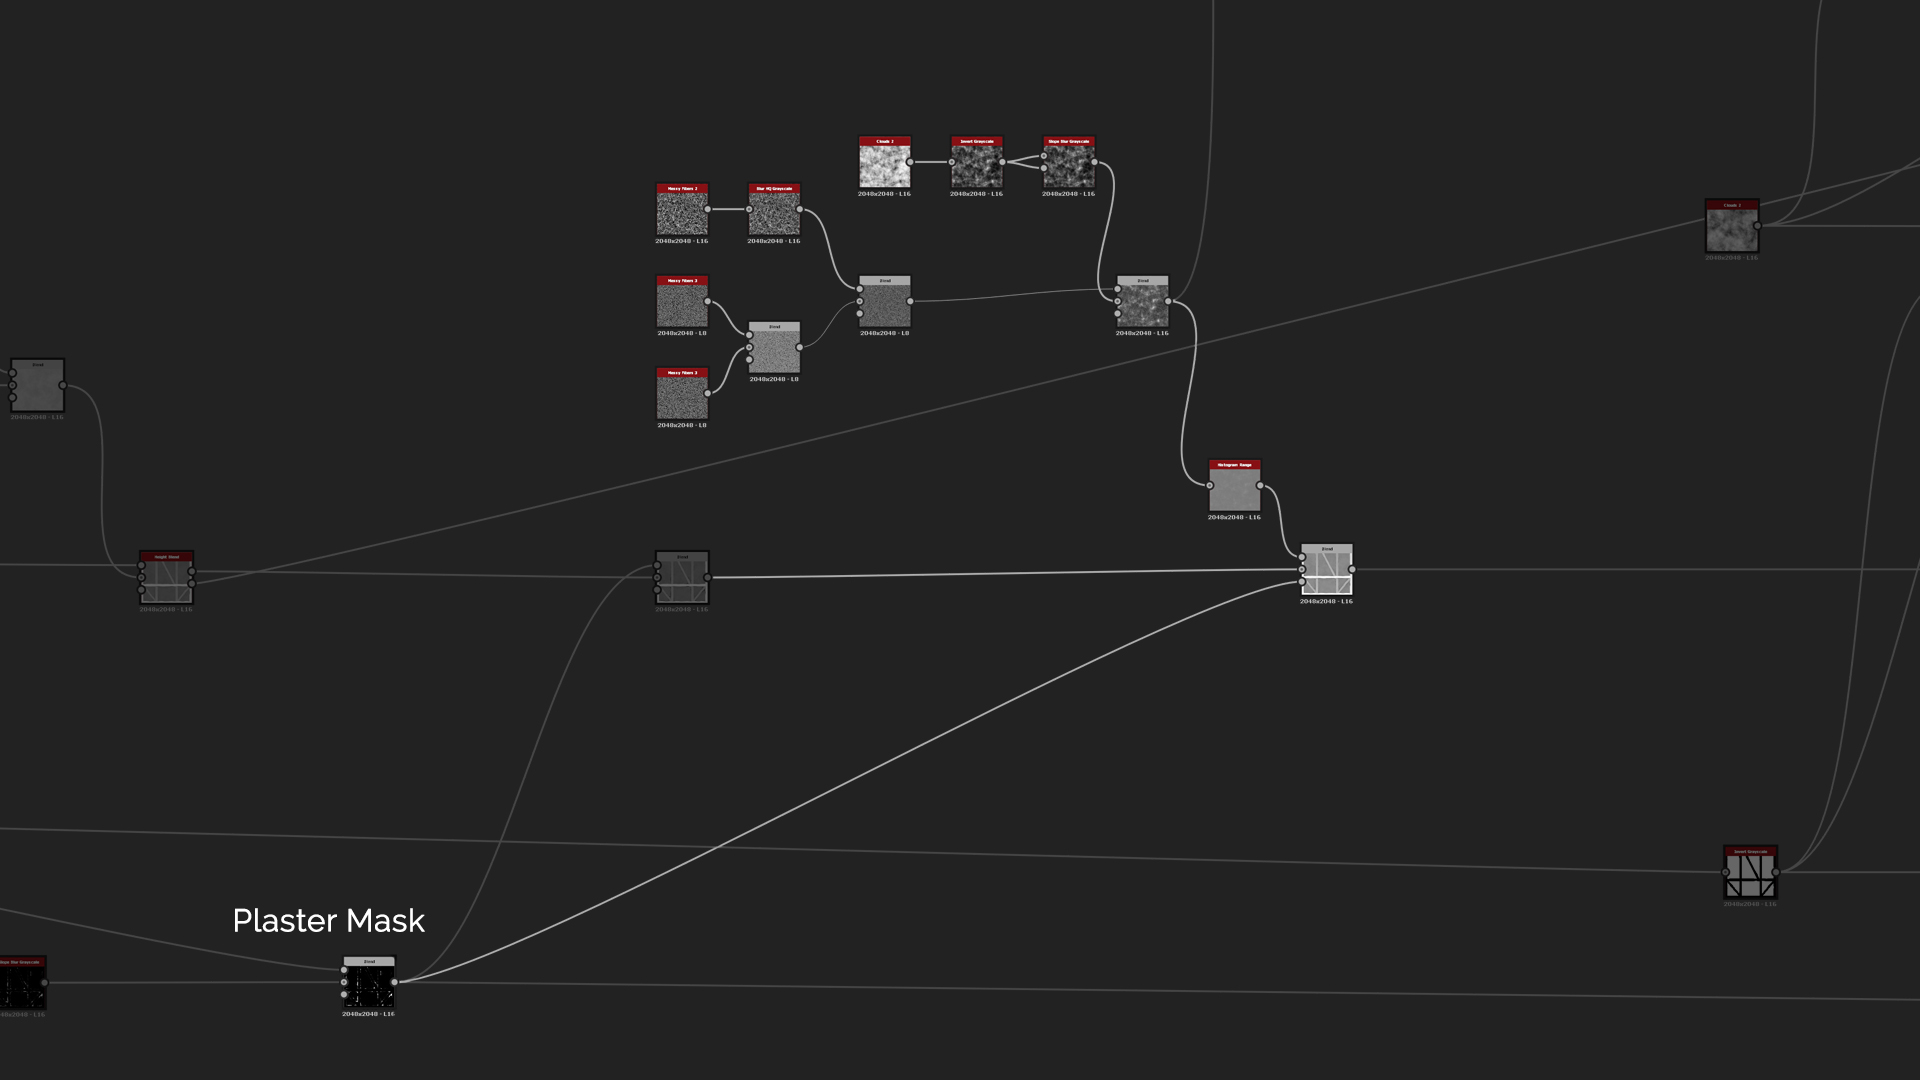
For the plaster you can start out with Clouds 2 and warp them with Non-Directional Warp and Slope Blur. Here we want to make the plaster look really worn out and as if it was done using the most basic tools. After that use Histogram Range to soften up the height since it is too heavy. Then you can add micro details with BnW Spots 2 noise with very subtle blend of 0.0023 and layered feel to it by using Clouds 2 and Histogram scan that is clamped to full black and white. For the final blend between the Plaster and Wooden Beams, use Height Blend node. The great thing with that node is that it generates out mask between the two layers that comes really handy in the coloring phase.
Next step is to add some broken off corners where the plaster didn't hold very well. To achieve that we use Histogram Scan first to get the mask for the beams, and then use Ambient Occlusion with BlurHQ and Histogram Scan. That helps separating the inner corners on which we started to add wear effect. Throughout the whole texture we used very similar workflows to retain cohesive look, so here is the same workflow that we used in the Wood Pattern. We start with Slope Blur in Min mode that cuts into the corners which is followed by Non-Directional Warp and Slope Blur with Clouds 2. Finally we subtract the Wooden Beams Mask from the corners so they will not interfere with the wood shapes and Subtract with a low intensity from the main height.
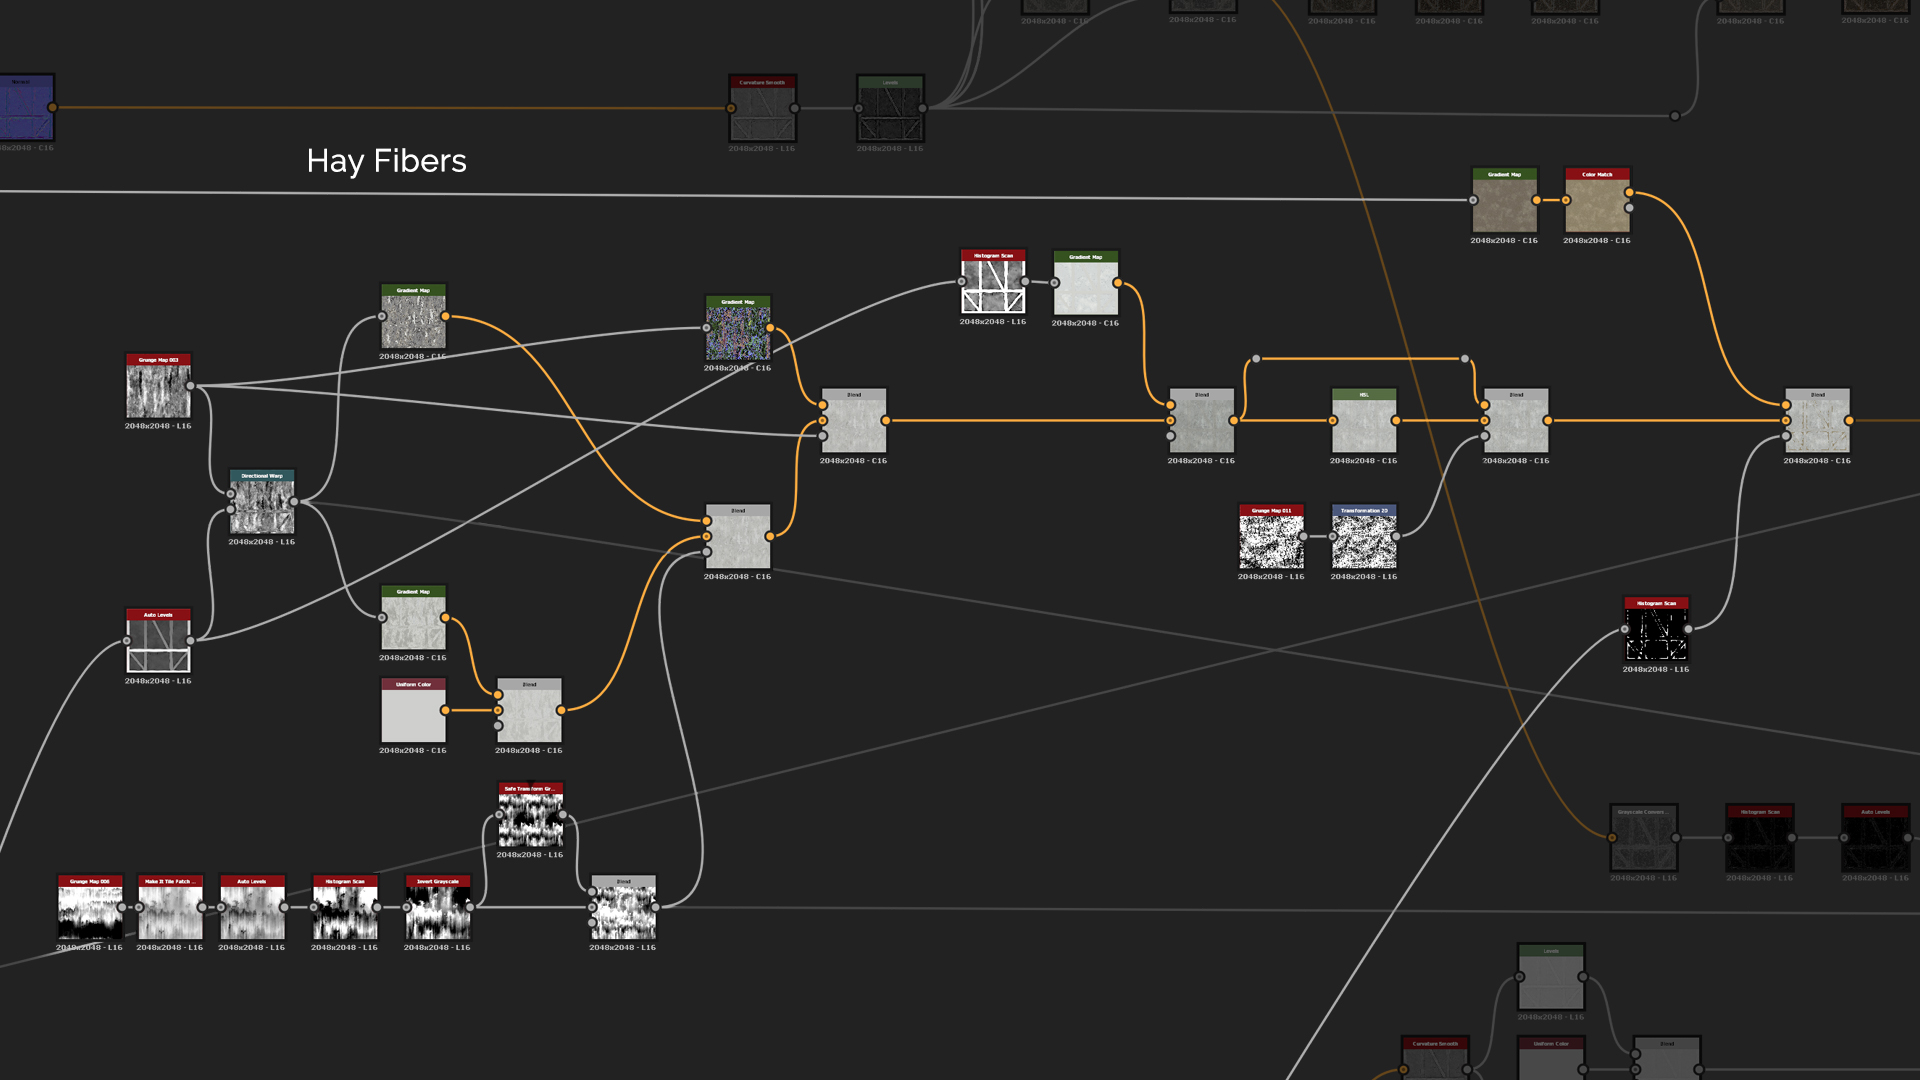
For more detail on the broken off plaster areas, we want to add hay fibers into the mix. To do that you can create a bunch of Messy Fibers nodes and mix them together with a simple Max Lighten blend mode and Multiply to add just a tint of variation to the height. To mask out random areas of the fibers, create another Clouds 2 that you invert and use Slope Blur to make it more uneven. The effect is again too strong so we need to add Histogram Range to soften it and blend them in by using a simple Copy mode.
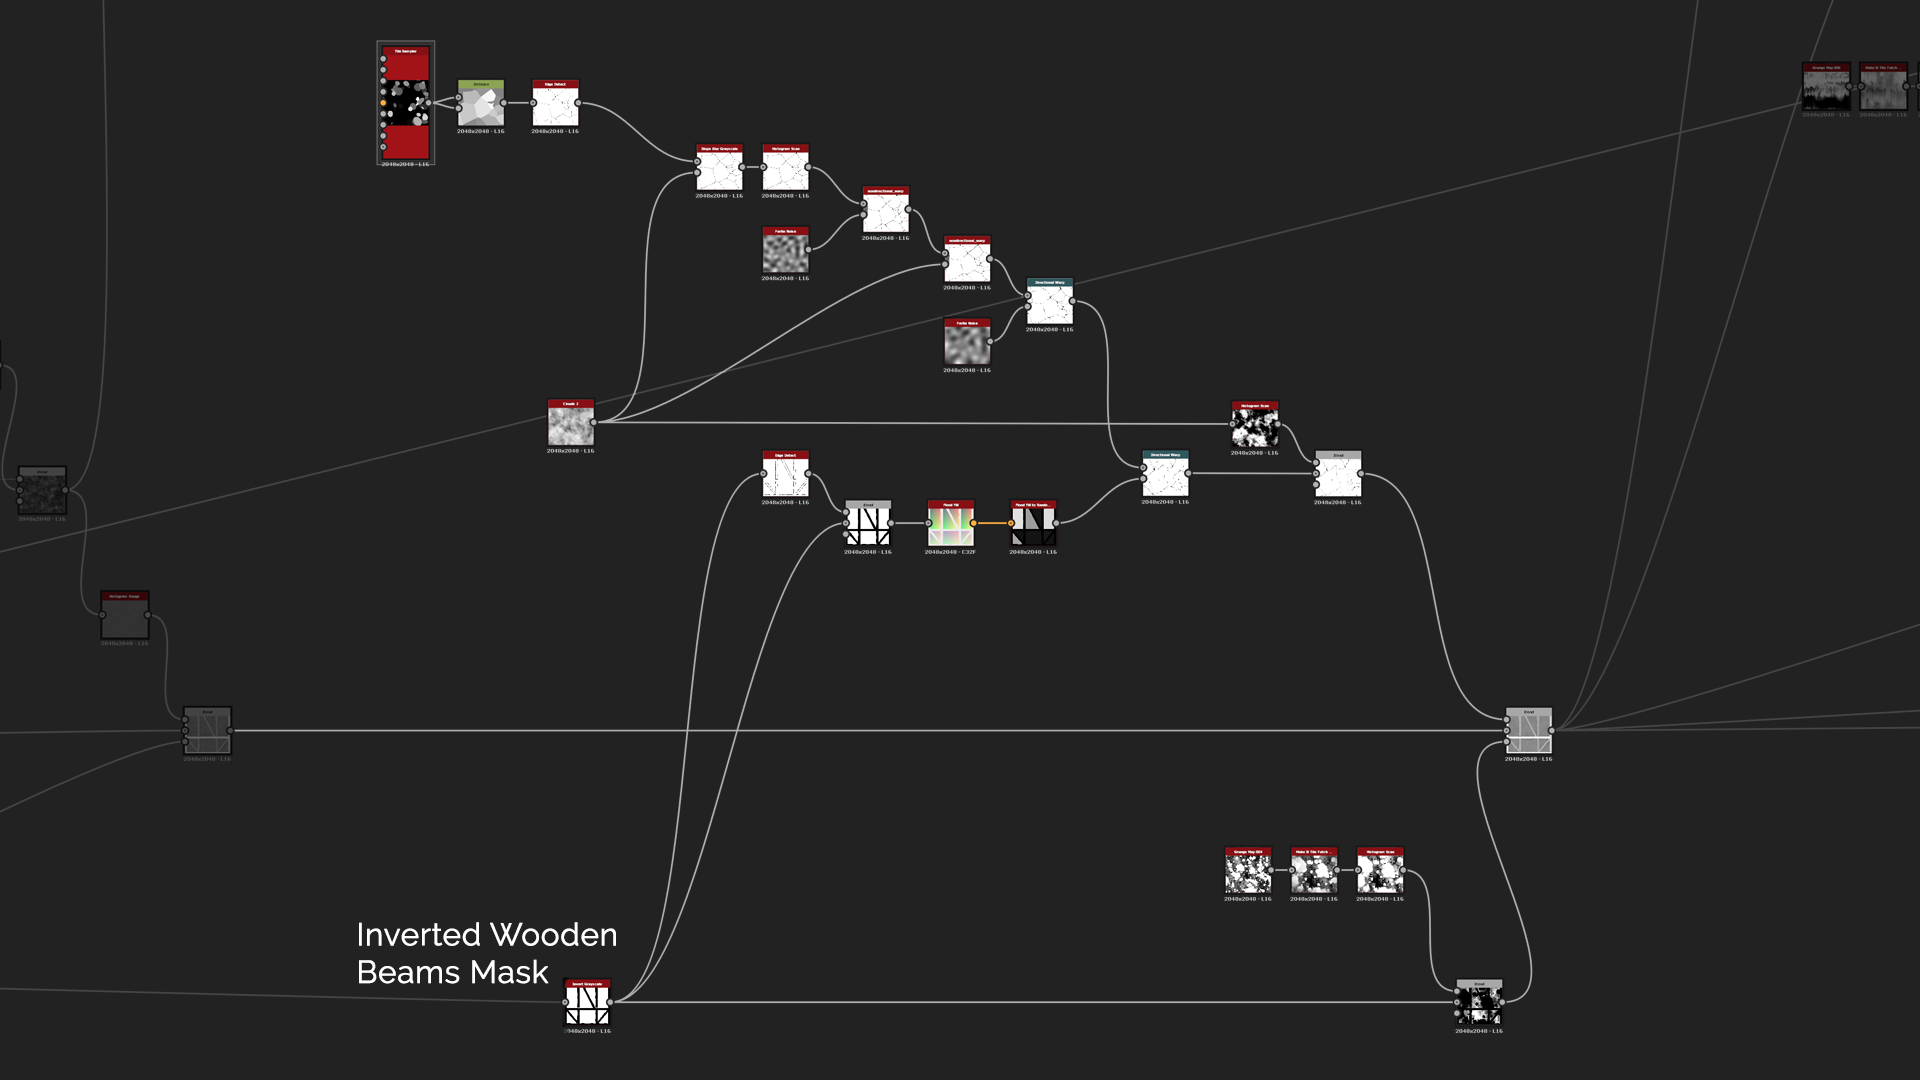
The final step to the Height : we want to add some cracks to the plaster. Let's start off with Tile Sampler and randomize everything as much as you can there. After that you can use Distance node with the Maximum Distance being at 10,000 and Edge Detect which generates nicely randomized cracks pattern. And again, start adding wear to the cracks by using Slope Blur with Clouds 2 and Non-Directional Warp with Perlin Noise.
Right now the cracks look too linear and the whole pattern is connected. In order to break it off and have different looking cracks for each plaster section, use Flood Fill on the Inverted Wooden Beams Mask and Flood Fill to Random Grayscale to get luminance variation. And now using Directional Warp with the cracks being Input and the Random Grayscale as Intensity, increase the Intensity to 500, making each section of the plaster to have unique cracks pattern due to the warping. And lastly you can use Histogram Scan with Clouds 2 to cut away some of the cracks to have a more natural feel for them. For the blend Opacity, use Grunge Map 4 and make it run through Make It Tile Patch with Octave at 0 to make it bigger.
For the Normal Map Intensity there we have 20, Ambient Occlusion for both Height Depth and Radius at 0.1 and you can add BlurHQ with 0.1 intensity in front of the Heightmap to have less distortion on the Wooden Beams when using tessellation.
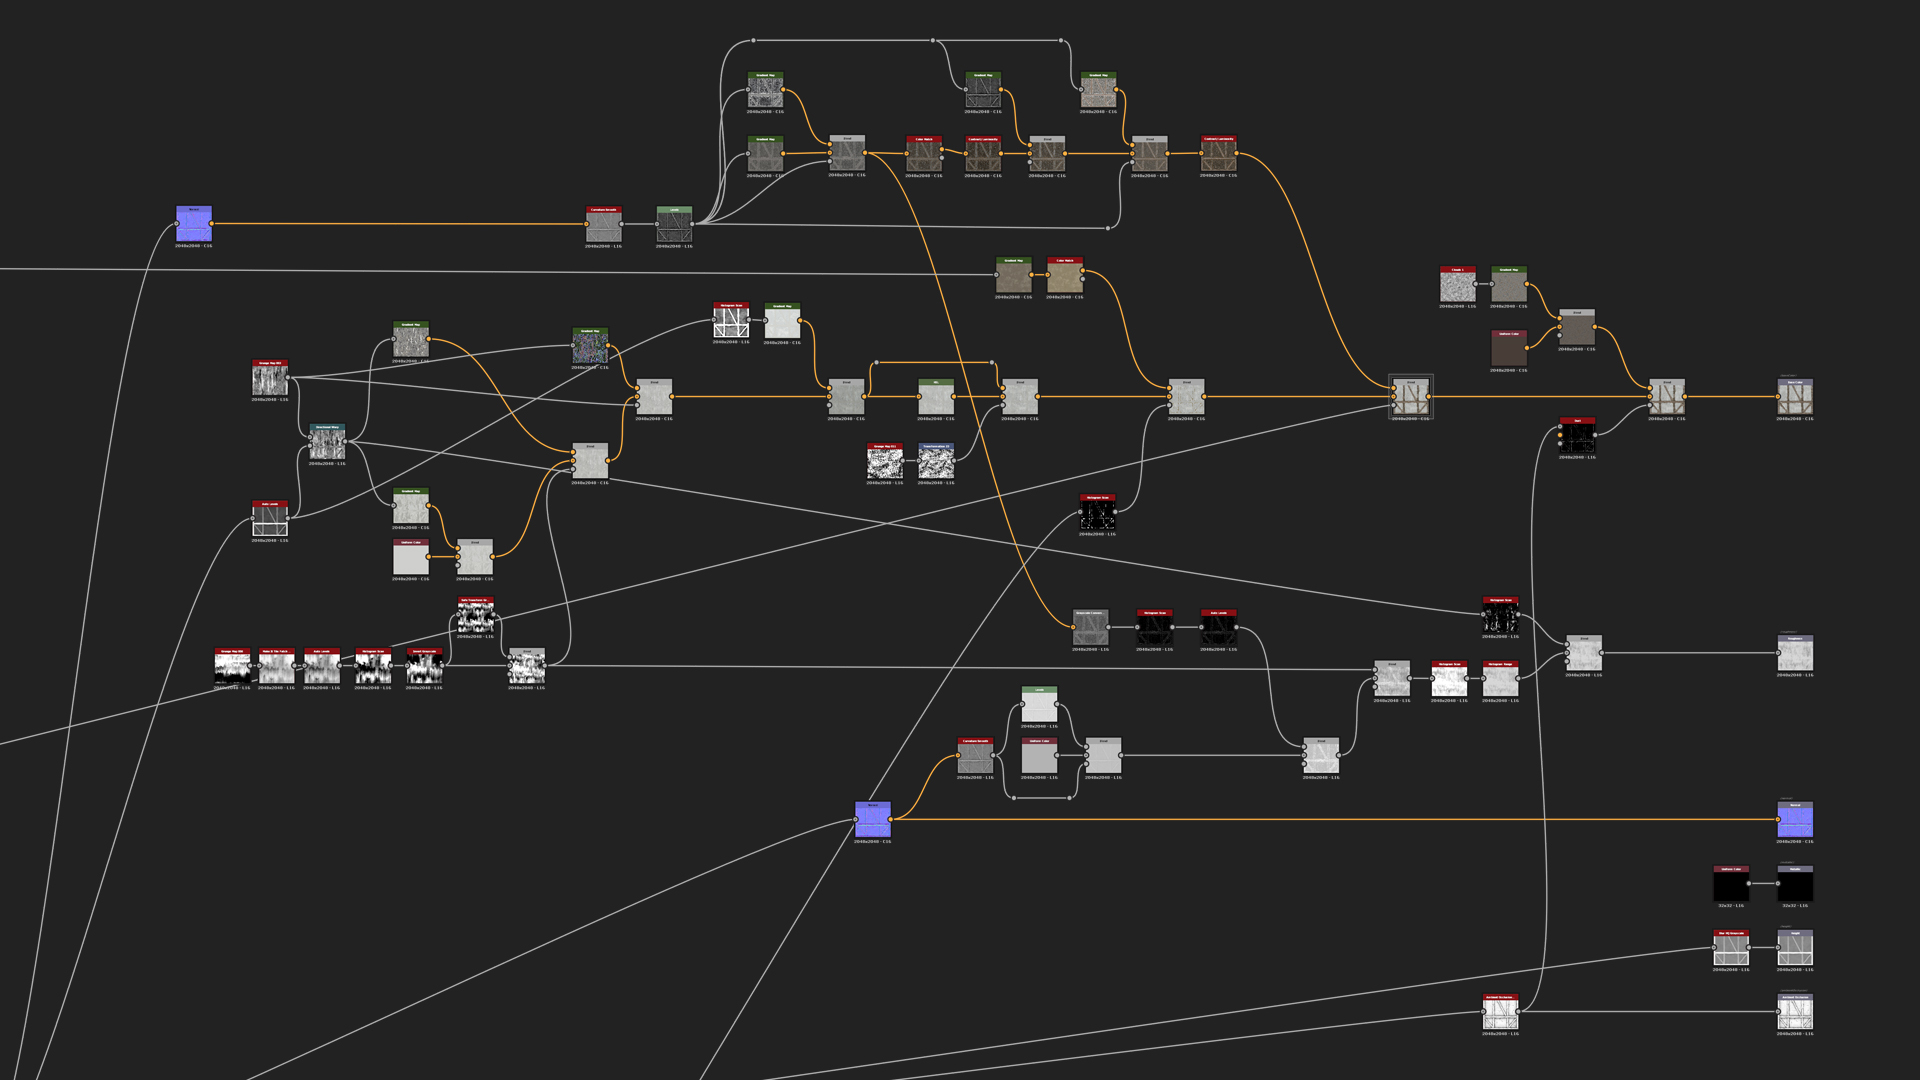
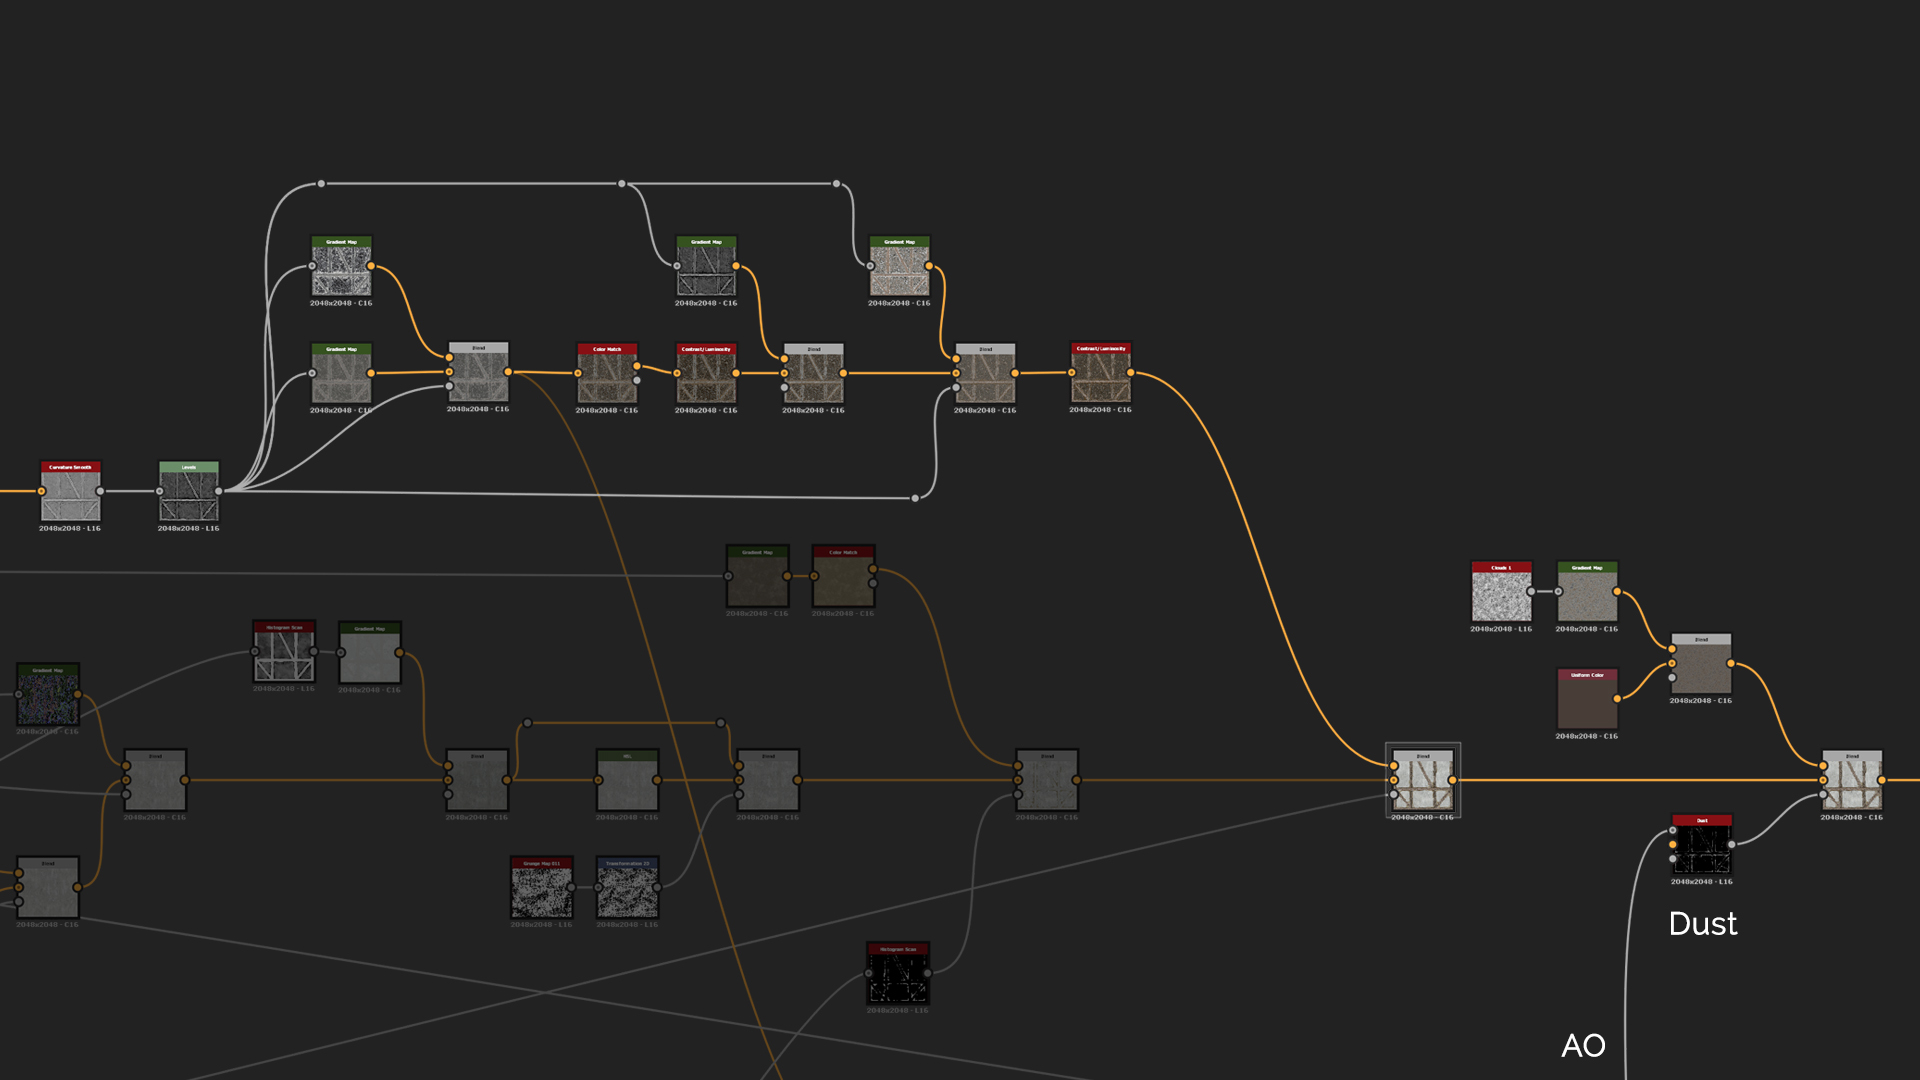
Fortunately the Base Color is fairly simple too even if it looks complicated. For the wood we have to create another Normal node so the graph will be easier to read. That runs into Curvature Smooth that runs through different Gradient maps. For the plaster use the Grunge Map 3 that was warped around the final height and goes through the same flow as the wood by using different Gradient maps that are picked from the reference images. In order to add some leaking effect to the Base Color and Roughness, we can use Grunge Map 6 that runs through Make It Tile Patch where Octave is on 1 and the Pattern Width & Height are increased. Then also add Safe Transform to tile it a bit more and blend both of the leaking effects together using Max Lighten mode. Blend all the different colors together using the mask generated before like one from the Height Blend and Plaster Mask. And for the final detail add some dirt with Dust generator that comes with Designer.
For Roughness we can use Curvature Smooth as a mask for a blend of a Uniform Color and Levels from the Curvature Smooth. Then add few details from the Base Color Gradient using a Grayscale Conversion node and Histogram Scan to mask out only small amount of details which you will then blend in using Add. The next blend is for the leaking effect. You can do that with Multiply mode on Roughness which is then adjusted with Histogram Scan and Histogram Range. For the final blend just add the same warped Grunge Map that was used for the plaster.
Conclusion
Hopefully this tutorial wasn't too hard to follow. Please do grab the project files to follow along with the explanations so it would more understandable and makes more sense.
Few final suggestions and tips from me would to be to always try to use Blend node as realistically as possible. E.g. if you have a ground with rocks, then the ground layer will always go to the Background and rocks at Foreground as it is the top level of the texture. This helps to not get confused on how to blend different layers of the material together. Also, it is a really good practice to always try and use new nodes and experiment with them. That helps to understand Substance Designer more and broaden the mindset on how to approach different shapes and patterns.
I really hope this tutorial was enjoyable, helpful and gave some insight to my material creation process. Thank you for reading it!
You can control how Adobe websites use cookies and similar technologies by making choices below. But note that if you disable cookies and similar technologies entirely, Adobe websites may not function properly.
Cookies are small text files stored by your web browser when you use websites. There are also other technologies that can be used for similar purposes like HTML5 Local Storage and local shared objects, web beacons, and embedded scripts. These technologies help us do things like remembering you and your preferences when you return to our sites, measure how you use the website, conduct market research, and gather information about the ads you see and interact with.
You can make choices in the menu below about what cookies and other technologies you want us to use on Adobe sites when you visit them from this browser. You can always change those choices later by clicking on the Cookie Preferences link at the bottom of the page.
If enabled:
We can improve your experience by tailoring the site and the content to things we think might be of interest
We can better keep track of your preferences — like what language you prefer to use
We will better understand your likely interests so we can provide you more relevant Adobe ads and content on non-Adobe websites and in non-Adobe apps
It will help us improve the performance of our website and those of our partners who use the Adobe Experience Cloud
If disabled:
We won’t be able to remember you from session to session so the experience may not be tailored to your interests
You’ll still have access to the content of the site but certain features that depend on cookies may not function
You’ll still see ads, they just may not be as relevant to you
General information
You can control how Adobe websites use cookies and similar technologies by making choices below. But note that if you disable cookies and similar technologies entirely, Adobe websites may not function properly.
Cookies are small text files stored by your web browser when you use websites. There are also other technologies that can be used for similar purposes like HTML5 Local Storage, web beacons, and embedded scripts. These technologies help us do things like remembering you and your preferences when you return to our sites, measure how you use the website, conduct market research, and gather information about the ads you see and interact with.
You can make choices in the menu below about what cookies and other technologies you want us to use on Adobe sites when you visit them from this browser. You can always change those choices later by clicking on the Cookie Preferences link at the bottom of the page.
If enabled:
We can improve your experience by tailoring the site and the content to things we think might be of interest
We can better keep track of your preferences — like what language you prefer to use
We will better understand your likely interests so we can provide you more relevant Adobe ads and content on non-Adobe websites and in non-Adobe apps
It will help us improve the performance of our website and those of our partners who use the Adobe Experience Cloud
If disabled:
We won’t be able to remember you from session to session so the experience may not be tailored to your interests
We’ll still count your use of our site and services
You’ll still have access to the content of the site but certain features that depend on cookies may not function
You’ll still see ads, they just may not be as relevant to you
Operate the site and core servicesOperate site and measure engagement
Always active
These cookies are required, and they are used to enable the site and related services core functionality. Without them the site could not operate, so they cannot be disabled.
These cookies enable the site and related services’ core functionality and collect statistics about user engagement, such as counting active use to help us understand trends. These cookies cannot be disabled.
Measure performance
These cookies are used to analyze site usage to measure and improve performance. Without them Adobe cannot know what content is most valued and how often unique visitors return to the site, making it hard to improve information we offer to you.
These cookies are used to analyze site usage to measure and improve performance. Without them Adobe cannot know what content is most valued, making it hard to improve information we offer to you.
Extend functionality
These cookies are used to enhance the functionality of Adobe sites such as remembering your settings and preferences to deliver a personalized experience; for example, your username, your repeated visits, preferred language, your country, or any other saved preference.
Personalize advertising
These cookies are used to enable Adobe and our partners to serve ads more relevant to your interests. Without them you will still see ads, but they might not be as relevant to you.
Personalize advertising
These cookies are used to enable Adobe and our partners to serve ads more relevant to your interests. Without them you will still see ads, but they might not be as relevant to you.