Mark Foreman's Substance 3D Designer tips and tricks
In this tutorial, Mark Foreman, Senior Environment Artist at CD PROJEKT RED, covers a few deep dives into small parts of process from some of his Substance materials in his medieval World Substance 3D Asset Signature release. Each of these are processes or tricks he find himself doing quite often while working on his materials inside Substance 3D Designer.
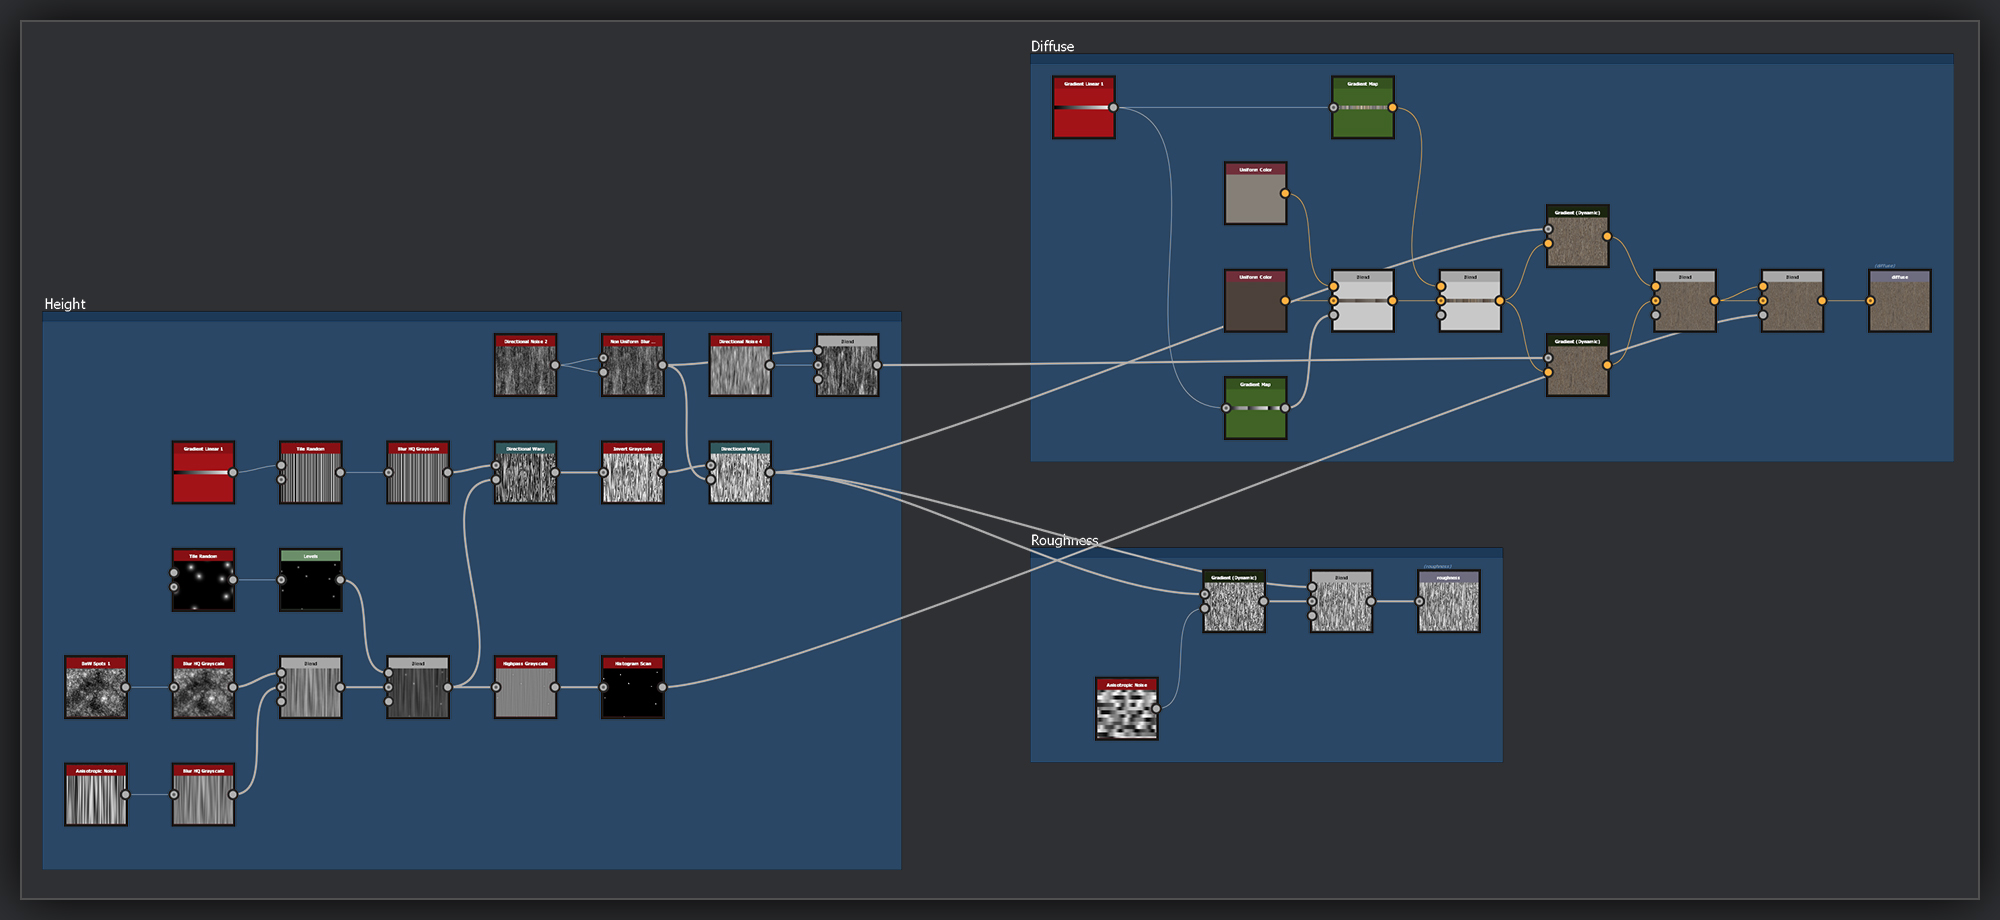
A number of materials in my Substance 3D Asset Signature set feature wooden elements. This is the method I use to create a simple wood grain for these parts. I’ll often start with this set up, and then Depending on the scale I am trying to represent in a material, or on features such as the age or wear amount of the wood, I will further modify the grain to represent the specific features I’m looking for.
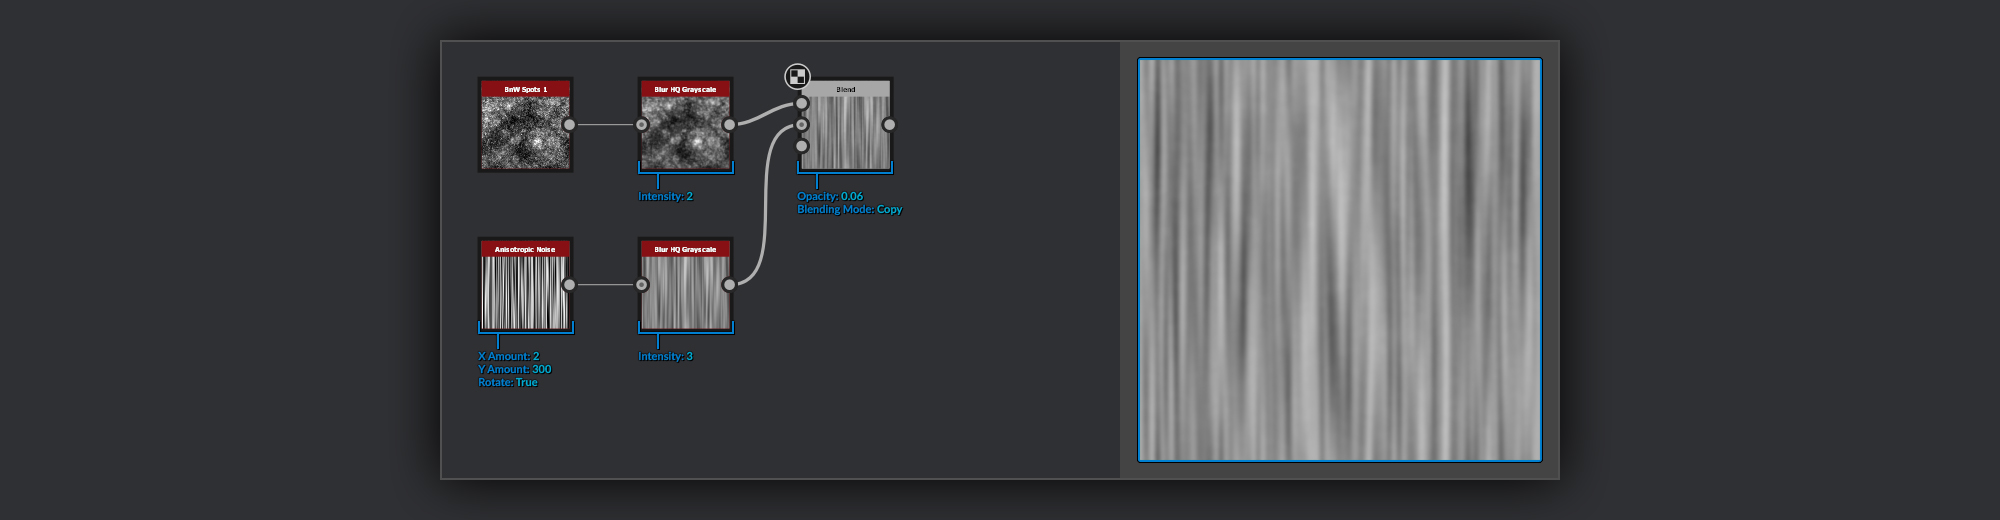
The start of the grain is an Anisotropic Noise which I blur a bit to remove the sharp edges. I then blend this with a blurred noise to add a little wobble to what will become my wood grain. I use a pretty low opacity to blend the noise in, here I’m using just 0.06, if you bring it up you’ll get less straight lines in your final grain.
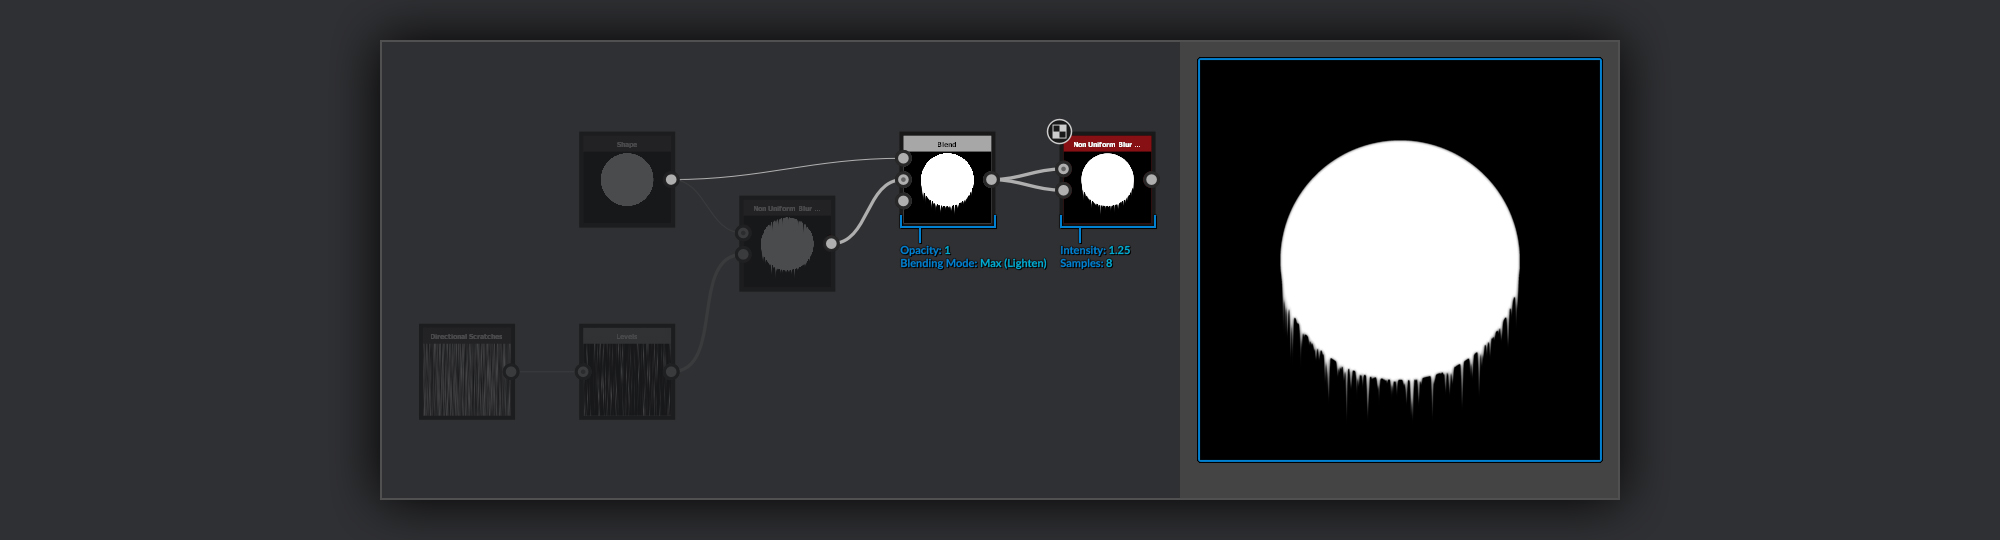
To add some knots to the wood I scatter some Thorn shapes in a Tile Random. I chose the thorn shape as the falloff in the gradient Means you will get more rings towards the center of the knot in the resulting wood grain. I also create mask to pick out the knots in my diffuse later, I use a highpass to flatten the range, and then isolate the center of the knots using a histogram scan.
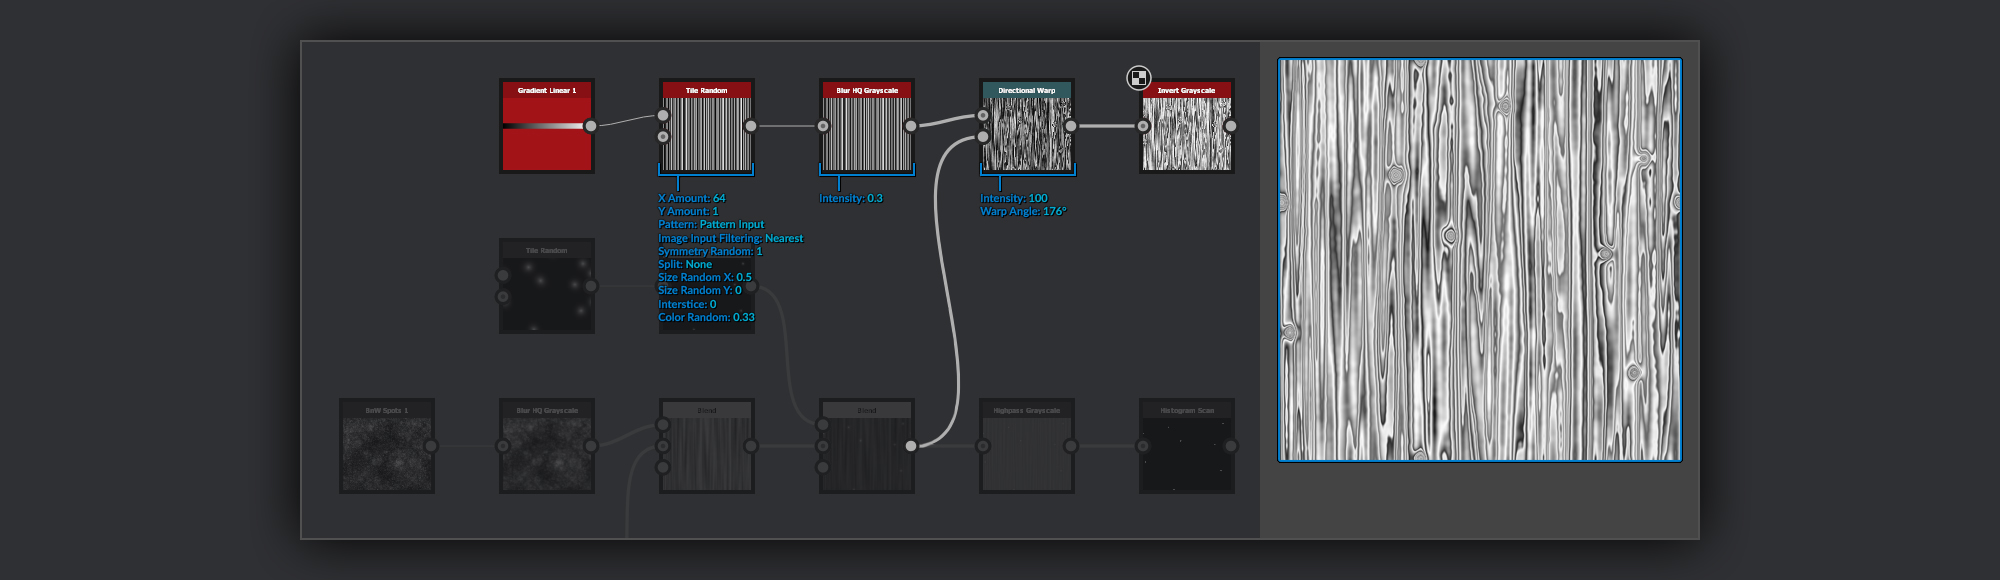
Next to create the growth ring shapes in the wood grain that will go into my heightmap. I use a Tile Sampler to randomly arrange some gradients with their symmetry flipped randomly and some small variation in width and brightness. After this I apply a small blur to remove the sharpest edges. I then warp this over my wood base using a Directional wap. This squashes and stretches the gradients around the forms in my wood base, bringing out the grain rings around the knots for example. Finally I inverted it as I felt it was a little dark on average
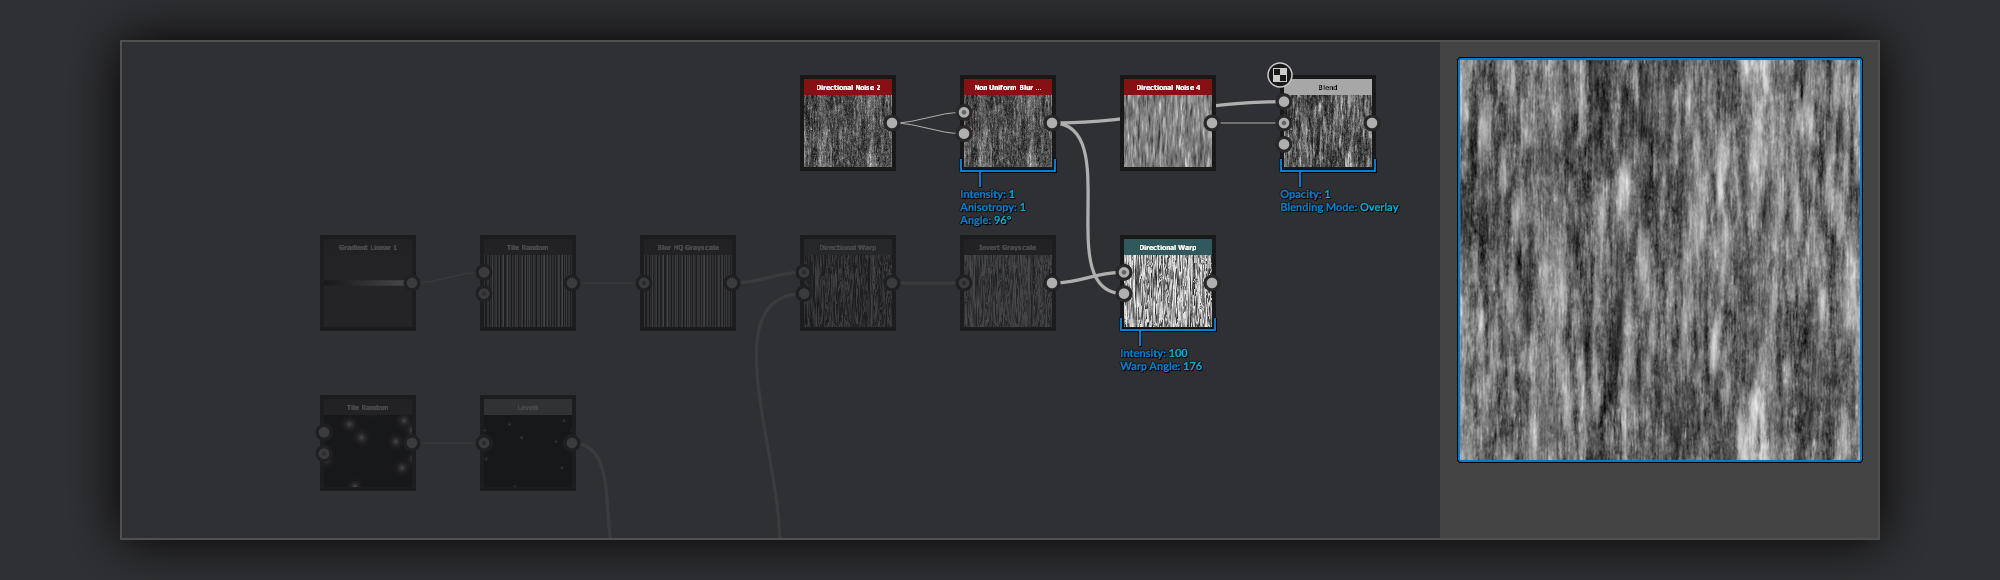
The last bit of my wood grain height parts is some noise to represent the fibres in the wood. I start these with a Directional Noise 2 that I put through a Non Uniform Blur Grayscale to soften the brightest spots. Adding the anisotropy helps keep the fiber feeling present. I prefer using the Non Uniform Blur to a Directional Blur here as the directional blur would smooth out the result a bit too much. At this point I also Directional Warp my wood heightmap over the grain so the rings in the wood will follow the grain a small bit. Lastly for the grain I Overlay some Directional Noise 4 to add a layer of mid-size noise. This is the basis of my wood grain heightmap, I then manipulate and blend both the Grain and Fibre heightmaps over all the wooden elements in my graph.
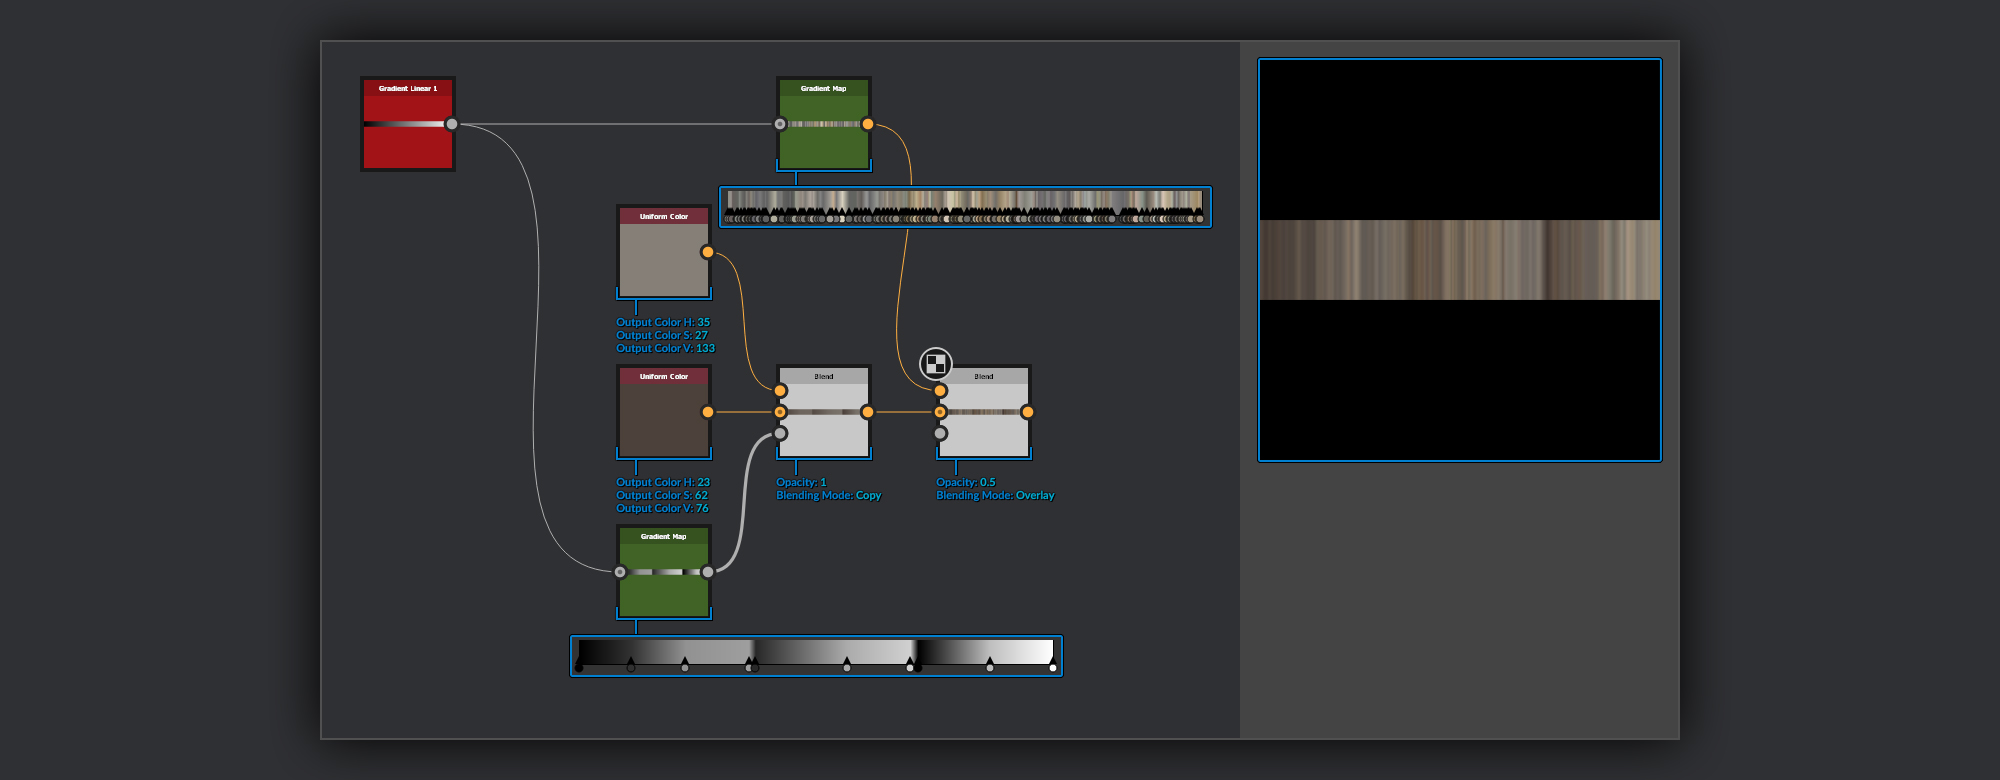
When it comes to colourising the wood I use Gradient (Dynamic) nodes to apply colour to the heightmap layers. I create a palette of colours to use in the Gradient (Dynamic) nodes. For this I blend two Uniform Color nodes together using a mask made with some gradient ramps hand placed to add some sub rings of colour into the heightmap. The uniform Color nodes will be the main method of colourising the wood, and I can return to these to adjust it as I like further on in the material creation process. I also blend some extra bands of colour noise over this to add further complexity to my colour rings.
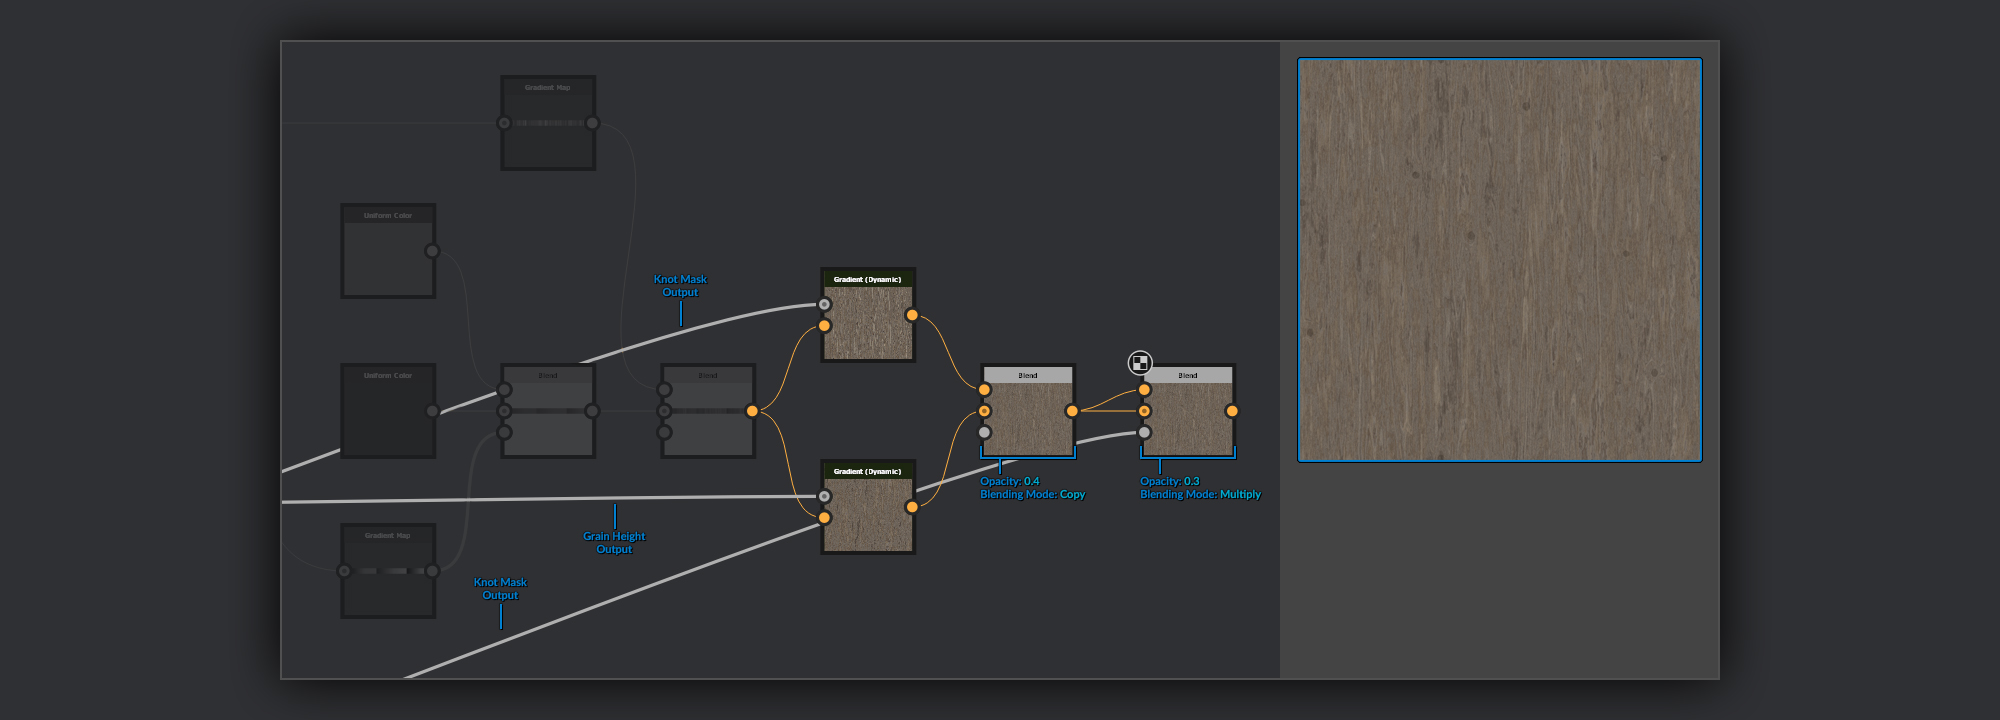
This colour palette is then used as the Gradient Input of the two Gradient (Dynamic) nodes. One for the wood grain, and one for the Wood Rings. I like to keep them separate and blend them together after colourising them, as it helps reduce the noisiness and contrast of the resulting colour map, as well as adding an extra layer of colour complexity. Finally to add darker wood spots for the center of the knots, I multiply the wood diffuse over itself, using the mask I made for the knots earlier.
For the wood grain roughness I use a very similar method to the basecolour, but instead I use an Anisotropic Noise for the Gradient Input of a Gradient (Dynamic) node to add some random bands of roughness to the wood rings. I combine this noisier rings pass with the height of the unmodified wood rings in a blend node.
These various passes are then masked into their corresponding maps with the rest of the wooden elements from the heightmap. I then layer over any dirt or weathering I might want for the material depending on how I have used the wood in my material elements.
I have a couple of methods to create drips and leaks depending on the requirements of the material. The first method is very useful for adding leaks targeted to a specific component of a material, such as mortar between bricks of water damage from below an item of ornamentation. The second method I use mostly when I want generic or random leaks. You can still mask the source spots so they only appear from specific elements, but it’s a little harder to control where the elaks appear that way. With the first method you know the elak will always start at the edge of your mask.
The first method I use when I want specific drips or leaks to come from an object, such as the mortar between bricks I mentioned before.
I start with a mask or heightmap, it can work well with either as long as the item you want to form drips from is defined with the positive space. I put this mask through a Non Uniform Blur Grayscale node. For the Blur Map I use a Directional Scratches node, first put through a Levels node. In the Levels node you can use the various adjustments to mix up lengths and densities of the drips.
To clean up the top edge of the shape that was also eroded by the Non Uniform Blur node, I blend this back over the original input mask using Max (Lighten). Finally to soften the drips I sometimes pass them through another Non Uniform Blur node to better merge the drips with the original mask if I feel it is necessary.
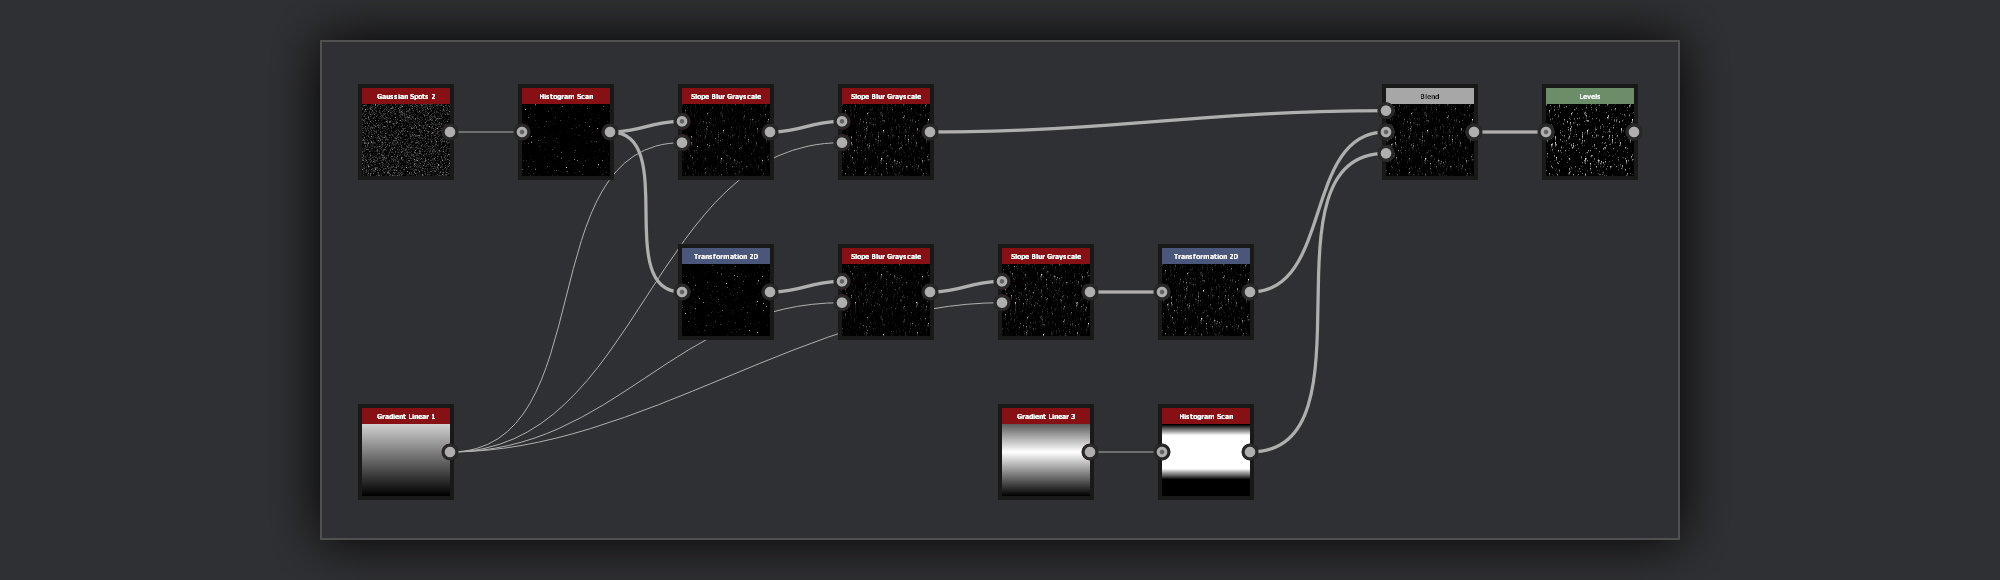
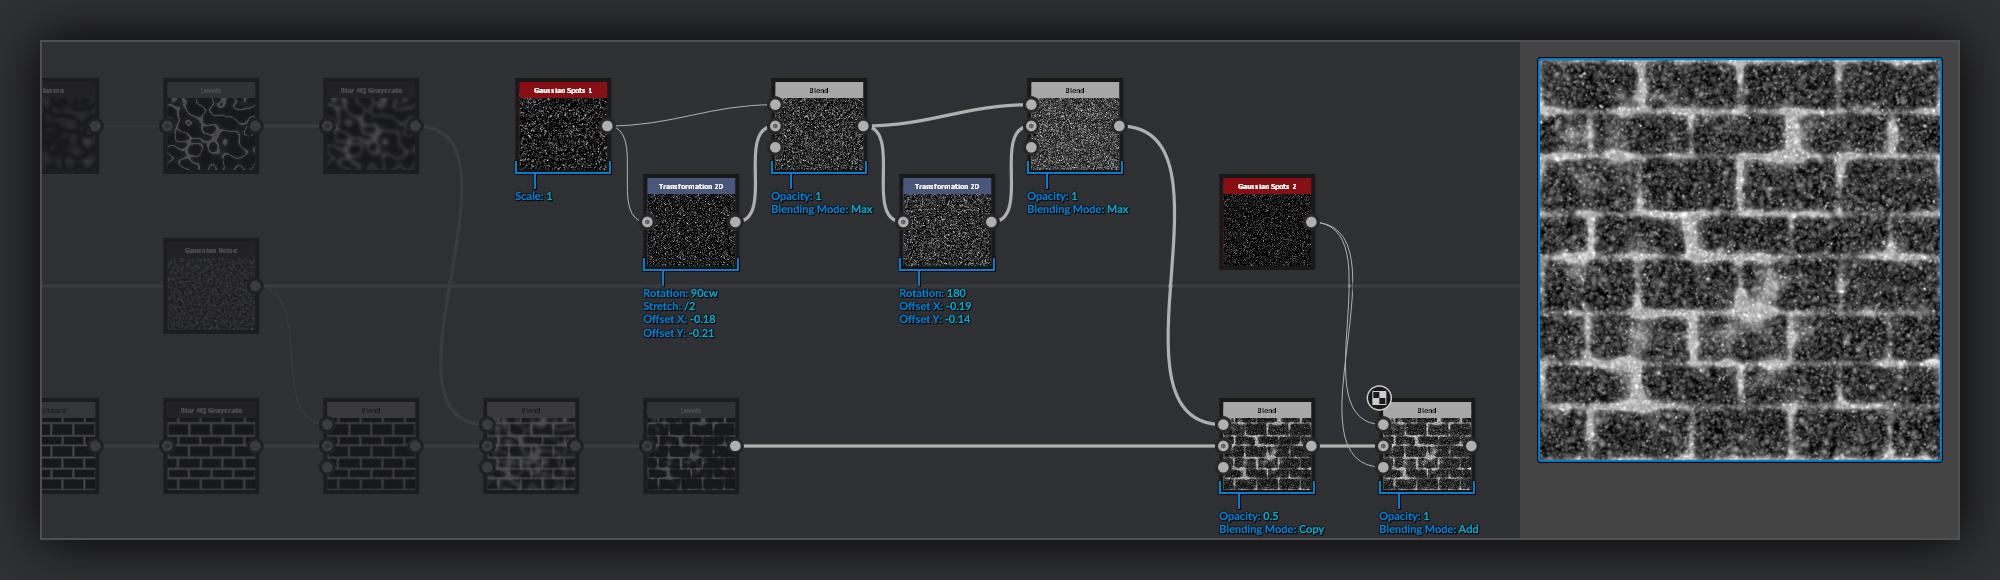
The second method I use quite often which is handy for adding leaky noise across a whole surface. This method uses Slope Blur Grayscale nodes to drag out a noise to create drip shapes.
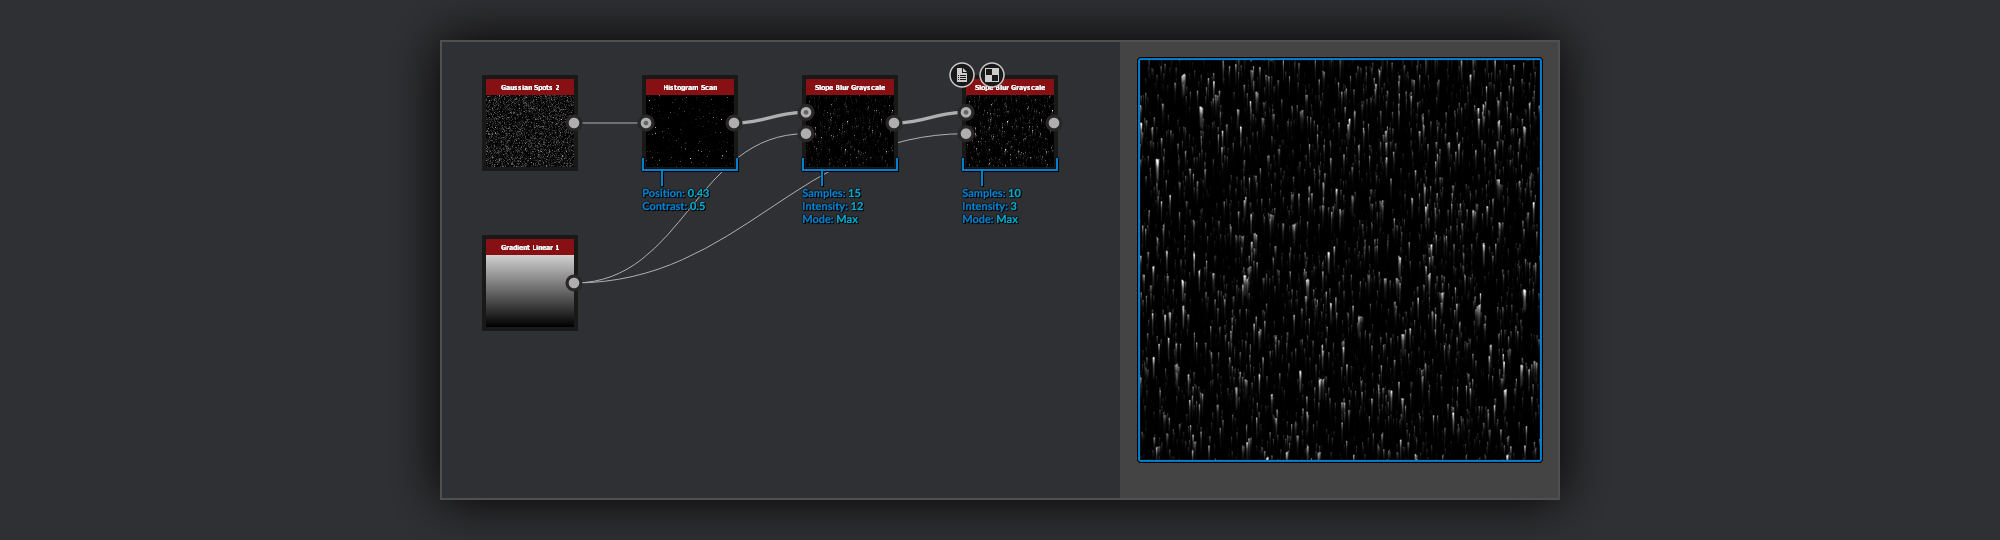
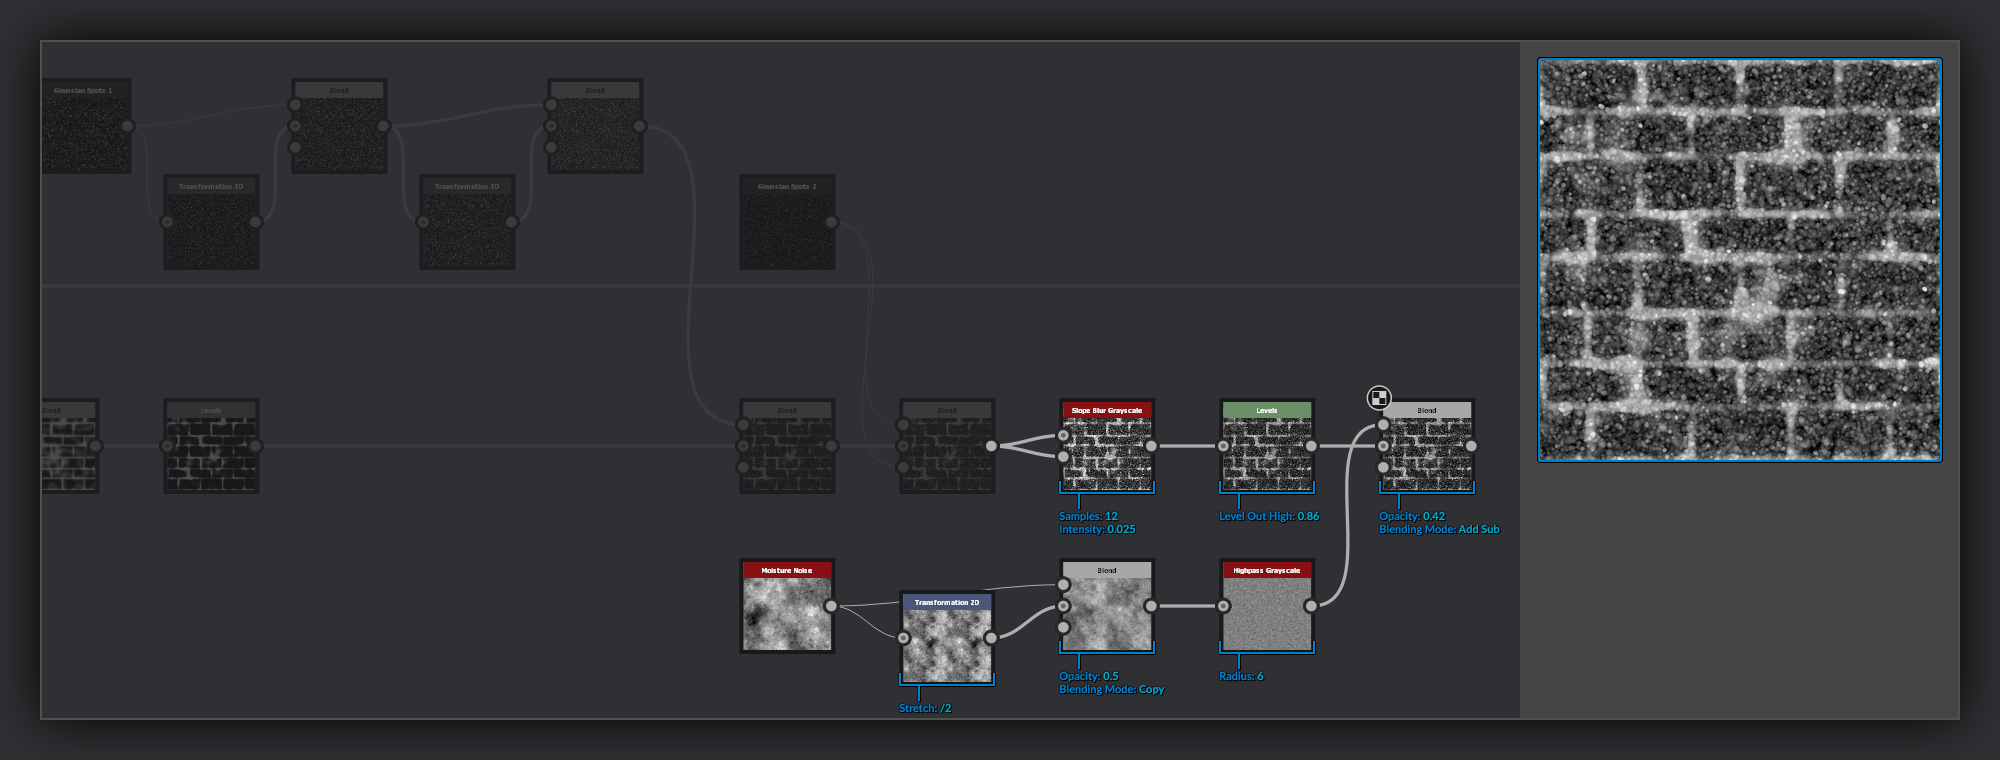
Here I’ve started with a Gaussian Spots 2 as a base for my leak placement. I’ve picked out a small band of the spots using a Histogram Scan node for a leak mask. This mask selection is then put through a couple of Slope Blur Grayscale nodes with their modes set to Max with a Gradient Linear 1 in the Slope input to drag everything down. I’m using two Slope Blur Grayscale node passes to maximise the length of each leak while minimising sampling artifacts. There will be small artefacts at the top of the canvas, but If you aren’t worried about the tiling of your leaks, such as if you are going to mask out the border you can stop here. Otherwise you’ll have to fix the tiling as the Slope Blur introduces some artifacts where the white and black points of the gradient meet.

One option to solve this is to repeat the Slope Blur Grayscale pass on a duplicate of the leaks mask that has been offset vertically by 50% before the blurring, and then returned to an offset of 0, this will put the artifact in the center of the canvas. You can then blend the previous pass that has the artifact on the outside over this duplicate pass, masking out the edges to hide the artifact there. The last thing I do to my leaks is to use a Levels node to adjust intensity or refine the silhouette. Here I’ve brought the Levels in up to sharpen the leaks and used the Levels Mid to add a little more volume.
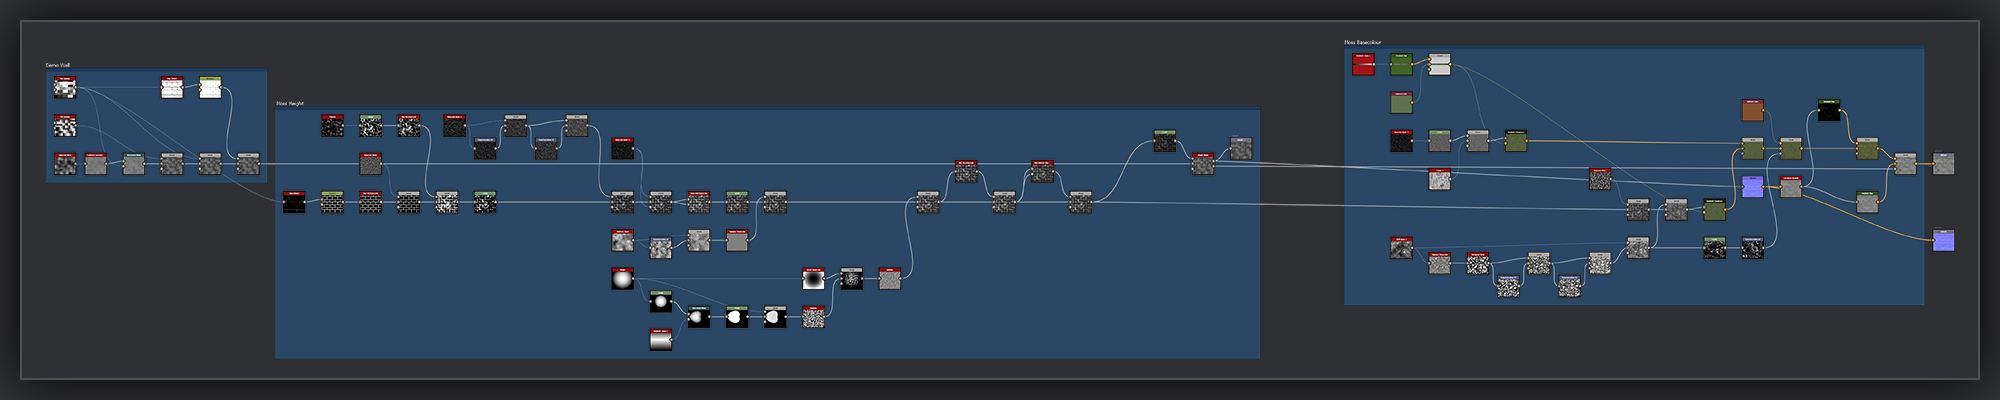
Moss is something that I often approach differently on a material by material basis depending on the particular surface I am working on. However this is how I often start most of my moss when it is for a material that has a build up of moss in between the blocks of a wall, or growing in the gaps between the tiles of a roof or floor. Depending on how much moss may feature on a surface or how prominent it is in a material I may stop here, or continue to layer extra shapes on-top as and when I feel they are needed.
For the purpose of this tutorial I need a demo surface to create the moss on-top of. Here’s how I set my simple wall up so you can follow along in the rest of the steps.
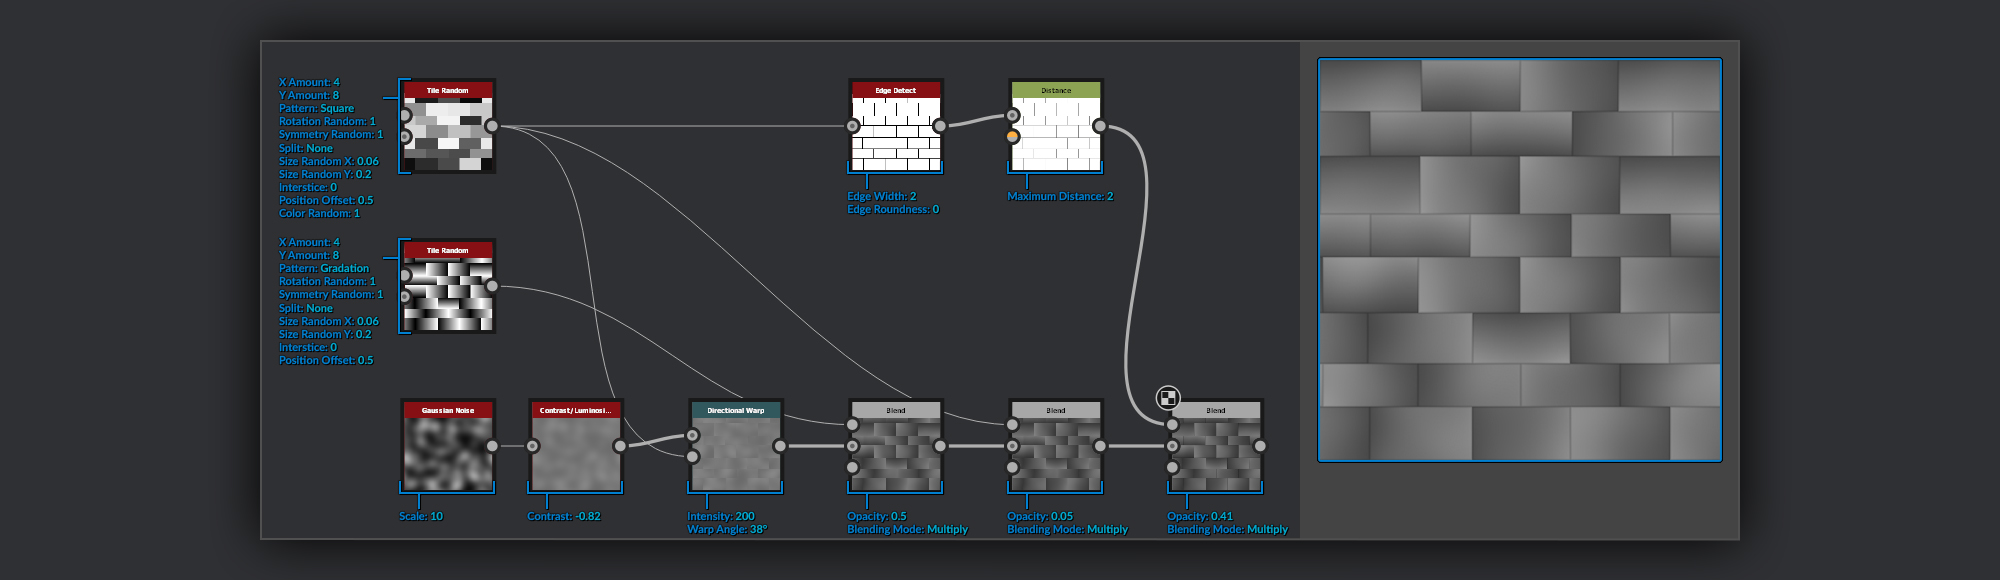
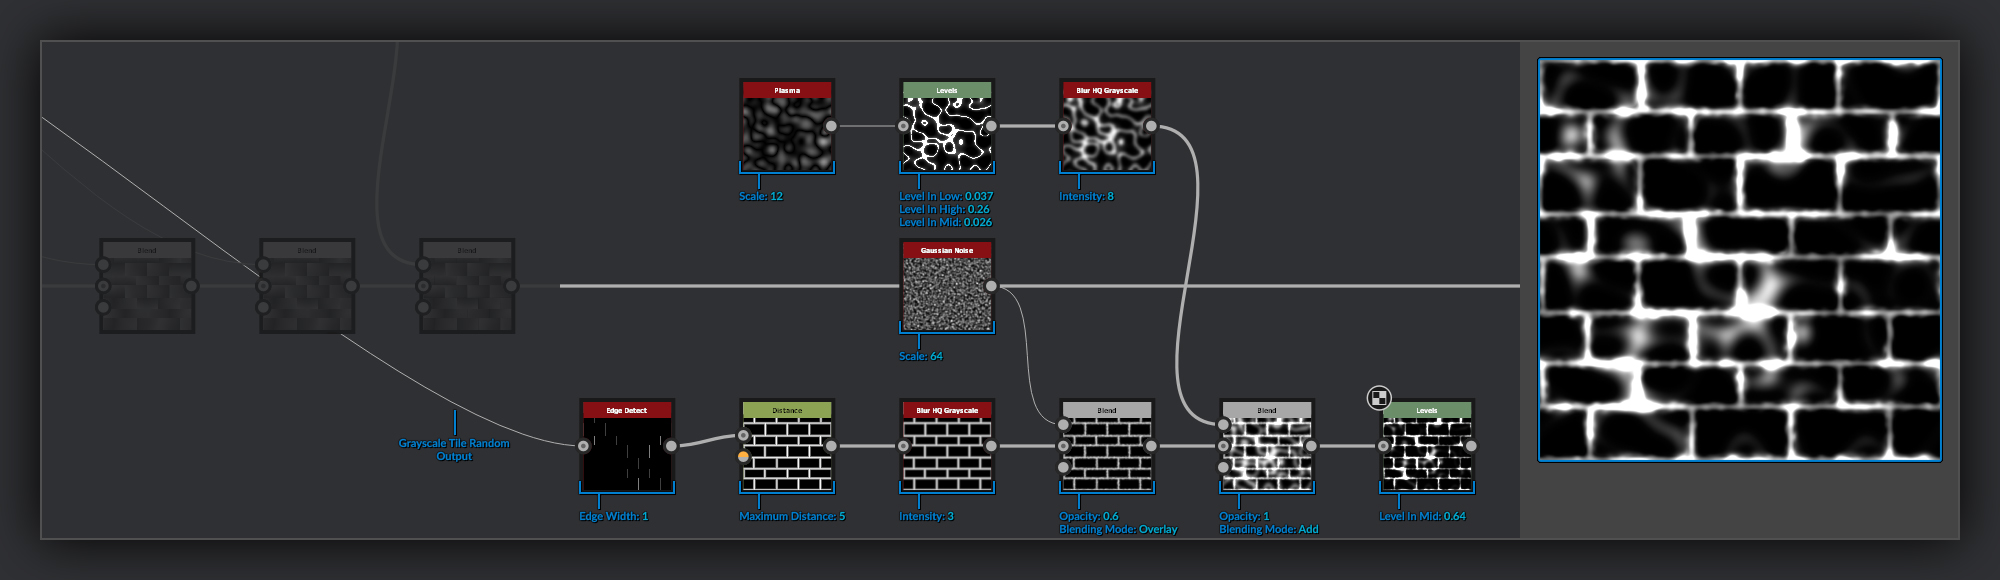
The moss starts by grabbing a mask of the gaps I want the moss to grow in. I’ve done that with an Edge Detect node here to pick out the edges of the blocks in my demo surface from the mixed grayscale Tile Sampler node. I keep the Edge Width as thin as possible in the Edge Detect node so I can control the width of the moss build up with a Distance node as the gradient it gives me will help with the 3 dimensionality of the moss. I blur my moss mask and blend it with some Gaussian Noise to start breaking up it’s silhouette. Next I blend in some Plasma noise that I’ve clamped and inverted to help inject some larger chaotic shapes into the moss. Finally for this stage I use a Levels node to bend the midpoint and increase the contrast.
Now I’m going to start building up the blobby shapes that are going to give the moss it’s pillowy form. I start by layering a Gaussian Spots 1 with various manipulations of itself to further increase the variance in size and intensity of the blobs beyond its original appearance. This also helps fill some of the pure black in the noise with more useful information. I blend this over my growing Moss Heightmap using a blend node. After these large blobs I blend in some smaller high points using a Gaussian Spots 2 masked by itself to further modulate the intensities in the noise.
Next up I put my moss heightmap through a Slope Blur Grayscale in both inputs. This inflates the moss blobs making them look like distinct plants from one another, rather than than the undulating uniform mass it was before. After this I use a levels node to slightly bring down the highest points from close to pure white. After this I alyer on some Moisture Noise that has been layered with itself again to increase the high frequency detail.
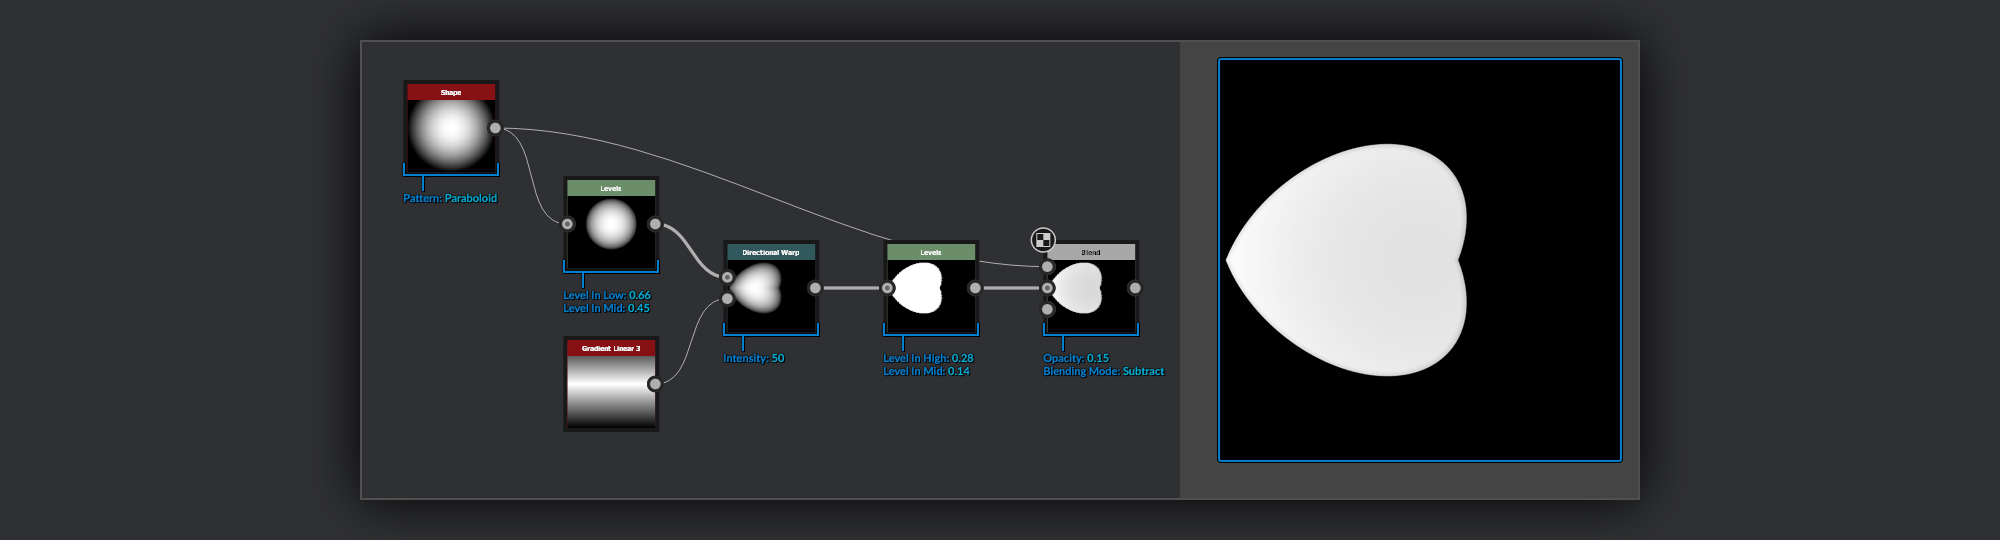
Next I’ll add some super simple leafy spots. I make a simple leaf using a Shape node set to Paraboloid. I shrink it down with a levels node and then shape it using a Directional Warp over a Gradient Linear 3. I then use a levels to flatten it out before subtracting the unleveled version of the original Shape node output to add a slight dip to the leaf.
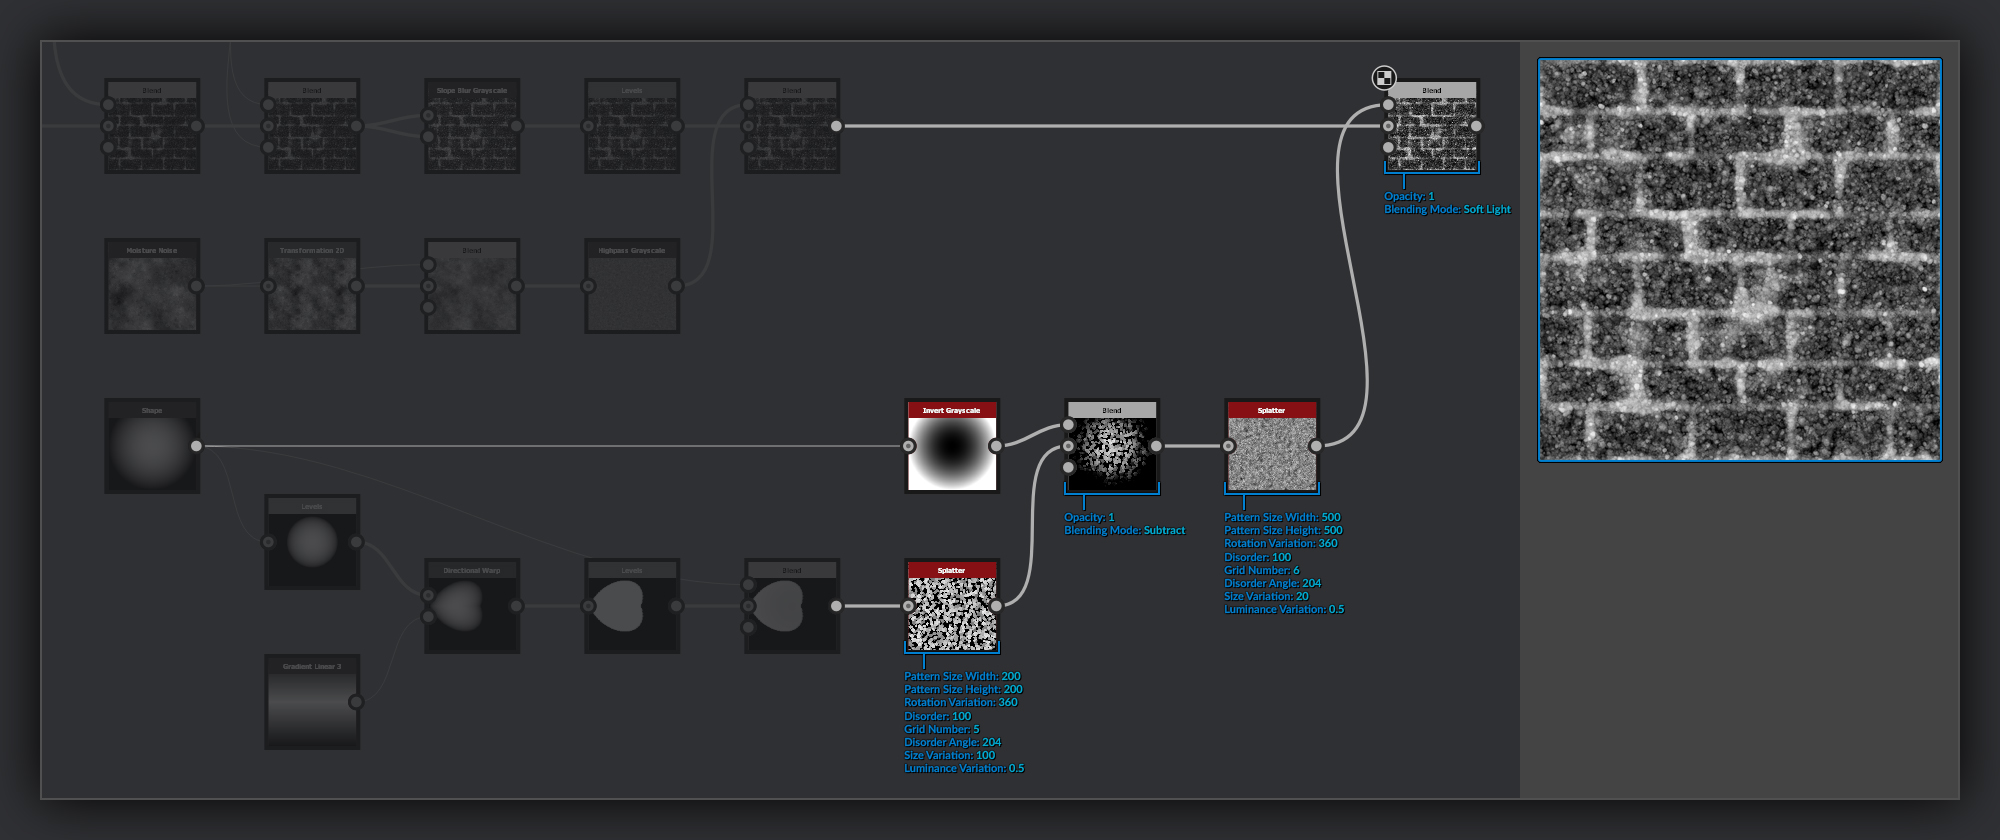
To create clusters of leaves I first scatter the leaf shape in a Splatter node. I blend the result of this splatter with the original Paraboloid inverted and scatter this leaf cluster again inside another Splatter node. I blend this result with my moss heightmap.
The final couple of steps are to soften the height so it blends a bit better with the blocks below. First I blur the moss height slightly and blend this back over itself so the main shapes flom from one to another a bit more. Next I put the moss height through a Non Uniform Blur to soften and flatten out the shapes slightly, this also helps to reduce the intensity of some of the smaller bright spots. I then blend this with the brick block, using a Height Blend node and a Levels node to control the level of the moss.
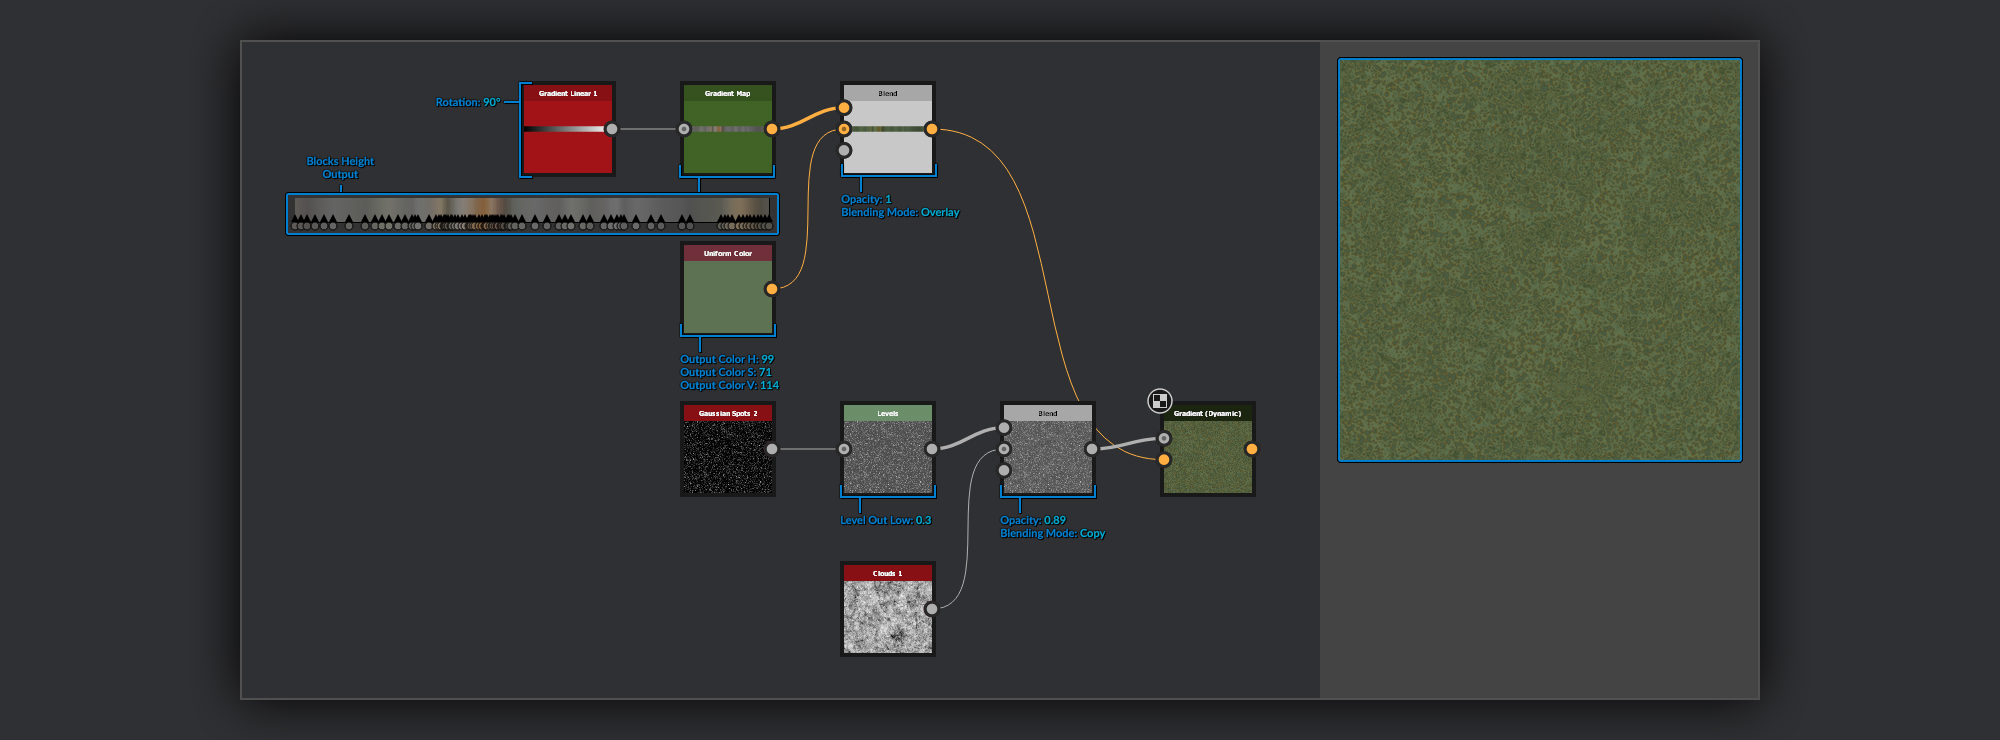
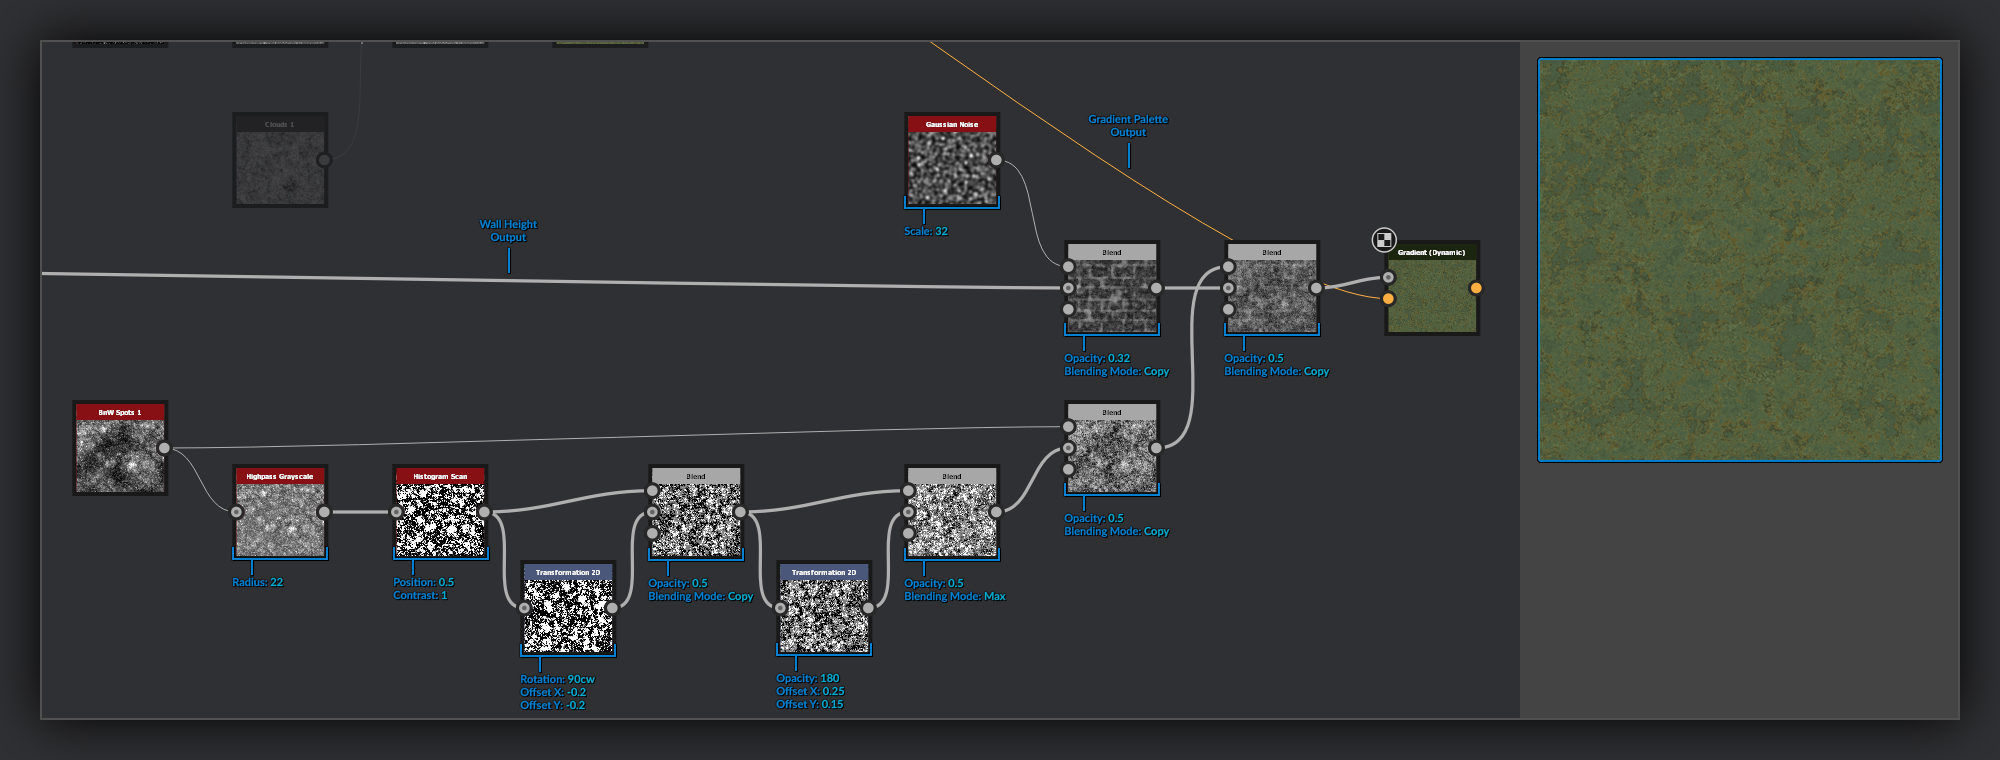
Like the wood grain before it, the basecolour for the moss is a couple of passes through some Gradient (Dynamic) nodes that are then combined, just as the wood before. For the colour of the moss I use a Uniform Color node to define the main colour, this is then overlaid with a gradient that features some extra colour noise in a blend node. In the first Gradient (Dynamic) pass I combine a Clouds 1 noise with some level adjusted Gaussian Spots 2 to get some blobs of colour.
The second Gradient (Dynamic) takes the Height of the moss blended with a Gaussian Noise to add some patches of height variation. I then combine this with some random grayscale values that were made by layering a slice of BnW Spots 1 over itself with various transformations to create a patchy noise.

I combine the outputs of the two Gradient (Dynamic) nodes in a blend node. To add some further colour variance I blend in a little brown for some dried out or dead patches. I make a mask for this using this transformed noise from before, passed through a levels node to isolate a mask. The last thing I do to the moss albedo is add some information from the curvature tinted slightly green to keep the warm colours in the moss intact. This helps give the moss the appearance of a bloom of young growth on the tips. Finally I blend this with the wall diffuse, using the mask output from the Height Blend node to mask it properly. For the purpose of this tutorial I’ve just used the curvature output as my wall diffuse.