Vincent Dérozier took time off from his job as a Environment Texture Artist at Ubisoft Montréal to challenge himself to create an insane sculpture - only in Substance Designer!
SACRED BUST BREAKDOWN
All in all, this project took 3 weeks, so to avoid creating a breakdown with 500 steps, I focused on all the key setups and recipes.
Every time I start a new project I like to make some little sketches to have more than just a mental image. This step is more a visual list of every idea I have than a professional illustration. I keep making this kind of doodles all along the process.
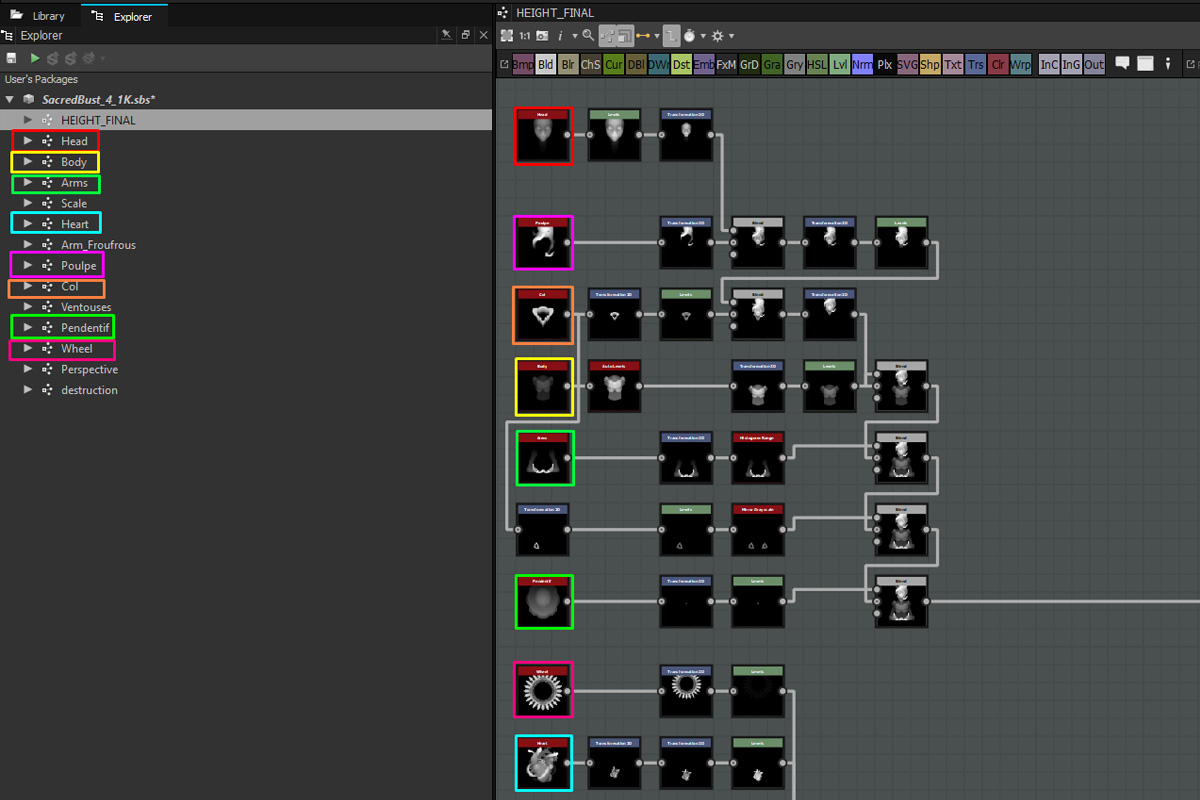
I know that this piece is going to be complex, so I break down my character into separate sub-graphs for each element. That way, I can focus on each part and tackle every setup without losing my mind.
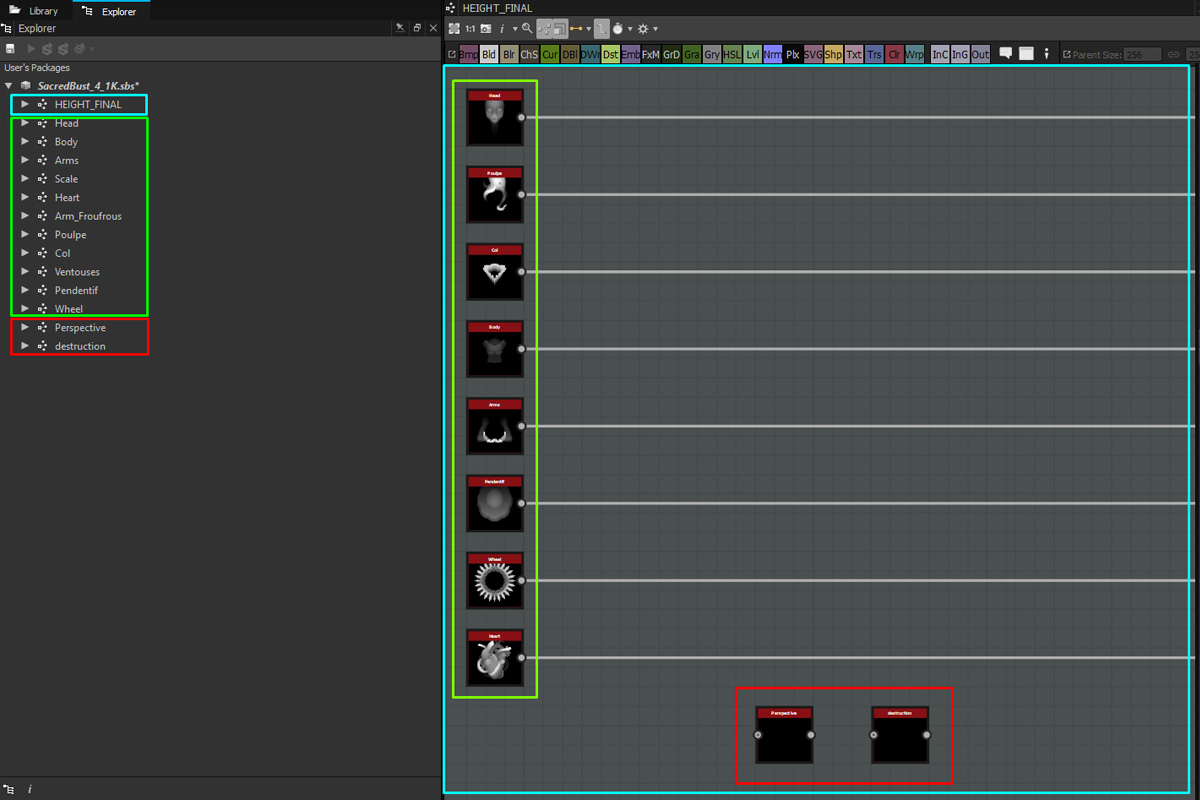
Separate graphs are a great way to gain time but the risk is to lose sight of the big picture. That's why the first graph I create is the Master Graph where I store all the pieces that will become the final picture. Every time I create a new part/graph, I put an instance of it in the Master Graph. That way, I can keep an eye on my character building.
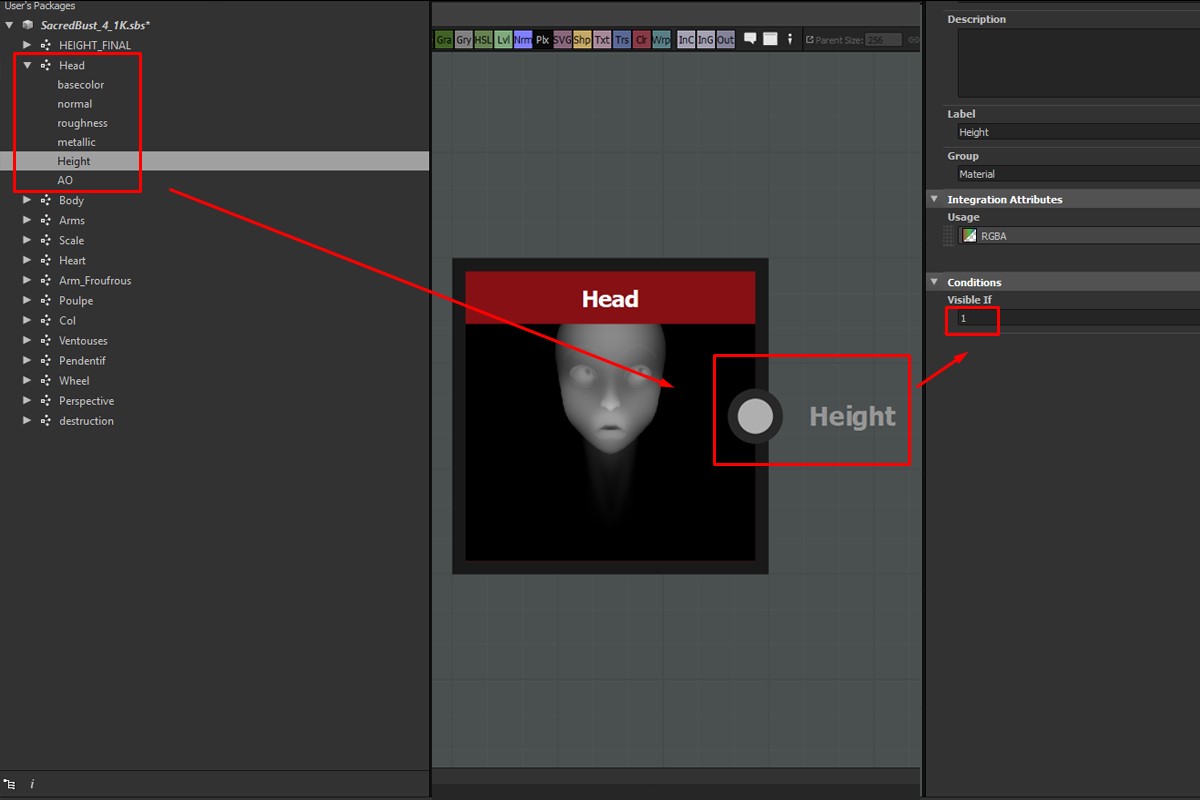
In order to keep everything light in the master Graph but efficient in the sub-graphs, I put all the sub-graph inputs values at 0 -- except for the height map. That way I can work on every sub-graph with a good preview and have only the height map exposed in my master graph.
The Head :
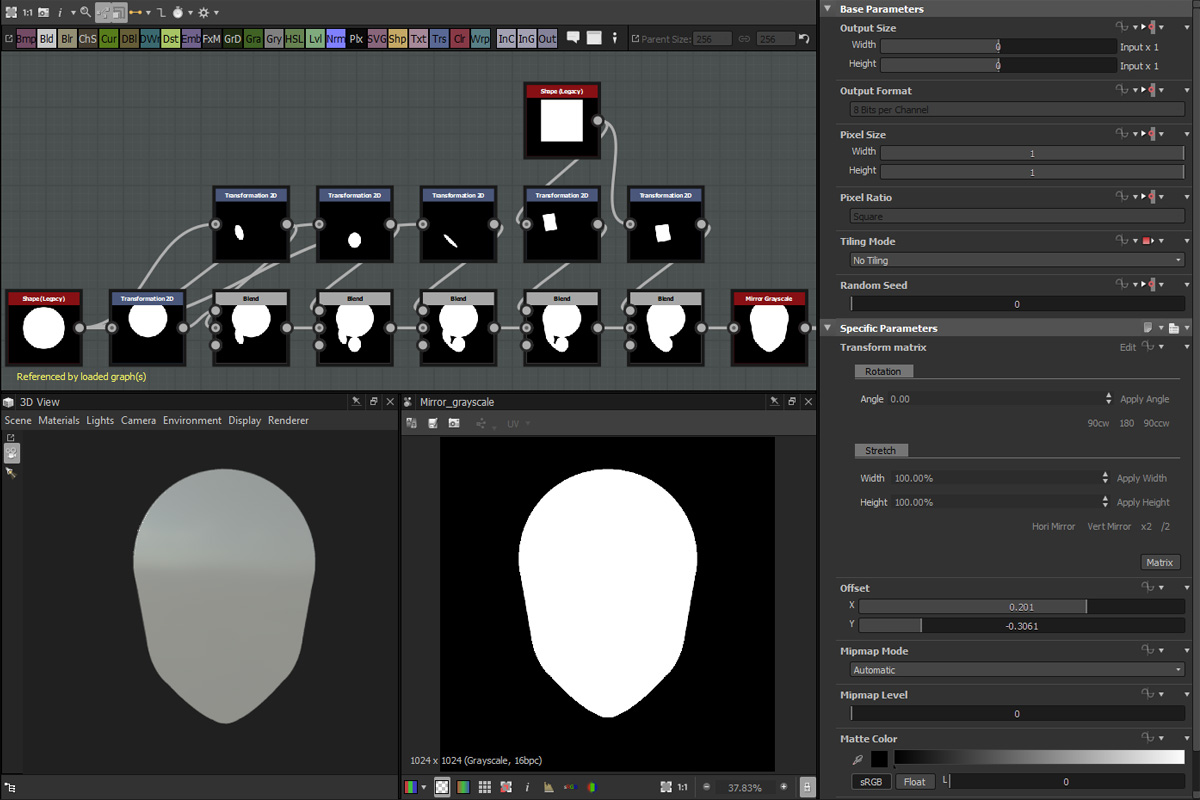
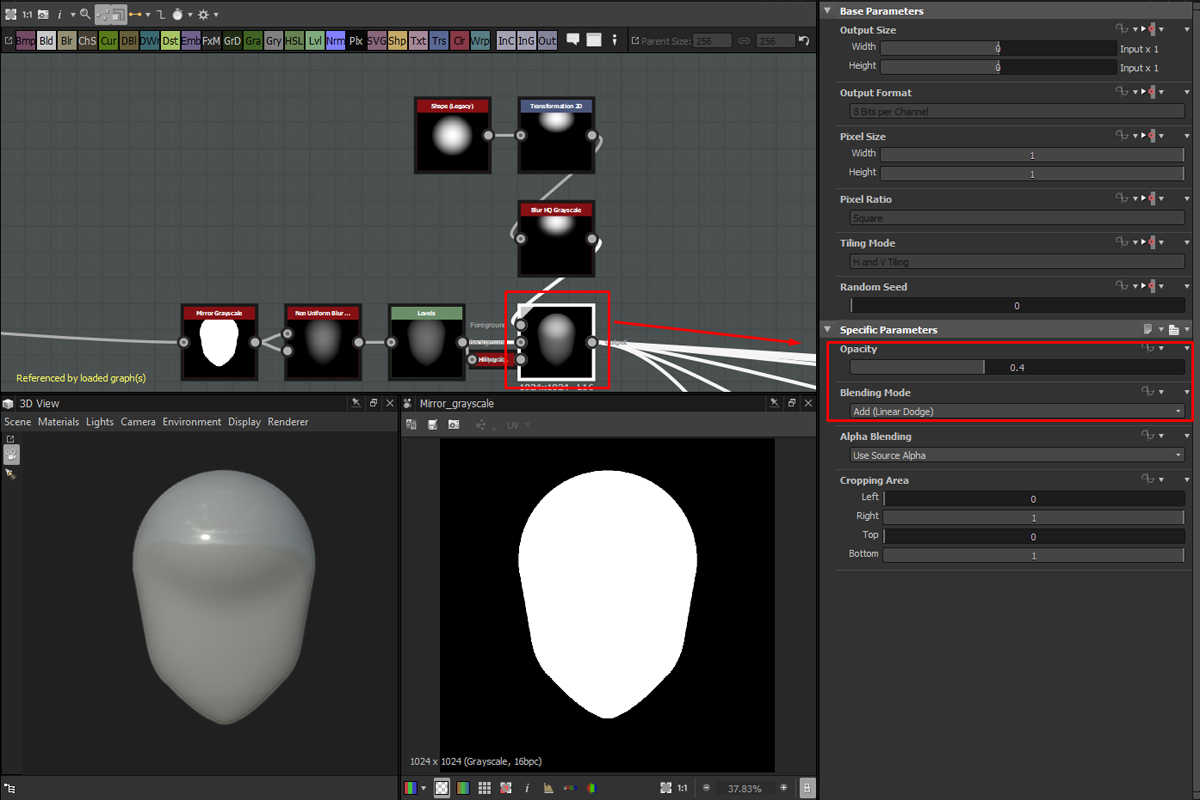
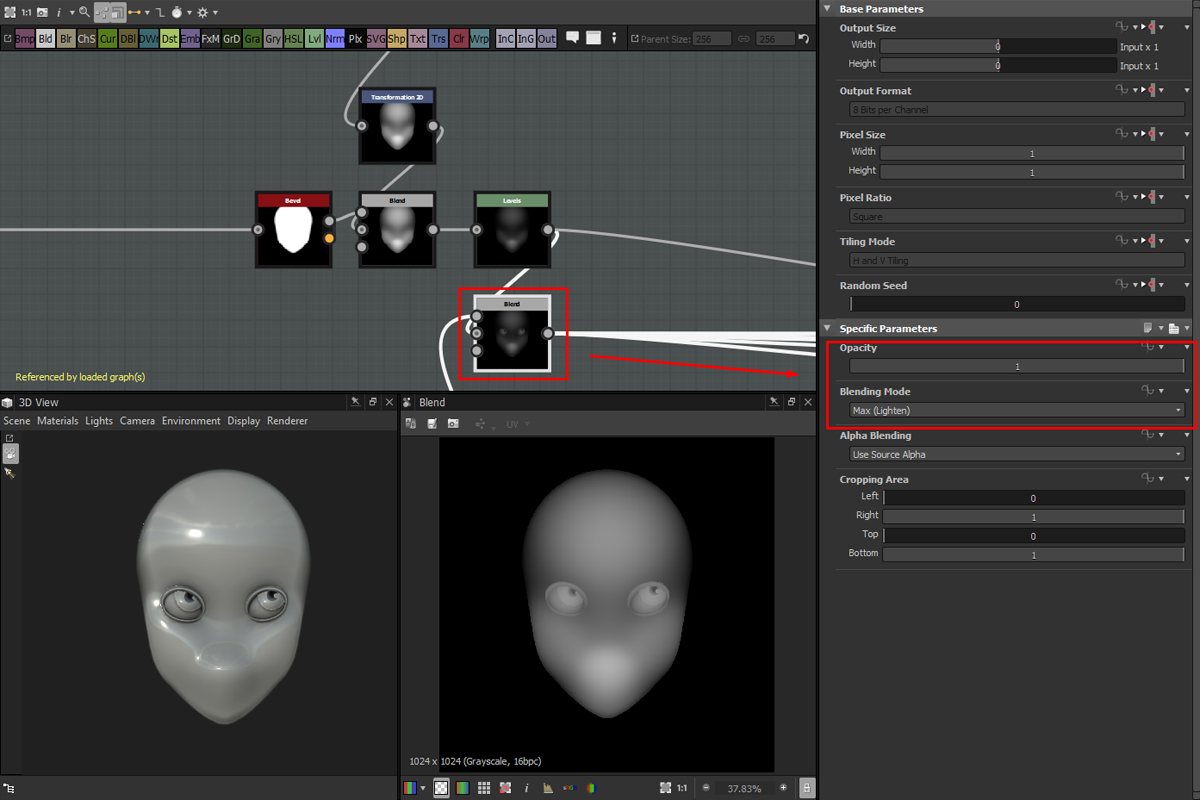
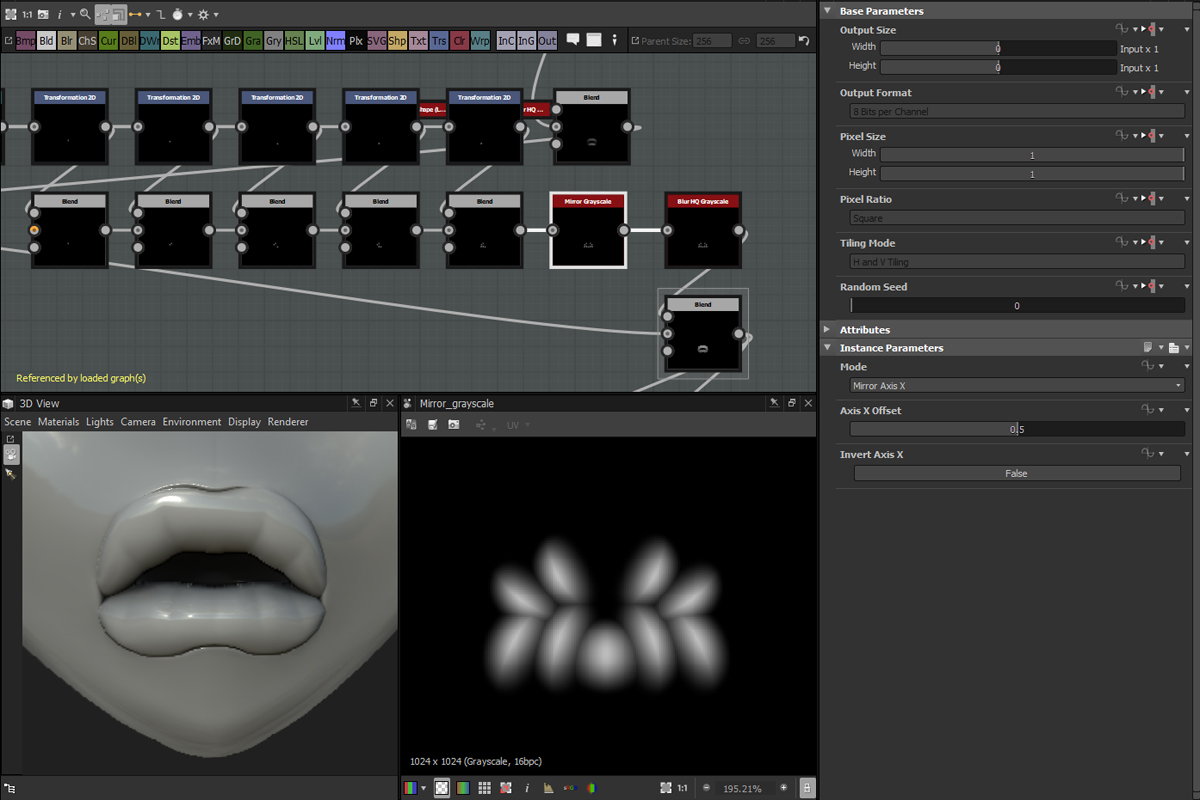
I start with the face because it's the more challenging part. I mostly create my shapes like in a drawing, starting from the big shapes to the smaller ones. Here, I build the silhouette first by manipulating simple shapes and blending them together with the Blends in Add mode. Don't forget to remove the tiling of your transform.
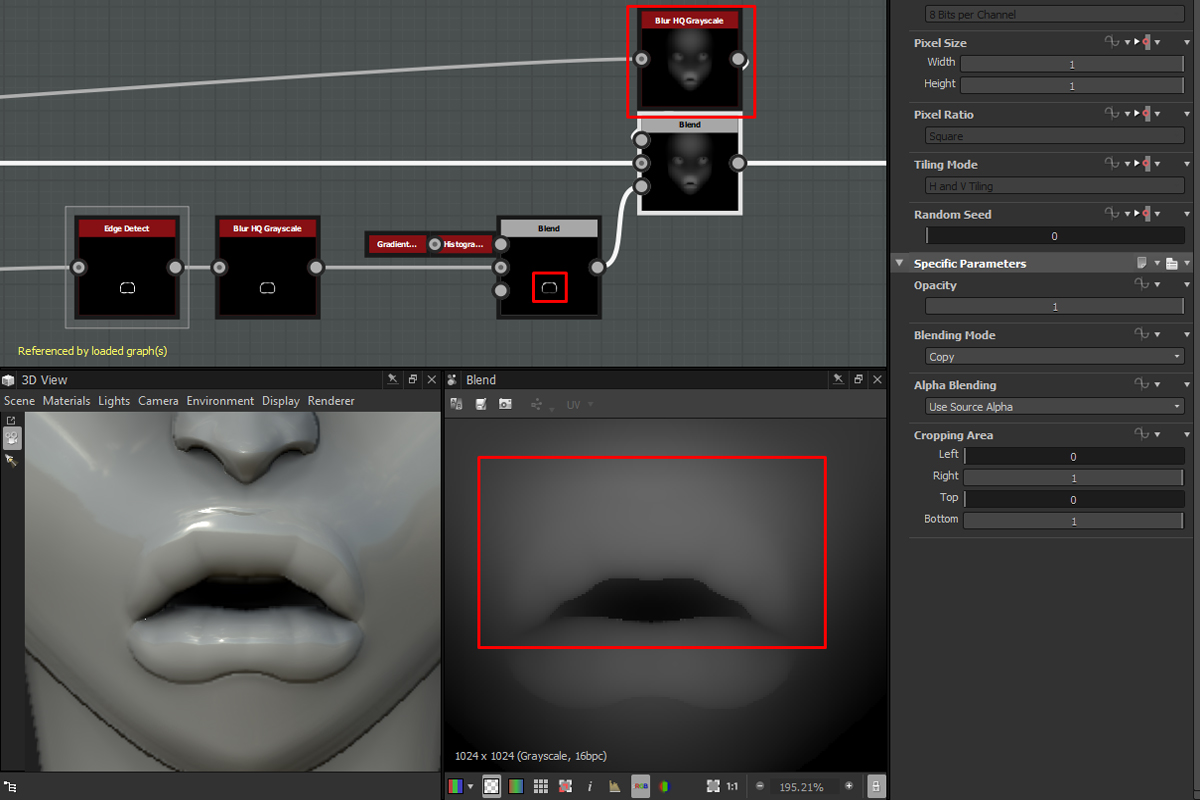
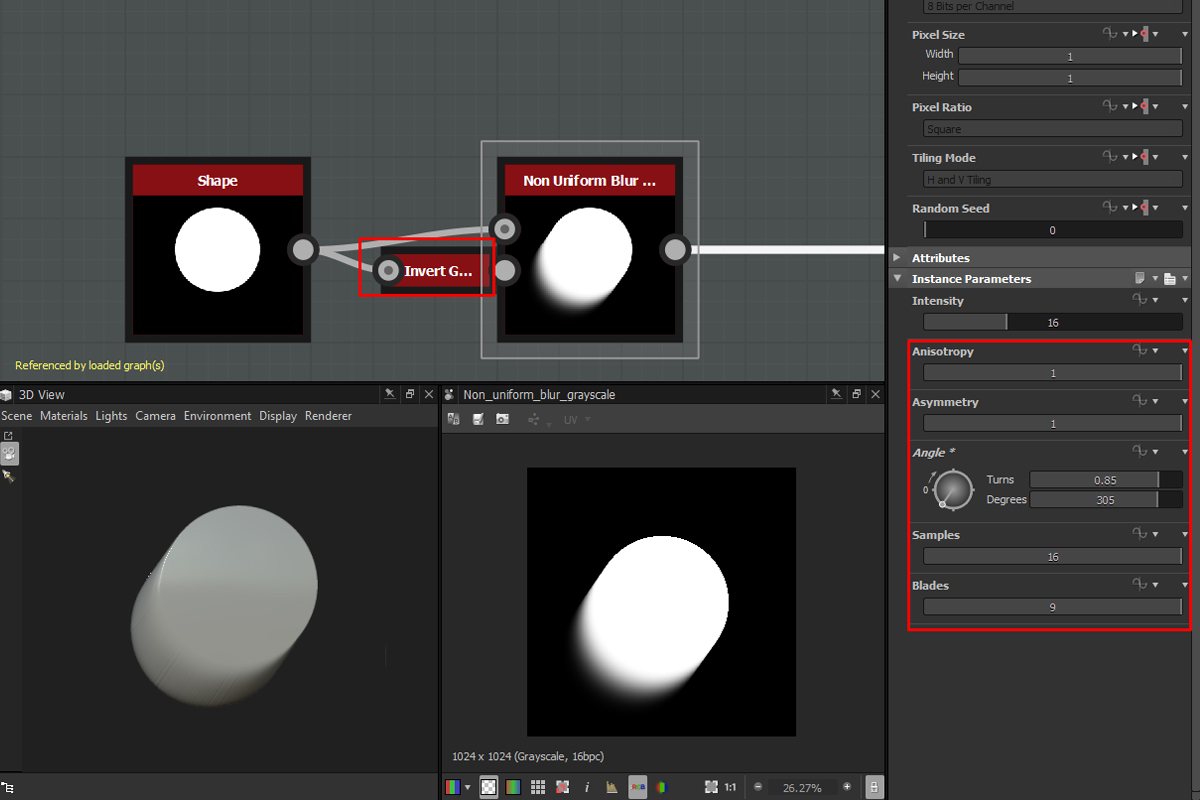
When I'm happy with the silhouette, I start building the main volume with a non-uniform blur clamped with a level. Then, I sculpt the medium shapes by adding simple shapes to it. To have a smooth result I blur my shapes before adding it on the head and play with the opacity value. To avoid breaking the silhouette I limit the impact of my adds by putting the head's silhouette as a mask.
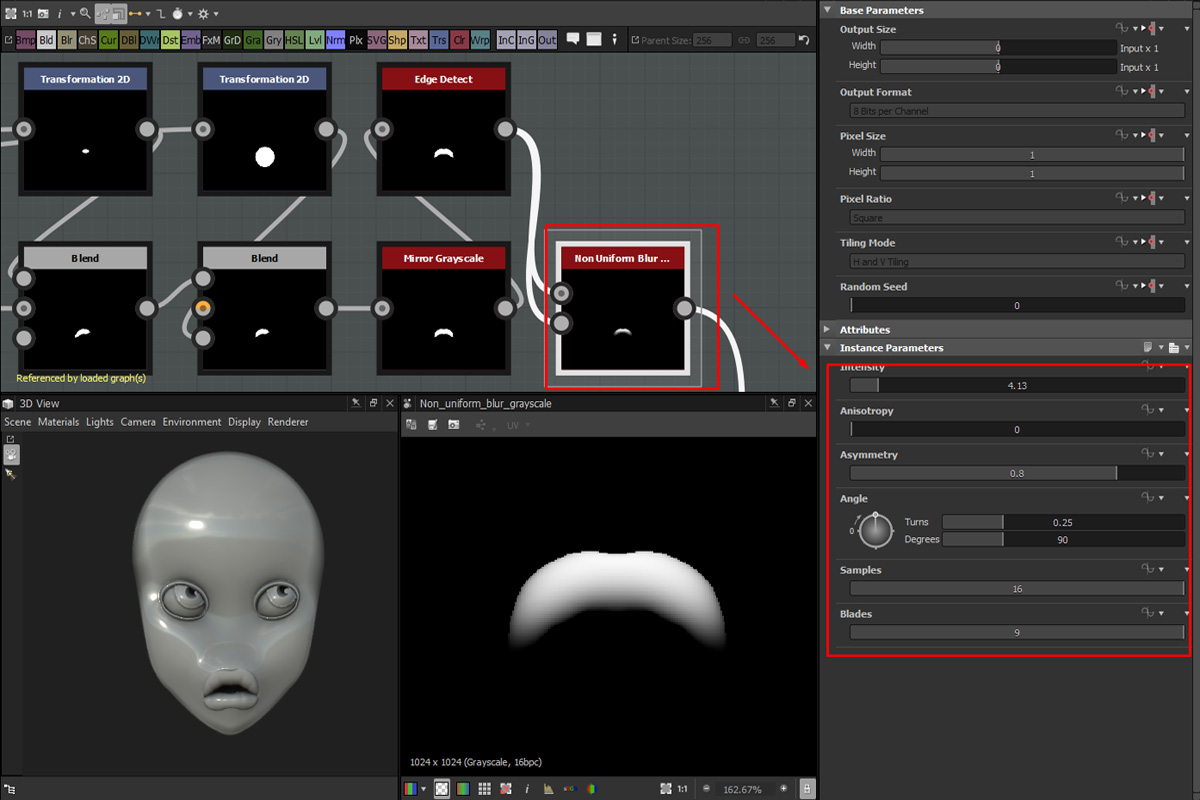
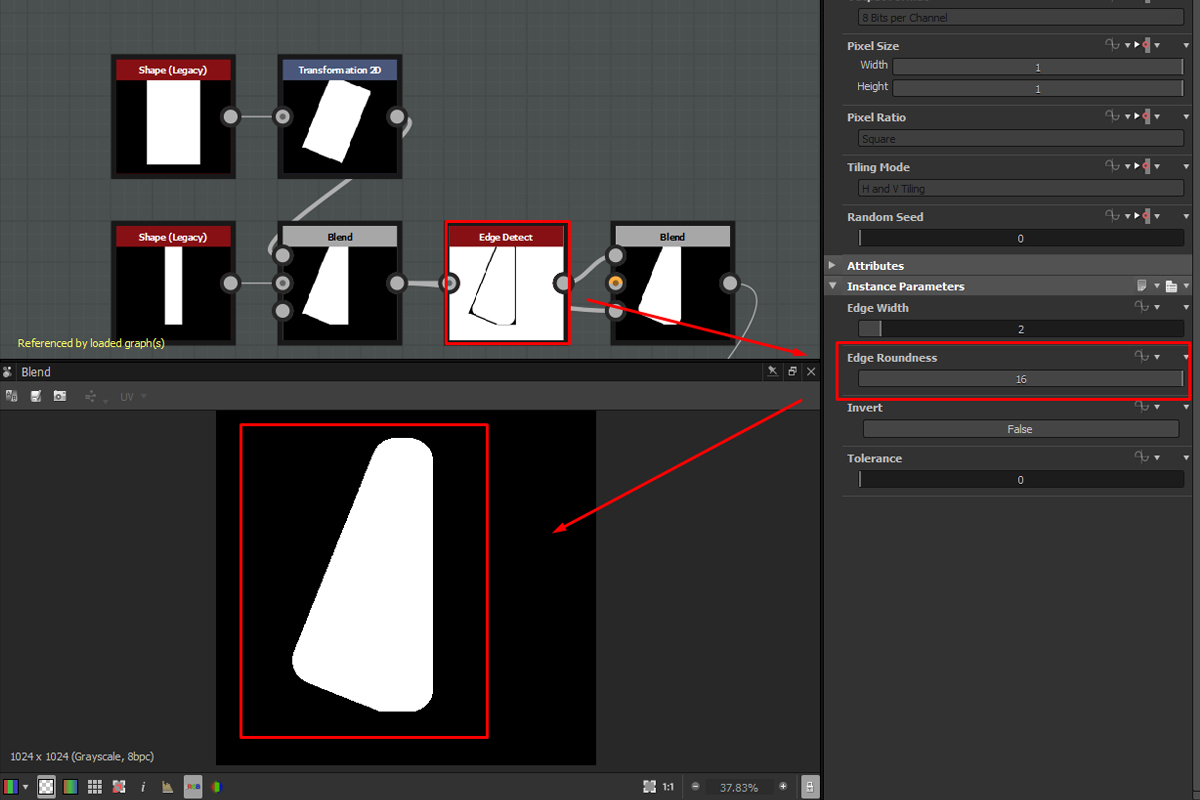
Using the same recipes combined with edge detects and bevels I start the other part of the face (nose, eyes, ears, etc..). Playing with the options of the non-uniform blur like the Asymmetry can help the creation of an interesting sculpting effect quickly.
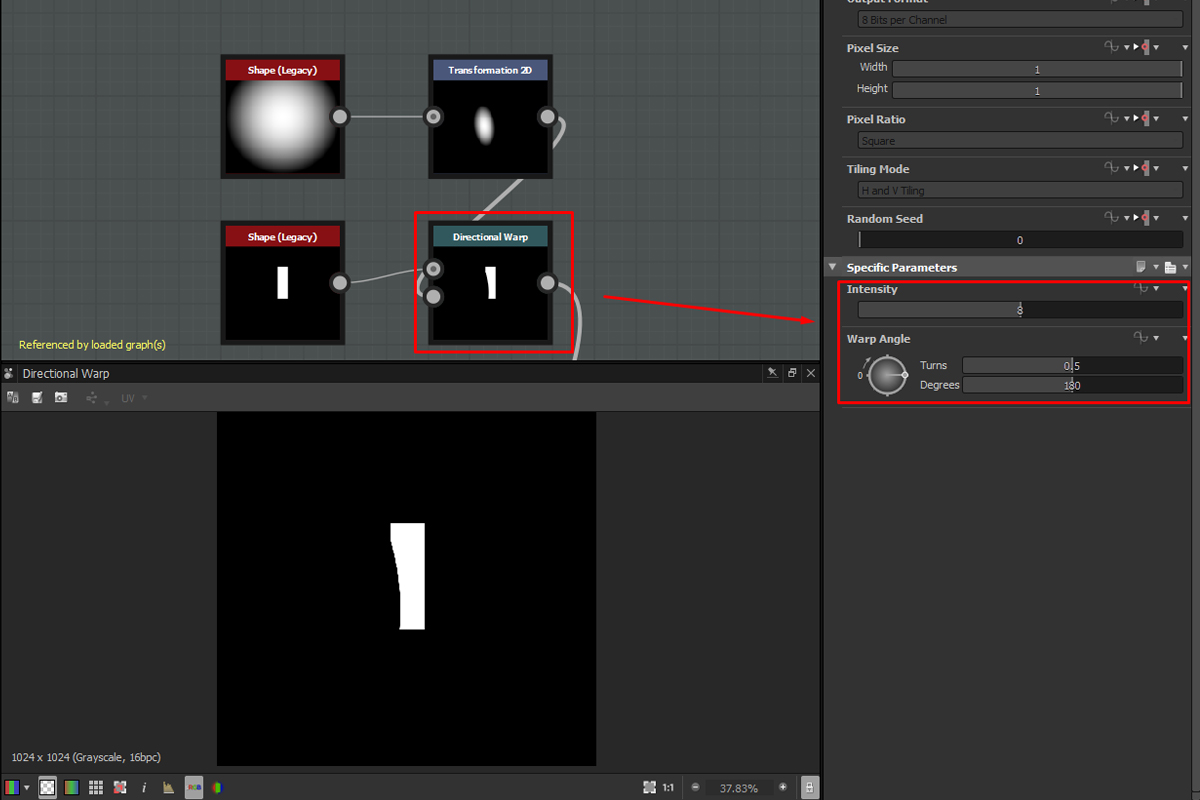
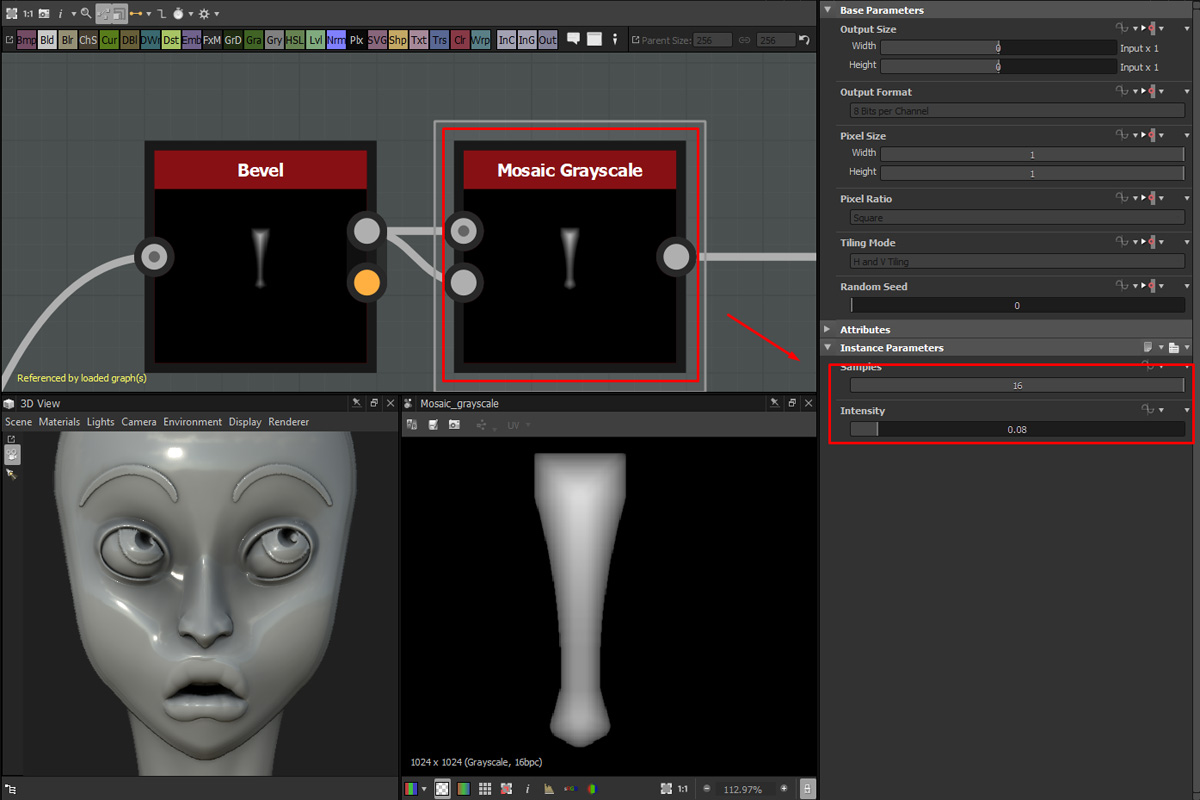
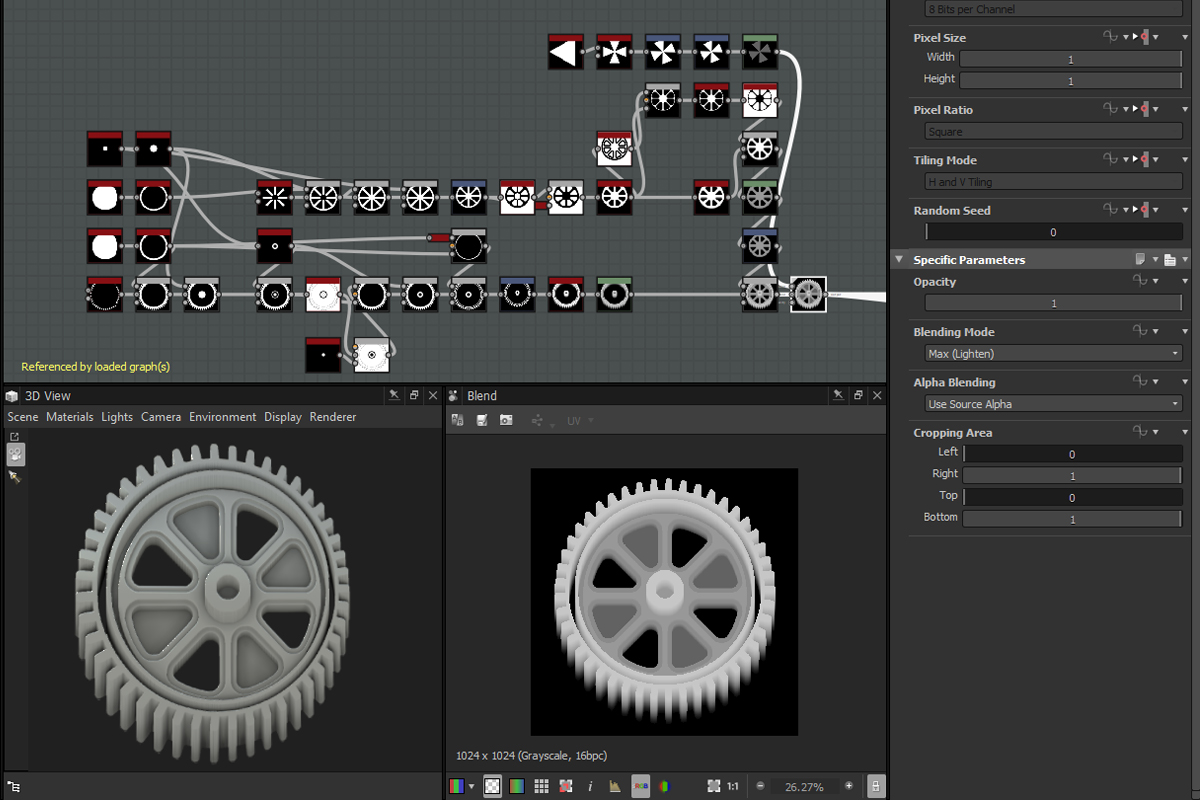
I heavily use directional warp to manipulate, edge detect to round shapes, and mosaic grayscale to inflate my volumes. All those little setups are essential to keep control on what you are doing.
Octopus
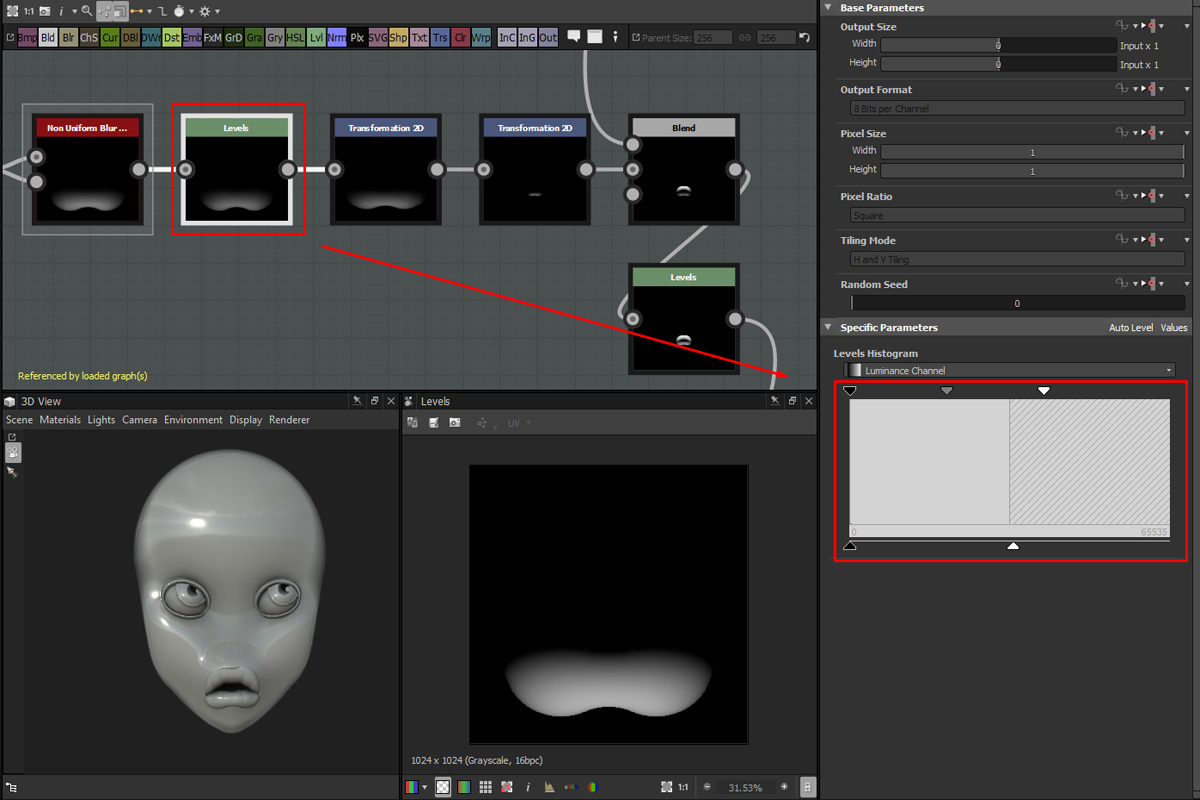
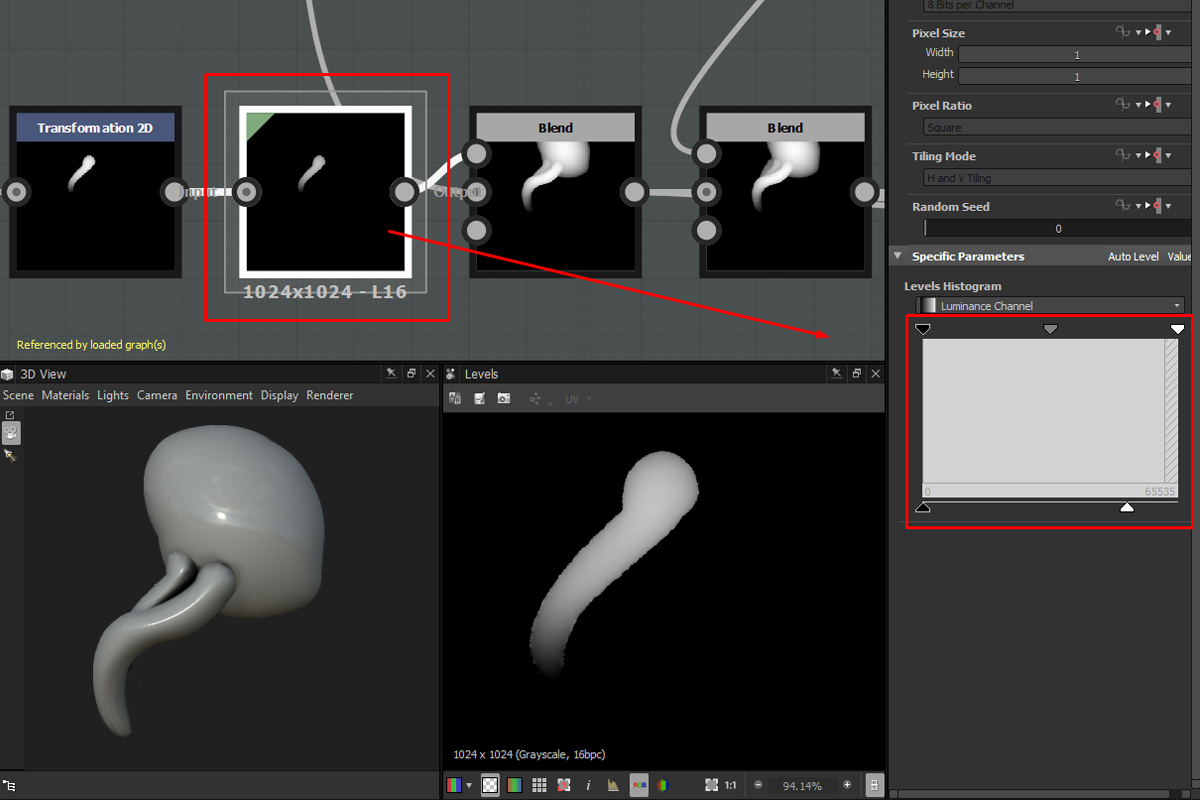
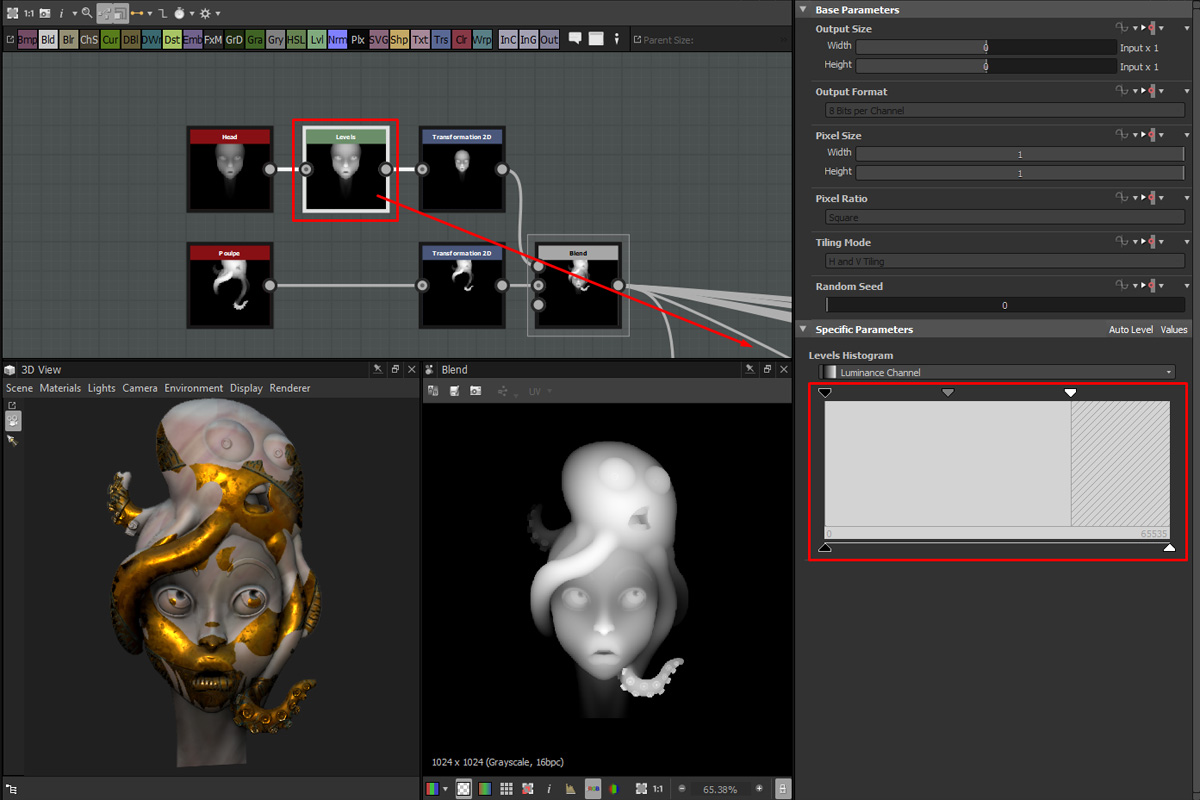
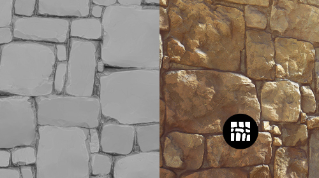
Height maps don't place themselves in the proper place or with the right black and white range. Do not hesitate to manipulate them to control placement and height balance. We don't want to end up with non-accurate height values. Levels are really convenient if you want to check the placement of your element and the real range of your height map.
To enhance the sculpted feeling, intersections are essential. You need to work it as if you were sculpting it. I often smooth the intersection of two volumes when it‘s helpful. In order to do that, I first isolate the volume I want the borders to be smooth, edge detect it, blur the result and use It as a mask to blur my volume. This setup allows me to pinpoint the area I want to blur.
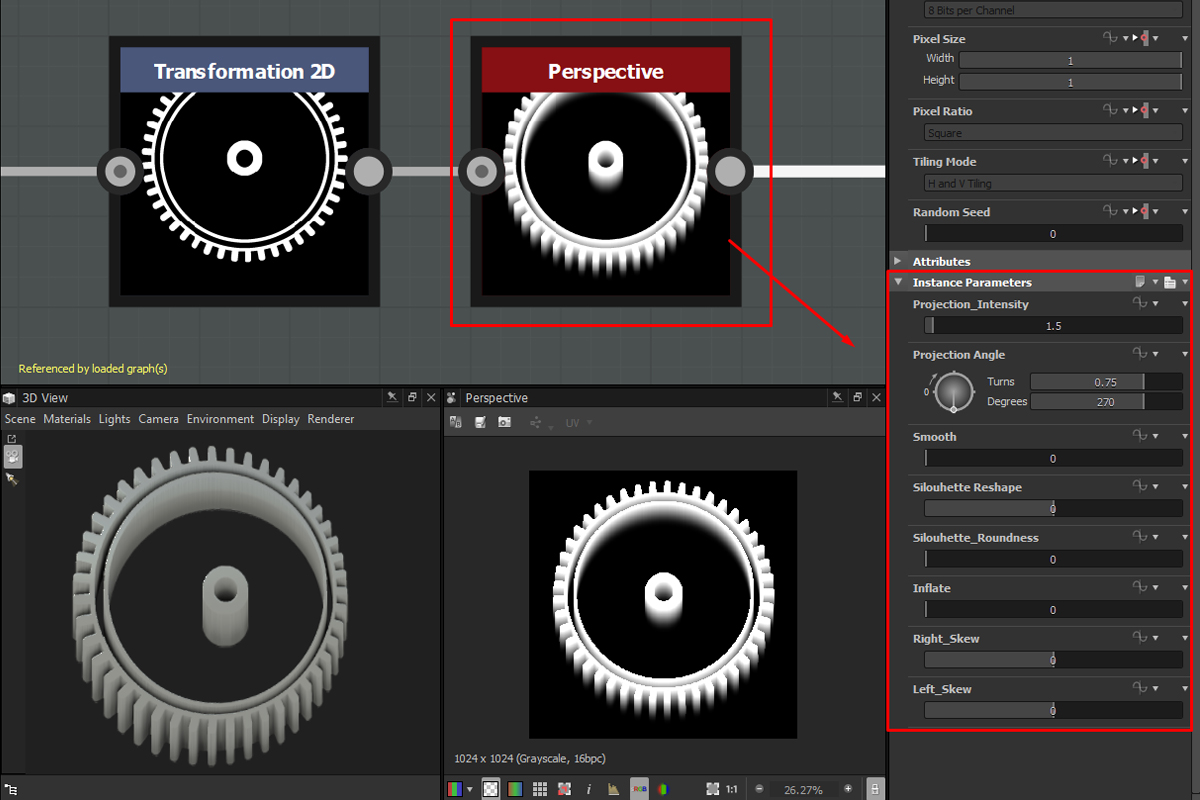
Perspective Node :
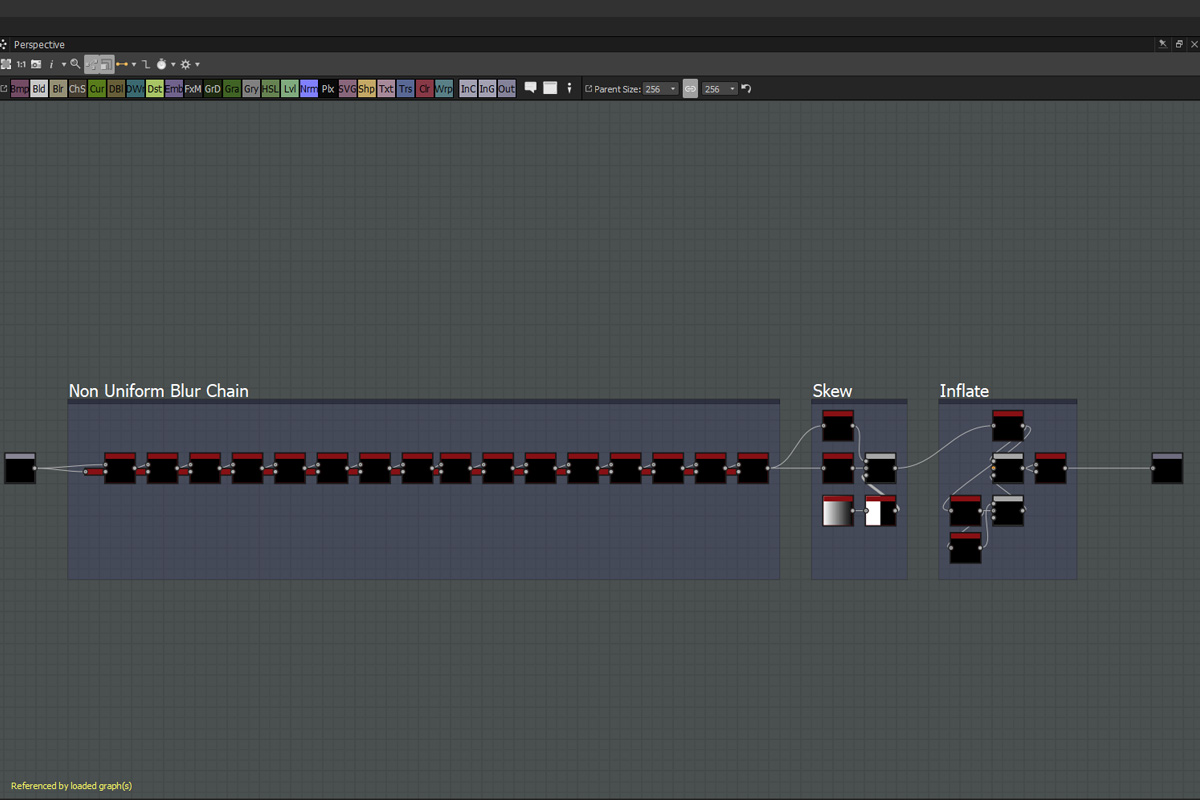
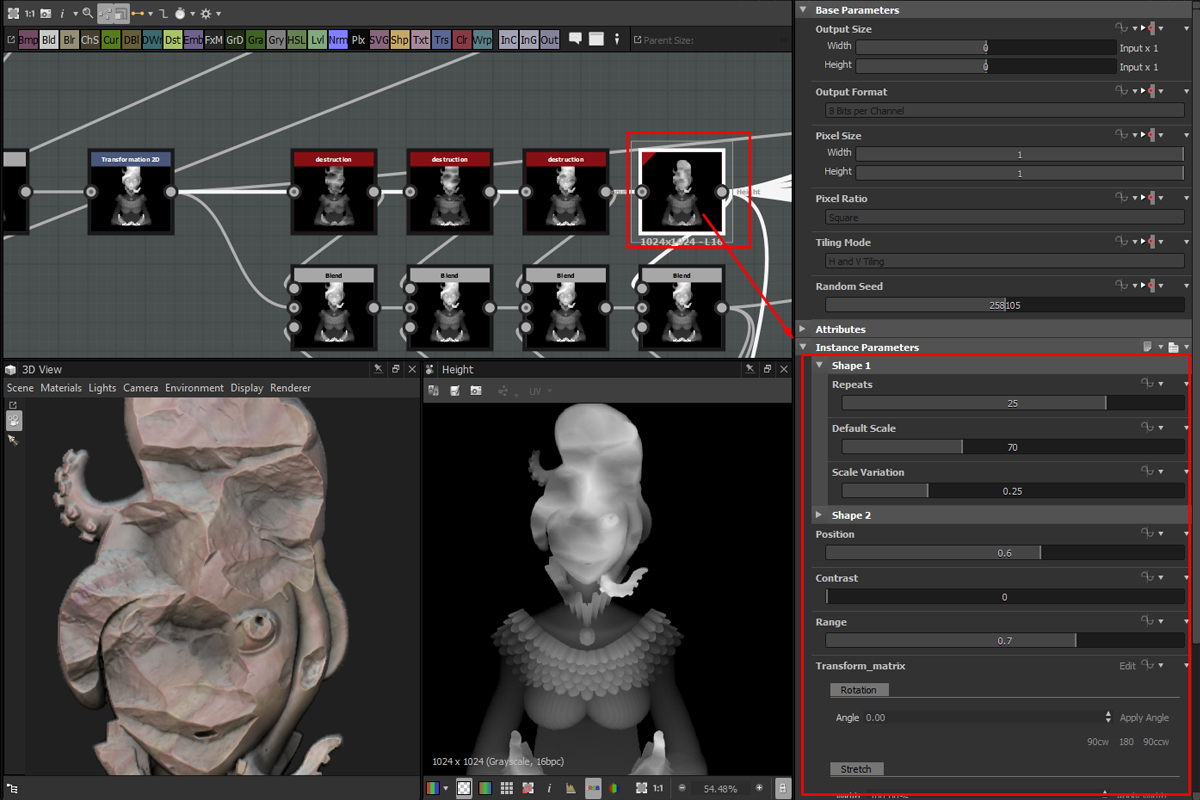
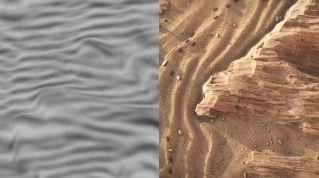
For this project, I was aiming to push the 3D feeling of my volumes. Sculpting shapes was not simple or efficient enough on some parts so I built a perspective node. It's basically a non-uniform blur chain that pushes the shape you input in it.
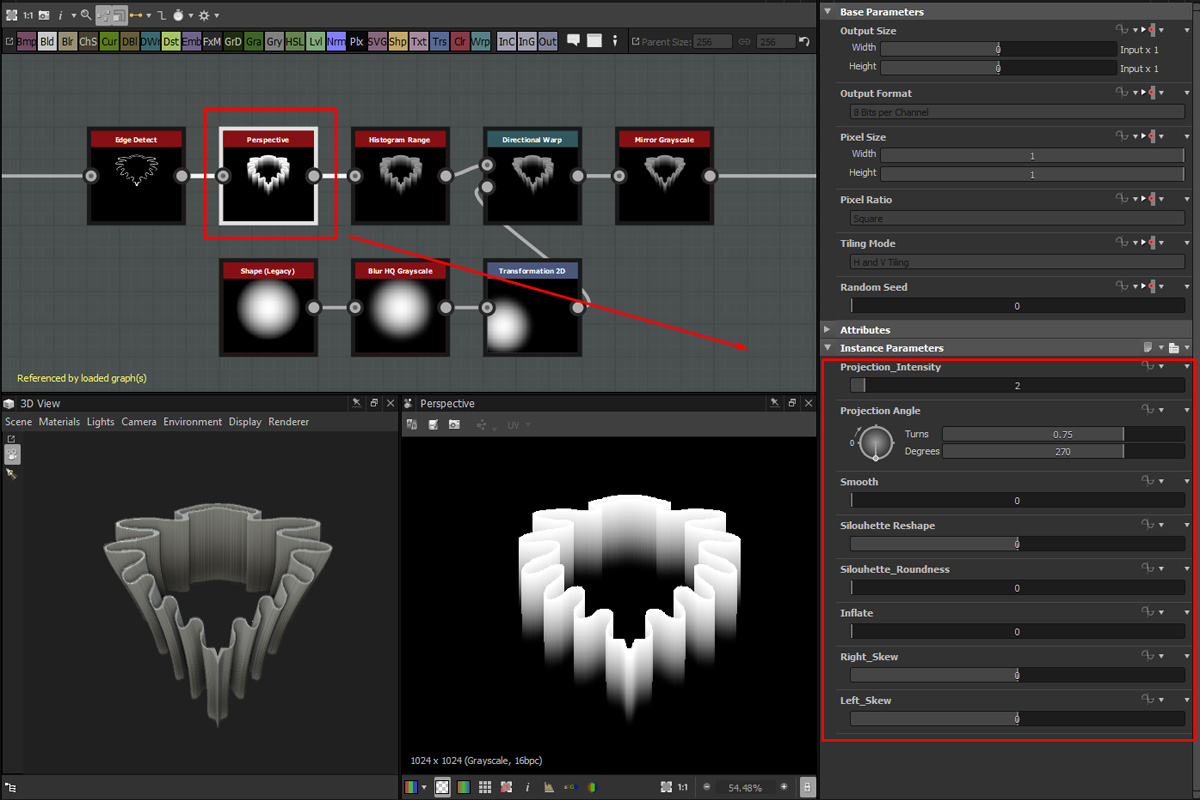
I create complex shapes separately and blend them together to obtain my final design.
This Perspective Node allowed me to create mechanical but organic shapes as well, like the collar, octopus suckers, scales or the fingers. This setup definitely helped me gain a lot of time.
Finalizing the sculpt
All along this character creation, I keep my Master Graph up to date, balancing all the height map parts to synchronize everything and use the full range from black to white of my height map.
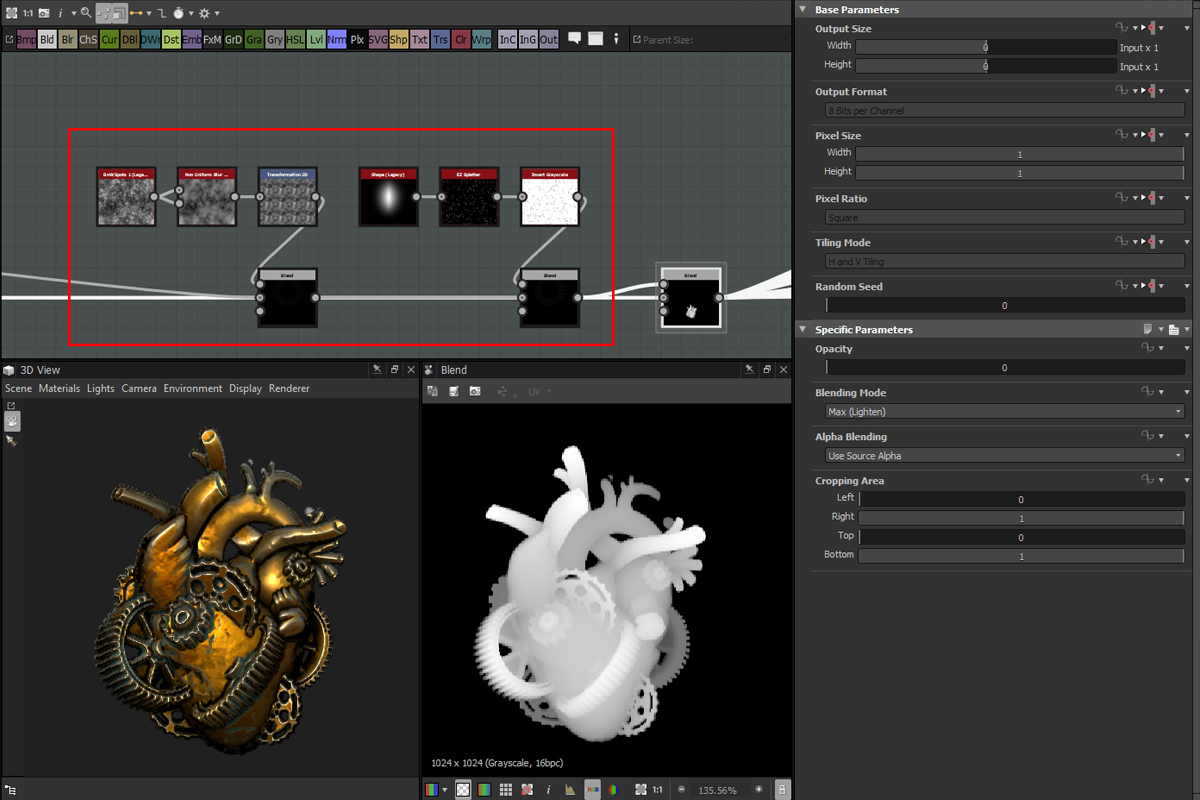
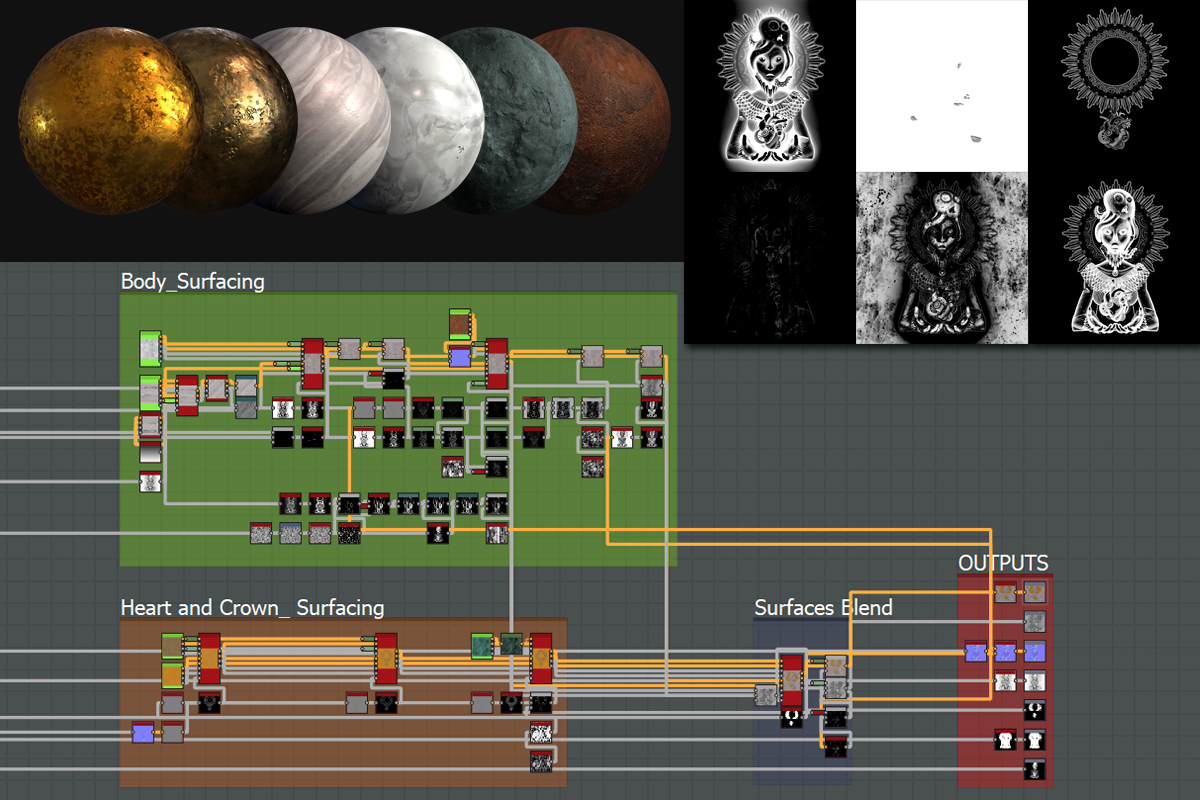
I separate the metallic and non-metallic parts to sculpt them separately. This way I can better control the surfacing.
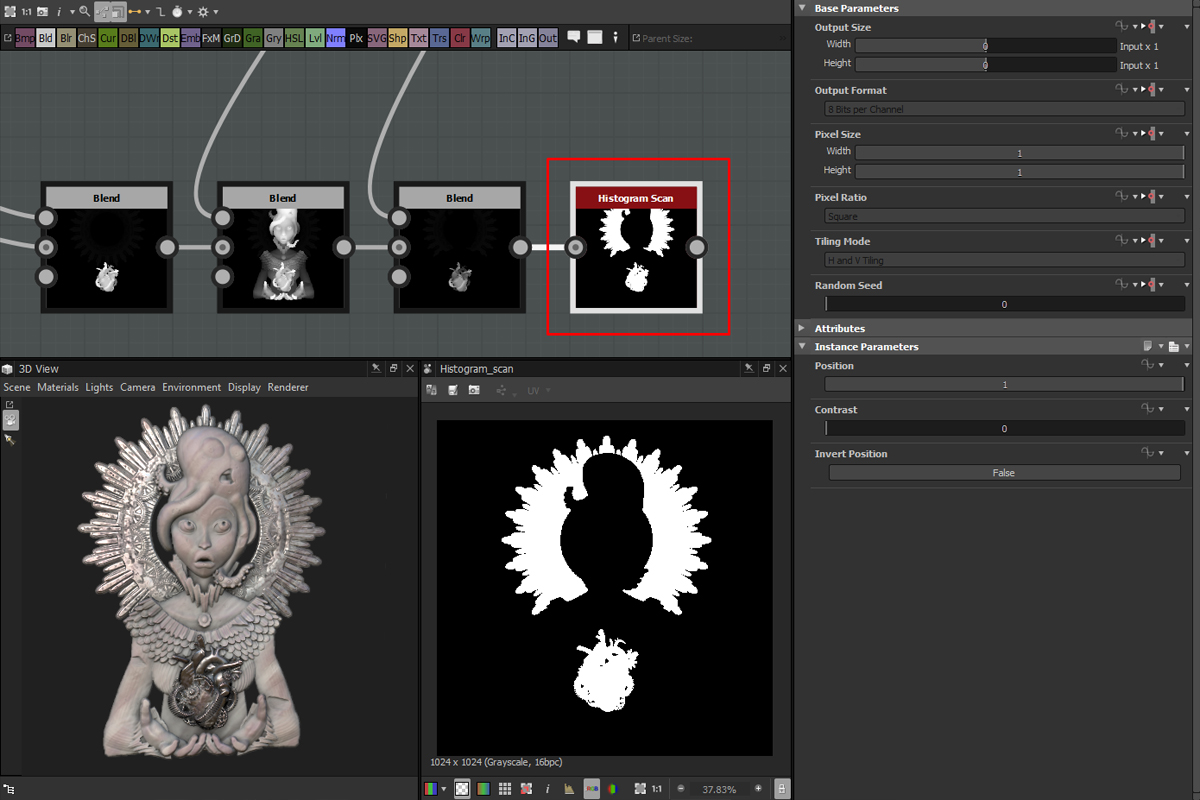
This setup also allows me to obtain a clean Mask I will need later on.
When I'm happy with the height, I can start working the Albedo and Roughness. In order to go faster, I import some materials I previously made and blend them according to mask extracts from my height.
__
Vincent Dérozier told us more about his working process and experience as an Environment Texture Artist in Ubisoft. Read ithere .
You can control how Adobe websites use cookies and similar technologies by making choices below. But note that if you disable cookies and similar technologies entirely, Adobe websites may not function properly.
Cookies are small text files stored by your web browser when you use websites. There are also other technologies that can be used for similar purposes like HTML5 Local Storage and local shared objects, web beacons, and embedded scripts. These technologies help us do things like remembering you and your preferences when you return to our sites, measure how you use the website, conduct market research, and gather information about the ads you see and interact with.
You can make choices in the menu below about what cookies and other technologies you want us to use on Adobe sites when you visit them from this browser. You can always change those choices later by clicking on the Cookie Preferences link at the bottom of the page.
If enabled:
We can improve your experience by tailoring the site and the content to things we think might be of interest
We can better keep track of your preferences — like what language you prefer to use
We will better understand your likely interests so we can provide you more relevant Adobe ads and content on non-Adobe websites and in non-Adobe apps
It will help us improve the performance of our website and those of our partners who use the Adobe Experience Cloud
If disabled:
We won’t be able to remember you from session to session so the experience may not be tailored to your interests
You’ll still have access to the content of the site but certain features that depend on cookies may not function
You’ll still see ads, they just may not be as relevant to you
General information
You can control how Adobe websites use cookies and similar technologies by making choices below. But note that if you disable cookies and similar technologies entirely, Adobe websites may not function properly.
Cookies are small text files stored by your web browser when you use websites. There are also other technologies that can be used for similar purposes like HTML5 Local Storage, web beacons, and embedded scripts. These technologies help us do things like remembering you and your preferences when you return to our sites, measure how you use the website, conduct market research, and gather information about the ads you see and interact with.
You can make choices in the menu below about what cookies and other technologies you want us to use on Adobe sites when you visit them from this browser. You can always change those choices later by clicking on the Cookie Preferences link at the bottom of the page.
If enabled:
We can improve your experience by tailoring the site and the content to things we think might be of interest
We can better keep track of your preferences — like what language you prefer to use
We will better understand your likely interests so we can provide you more relevant Adobe ads and content on non-Adobe websites and in non-Adobe apps
It will help us improve the performance of our website and those of our partners who use the Adobe Experience Cloud
If disabled:
We won’t be able to remember you from session to session so the experience may not be tailored to your interests
We’ll still count your use of our site and services
You’ll still have access to the content of the site but certain features that depend on cookies may not function
You’ll still see ads, they just may not be as relevant to you
Operate the site and core servicesOperate site and measure engagement
Always active
These cookies are required, and they are used to enable the site and related services core functionality. Without them the site could not operate, so they cannot be disabled.
These cookies enable the site and related services’ core functionality and collect statistics about user engagement, such as counting active use to help us understand trends. These cookies cannot be disabled.
Measure performance
These cookies are used to analyze site usage to measure and improve performance. Without them Adobe cannot know what content is most valued and how often unique visitors return to the site, making it hard to improve information we offer to you.
These cookies are used to analyze site usage to measure and improve performance. Without them Adobe cannot know what content is most valued, making it hard to improve information we offer to you.
Extend functionality
These cookies are used to enhance the functionality of Adobe sites such as remembering your settings and preferences to deliver a personalized experience; for example, your username, your repeated visits, preferred language, your country, or any other saved preference.
Personalize advertising
These cookies are used to enable Adobe and our partners to serve ads more relevant to your interests. Without them you will still see ads, but they might not be as relevant to you.
Personalize advertising
These cookies are used to enable Adobe and our partners to serve ads more relevant to your interests. Without them you will still see ads, but they might not be as relevant to you.