Creative Cloud All Apps
£56.98/mo
Get Photoshop and the entire collection of creative apps across desktop and mobile. Learn more
Architectural photographers have to consider time of day, weather, and vantage points to create stunning images of cathedrals, homes, skyscrapers, and more. In this expert guide, photographer Ludwig Favre reveals his top tips and speaks to other professionals about what factors to bear in mind for architecture photography.
Architecture photography involves shooting building exteriors and interiors, as well as bridges, cityscapes, and other notable structures. But for me, it’s much more than this – it’s a way of capturing the feeling of a time and place.
Let me show you why emotion is the most important aspect of architectural photography - and how you can bring it into your images.
From shots of historical buildings to humble abodes, architectural photography covers photos that primarily showcase the interior or exterior of manmade structures. With subjects that are static and easily accessible, architectural photography is a natural beginning for a lot of photographers – as it was with me. “I think it’s a good place to start,” says photographer Nick Ulivieri. “The architecture’s already there, and you can just go outside and shoot whatever you want to shoot.”
You don’t need a studio or elaborate light setup, at least not for exterior shots, to capture great photos of buildings. You don’t need to direct models. Your subject is still, freeing you up to study how the setting may affect every shot. Lighting, weather, and the potential angles you can shoot from are the variables that you need to consider as you begin building your architectural photography skills.
You give up a lot of control when shooting the outside of a building. “The challenge with creating high-quality architectural images is knowing when and when not to shoot a certain structure,” says Ulivieri. “You're at the mercy of the building’s design, the location, the shadows, and the weather.” In some forms of photography, you can control the environment to get the right shot, but with most architectural subjects it’s all about your ability to adapt.
One of the most difficult elements of architecture photography is deciding where to take your camera. With so many amazing buildings in every city, you can easily spend a long time researching the architecture of historic landmarks, modern structures, and urban landscapes.
I tend to source inspiration from Pinterest and Google Images - looking for buildings which have the perfect composition of shapes, colours, and designs. Once I have a few ideas I travel to these places to look for what I can only describe as a “feeling”. By that I mean somewhere that really speaks to you on a level beyond the visuals.
For example, there are places in the US where I feel a sense of nostalgia, due to all the American TV shows and movies I watched as a kid. This particular emotion is heightened during sunset, which tinges everything with a sepia-kissed natural glow, evoking the past.
An awareness of the magic of a setting transforms architecture photography from the simple act of taking a photograph of a building, to truly capturing a moment in time.
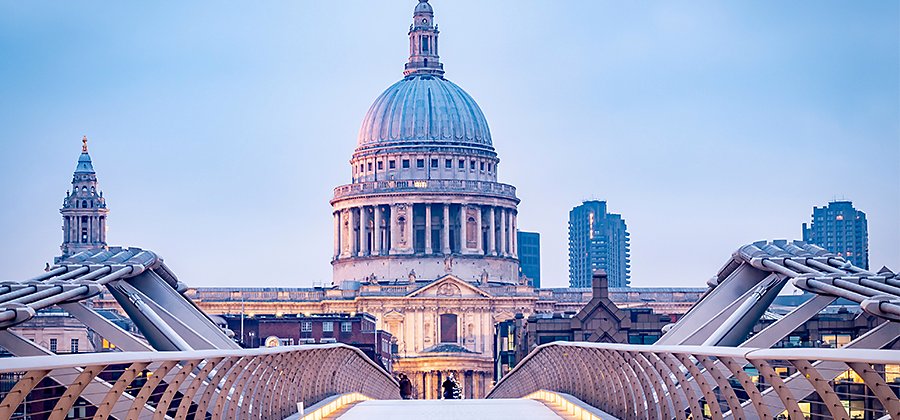
“There are two main shots. A really nice daytime photo where you’ve got a blue sky and maybe some clouds,” says Ulivieri. “And then there’s blue hour.”
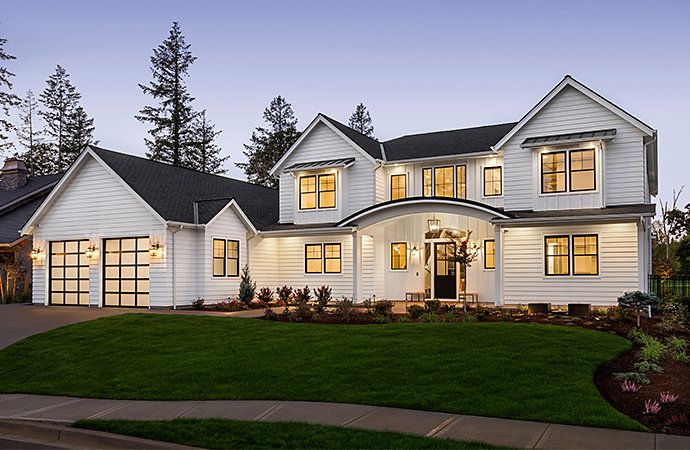
Blue hour is the time just after sunset when the sky takes on a pink, blue, or purple tinge, and photos of buildings at that time can help highlight external lighting features while lighting up exterior aspects like facades. Plus, photos shot at blue hour may allow internal lights to give the building an inner glow. The bright lights, deep colors, and dramatic contrasts of blue hour photos make these shots a popular choice for the large marquee images that often dominate websites, brochures, and other assets.
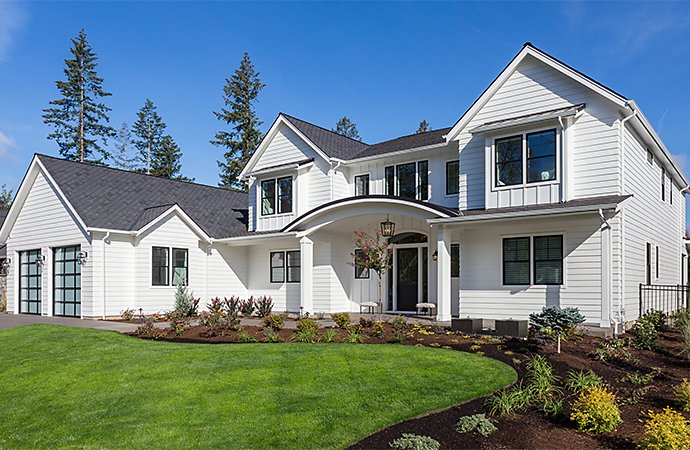
While some architecture photography is artistic, many clients want to showcase buildings or real estate — for commercial purposes — on a clear day or just after sunset. For these daylight shots, avoid direct sunlight. Taking photos when the sun is overhead will result in harsh contrasts and deep shadows. “Exterior is mainly about time of day,” says photographer Kenton Waltz. “Shooting at magic hour is great, because you don’t get harsh exposure differences.” Magic hour, also known as golden hour, is about an hour after dawn or before sunset. It’s known for providing a lot of soft, warm light.
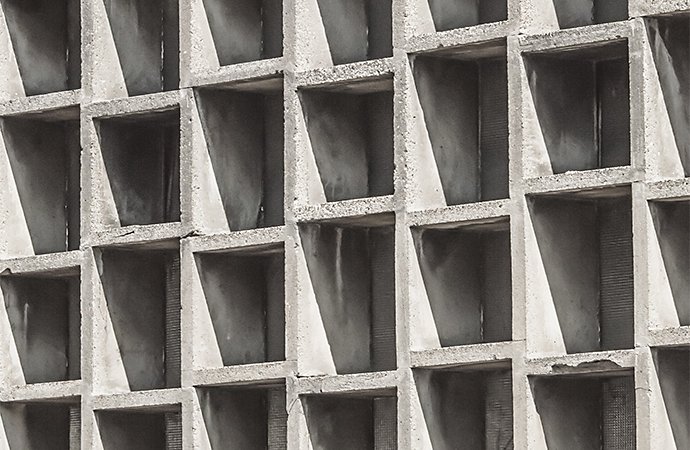
Different buildings often look better during different weather conditions and at different times of day. “If you’re doing a more brutalist structure where contrast is part of the design, you might want to shoot at high noon when you get more shadows,” Waltz says. Likewise, metal and concrete industrial structures can look especially imposing when slick with rain, old Victorian mansions can look haunting beneath an overcast sky. And if you want to emphasize the height of a skyscraper, you can choose to shoot it when the top of the building is shrouded in clouds. It’s all about seeking out the right setting for each building.
When it comes to weather, a warm sunny day is almost always what I want. Blue skies can be boring – so I prefer at least a few clouds to break up the colour.
However, if I happen to be shooting during a storm – this can provide my images with added drama. Capturing storm clouds looming over a building can provide a multi-sensory experience to the viewer. It doesn’t take much for them to imagine the feeling of the storm coming through the photograph.
“An awareness of the magic of a setting transforms architecture photography from the simple act of taking a photograph of a building, to truly capturing a moment in time.”
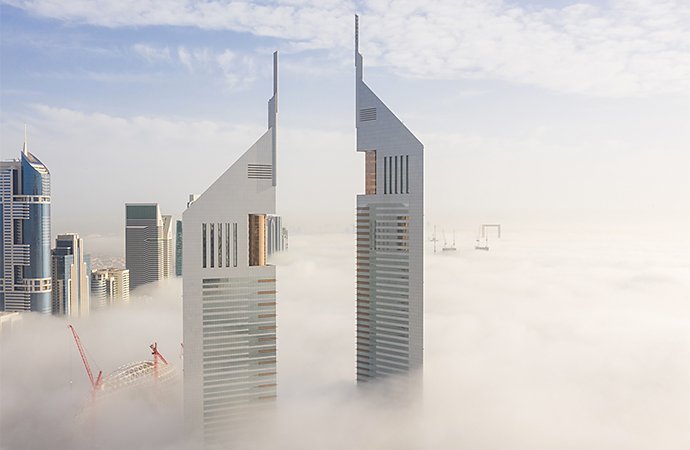
Street-level photos may not provide the best angle for your subject. “If you’re shooting a skyscraper or a building taller than 30 storeys, find a vantage point,” says Waltz. To avoid distortions in perspective, stand on something that’s about halfway up the height of what you’re trying to photograph. If you look up at a structure, its lines will appear to converge due to perspective. However, if you’re directly across from a building, there’s no perspective change. For especially tall buildings the right vantage point might not be anywhere on the ground or a nearby structure. “Sometimes a drone is the best option if you can’t get where you need to be,” says Waltz. If you have the budget, cranes and helicopters are an option, as well.
In my experience as an architecture photographer, the biggest challenge is lining everything up. If you take a picture of the building from the ground facing up, the lines won’t be straight – so it’s important to be level with the building, or at least align your view to the main focus of the building or scene.
If it’s not possible to frame the shot in such a linear way – it is possible to achieve the effect in Lightroom afterwards.
The first thing any interior photographer needs to do is prepare the space. Most homes, offices, or other lived-in buildings won’t be set up to look their best in a photo. They’ll be set up for daily use. A good interior photographer knows how to fix that. “It’s a running gag with interior photographers,” says Waltz, “but our biggest job is moving furniture.”

Interior photographers should also be prepared to bust out the cleaning supplies. “Everybody’s got toothpaste on the mirror,” says Waltz. “It doesn’t matter who you are, or how expensive your house is, there’s toothpaste on the mirror. Be ready to clean the space.”
Once the place is prepared, get low. Shooting from a lower height can make a shot more about what’s actually in the room. “I like to shoot from kid height,” says Ulivieri. “My camera is maybe two-and-a-half to three feet off the ground. If you shoot lower it helps you focus on the details of the space.” That lower vantage point allows chairs, sofas, and tables to take prominence in the shot. A little higher up, and you’re mostly focusing on walls and doors.
Weather can still be a factor with interior photography. If you’re shooting a property on a dark or rainy day, you will have to be prepared to deal with whatever natural light (or lack thereof) is coming into the space. “You can work on composition regardless of how well or poorly lit a space may be,” says Ulivieri. High-end equipment like off-camera flashes can also correct for poor natural lighting, but good composition will go a long way.
It doesn’t take much to get into architectural photography, but you’ll want more than just a DSLR camera to get truly great shots.
Even with all the right equipment, the most important thing for any architecture photographer is patience. “You cannot rush these things,” says Waltz. “We might do an entire day and walk away with ten photos.” Be willing to work with the environment, weather, and the building itself. It can be a slow process, but one that makes amazing images of everything from residential real estate to the biggest structures on the skyline.
Often I shoot on aperture priority mode if I don’t have time to adjust the settings – for example, if I’m walking around a city shooting without a tripod, with my camera in hand.
However, whenever I am staging a shot with a tripod, use the manual mode to adjust the aperture. When shooting architecture, the aperture needs to be around f/10. After f/10, you will start to lose clarity.
ISO should always be at 100, but shutter speed can vary depending on the light. I’d recommend starting at 1/125th of a second and experimenting with slightly faster or slower speeds if necessary.
“A 35mm or 60mm lens gives me all the options I need.”
Invest in a good camera and lenses. Of course, everyone has to compromise at some level – so if I had to pick, I’d choose to have a mid-range camera with a range of quality lenses, rather than a premium camera with only one lens.
Visit a location at least twice. The first time you visit, you’re just discovering a place. The second time is about trying to see what makes it special.
Remember the power of editing. I use Adobe Lightroom to frame my images. It helps me get the angle and outline just right. I also enjoy experimenting with the highlights, lowlights, and colour saturation, which can bring a different perspective and take a photograph to a new level.

Ludwig Favre is a photographer specialising in architecture. Born in France, Ludwig is best known for his shots of major cities and landscapes in the US. His work has appeared in galleries, magazines and advertising campaigns across the world.
Learn more about Ludwig’s photography with Lightroom.
Discover Ludwig’s work:
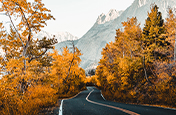
Building a great landscape photo.
Explore ways to artistically capture scenic views with tips on landscape photography.

Getting started in real estate photography.
Begin your journey into real estate photography with these tips and insights from working pros.

Tips for capturing nature photos of all kinds.
Explore the possibilities of nature photography, from animals in motion to sprawling landscapes.
How to use and break, the rule of thirds.
Improve your photo composition skills to capture more stunning images.
£21.98/mo
Get Photoshop on desktop and iPad as part of Creative Cloud.
£56.98/mo
Get Photoshop and the entire collection of creative apps across desktop and mobile. Learn more
£16.24/mo
Save over 65% on 20+ Creative Cloud apps — includes Photoshop. Learn more
£27.99/mo
Get Photoshop and 20+ Creative Cloud apps plus exclusive business features.
See what's included | Learn more