Sample rates and audio sampling:
a guide for beginners.
When you’re trying to sample audio from an analogue source, a calculation takes place inside the computer. The calculation converts the analogue sounds of a guitar, keyboard or other instrument into digital data. Sample rate is key to the quality of this conversion.
In this article we’ll look at how sample rates impact the quality of your digital audio and explore the role of bit depth. We’ll also show you how to convert and compress the final product so it can be manipulated and moved easily.

What you’ll learn:
- What are sample rates?
- What is bit depth?
- Why is the standard audio sample rate 44.1kHz?
- What other sample rates are used – and what for?
- Can I compress an audio file without losing quality?
- How to convert an audio file to a different sample rate in Adobe Audition
What are sample rates?
Audio sampling is the process of transforming a musical source into a digital file. Digital audio recording does this by taking samples of the audio source along the soundwaves at regular intervals. The more samples you take – known as the ‘sample rate’ – the more closely the final digital file will resemble the original. A higher sample rate tends to deliver a better-quality audio reproduction.

Sample rates are usually measured per second, using kilohertz (kHz) or cycles per second. CDs are usually recorded at 44.1kHz – which means that every second, 44,100 samples were taken.
If you can master sample rates, you can create more accurate recordings. Once you have this digital copy you can manipulate, mix and edit without losing any sound quality.

The final sound quality of your recording relies on more than just sample rate – bit depth also plays its part.
What is bit depth/rate?
Every sample you take when making an audio recording needs to be stored within your computer’s ‘bits’. The more bits you use to record each sample, the better the sound reproduction.
In other words, a high sample rate along with a high bit depth (AKA ‘bit rate’ or ‘sample format’) will deliver the best audio quality in your recording. The higher the bit depth, the higher the dynamic range.

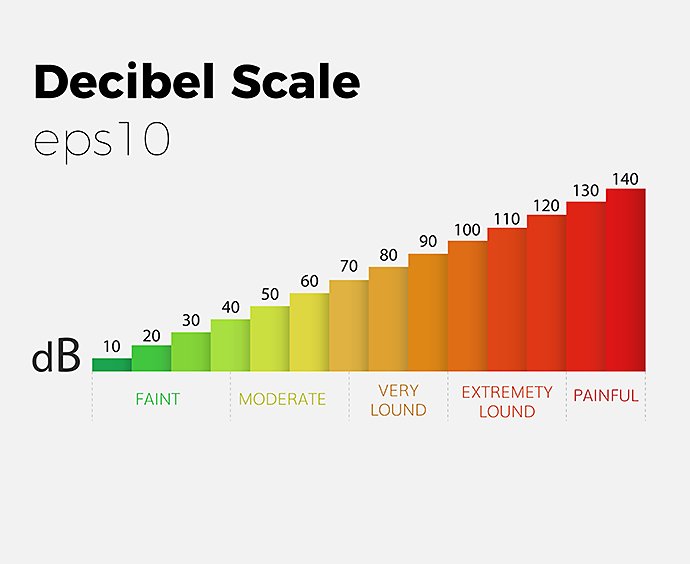
Dynamic range is the difference between the low volume and high volume sections of your recording. This is measured in decibels – or dBs. The human ear can hear sounds up to 90dB, but recording over this level allows softer sounds to be amplified for high fidelity audio.

8-bit audio.
This is a fairly low-quality reproduction, producing audio at 46dB – around half the top level of human hearing.
16-bit audio.
This is where the human ear can usually hear to at 96dB.
24-bit audio.
While at 145dB it’s well above the human hearing range, it can be useful to work at this level to reduce the ‘noise floor’ – essentially the digital white noise.
32-bit float audio.
This can offer nearly infinite decibel levels, and is really only used for super-high-quality audio – for example, sudden loud noises that need capturing without the use of limiters.
Why is the standard audio sample rate 44.1kHz?
Many modern-day recordings use the 44.1kHz sample rate, and it’s the standard rate for CDs. This is partly down to how sample rates work and how we hear as humans.

Sample rates were first discussed in the 1940s, as part of the Nyquist–Shannon theorem. This states that any sampling rate must have twice the frequency of the original recording, otherwise the sound is not faithfully reproduced.
The human ear can hear between 20 hertz (20Hz) and 20 kilohertz (20kHz). 44.1kHz is more than twice the top range of human hearing, so will provide a very accurate reproduction according to the theory.
Some people still record in higher sample rates to capture all sounds. While we can’t hear these in the original recordings, if an audio sample recorded at 192kHz was pitched down, some hitherto inaudible frequencies would become audible. If it was recorded at a lower sample rate and then pitched down, some of the highs in that audio would be lost.

However, even if you’re recording at a higher rate, it will be likely converted back to 44.1kHz – the rate to which many modern audio systems are set.
What other sample rates are used – and what for?
With 44.1kHz the standard for CD audio, you might wonder why other sample rates exist. As we’ve mentioned, higher sampling rates can provide clearer audio with no white noise. They can also be useful for mastering and mixing audio. Even if we can’t hear some sounds, they do exist in the higher sampling rate recording and so can still be manipulated.

48kHz.
This sample rate is also used as a standard rate alongside 44.1kHz. Do check though, as audio recorded in one rate and played at another will be either sped up or slowed down.
88.2kHz.
This is now the gold standard for hi-res recordings. Using this sample rate produces less distortion (called ‘aliasing’) when converting from analogue to digital, and allows greater freedom when mixing and mastering.
96kHz.
Similar to 88.2kHz, this sample rate provides more options when mixing and mastering the audio. But working at these higher rates could be an issue if your computer can’t handle the added information and storage needed.
192kHz.
Some reports have suggested that recording at such a high sample rate can produce issues in your audio, such as jittering. It’s also hard to find computers that can handle it. Really, it’s only useful for slowing down high-frequency audio.
Can I compress an audio file without losing quality?
When dealing with high sample rates, you’re going to end up with large files. To get a rough idea of how big a file is going to be, you can use these calculations:
- Sample rate (in hertz not kilohertz) x Bit rate x Number of channels x Number of seconds = total bits
- Total bits / 8 = bytes
- Bytes / 1,000,000 = megabytes or MBs
For example:
44100Hz x 16-bit x 2 channels for stereo recording x 4400 seconds (a 74-minute CD recording) = 6,209,280,000 bits – or around 6.2billion bits
6,209,280,000 bits / 8 = 776,160,000 bytes or 776 million bytes
776,160,000 bytes / 1,000,000 = 776.16MB
Compressing the file size.
Transferring and working with files this size can be difficult. One option is to compress the file size.
Compressing audio has been common practice since the launch of MP3 files. Such files allowed audio to be compressed with little impact on its quality. Converting audio to MP3 – which can be done on many computers and some websites – can reduce file size by a factor of 10 in some cases. It does this by removing any recorded audio that the human ear can’t pick up.

To compress your audio file with Adobe Audition, simply select the MP3 file format when saving. It’s important that you only compress to MP3 once, otherwise a file risks being recompressed. This can make any artefacts – or sonic errors – more pronounced.
MP3s are either compressed to 128 kbps or, more common recently, 256 kbps and 320 kbps. This is referred to a ‘lossy’ compression, where there is some actual loss in sound quality – even if most people can’t hear it.
Lossless compression.
Alternatively, there is a lossless compression. This reduces file size without losing any sound quality. Instead of removing audio, it rewrites data in the file in a more efficient manner. These file sizes are larger than MP3s – usually cutting the file size in half, instead of reducing it to a tenth of the original.
These types of files are generally not used for daily use, but more as a way to store audio. The main types are FLAC, WavPack, Monkey’s Audio, and ALAC (Apple Lossless).
How to convert an audio file to a different sample rate in Adobe Audition.
You can easily convert an audio file into a different sample rate using Adobe Audition.
First, check what sample rate the sound card on your computer supports, as these can be limited. Then follow these steps:
- Click Waveform Editor > Edit > Convert Sample Type – or simply double-click the Sample Type section of the status bar
- Select the new rate you want from Sample Rate list, or enter a custom rate in the text box
- Click Advanced then drag the Quality Slider to adjust the quality of the sampling conversion
- Select Pre/Post Filter to prevent distortion/aliasing noise
Discover the full range of audio sample, mixing and mastering features available with Adobe Audition.
You might also be interested in…
Learn how to create a shot list that guides the crew through all of the day’s camera setups.
Establishing shots are crucial because they tell us where, and often when, the action is happening.
Lossy or lossless? Compressed or uncompressed? Find the audio format that fits your needs.
Learn about the dynamic range of your camera and how to manipulate it to create the images you want.
Get Adobe Audition.
Create, mix, and design sound effects with the industry’s best digital audio editing software.
7 days free, then US$22.99/mo.


