Photography (20GB)
US$9.99/mo
Lightroom on desktop and mobile, Lightroom Classic, and Photoshop on desktop and iPad. Learn more
In this this simple how-to, graphic artist Erica Larson demonstrates how she lights up an image by adding a neon effect in Adobe Photoshop.

Erica Larson dreams up inspired designs every day as an Associate Creative Director on the Adobe Studio team. She makes stuff that makes others want to make stuff.
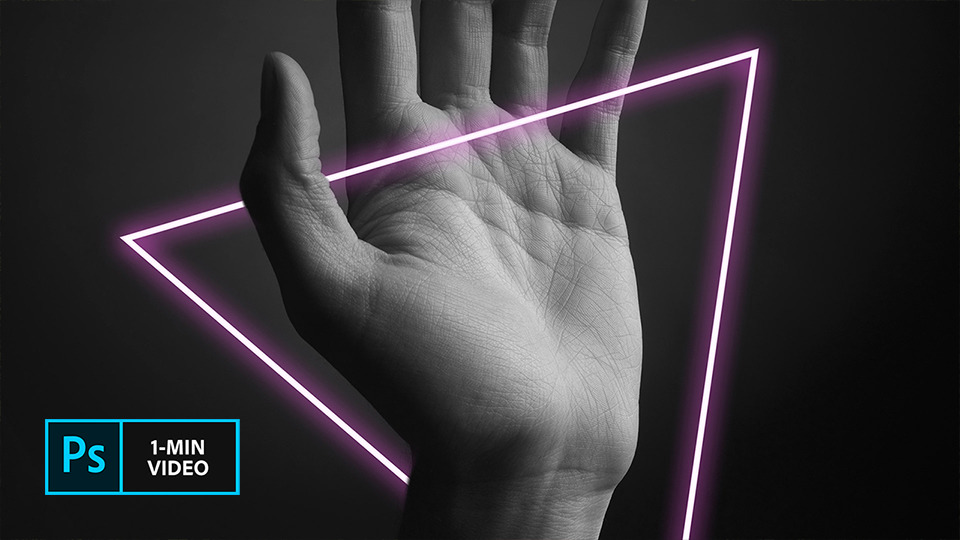
Connect the dots and design your glow—watch our one-minute video overview of this technique and see the steps below.
Use these sample images or practice with your own.
Step 1: Draw a shape
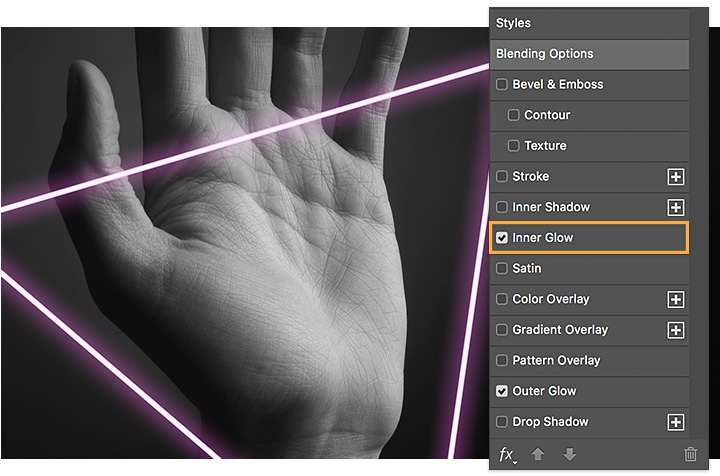
Using the Pen tool, Larson clicked three points to draw a triangle around the hand. You can draw any shape on your image and, with the new Shape layer selected, click on the Add Layer Style icon from the Layers panel and choose Outer Glow.

Experiment with different colors and settings for the Outer Glow. Larson settled on a vivid magenta. Then she set an Inner Glow, changed the Blend Mode to Multiply, and applied the same magenta color.
Larson right-clicked on the Shape layer and chose Convert To Smart Object. Then she added a mask to the Shape layer.

Larson wanted to hide the triangle just behind the wrist. To hide parts of your neon shape, set the Brush tool to black, select the mask (the white icon on the layer), and brush to remove those sections. To reverse the effect, simply change the brush color to white and paint on the mask to reveal detail again.

From computer screens to movie marquees, neon design is everywhere—now it’s time for you to design your own and shine bright.

Note: Project files included with this tutorial are for practice purposes only.
Create beautiful images with Photoshop brushes, Content-Aware Fill, Photo effects, Neural Filter, Sky replacement, and the many tools photographers rely on.
Explore the Photoshop family of apps.

Before committing ink to skin, design the illusion of a tattoo.

Blend distorted text with your images for a 3D finish.

Learn to create surreal images by compositing two photographs.

Brush out your photos rough spots for cleaner, clearer images.
Find the Creative Cloud plan that’s right for you.
US$9.99/mo
Lightroom on desktop and mobile, Lightroom Classic, and Photoshop on desktop and iPad. Learn more
Photography (20GB)
Lightroom on desktop and mobile, Lightroom Classic, and Photoshop on desktop and iPad. Learn more
US$9.99/mo
US$22.99/mo
Get Photoshop on desktop and iPad as part of Creative Cloud. Learn more
Adobe Photoshop Single App
Get Photoshop on desktop and iPad as part of Creative Cloud. Learn more
US$22.99/mo
US$57.99/mo
Get Photoshop on desktop and iPad, plus the entire collection of creative apps. Learn more
All Apps
Get Photoshop on desktop and iPad, plus the entire collection of creative apps. Learn more
US$57.99/mo
US$19.99/mo.
Save over 60% on the entire collection of Creative Cloud apps. Learn more
Students and teachers
Save over 60% on the entire collection of Creative Cloud apps. Learn more
US$19.99/mo
Bạn sẽ nhận được những gì.
Bạn sẽ nhận được những gì.