Fix and composite AI-generated images in Photoshop
Use Rotate Object, Generative Fill, and multiple models to turn a flawed generation into a polished deliverable.
Published
Introduction and meet Jesús Ramirez
[Jesús Ramirez]: You're never stuck with the output an AI model gives you.
Here's how I turn a flawed generation into a finished deliverable.
My name is Jesús Ramirez, and I create TV and movie posters professionally.
Features like Rotate Object, Harmonize, and Generative Upscale move you fast but oftentimes don't produce a client-ready result on their own.
In this video, I'll show you a multi-model workflow I use to turn imperfect generations into deliverables that a client can use.
We'll start with two client-provided assets.
A portrait of a man, and a street scene for the background.
The goal is to place the man into the scene so it feels like he's facing the camera.
The problem is that the two images have different perspectives and the man is not looking at the camera.
And flipping the image horizontally will not work.
To solve this issue, we'll use the Rotate Object feature.
Rotate a subject to match a new perspective
Start by pressing CTRL T on Windows, that's CMD T on the Mac to transform.
Then click Rotate Object from the Contextual taskbar.
This will automatically remove the background and create a Rotate Object layer.
The blue rotation overlays let you rotate the layer like working with a 3D model.
This lets you preview your subject from different angles, revealing perspectives that weren't in the original photo.
This tool really feels like magic.
Once you have a perspective that works, use the corner handles to match the scale.
When you're happy with the result, press ENTER on Windows, or RETURN on the Mac to commit the change.
Photoshop then replaces the preview rotation with a high resolution version.
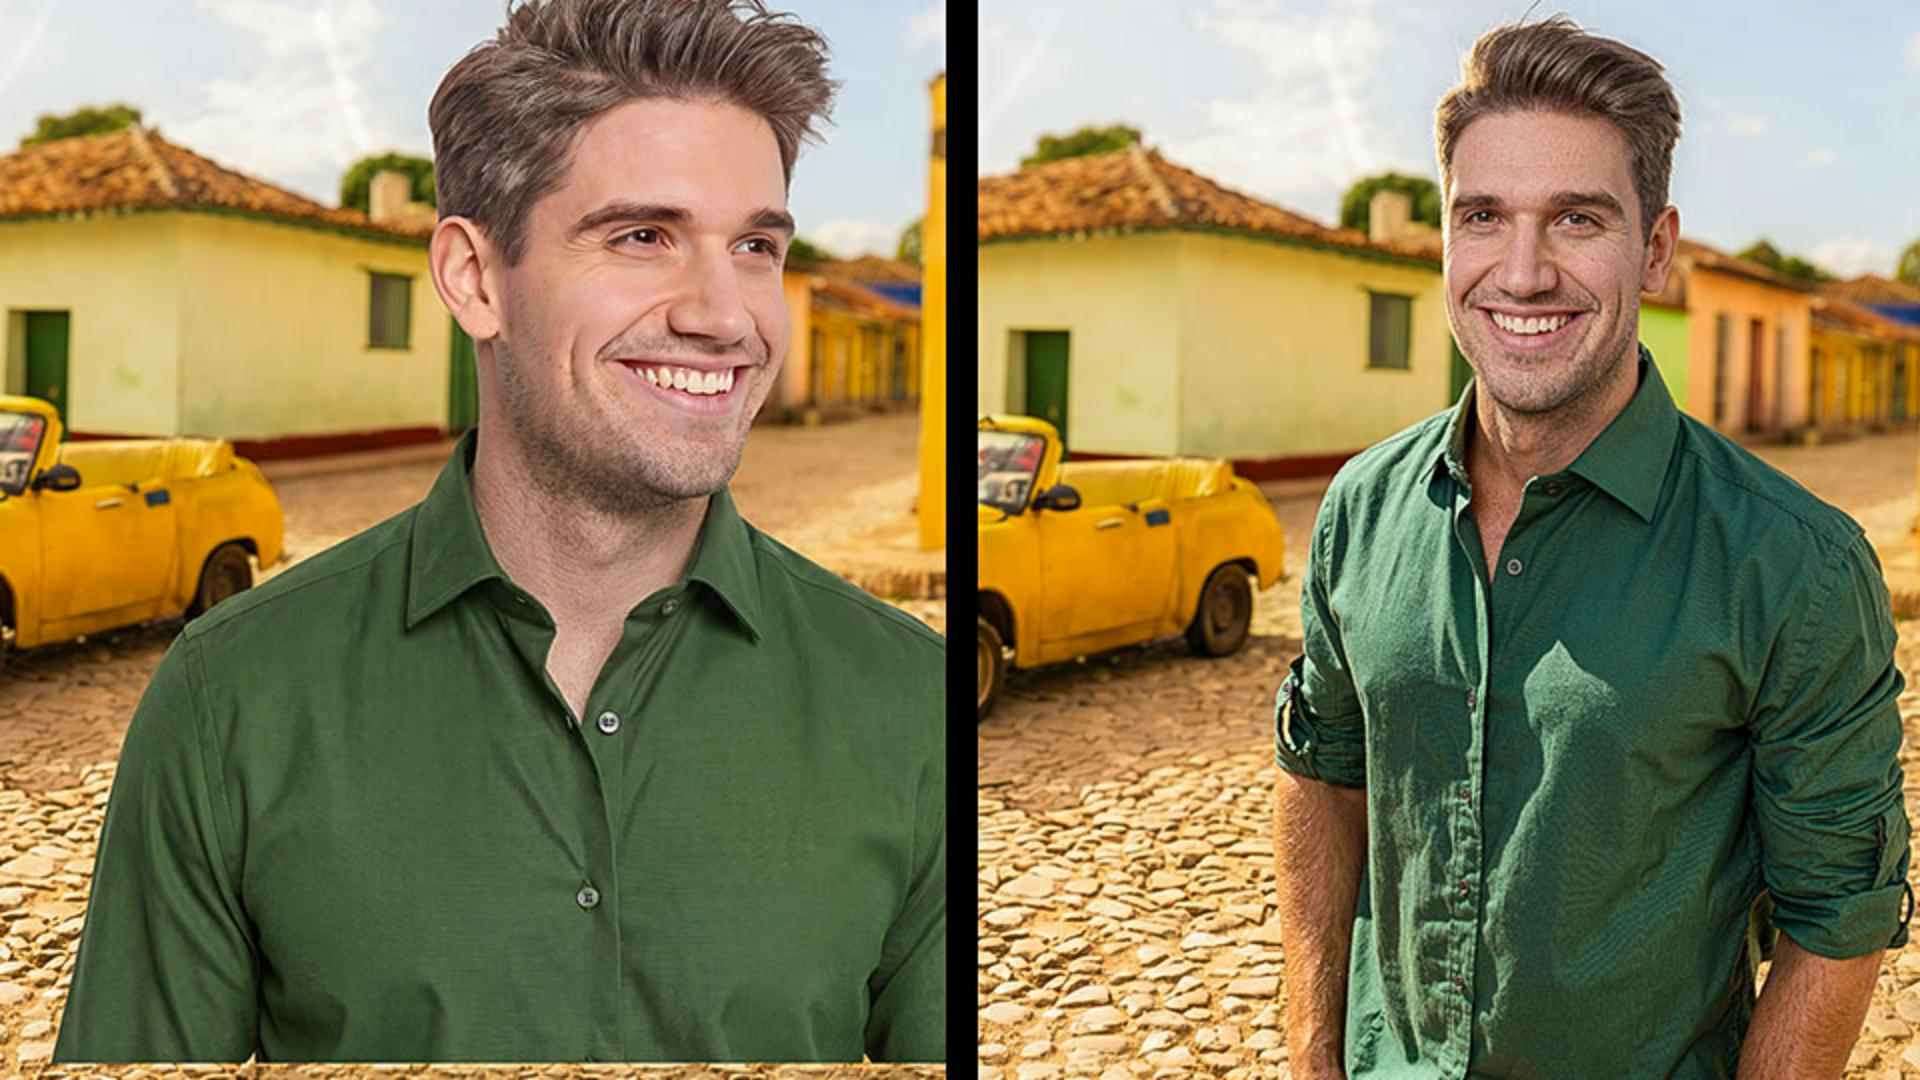
This rotation is very convincing, but we have issues.
There's a pattern on his shirt that doesn't belong, the face has that smooth AI softness, and the bottom half of his body is missing.
These are all issues we need to fix, but we have a great starting point that the Rotate Object feature gave us.
Fixing the imperfections will be our next task.
Next, let's fix the missing lower half of his body.
Enable the Selection Brush Tool from the toolbar.
Then loop around the bottom where his body should be.
When you return to where you started and release, Photoshop fills in the selection.
Then click Generative Fill from the Contextual taskbar.
Select the Adobe models button, then choose Firefly Fill & Expand.
Adobe models read the entire image for context, which makes them the right choice for extending a figure into the surrounding scene.
Then give it a prompt.
I'll type "button-up shirt with the sleeves rolled up and hands resting at his sides," then click Generate.
In a few moments, you'll get three variations.
Cycle through them from the Properties panel.
In this case, the model placed one of his hands in his pocket across all variations.
That works well for me, but if you don't like the results, you can always generate again.
Next, let's work on adding details to the image and matching it to the background.
You might think about using the Harmonize feature in this case, but as you can see, it can't fix the imperfections still baked into the image.
To get much better results, we'll use a combination of models targeting different areas of his body.
Let's start with his head.
Enable the Rectangular Marquee Tool by pressing the M key.
Here's a rule for Partner models.
Always make a perfect square selection when alignment to the background is important.
A 1-to-1 selection is the shape most likely to give you the cleanest alignment.
Hold Shift and create a square selection over his head.
Then, go into Generative Fill, select the Partner models button, and choose the latest Gemini model.
Gemini is great at following detailed instructions and preserving character identity, which is exactly what a face needs.
To save time, I'll paste in a prompt.
The key with this technique is to be specific about every detail you want.
In this prompt, I'm describing the details I want for his skin, eyes, and even how the sunlight affects his hair.
Click Generate, and in a few moments, you'll get one result.
And here it is.
It's fantastic!
You can zoom in to analyze the result.
And as you can see, there's a huge difference between the Rotate Object and the Generative Fill result.
The skin has real texture, the eyes are sharp, and the hair has a natural feel.
Fix imperfections with targeted model choices
Much, much better.
Let me show you why model choice matters.
Run the same prompt through the latest Flux model.
And here's the result.
Notice the difference.
The face lost a lot of realism, and the model was heavy-handed with the skin texture.
Gemini held character identity much better.
But this doesn't mean you should skip Flux.
In my testing, I've seen it deliver far better photographic details in clothing, hands, and other materials.
Let me show you.
Make a perfect square selection over the entire shirt, go to Generative Fill, the Flux model is still selected, and I'll paste a prompt.
These models understand detailed language, so don't be afraid to be specific.
In this case, I want a solid forest green shirt.
And I even included the exact hex code so the model knows precisely which green I want.
I also gave it details on skin, fabric texture, and lighting.
I'll Generate.
And here's the result.
Look at the detail in the fabric weave and the highlights and shadows along his arms.
It looks so good.
To compare, run the same prompt through Gemini.
Here's the result.
It does an acceptable job, but Flux holds more detail and realism in the fabric and his arms.
I recommend trying both models and using the one that works best for the project at hand.
Composite the best results into one final image
From here, this becomes a compositing job.
We'll combine the Gemini face with the Flux shirt.
First, right-click on each generated layer, and choose Convert to Smart Object, so you can work non-destructively and have access to the Remove Background button in the Contextual taskbar.
Remove the background on both layers, which will create a layer mask, controlling what stays visible without deleting pixels.
Then disable all layers by clicking on the topmost eye icon and dragging down, and we'll only work with the body and the face.
Then, select the layer mask on the layer with the body.
Press the B key to enable the Brush Tool, then press X to swap the foreground color to black.
Paint along the seam on the mask to blend the head and body together.
I think this looks fantastic!
It may not be the perfect match on the first pass, but remember, you're in Photoshop and you can keep refining the image until it works for you.
To compare, I'll move the Rotate Object layer next to our result.
The difference is night and day.
So much better.
Remember, you're never stuck with the first output a model gives you.
You can treat the first output as a reference, then improve on it with other models.
And composite everything together when you're done.
This is also the technique I recommend for upscaling.
Generative Upscale models may deliver more pixels, but they don't always deliver the sharpness and detail you want.
You can always generate details with different models and composite the result.
Now, we can deliver this image to our client and use it for any need they have.
That includes animating it with the Image to Video module on the Firefly website and using Adobe Express to create social media assets.
Now that you know how to turn an imperfect generation into a finished deliverable, try it with your next project.
Again, my name is Jesús Ramirez.
Thank you for watching!
What you’ll learn
Rotate a subject to match a new perspective
Use Rotate Object to preview your subject from angles that weren't in the original photo. Match the scale, then commit the change for a high-resolution result.
Fix imperfections with targeted model choices
Different models handle details like skin, hair, and fabric differently. Test a few options and use whichever gives you the most pleasing result.
Composite the best results into one final image
Combine your strongest generations using layer masks to blend the seams. Keep refining until the composite reads as one photo.
Instruction by

