Precision-edit a photo with Generative Fill in Photoshop
Fix hair, skin, and clothing, then match lighting to a new background, all while staying fully editable.
Published
Introduction and meet Jesús Ramirez
[Jesús Ramirez]: Manually cleaning up a photo used to take hours.
This Generative Fill workflow takes minutes and the results hold up at poster scale.
My name is Jesús Ramirez and I create TV and movie posters professionally.
In this video, you'll learn my Generative Fill retouching workflow to transform an ordinary photo into a finished, delivery-ready image.
Best of all, it will remain editable and modularized in case our client needs edits.
Here's a high-res client image, and this is the background we will place him in.
The first step is to retouch the image to make it ready for primetime.
Before doing any editing, scan for issues.
Think like an art director.
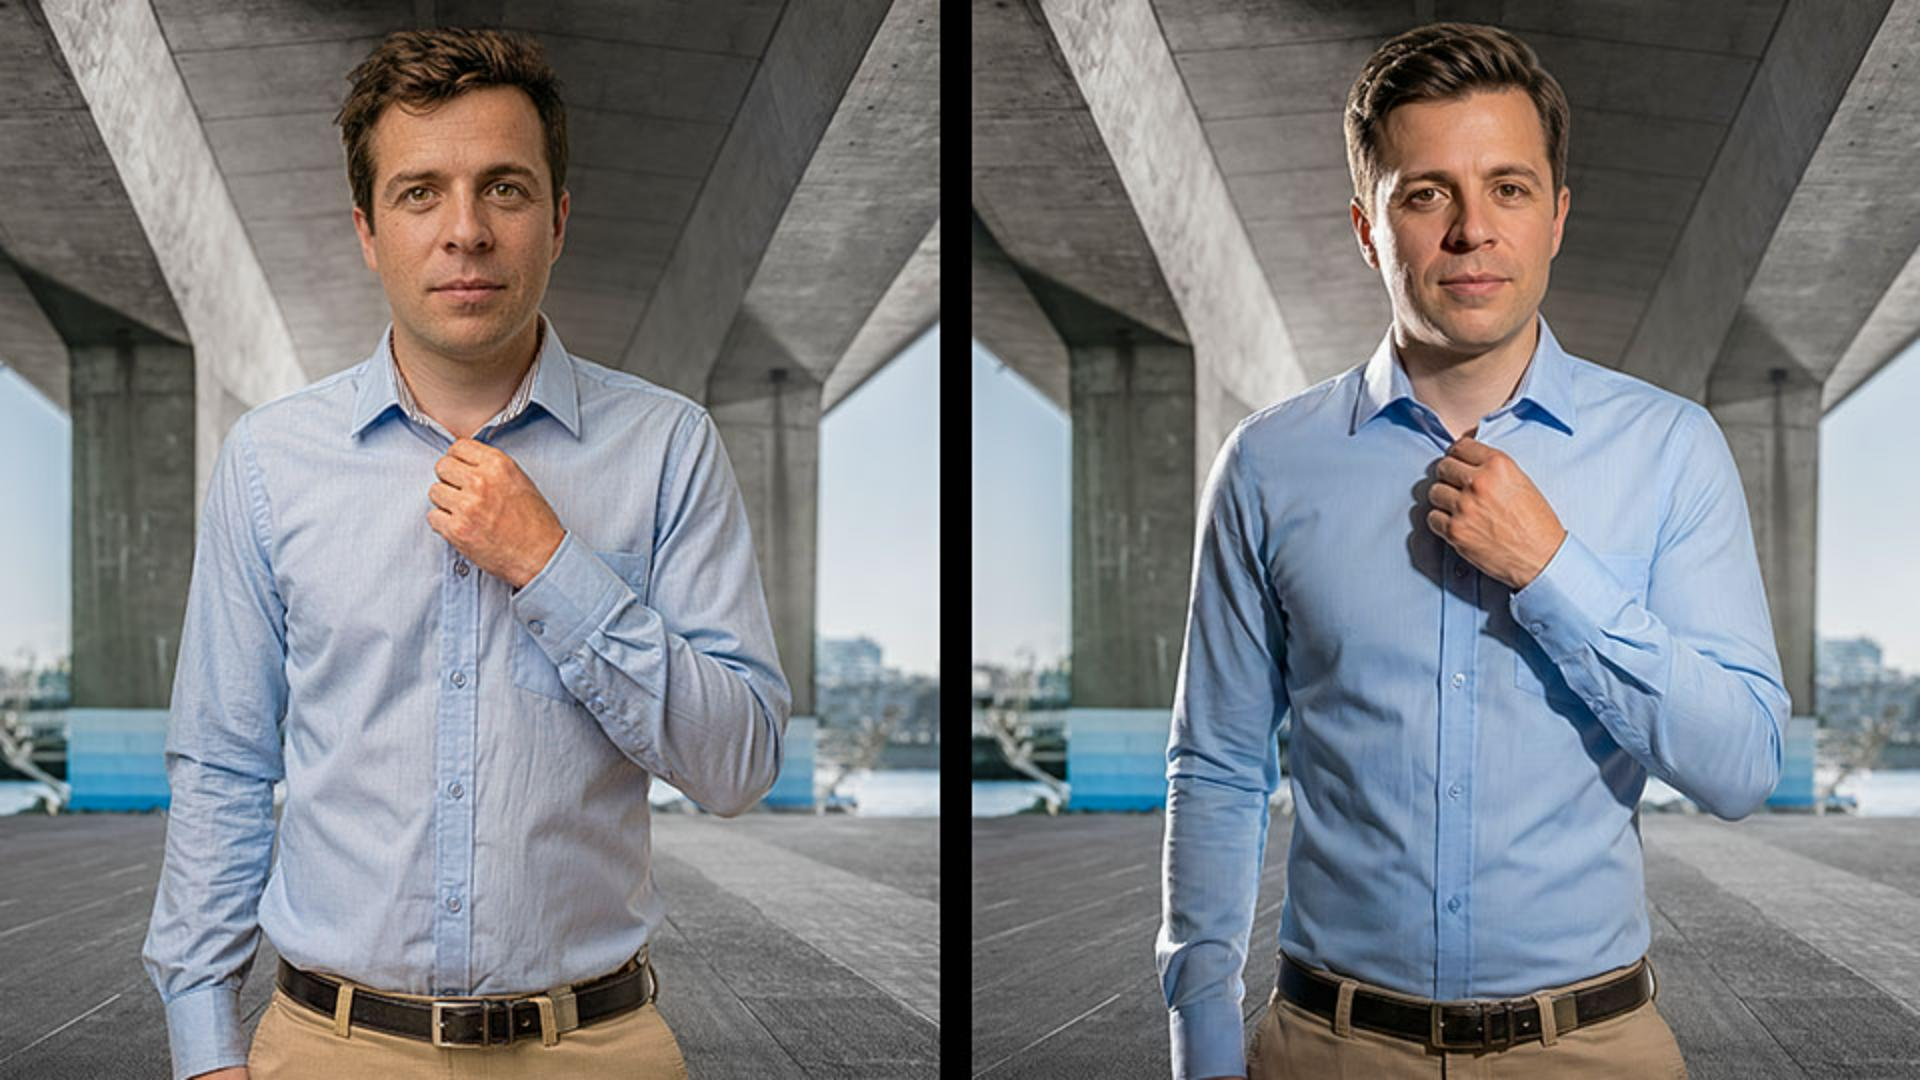
I immediately see three problems: a loose wrinkled shirt, unkempt hair, and skin imperfections.
We'll fix all three by alternating between Partner models for the global changes and a Firefly model for the targeted cleanup.
Let's start by fixing his unkempt hair
Retouch with Generative Fill and the Remove tool
we'll clean up one section at a time to ensure we achieve the best possible outcome in each.
To start enable the Rectangular Marquee Tool from the toolbar.
Hold shift to create a perfect square over his hair.
Make the selection large enough to cover his hair but not much larger.
Then click Generative Fill in the Contextual taskbar.
From the model drop-down select from two categories of AI models: Firefly models built by Adobe, and Partner models built by outside providers.
We'll use both types today but we'll start with the latest Google Gemini model it's great at following detailed plain language directions in keeping subject and character consistency.
Perfect for retouching.
Then give it a prompt.
Tell it exactly what you want it to do.
To save time, I'll paste the prompt that tells the model to remove stray strands and create a clean groom appearance.
Now, click Generate and in a few moments you'll get one generation.
If you're unhappy with it, you can generate one more time to create a second image.
Also, notice how well it aligns with the original image.
With Partner models, it's best to use a perfect square selection to improve alignment with the original background image.
Let's move on to retouching his skin.
Again, make a perfect square selection around this face.
From Generative Fill, use the same Gemini model, and I'll paste the prompt that will naturally smooth his skin.
Click Generate and wait for the result.
I'll zoom in, and look at this, his skin looks much better.
I'll compare it to the original.
The results are not perfect.
We do have a few imperfections that we can fix with the Remove Tool.
First, create a new layer to work non-destructively, then enable the Remove Tool from the toolbar.
From the Options bar, set the mode to Auto.
The Auto mode lets Photoshop pick the right approach for each stroke.
Simple removals run locally and stay fast.
Anything tougher uses AI for cleaner results.
Also, check the Sample all layers option to give the tool access to the layers below the blank one.
Now you can brush over any remaining imperfection.
In a real project, spend some time removing all the distractions and I'll disable the retouch layer so you can see the changes we've made.
Let's now fix this shirt.
Again, make a perfect square selection and I'll paste a prompt that tells the model to remove wrinkles and make the shirt fitted to his body.
Then I'll Generate and here's my result.
Nearly all wrinkles have disappeared but we still have a few I would like to remove.
To do so we'll use a different model.
First, enable the Selection Brush.
Then loop around the fold.
When you come back to the area where you started and finish the loop, Photoshop will fill in the selection.
Then click Generative Fill.
Go into the Adobe tab and set the model to Firefly Fill & Expand.
Leave the prompt blank and generate.
Firefly models analyze the entire image, not just your selection, and fill in gaps using context alone.
The image serves as the prompt, so you can often leave the prompt blank and still get great results.
And of course, you don't have to worry about creating perfect square selections with them.
And these are my results.
Firefly gives you three variations to choose from.
Cycle through them in the Properties Panel and pick the one that best fits.
Choose the right model for each fix
And this is the workflow I recommend.
Use Partner models for big changes and Firefly models for targeted cleanup.
Now we need to make changes to our image to better fit the background it will live in.
Match lighting and composite into a background
Notice that the background's light is coming from the right, but it's coming on the left in the talent shot.
So we'll need to change the lighting.
To do so, make a square selection around the entire person.
Go into Generative Fill and change the model to Gemini.
And I'll use this prompt that flips the lighting to come from the right.
Generate and wait for the results.
And here we go.
The light source has moved and the highlights and shadows now match the direction of the background's light source.
Let's give our client more options.
Here's a keyboard shortcut you should commit to memory.
Press CTRL Shift D on Windows, that's CMD Shift D on the Mac, to restore your last active selection.
No matter what you've done in between, Photoshop can bring back that selection.
In this case, I have a perfect square selection around the entire body, and I can go into Generative Fill and paste in a prompt that will add a rim light to the left side of his body.
Remember, everything we're making is modularized and editable.
We can easily remove the rim light if the client is unhappy with it.
And here's the result.
I think it looks great.
We can now composite this into the background.
To do so, hold Shift, click on the topmost layer, and then click on your first generated layer.
With all the layers selected, right-click and convert the layers into a Smart Object.
A Smart Object is a container that holds one or more layers and it allows us to apply non-destructive adjustments.
And we can now treat all those layers as a single layer.
All we need to do now is click the Remove Background button from the taskbar.
And here's our result.
It looks fantastic!
I'll remove the background from the original layer so that you can compare the difference.
This is before, and this is after much, much better.
Remember this image is editable and modularized.
If your client has changes like removing the rim light, you can open the Smart Object by double clicking on this thumbnail, disable that layer, close, and save the Smart Object.
And the updates show on your working documents.
Now that you know how to use Generative Fill to turn an average photo into a delivery-ready image, try it with your next project.
Again, my name is Jesús Ramirez.
Thank you for watching!
What you’ll learn
Retouch with Generative Fill and the Remove tool
Make square selections around problem areas like hair, skin, and clothing, then use Generative Fill to clean each one up. Follow up with the Remove tool on a new layer for any leftover imperfections.
Choose the right model for each fix
Use partner models for broad changes and Firefly models for targeted cleanup, since Firefly reads the full image and can fill gaps with the prompt left blank. Each approach suits a different kind of retouch.
Match lighting and composite into a background
Flip the light source and add a rim light so the subject matches the background's lighting direction. Convert your layers into a Smart Object, remove the background, and composite the result while keeping every edit reversible.
Instruction by

