Turn one brand-aligned image into a full social campaign
Go from a brand image created in Firefly to scheduled posts on Instagram, TikTok, and YouTube — published in Express.
Published
Introduction and meet Angelo Montilla
[Angelo Montilla]: Ever wish you could take a single idea or design concept from Adobe Firefly and build a consistent visual identity system that can be adapted for various platforms?
Hi everyone, my name is Angelo Montilla, and in this tutorial I'll show you how Firefly and Adobe Express can work together to generate images and create scalable content that can be published across multiple social media channels seamlessly.
Let's dive in and learn how you can create once and publish everywhere with Firefly and Express.
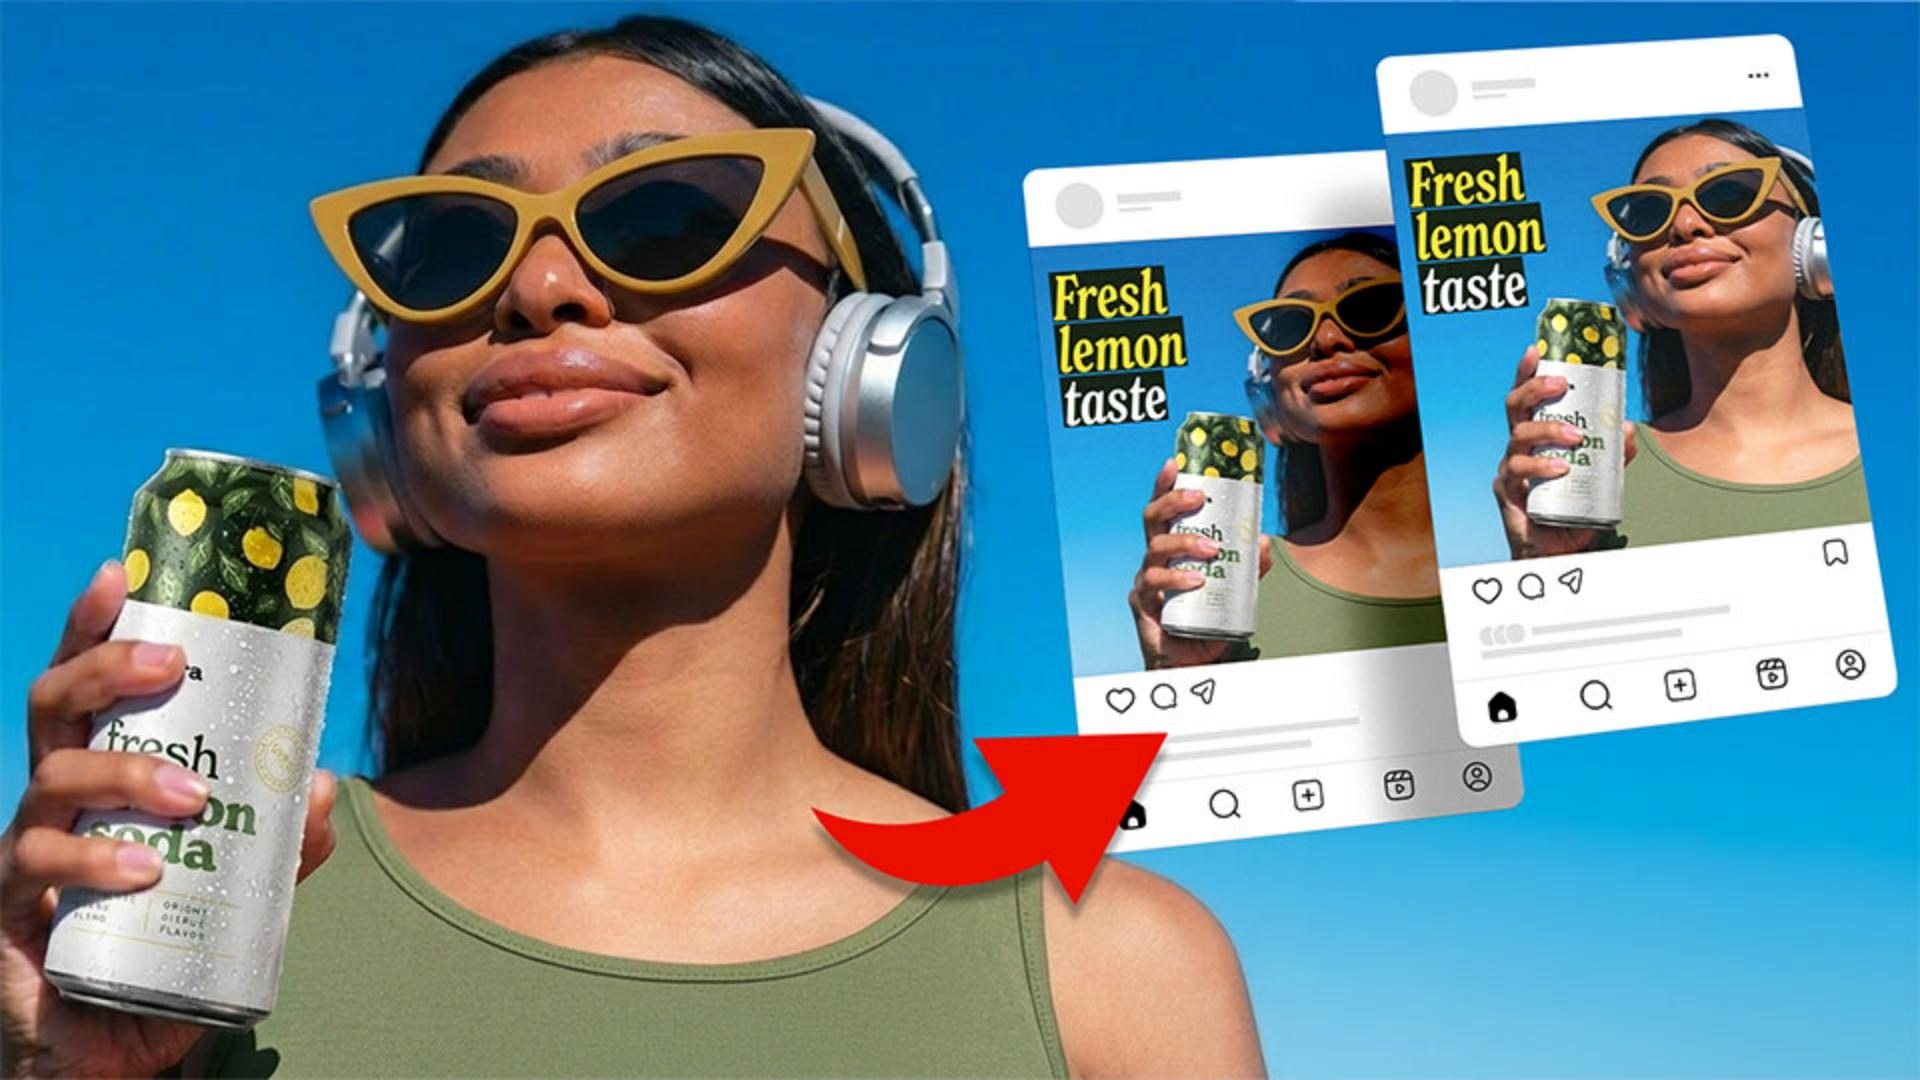
I'm starting with an image that I generated with the Firefly Image 5 model, which is known for its high-fidelity photorealism and excels at capturing lifelike lighting; and the prompt focuses on a woman standing confidently against a clear blue sky wearing stylish sunglasses and headphones while holding a white soda can.
This will be the base image for a soda drink product campaign post, so I'd like to use it as a reference image.
I'm going to switch the model to Gemini 3.1 (w/ Nano Banana 2), and also change the Aspect ratio from Auto to Widescreen (16:9).
Build a campaign image with reference images
Nano Banana 2 is fantastic for preserving original content when prompting and making edits.
Also, with Nano Banana, you can add up to six reference images.
First, I'm going to hover over the image, click on Edit, and then choose Use as reference image.
The image has been added as a reference, and you can see that on the left side of the screen.
Because this is a post for a product launch, I'll add a secondary reference image of a branded soda drink.
For this, I can simply drag and drop the PNG of the branded soda can and add it as a secondary reference image for my project.
Now I can update the prompt and ask Gemini to have the subject holding the soda can in the secondary image.
Once I've added my text prompt, I can click Generate to see my result.
And just like that, it does a fantastic job at having the subject holding the soda can from image two.
I'll click on the result to expand it.
And now I can refine the visuals so it's more on-brand.
For example, I'll add another text prompt and change the sunglasses and the subject's shirt with specific color codes to align with the product branding.
I'll leave the model on Nano Banana, and I'll click Generate to view the result.
After exploring a few variations and refining the details, I landed on a final image that really captures the look and feel I was going for.
Now that I have the campaign visual ready to go, I'll switch over to Express so I can resize and adapt it for other platforms.
To do that, I'll click on the Share button in the upper right-hand corner of the screen, and then choose Open in Express.
This will launch the image in a separate browser tab in Express, where I can now add some text and adapt the visual for other platforms.
Add text and effects in Express
From the left side of the screen, I'll choose Text and then click Add a title, which will place a text frame on the image.
I'll select the default text and then type my title: Fresh lemon taste.
I'll adjust the text frame so the text goes over three lines.
The text is currently centered, so from the menu on the left I'll adjust the Alignment so the text is left-aligned.
Now I'll change the font.
I'll be using the Adobe font New Spirit Compressed, and I'll choose Semibold Italic.
This matches the font from the soda can branding.
Next I'll increase the size of the text to 130 pt.
I also want to adjust the line spacing to reduce the space between the lines and the title.
So I'll click the More icon and then adjust the Line spacing slider to the left to reduce the space.
I'll zoom out by holding Option on a Mac, Alt on Windows, and scrolling out with the mouse.
Now I can position the text frame in the upper left-hand corner of the image.
Now I can select the text, and in the left menu I'll change the fill color to white.
I'll select the first two words in the text frame, and I have a yellow color code that I'll apply as the fill.
I can do that by clicking the Custom tab, and then simply pasting my Hex code in.
I'll press Return, and you can see 'fresh' and 'lemon' are both that yellow color.
With the text frame selected, I'll click on the Effects tab in the upper left corner.
Next I'll scroll down and choose a Shape background.
I can customize the shape background by clicking the Settings icon, and in this case, I'll sample a green color from the soda can to set it as the background.
Simply click on the Eyedropper tool and hover over a green color in the soda can to apply it as the background color.
I can also click and drag the Shape size slider to increase or decrease the size of the background shape.
Adding an effect like this can really separate the text from the image and make it more readable, especially when you have an image with a busy background.
I can now focus on resizing and adapting the design for other platforms.
Resize for every platform and schedule posts
First, click on the Resize button at the top of the screen, which launches the Resize menu on the left side.
In the Social media and ads section, I'll click on Instagram and then choose 1080 x 1080 square, as well as 1080 x 1350.
Next, I'll make my way over to TikTok and I'll choose 1080 x 1920.
And finally, I'll choose YouTube and then select 1280 x 720.
Once I have all the sizes I want, I'll click on Duplicate & Resize and watch as Express automatically resizes and adapts those ratios for me.
There will be instances where the text on the newly created pages may need to be adjusted or resized slightly.
For example, if I go back to all the pages, I can click on the Instagram 1080 x 1350 post, move the text up, and resize it accordingly to fill the space.
As a final step, I can schedule posts directly inside of Adobe Express to ensure they're published in a timely manner.
For example, to schedule a post with the design selected, click on the Share button in the upper right-hand corner, and then click Show all to bring up more options.
I can now click on Schedule post, which launches another window to add more details.
In the Select channels... dropdown, I'll choose Instagram.
Next, I can add the copy for the post in the Caption field.
This has all the details for the product launch campaign.
I can click on the Preview button in the bottom right corner of the window to get a sneak peek of the Instagram post, and it's really looking great!
Finally, I'll scroll down, and select Schedule, and then click the Calendar icon to choose a publish date and time.
Once I'm satisfied, I can click Schedule to lock in the product launch campaign post.
And that's how you can use Adobe Firefly and Adobe Express to create a single visual and scale it across multiple platforms.
This is a powerful workflow you can start using in your own projects to build consistency, save time, and create content at scale.
Thanks so much for watching.
My name is Angelo Montilla, and I'll see you in the next video.
Note: Stock assets provided are for practice purposes only. See terms.
What you’ll learn
Build a campaign image with reference images
Start with a base image in Firefly, then add reference images to introduce brand assets, like a product shot, and refine color and styling to match your visual identity.
Add text and effects in Express
Open the image in Express, then add a title, choose on-brand fonts and colors, and apply a shape background to make text stand out over an image.
Resize for every platform and schedule posts
Use the Resize tool in Express to generate platform-specific dimensions for Instagram, TikTok, and YouTube in one step, then schedule your posts directly from Express.
Instruction and design by