Edit photos with Generative Fill in Adobe Firefly
Remove, add, or expand image content using brushes, prompts, and smart presets to shape the perfect photo.
Published
Ever wish you could remove something from a photo or add something that wasn't there?
Now you can with Adobe Firefly.
I'm Jesús Ramirez.
In this video, I'll show you how to use Generative fill to easily add, expand, and remove parts of an image for a travel brochure, using just a few clicks and simple prompts.
From the Firefly website, at firefly.adobe.com, click on the Image tab, then on Generative fill.
From here, you can upload a photo by clicking on the Upload button, and selecting it from your computer, or by simply dragging it into this box, which is what I will do.
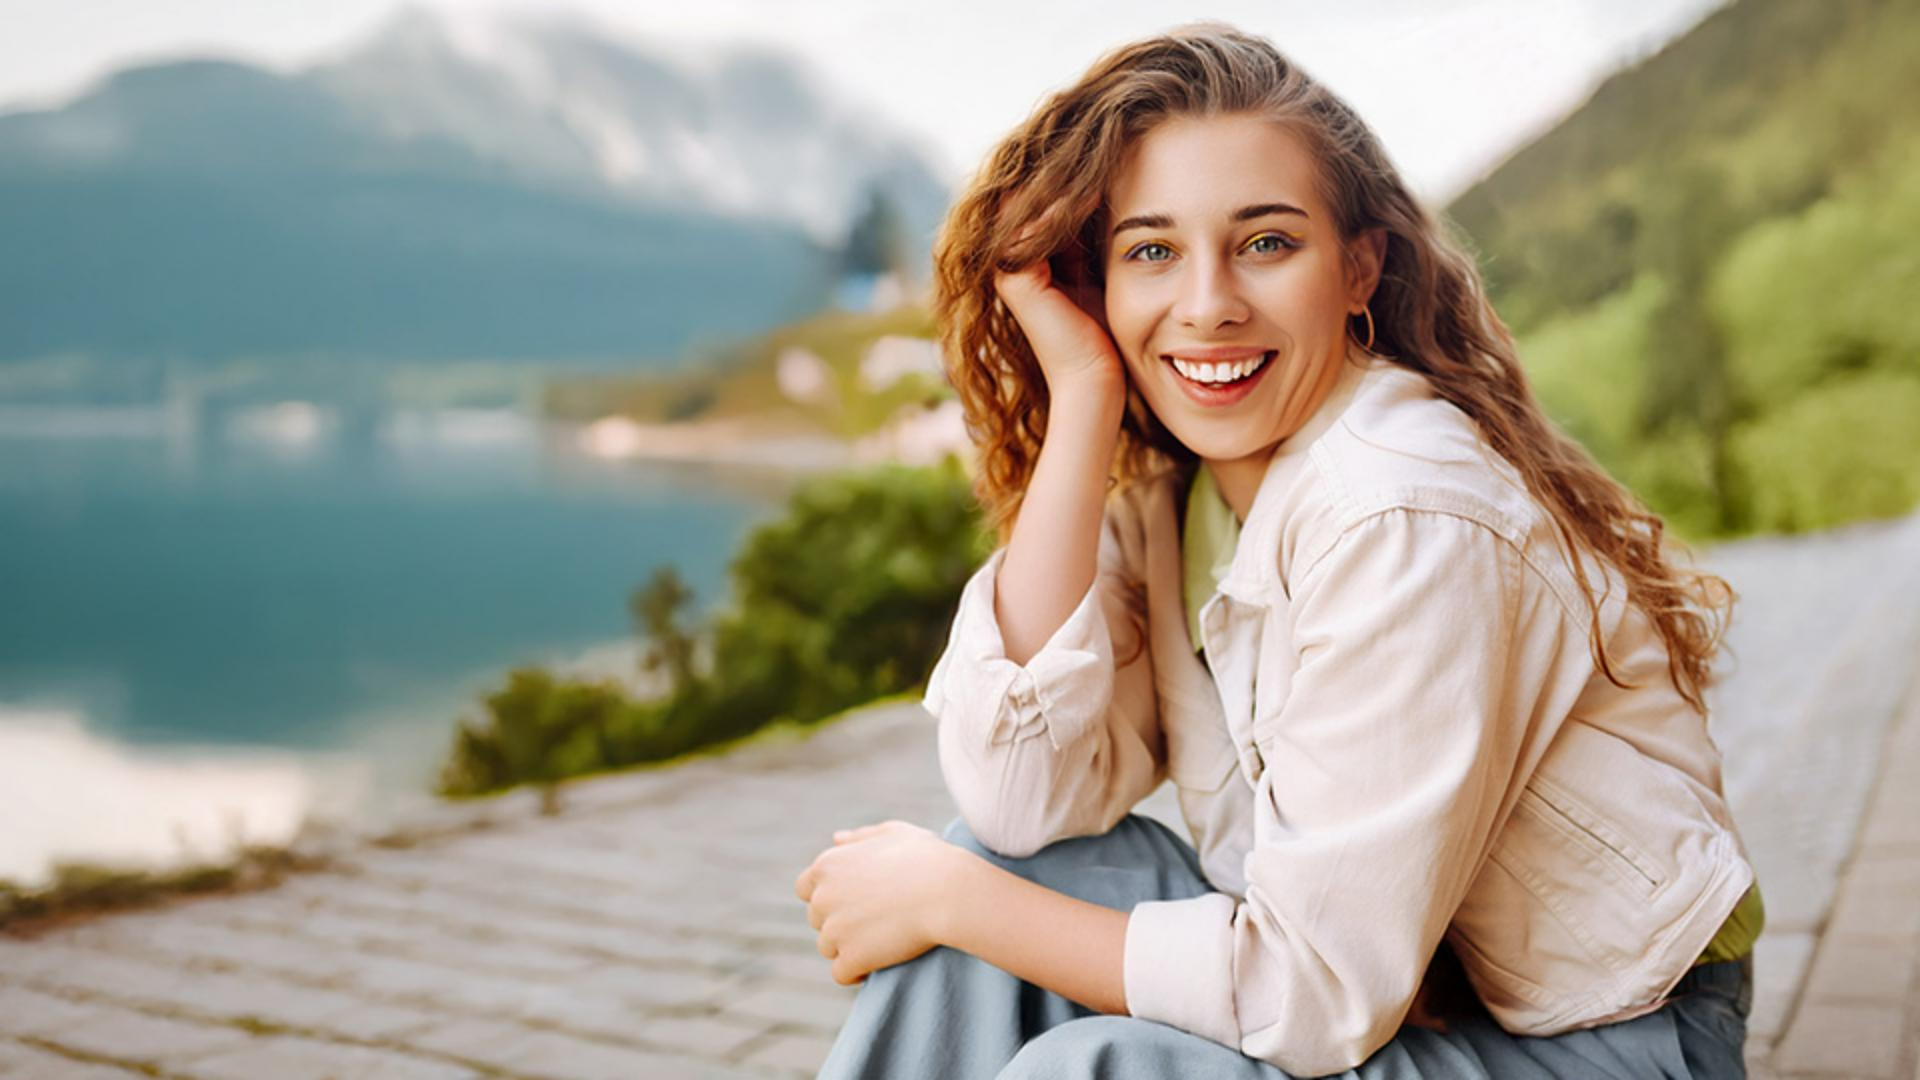
This photo will be used for a travel brochure, and I would like to improve it just a bit before we publish it.
Let's start by removing the distracting man wearing the red shirt.
On the left, you will see the Toolbar, which contains tools to edit your image and a Pan tool that allows you to move the image around the workspace.
To start, enable the Remove tool, then make sure Add is enabled.
This will allow you to add to your selection.
Now make sure you have a brush small enough you can work with.
You can do so from the Brush settings in this menu.
You have three controls: Brush size, which controls the size of the brush tip; Brush hardness, which controls the softness of the brush edge, and Brush opacity, which controls the intensity of the brush.
Of course, you can use the Brush size slider to resize your brush, but I prefer using the keyboard shortcut.
Tap on the left or right bracket keys to resize your brush.
The bracket keys are to the right of the letter P in North American keyboards.
A brush about this big should work, and I'll brush over that man in the background.
The checkerboard pattern indicates the areas where the generated content will appear.
Now that I painted over the man, I'll press the Remove button and, in a few moments, you will see three generations.
The results are just incredible.
Firefly will match lighting, perspective, and depth of field, creating a photorealistic result.
You can click on this arrow icon to cycle through the other two results, and they're just as good.
If you're unhappy with the results, click on the More button to generate three additional variations.
However, there's no need to do so in this case.
I'm happy with these generations.
I'll press the Keep button to apply the generated content to my image and continue working.
The Remove tool is also great for removing objects that overlap with people.
For example, her purse is very distracting and it's not giving us the relaxed vacation vibe were going for.
So, let's remove it.
Again, we'll use the Remove tool.
Here's a tip for making selections: Trace around an object with a small brush, then increase your Brush size by tapping the right bracket key and fill in the rest.
This selection looks good, so I'll click on the Remove button.
And again, Firefly does a fantastic job of matching the content of this image.
I like this generation the best, so I'll click on the Keep button.
Again, we want to make this image feel like a relaxing European vacation.
So, let's see if rolling up her sleeves helps.
To add specific content to an image, click on Insert.
This tool works very similarly to the Remove tool.
The only difference is that we now get a textbox where we can type in a prompt to influence the generation.
We'll start by making a selection around her forearms.
To get better control, I'll decrease the Brush size by tapping on the left bracket key, and I will brush over her forearms.
I'll make sure not to leave any pieces behind.
Then I will type: 'rolled up sleeves' and I'll click on Generate.
This first result is fantastic.
Let's look at the rest.
They're all pretty good, but I think I like the first one the best, so I'll select it and click on the Keep button.
I'm really happy with how this image turned out, and I would love to use it across multiple campaigns on different platforms.
Each one will need a different aspect ratio, but thankfully that's not a problem in Adobe Firefly.
With the Expand tool, I can easily extend the image to fit any size I need.
Once you enable the Expand tool, you can select the preset that best works for your project.
In this case, I'll choose Freeform to manually select the width by dragging on these handles.
I want to have negative space on the left of the image, and I will use the Rule of Thirds guides to align her face to this upper right intersection.
If you want to generate something specific like a location, you can type it in the Prompt, or you can leave it blank to have Firefly determine what to generate based on the content of the photo.
In this case, I'll leave the Prompt blank, and I'll click on Generate.
Firefly will then turn this vertical image into a horizontal one by adding content to the left side.
Choose the variation you like the best.
In this case, I'll go with this one and I'll press Keep.
To see my image without the overlays, I'll enable the Insert tool.
And this image looks fantastic.
It's everything I wanted.
Now that you've seen how easy it is to add, expand, or remove parts of your image with Generative fill, try it with your photos.
Again, my name is Jesús Ramirez.
Thank you for watching.
Note: Stock assets provided are for practice purposes only. See terms.
What you’ll learn
Remove distractions
Use the brush to select unwanted objects — Firefly fills in the area with photorealistic results.
Add new elements with prompts
Select a region and type what you want to see — like props, clothing, or background features.
Resize and reframe with Expand
Expand your image to fit different sizes or layouts, or to create space for text.
Instruction by
Adobe Stock Contributor