In this video you will learn how to correct the brightness of your photos in Lightroom CC.
You can follow along with any photo or you can download the sample file from the Adobe page for this tutorial.
Once you import the sample photo into Lightroom CC you will see it in the photo grid.
Click on it and open the Edit workspace by clicking on the Edit button.
Then click on the Light panel to expand it.
The Light panel gives you powerful control over your images brightness.
It allows you to bring out the hidden detail in your photos.
Starting with auto tone adjustments
If you're new to Lightroom CC a great place to start is with the Auto button.
You can use it as a starting point or a one click solution.
When you click on the Auto button Lightroom CC uses machine learning technology to analyze your photo and it determines the best settings for each slider.
Sometimes you may need to fine tune the auto correction but, in this case, it did a fantastic job.
However, in this video we will not use the Auto button as a starting point.
Instead we will discuss each slider individually
Understanding the light panel sliders
so that you can better understand how they work.
To reset all the sliders, hold Alt on Windows, Option on the Mac.
That turns the Light panel label into a Reset button.
Click on it to return all the sliders to 0.
Photo adjustments are all subjective.
Feel free to make adjustments that look good to your eye.
It's not necessary to use the same values that you see on screen.
The six sliders in the Light panel adjust the brightness of different areas in your photo.
You can hover over any of the slider labels to display a helpful tooltip which contains a description and animation of what the slider controls.
The best way to work in the Light panel is to start on top and work your way down the list.
The Exposure slider controls the overall brightness of your photo.
Adjusting exposure and contrast
Dragging to the left reduces brightness or dragging to the right increases brightness.
This is a strong control and you should only use it if your photo is not exposed properly.
In this case the photo is a little underexposed.
It's a little too dark.
So, I'll move the slider to the right to brighten it up.
The Contrast slider makes bright areas brighter and dark areas darker.
This slider works great with flat images that need a boost in contrast.
But keep in mind that this is also a strong control that affects the entire image.
So, I'll reset the slider by double clicking on it.
Then I'll increase the Contrast just a bit.
Usually a slight increase in contrast is all you need to make your photos pop.
Recovering highlights and shadows
The Highlights slider controls the brightness of the lighter areas in your photo.
You can use the slider to reveal the hidden detail in bright areas.
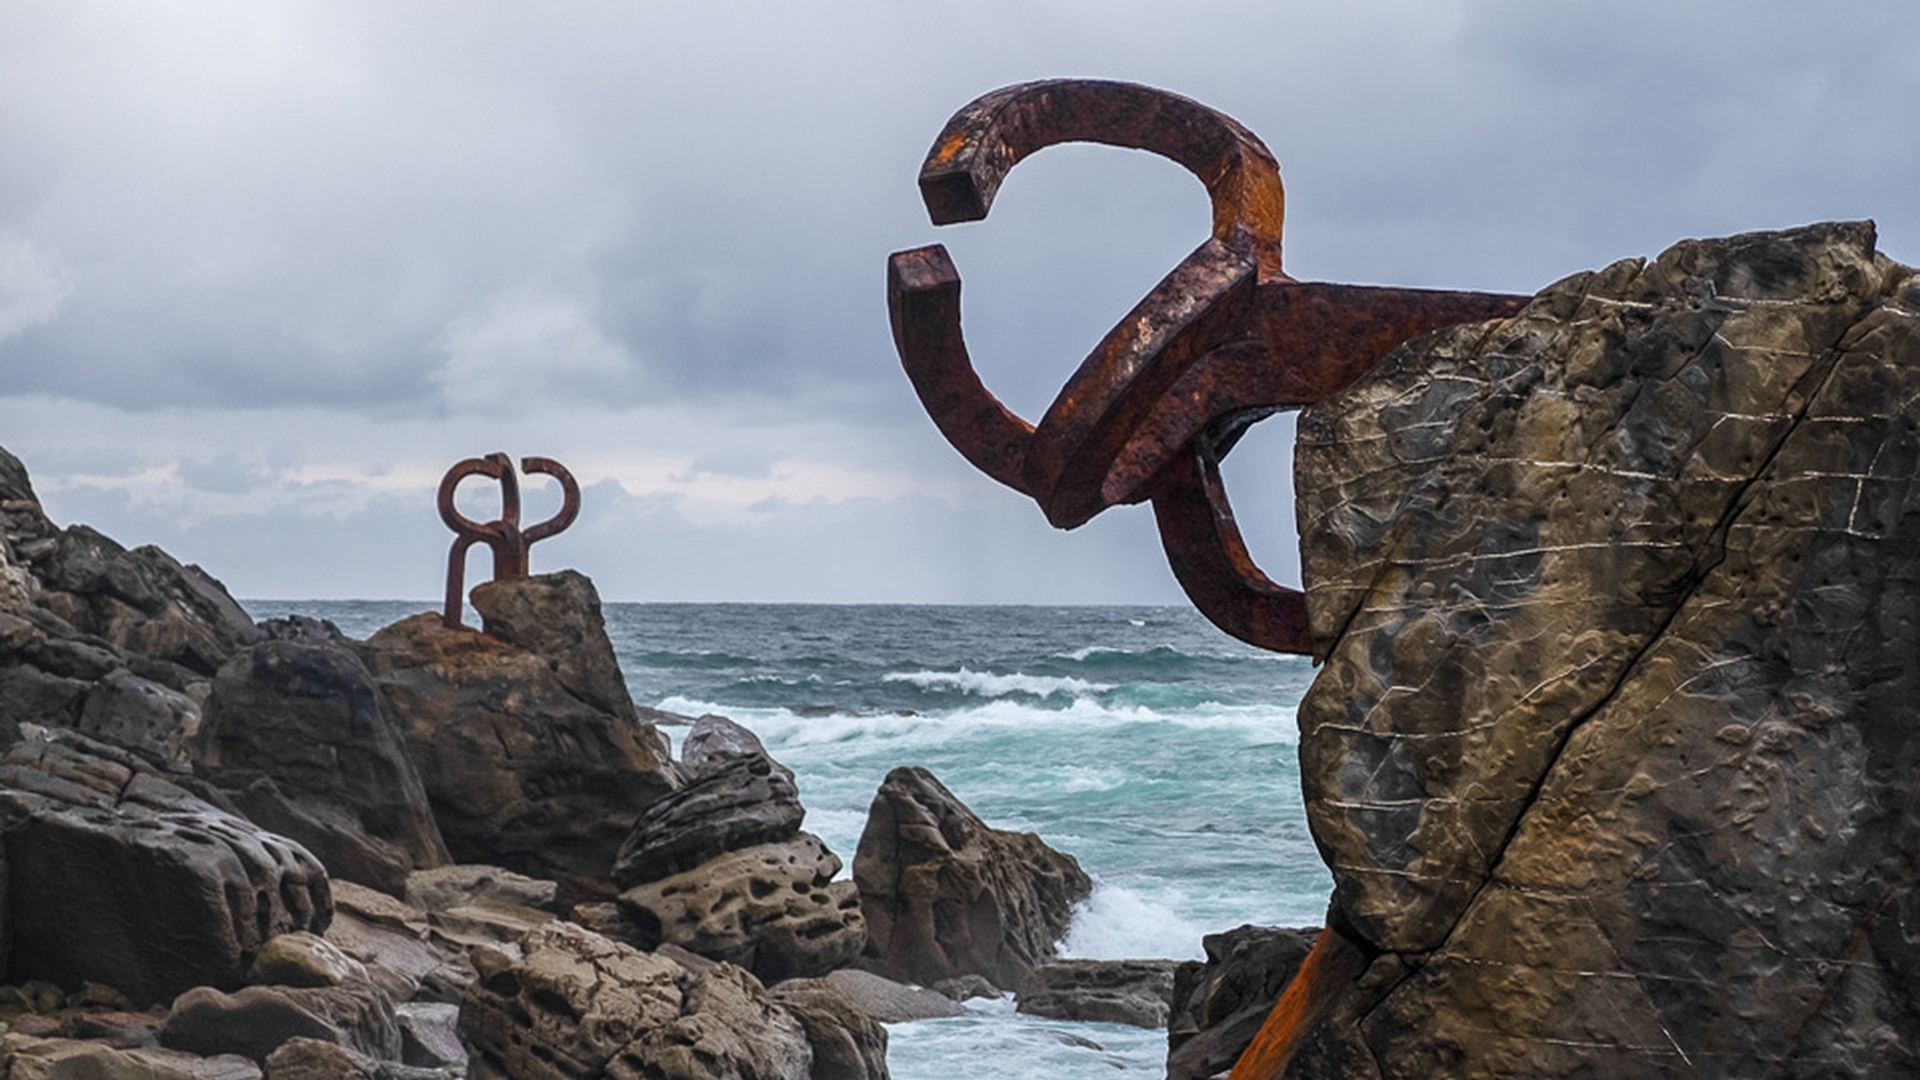
As I drag to the left you'll see clouds appear in the sky and you will see more detail in the waves.
The Shadows slider controls the brightness of the darker areas in your photo.
This slider is very useful for images that are too dark like this one.
Look at all the hidden detail that appears on the rocks and other dark areas of this image as I drag the slider to the right.
The Whites slider dictates the absolute brightest value of your image.
Setting whites, blacks, and fine-tuning brightness
If your photo was underexposed, you could remove the dullness and that contrast by dragging the slider to the right.
However, it can be difficult to know where to place the slider because if you move it too far to the right it will create areas that are completely white with no detail.
Fortunately, Lightroom CC has a feature that can help you prevent moving the slider too far.
As you drag the Whites slider hold the Alt key on Windows Option on the Mac to apply a black overlay on your image.
When you drag far enough to the right you will start to see some tiny areas of color then white These are the areas that are becoming pure white with no detail.
So, you want to move the slider back up to the point right before they start appearing.
The Blacks slider sets the black point.
The absolute darkest value of your image.
Slide it to the left to give your photo more contrast in a bit of a punch.
Keep in mind that if you push this slider too far to the left you can darken almost all the values in your photo and push the shadow detail into pure black.
After you've gone through all the sliders you may need to go back and continue to fine tune your image.
Although each slider focuses on a specific tonal range they all affect the overall image.
Click on the before and after icon to see the original photo and click on it again to see the adjusted image.
And now you know how you can adjust brightness to bring out the hidden detail in your photos.
What you learned: How to use the controls in the Light panel to bring out hidden detail in your photos
Apply an Auto brightness correction
To make an automatic adjustment, select your photo and click the Edit icon.
Open the Light panel by clicking it. Then click the Auto button at the top of the Light panel. Lightroom will use machine learning technology to analyze your photo and determine the best settings for each slider.
Manual brightness adjustments
To adjust the brightness of your image manually or to fine-tune the results of the Auto button, use the six sliders in the Light panel. These sliders control different tonal ranges, but they all work in the same way. Dragging to the left reduces light and dragging to the right increases light.
The Exposure slider controls the overall brightness of your photo.
The Contrast slider increases or decreases contrast.
The Highlights slider controls the brightness of the lighter areas in your photo. Drag the Highlights slider to the left to reveal the hidden detail in bright areas.
The Shadows slider controls the brightness of the darker areas in your photo. Drag the Shadows slider to the right to reveal the hidden detail in dark areas.
The Whites slider dictates the absolute brightest value of your image. Press the Option key (MacOS) or the Alt key (Windows) and drag the Whites slider to the right until you see spots of white or color. This sets the brightest parts of the photo to pure white.
The Blacks slider sets the Black Point, the absolute darkest value of your image. Slide it to the left to give your photo more contrast and a bit of a punch.
After you’ve gone through all of the sliders, you may need to go back and continue to fine-tune your image. Although each slider focuses on a specific tonal range, they all affect the overall image.
You can control how Adobe websites use cookies and similar technologies by making choices below. But note that if you disable cookies and similar technologies entirely, Adobe websites may not function properly.
Cookies are small text files stored by your web browser when you use websites. There are also other technologies that can be used for similar purposes like HTML5 Local Storage and local shared objects, web beacons, and embedded scripts. These technologies help us do things like remembering you and your preferences when you return to our sites, measure how you use the website, conduct market research, and gather information about the ads you see and interact with.
You can make choices in the menu below about what cookies and other technologies you want us to use on Adobe sites when you visit them from this browser. You can always change those choices later by clicking on the Cookie Preferences link at the bottom of the page.
If enabled:
We can improve your experience by tailoring the site and the content to things we think might be of interest
We can better keep track of your preferences — like what language you prefer to use
We will better understand your likely interests so we can provide you more relevant Adobe ads and content on non-Adobe websites and in non-Adobe apps
It will help us improve the performance of our website and those of our partners who use the Adobe Experience Cloud
If disabled:
We won’t be able to remember you from session to session so the experience may not be tailored to your interests
You’ll still have access to the content of the site but certain features that depend on cookies may not function
You’ll still see ads, they just may not be as relevant to you
General information
You can control how Adobe websites use cookies and similar technologies by making choices below. But note that if you disable cookies and similar technologies entirely, Adobe websites may not function properly.
Cookies are small text files stored by your web browser when you use websites. There are also other technologies that can be used for similar purposes like HTML5 Local Storage, web beacons, and embedded scripts. These technologies help us do things like remembering you and your preferences when you return to our sites, measure how you use the website, conduct market research, and gather information about the ads you see and interact with.
You can make choices in the menu below about what cookies and other technologies you want us to use on Adobe sites when you visit them from this browser. You can always change those choices later by clicking on the Cookie Preferences link at the bottom of the page.
If enabled:
We can improve your experience by tailoring the site and the content to things we think might be of interest
We can better keep track of your preferences — like what language you prefer to use
We will better understand your likely interests so we can provide you more relevant Adobe ads and content on non-Adobe websites and in non-Adobe apps
It will help us improve the performance of our website and those of our partners who use the Adobe Experience Cloud
If disabled:
We won’t be able to remember you from session to session so the experience may not be tailored to your interests
We’ll still count your use of our site and services
You’ll still have access to the content of the site but certain features that depend on cookies may not function
You’ll still see ads, they just may not be as relevant to you
Operate the site and core servicesOperate site and measure engagement
Always active
These cookies are required, and they are used to enable the site and related services core functionality. Without them the site could not operate, so they cannot be disabled.
These cookies enable the site and related services’ core functionality and collect statistics about user engagement, such as counting active use to help us understand trends. These cookies cannot be disabled.
Measure performance
These cookies are used to analyze site usage to measure and improve performance. Without them Adobe cannot know what content is most valued and how often unique visitors return to the site, making it hard to improve information we offer to you.
These cookies are used to analyze site usage to measure and improve performance. Without them Adobe cannot know what content is most valued, making it hard to improve information we offer to you.
Extend functionality
These cookies are used to enhance the functionality of Adobe sites such as remembering your settings and preferences to deliver a personalized experience; for example, your username, your repeated visits, preferred language, your country, or any other saved preference.
Personalize advertising
These cookies are used to enable Adobe and our partners to serve ads more relevant to your interests. Without them you will still see ads, but they might not be as relevant to you.
Personalize advertising
These cookies are used to enable Adobe and our partners to serve ads more relevant to your interests. Without them you will still see ads, but they might not be as relevant to you.