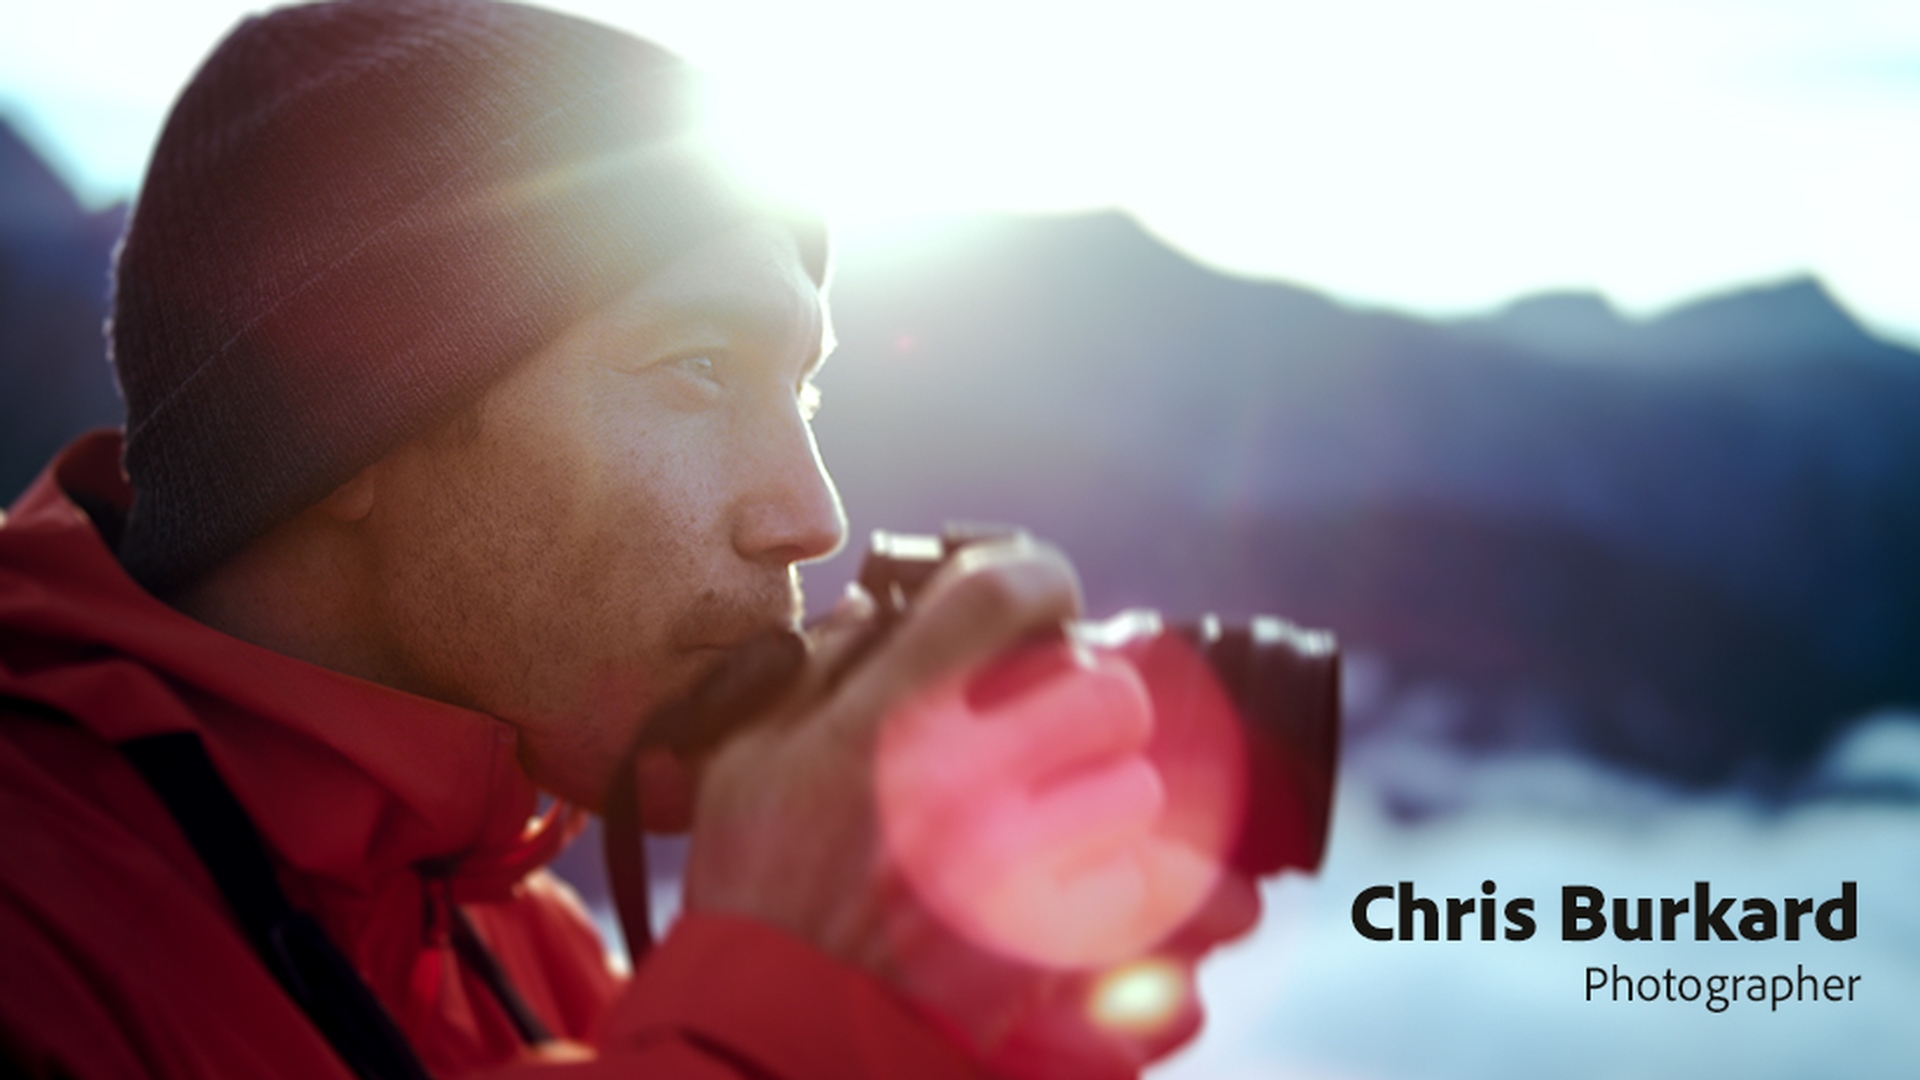
Create incredible landscape photos with Lightroom Classic
See how pro photographer Chris Burkard prepares for a landscape shoot, and get his tips for conveying scale and using perspective to make the difference between a good photo and a great one.
Published
Introduction
I grew up in this tiny town in the California coast.
Finding inspiration and purpose through photography
I was inspired by wide open spaces.
I didn't grow up with a passport.
Never traveled anywhere.
For me I saw camera as a way to get me out of this small town and see the world.
When I'm approaching a place,
Approaching landscapes from multiple perspectives
I want to shoot it from a multitude of perspectives.
I want to be in the air, I want to be on land and I want to be in the water trying to bring a vision of each.
I actually feel like whatever this place is giving me I'm giving something back to it.
At the root of it all has always been this love and passion for landscapes.
Creating great images is really a two-part process.
The two-part process: shooting in the field and post-processing
Part of it is what you're doing in the field and the other part is that post-processing element where you're creating the most beautiful vision of what you saw.
Someone told me once
Using light creatively throughout the day
you're going to create all your best images 20 minutes after the sun rises and 20 minutes before the sun sets.
But in the middle of the day I found that if you just allow the Sun to hide itself behind some leaves it'll start to make a beautiful star shape.
Preparing intelligently and using scale to strengthen images
I put in so much leg work before I even get to a location.
The more you know the less you need and that's a mantra that I've tried to apply in every facet of life, especially in photography.
The idea that I can pack a really intelligent camera kit that covers all my bases.
Nothing extra has changed the way that I've been able to move through these landscapes.
When you're shooting a waterfall that's miles away and there's 3000-foot tall cliffs that meet it, having scale helps immensely.
It can be really hard to judge just how big all of that is by having some bright object or subject that kind of separates you from that landscape that brings it all front and center and makes you feel like Wow!
Look at how huge that is.
In the beginning of my career I was out to collect stamps for my passport but at a certain point I realized that sharing my work became the reason that I wanted to do this.
I love creating something that could inspire a movement and feelings of wanderlust, the desire to get out and truly see the world.
Make good landscape shots great with simple edits
Enable lens profile corrections to remove distortions and vignetting, and apply the Camera Landscape profile to bring out color. Use Auto Tone, fix crooked horizons, dehaze skies, and bring out detail. Then use the Linear Gradient tool to adjust exposure in specific areas and make your photos look amazing.
Introduction
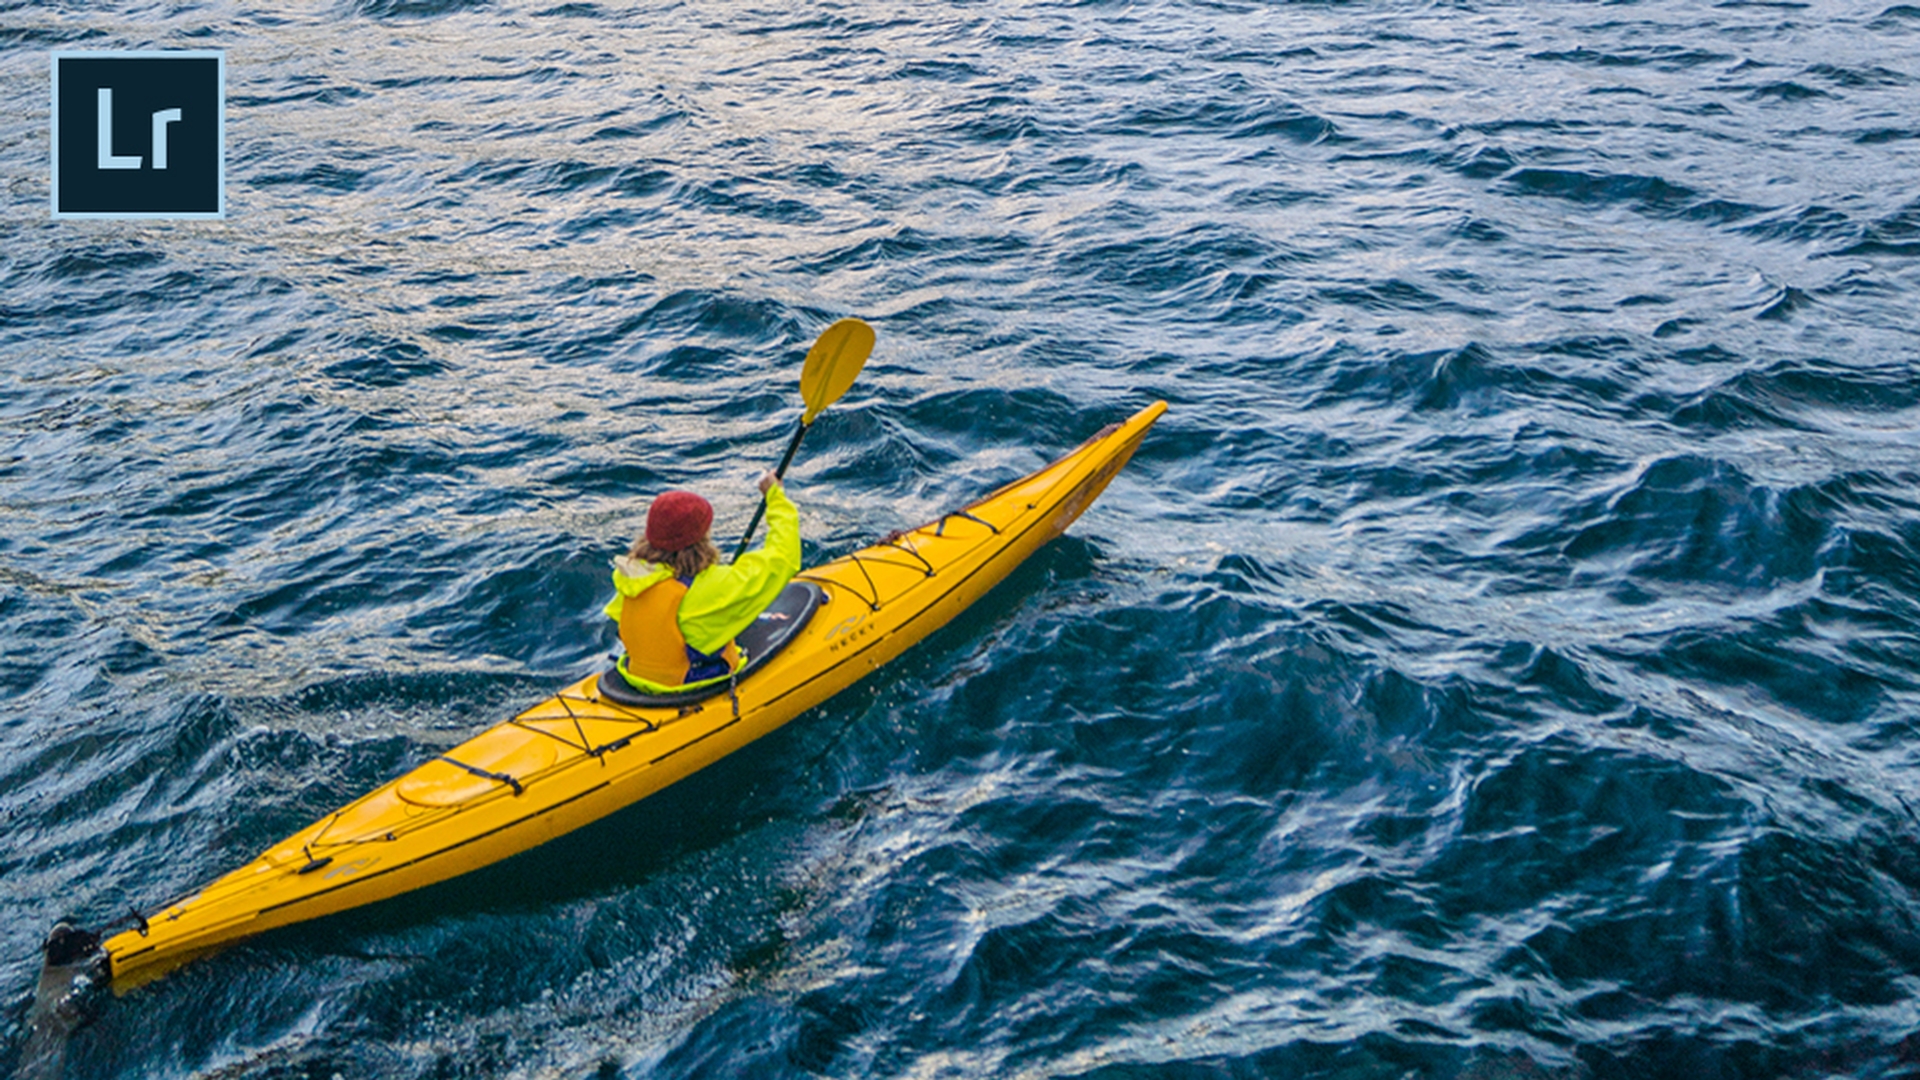
Here in Lightroom Classic CC we can take our landscape photography to the next level.
We've got some photos here from pro photographer Chris Burkhardt who captured these in New Zealand.
However, I'm looking at this one particular photo and I took it over to the Develop module because I think we can make this photo much better than it is out of the camera.
Now it's a little bit on the dark side.
That's because he underexposed on purpose to bring out the detail in the sky.
However, that detail was captured in RAW, so we can bring it back here in a Lightroom Classic CC.
Now one of the things I'll do to every photo
Recovering RAW detail with profile corrections
is Enable Profile Corrections.
That will remove any lens distortion as well as any vignetting caused by the camera.
Next thing I'll do as I'll head to the Camera Calibration
Building a strong base using camera profiles and auto tone
because we can get a much better starting point just by switching profiles from Adobe Standard to a richer profile that was based on the camera such as Camera Landscape.
As you can see the color starts to come out in this particular photo.
Now we can go to the Basic panel and from here I can even get a better starting point.
Rather than moving all these sliders manually I'm just going to go ahead and do the AI based auto tone.
That will bring out all of the detail here in the water down on the kayaker.
But there's a couple of things I still need to correct.
First of all, I don't like the cricket horizon line.
Straightening the horizon with crop and angle tools
So, I'm going to switch to the Crop tool and in the Crop tool there is an Auto button for straighten.
Now the Auto button will work if it can detect something that should be straight.
But if you use the Angle tool this way you get to straighten the photo based on whatever line or angle you choose.
Now that I've got the photo perfectly straighten, I've got the horizon looking good.
I notice that my sky is still a little bit hazy.
Enhancing atmosphere with dehaze and clarity
So, I'm going to go over to my Effects panel and I'm just going to bring up the Dehaze ever so slightly.
Look at what that does, look at the improvement it makes on the sky just that easily.
Now we'll head over to the Basic panel one last time where we're going to go ahead and bring up the Clarity of this photo to really bring out more detail.
And as you can see we can really start to see it in those mountains.
Now we're going to do one more thing.
We're going to mimic what the sun is doing to the mountains
Adding directional light using a linear gradient
down here on the kayaker.
We're going to do that using the linear gradient.
Now I've already got the linear gradient set to the Exposure preset which is just going to brighten up the Exposure based on whatever angle I drag it in.
So, I'm going to drag it into an angle that kind of mimics the direction that the sun is casting.
And I can move that around, pick it up and just get it just the way I want.
If I want to tilt it, I can.
I can have it come in at any angle that I want.
Now that I've got this just the way I want it we can go from out of the camera and something basic to something phenomenal here in Lightroom Classic CC.
Merge multiple exposures to create HDR landscapes
Combine multiple raw exposures into a single high dynamic range (HDR) landscape that shows rich detail from the highlights to the shadows. Automatically align the images, improve tone, and de-ghost any objects that changed position between images. Then apply basic edits to get the perfect look.
Introduction
Often times when we're capturing landscape images our human eye can see a higher dynamic range than our camera sensors can record.
Luckily pro photographer Chris Burkhardt captured these amazing photos from New Zealand.
And he purposely overexposed by a couple of stops and underexposed by a couple of stops because he knew that capturing in RAW would give us the detail and that we would be able to combine these two exposures to a high dynamic range image here in Lightroom Classic CC.
Starting an HDR photo merge from bracketed exposures
So, I'm just going to right click on the two images, choose Photo Merge and merge to HDR or Control H in the future.
Using auto align, auto settings, and deghost options
That will bring up this preview that is set to Auto Align them.
So, if there was any movement or if you weren't on a tripod it would take care of it for you.
It will also apply the Auto Settings, the auto tone to give you a much better starting point.
If there was anything actually moving in the scene such as someone walking by or a bird flying by, you can even use Deghost options to lock in on one frame so that you would capture that movement and freeze it.
Merging images into a new HDR RAW file
Once I click Merge that will actually start a background process, building a new RAW DNG file of the HDR scene.
So, with this new HDR scene I can of course preview it and look at it the Develop module
Enhancing the HDR image in the Develop module
where I'm just going to apply a couple of basic edits.
The first one I'm going to apply is switching to the new Adobe Landscape profile to give me a much better starting point.
I'm going to pump up the Exposure just a bit and add a little bit of Dehaze as a finishing touch.
So, this is our before, our other before and our new after all possible with Lightroom Classic CC.
Create panoramas from a series of landscape photos
Merge multiple photos into a single panoramic landscape with Pano Merge, and then use Boundary Warp to capture all the detail at the edges. You’ll get a high-res DNG file that you can refine as you wish.
Introduction
When capturing landscape photography sometimes you just can't get it all in one shot.
Sometimes the lens just isn't wide enough.
Luckily pro photographer Chris Burkhart captured these photos in New Zealand and he captured them with the intent of merging them to a panorama here in Lightroom Classic CC.
Selecting images and starting a panorama merge
So, I can see that he captured about 15 frames with a little bit of overlap in between each one.
And now I can go ahead and select all 15, right click and do a Photo Merge to Panorama which is also Control M on a keyboard.
Now this will bring up a preview where you can choose your projections.
Choosing the right panorama projection
So, for example Cylindrical probably isn't what I want.
That's going to maybe wrap it around in a circle, Spherical or Perspective are usually going to be the two you want, but I'm just going to show you what Cylindrical looks like and then we're going to switch it probably to Spherical.
Now sometimes you may click on a projection and it may tell you that this particular image is not suitable for it.
And this is not what I had in mind.
So, let's switch to Spherical and that will give us the better panorama.
I'm pretty sure of it.
Once it builds that preview you'll be able to go in and make further adjustments.
All right, so it's built preview and I have the option of doing what I would have always done.
Using boundary warp to preserve image area
I can just crop it and that will give me my panorama.
But look at how much space I'm losing.
Now this is usually caused by for example not shooting with a tripod.
However, using Lightroom Classic CC and the new Boundary Warp.
I don't have to give up that extra space.
I can actually just drag the slider to warp the image into the existing space taking advantage of all the detail and all that photography that's just waiting to happen.
Now I'm going to go ahead and click Merge
Merging the panorama and continuing edits
and what that will do is start a background process where it merges a new panorama, a new RAW file in the background and places it in the same collection or folder that you were working from, right next to the original photos.
From there you can make any adjustments or edits that you want.
And here's the new high resolution DNG RAW file that it created.
So, I can pop over to the Develop module where I can continue to enhance this photo and make it better.
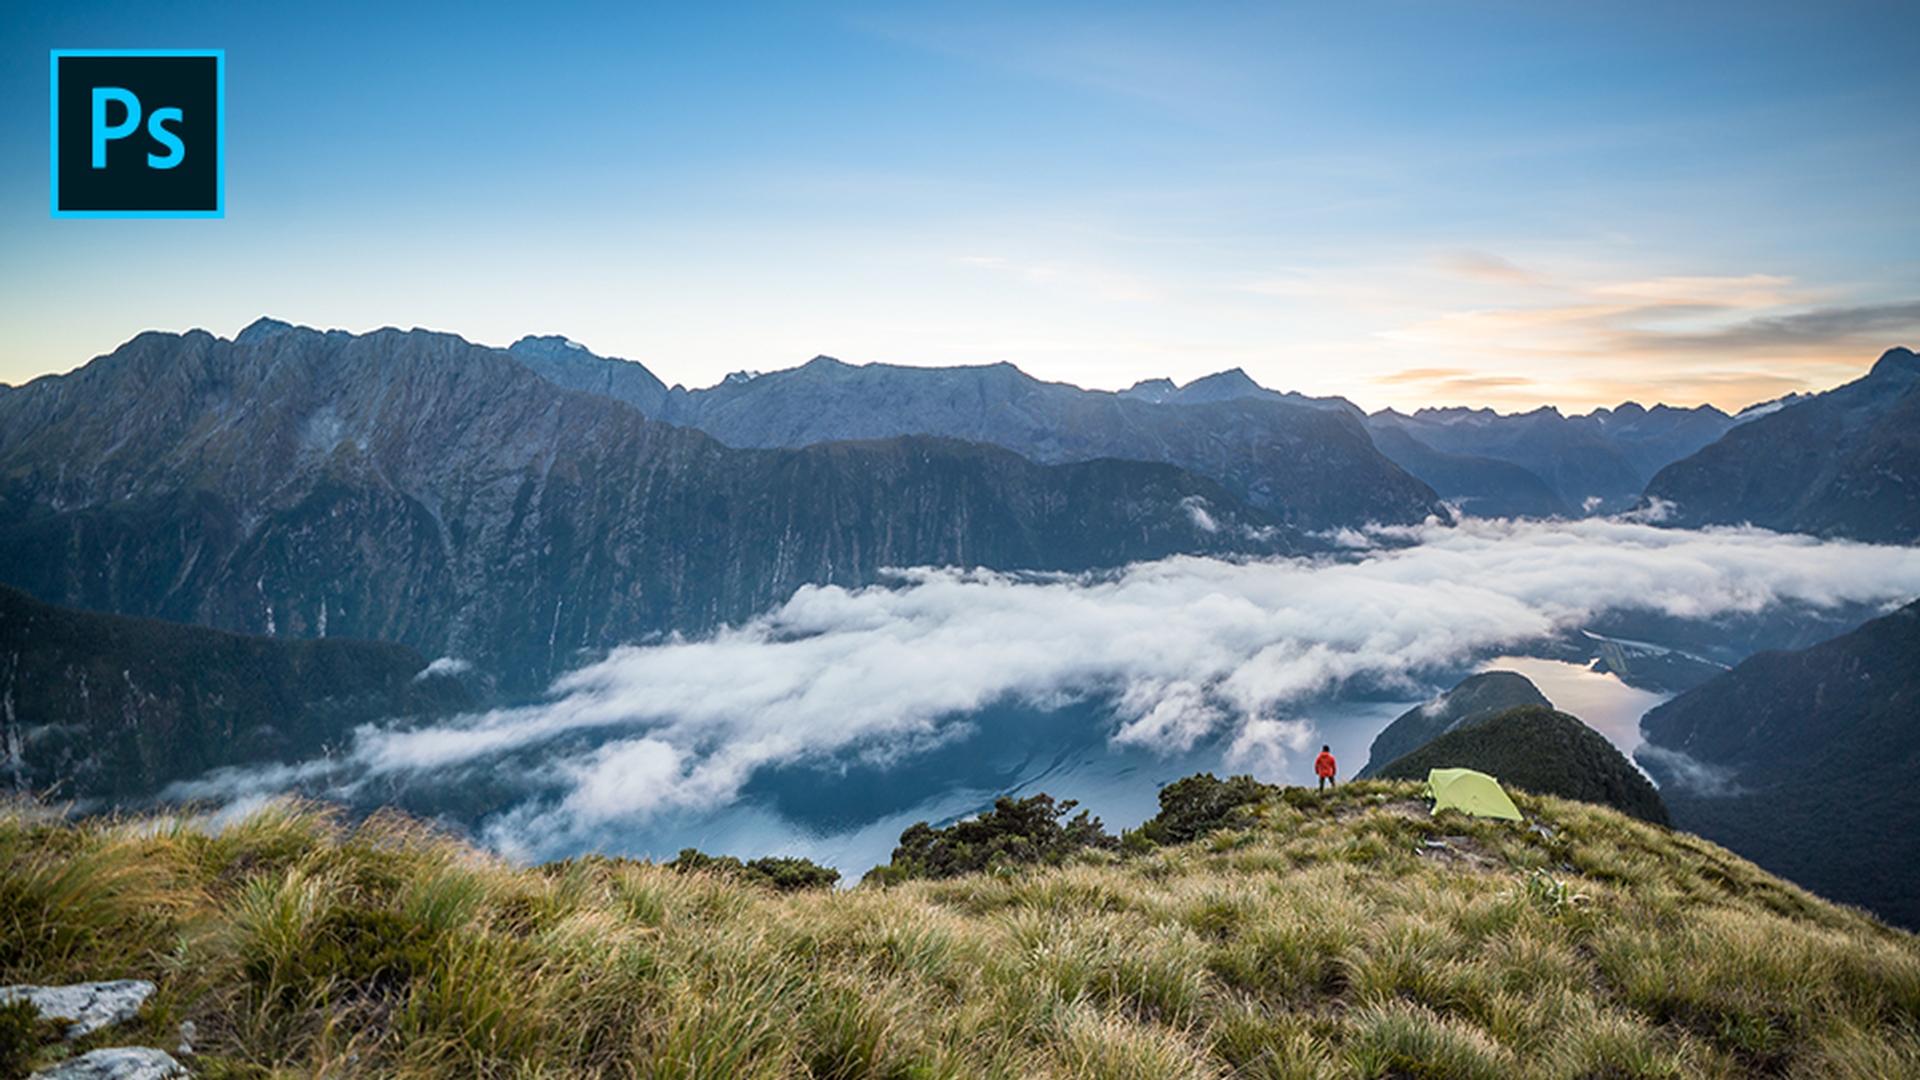
Composite your landscape photos with Photoshop
Straighten your photos using the Content-Aware Crop tool to automatically fill in details at the edges. Remove distracting elements with Content-Aware Fill. And easily replace the sky from one photo with the sky from another using Quick Select, copy/paste, and Free Transform.
Introduction
While I love editing my landscape photos in Lightroom CC there are times I need to do more.
And that's where Photoshop CC comes in.
I've got Photoshop CC open with this amazing scene captured in New Zealand by pro photographer Chris Burkhart.
There are a few things I'd love to do to make this amazing photo even better.
Straightening the image with content-aware crop
The first thing I'd love to do is just simply straighten the photo a bit.
It's a little tilted to the right and we're going to go ahead and fix that by switching to the Crop tool.
But you'll also notice that I've got Content-Aware enabled.
What that means is that when I go ahead and tilt this image and it normally gives us those dreaded white spaces I don't have to run from them, I don't have to pull them in.
I can actually go the other way because once I click Commit it will actually build the missing spaces using Content-Aware fill.
Now that I've got that in place the next thing I'll do is remove any distracting elements
Removing distractions using content-aware fill
- his campsite here and we no longer need it.
So, I'm just going to go ahead make a quick selection of it with the Lasso tool.
As you can see I don't have to be very exact because once I hit Shift Delete on my keyboard and bring up Content-Aware Fill I can just simply click OK and it will remove that scene as if it wasn't there.
Replacing the sky with a better exposure
Now the next thing I'd love to do is replace the sky.
The sky is pretty good, but Chris actually captured a better sky in this scene.
So, what I'd love to do is first of all switch to my Quick Select tool and with Quick Select just with one simple drag, I can go ahead and select the existing sky.
Now we'll head over to the better sky and we'll just simply Copy it.
Once we head back to the original image we can simply do a Paste, but not a regular paste.
We're going to do a Paste Special, Paste Into because that'll do a couple of things.
It will generate its own layer and layer mask and when I zoom out a bit I can use Free Transform to scale the sky up and get it just in place the way I want.
Once I get it where I want I can go ahead and click Commit, zoom back in and I can take a look at my finished photo.
Reviewing the before and after result
Here's my before and here's my after here in Photoshop CC.
You can control how Adobe websites use cookies and similar technologies by making choices below. But note that if you disable cookies and similar technologies entirely, Adobe websites may not function properly.
Cookies are small text files stored by your web browser when you use websites. There are also other technologies that can be used for similar purposes like HTML5 Local Storage and local shared objects, web beacons, and embedded scripts. These technologies help us do things like remembering you and your preferences when you return to our sites, measure how you use the website, conduct market research, and gather information about the ads you see and interact with.
You can make choices in the menu below about what cookies and other technologies you want us to use on Adobe sites when you visit them from this browser. You can always change those choices later by clicking on the Cookie Preferences link at the bottom of the page.
If enabled:
We can improve your experience by tailoring the site and the content to things we think might be of interest
We can better keep track of your preferences — like what language you prefer to use
We will better understand your likely interests so we can provide you more relevant Adobe ads and content on non-Adobe websites and in non-Adobe apps
It will help us improve the performance of our website and those of our partners who use the Adobe Experience Cloud
If disabled:
We won’t be able to remember you from session to session so the experience may not be tailored to your interests
You’ll still have access to the content of the site but certain features that depend on cookies may not function
You’ll still see ads, they just may not be as relevant to you
General information
You can control how Adobe websites use cookies and similar technologies by making choices below. But note that if you disable cookies and similar technologies entirely, Adobe websites may not function properly.
Cookies are small text files stored by your web browser when you use websites. There are also other technologies that can be used for similar purposes like HTML5 Local Storage, web beacons, and embedded scripts. These technologies help us do things like remembering you and your preferences when you return to our sites, measure how you use the website, conduct market research, and gather information about the ads you see and interact with.
You can make choices in the menu below about what cookies and other technologies you want us to use on Adobe sites when you visit them from this browser. You can always change those choices later by clicking on the Cookie Preferences link at the bottom of the page.
If enabled:
We can improve your experience by tailoring the site and the content to things we think might be of interest
We can better keep track of your preferences — like what language you prefer to use
We will better understand your likely interests so we can provide you more relevant Adobe ads and content on non-Adobe websites and in non-Adobe apps
It will help us improve the performance of our website and those of our partners who use the Adobe Experience Cloud
If disabled:
We won’t be able to remember you from session to session so the experience may not be tailored to your interests
We’ll still count your use of our site and services
You’ll still have access to the content of the site but certain features that depend on cookies may not function
You’ll still see ads, they just may not be as relevant to you
Operate the site and core servicesOperate site and measure engagement
Always active
These cookies are required, and they are used to enable the site and related services core functionality. Without them the site could not operate, so they cannot be disabled.
These cookies enable the site and related services’ core functionality and collect statistics about user engagement, such as counting active use to help us understand trends. These cookies cannot be disabled.
Measure performance
These cookies are used to analyze site usage to measure and improve performance. Without them Adobe cannot know what content is most valued and how often unique visitors return to the site, making it hard to improve information we offer to you.
These cookies are used to analyze site usage to measure and improve performance. Without them Adobe cannot know what content is most valued, making it hard to improve information we offer to you.
Extend functionality
These cookies are used to enhance the functionality of Adobe sites such as remembering your settings and preferences to deliver a personalized experience; for example, your username, your repeated visits, preferred language, your country, or any other saved preference.
Personalize advertising
These cookies are used to enable Adobe and our partners to serve ads more relevant to your interests. Without them you will still see ads, but they might not be as relevant to you.
Personalize advertising
These cookies are used to enable Adobe and our partners to serve ads more relevant to your interests. Without them you will still see ads, but they might not be as relevant to you.