Let's take a look at building a creative color look using the Lumetri Color panel and Lumetri Scopes panel.
I'm in the color workspace, which means I have those two panels displayed and things are nicely laid out for me to do some color work.
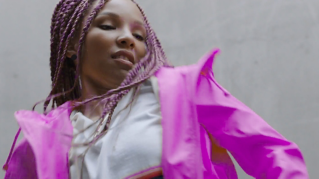
And I've got a clip selected which is a nice shot of the actress Andrea Sweeney and I've put an adjustment layer on top which has a crop on it to give me a bit more of a true wide screen image.
Be sure to download the sample project file that accompanies this tutorial, so you can work on the same footage I'm showing you.
I want to start by explaining the YUV vector scope and Luma waveform display because these are really fundamental to understanding the adjustments you're making in the Lumetri Color panel.
I've just enabled these two by right-clicking in the Lumetri Scopes panel and selecting the items I want.
Note that you've got an option to choose what kind of waveform you're viewing here as well.
There's a lot more to these two displays but I'm going to keep it simple, just as an introduction.
I also want to mention that we've got this option to view in 32 bit float or an 8 bit.
I'm going to stick to 8 bit because I want to see this 16 to 325 range that we should expect for YUV video.
I'm going to go full screen, so we can see these a little more clearly.
I'm going to press the accent or grave key on my keyboard.
On the left, I have my vector scope this is very simple when somebody explains it to you, and very weird if they don't.
It's a circular graph, a circular representation of every pixel in the video.
The white area in the middle is every pixel in this shot.
Now in the center of this wheel, there's no color, and towards the edge is strong color.
So, depending on where the pixels are displayed, you know how much color they have and what color it is.
It's a measure of color saturation.
You'll notice that we've got primary colors blue, red and green and secondary colors cyan, yellow and magenta displayed on the wheel.
But you can see very clearly what's going on in this display.
We've got quite a lot of red, I suppose that's the hat on our actress.
There's a fair bit of yellow as well, that's I suppose in the buildings, there's some orange.
And we've got a little bit of green, cyan and blue.
Basically, we've got every color in this shot but there's a lot more in the red-yellow spectrum.
The inner boxes are the YUV color gamut, so the white line represents the area you want to stay inside of if you're producing regular television.
The outer boxes are RGB which is a little bit bigger, and if you're producing content, for example, for the web or mobile, you might as well go out to those boxes, you're going to get stronger colors.
Now that we know how this display works, I'm going to come back out of full screen and just make a little adjustment.
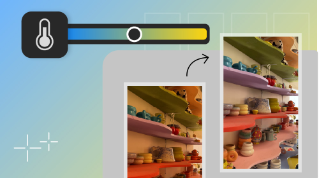
So, if I drag my Temperature slider, you can see immediately the effect this has in the vector scope.
I'm moving on a kind of an arc between the red and the blue.
Very often, this is the only adjustment you'll make, it's very simple and you can warm a shot up or cool it down.
Hence the name Temperature.
I'm just going to warn the shot up a little bit.
I think that kind of works for me.
Now, I need to be a little bit careful because you can see, I'm beginning to peek outside of the YUV range.
But let's take a look now at the Luma again.
I'm going to go full screen.
And let's look at our waveform.
Once again, we've got every pixel in the shot represented in this graph and the horizontal position for the pixels is accurate.
So, we're seeing each of the pixels if you'd like in a kind of column, a slice of the picture represented left to right, the height of the pixels on this graph represent the amount of Luma.
So, pixels near the top are bright and pixels near the bottom are dark.
Now, if I come out of full screen for a second, you can see here, we've got this very light-colored jacket, and there we've got the pixels for that jacket towards the left and up near the top.
Again now, we know how this works, we can begin to make some changes, so I'm just going to push up the exposure a little bit.
I'm going to increase my contrast.
You can see if I increase the contrast a lot or flatten it, the way the pixels move together or pull apart in the image and let's push that up.
I just think I want to pull down my highlights a touch and let's actually pull the Blacks right down.
This is the very darkest pixels in the image.
Let's lift the Whites a little, let's increase that Contrast even more.
I'm going to pull down the Shadows, that's the if you'd like quite dark pixels but not very, very dark pixels.
Let's pull up the Highlights, maybe let's pull them in.
You can see this is very much an art and a craft to get the final look that you want.
I don't want to burn out that jacket so I'm just playing with the Whites, that's the very bright pixels.
And the Highlights to make sure they stay in.
That's perfect.
I think I might also just push up the saturation a little bit.
I want to give this an overall older film look when people were still working out how to get natural looking colors.
I think that works for me.
What's great about understanding the vector scope and waveform display is that they help you to learn how these controls work in the Lumetri Color panel, just by taking these controls from one extreme to the other and observing the result in the waveform display, for example, you can begin to understand what the control is for.
I'm going to switch into the Creative section for a moment here.
And this gives me some simple controls to get pretty dramatic results in my picture.
I'm going to start out by using the Look menu to choose a preset look that will give me something closer to a Kodak film stock.
This is a preset I'm particular fond of.
You can see this gives me a kind of crushed look to the colors.
I like this very much.
To reduce the intensity a little bit, I'm going to increase this Faded Film control.
This is just going to chop off my shadows a little and give me clean levels everywhere.
But the very dark pixels begin to fade a little bit.
It's a very natural organic looking adjustment and I'm going to crank up the Vibrance a little.
This is going to give me more vivid color but it's going to try and protect the skin tones in the image.
All the while you're making these adjustments, you want to be looking back and forth between the controls, the image and the scopes.
You'll notice that all the adjustments you make in the Lumetri Color panel combine, so you can work in whichever sections you want to get the finished look you're after.
I think let's finish off with the Vignettes.
I'm going to click into the Vignette section here and you can see we've got an option to brighten or darken the pixels.
I'm going to darken a little, set the Midpoint in.
I'm going to just make that a little rounder.
I'm going to Feather this quite a lot and that again gives me that film look.
It's a lens aberration caused by the casing of a lens, it will give you this darkening effect.
And again, it just makes the film look a little bit older.
And it looks like we've managed to pull in the red quite nicely there as well.
So, I'm pretty happy with this look.
Let's just do a comparison, I'm going to press F to match frame to the original.
And you can see how dramatically different this is from our original video recording.
That's building a creative color look with the Lumetri Color panel in Adobe Premiere Pro CC.