When you're working with 360 Equirectangular footage in Premier Pro CC and After Effects CC it's important to know that there are specific VR effects. that have been specially made to be compatible with those footage types.
If we navigate to the Effects panel in Premier Pro CC, under Video Effects, you can scroll down you can see Immersive Video.
Under there you're going to see a host of VR effects.
If an effect has VR at the beginning of its title, you'll know that effect is specifically designed for 360 Equirectangular footage.
All of these effects are seamless and that's going to ensure you don't get any seam lines at the back, top or bottom of your video.
Let's go ahead and do a quick demonstration to see what this looks like.
I'm going to apply a Gaussian Blur to my 360 footage.
So, I'm just going to navigate to Blur, and I'm going to select Gaussian Blur and apply that to this 360 shot that I have.
I'm going come here; I'm going to increase the Blurriness.
Now let's jump over here and Toggle VR Video Display, and we're going to look at this shot in 360 now, so I can click and drag around.
Because we're not using a VR aware effect you're going to see we get this unwanted seamline, and a little bit of fringing at the top and at the bottom of our video.
You can see how this kind of pulls everything together, and that's because this effect is not designed to work with 360 footage.
So, what I do is I'm going to go ahead and exit the Toggle VR Video Display and I'm going to go ahead and select that Gaussian Blur and delete it.
Now let's go ahead and scroll back down over here to our Effects panel and I'm going to select the VR Blur it's a very similar effect, but designed for 360 Equirectangular footage I'm going to drop that on my clip.
Now we can see the VR Blur.
I'm just going to come over here and increase the Blurriness.
Now let's go over here and let's toggle the VR Video Display.
And now I'm going to move and look around my footage, and you can see there are no scenes at the back of our video, and the top and bottom areas look correct.
I'll go ahead and exit out of the toggle VR Video Display.
You'll also notice we have an option here for Frame Layout, so you can select from Monoscopic, or Stereoscopic - Over/Under formats.
I'm going to go ahead and delete the VR Blur effect Now there are four pretty standard VR effects then four filter type effects.
Let's go ahead and go through each of those.
So, as we just saw the VR Blur.
Next, we have VR De Noise, and this just allows you to de-noise any footage you have that might be shot in low light or might just be a little bit noisier type scenario.
Then we have the VR Glow.
That's going to work very similarly to the standard glow effect.
But again, it has been formatted to work with 360 Equirectangular footage and ensure that it is seamless.
And then finally we have VR Sharpen, again that works just like a standard sharpened effect.
It has been designed for 360 footage.
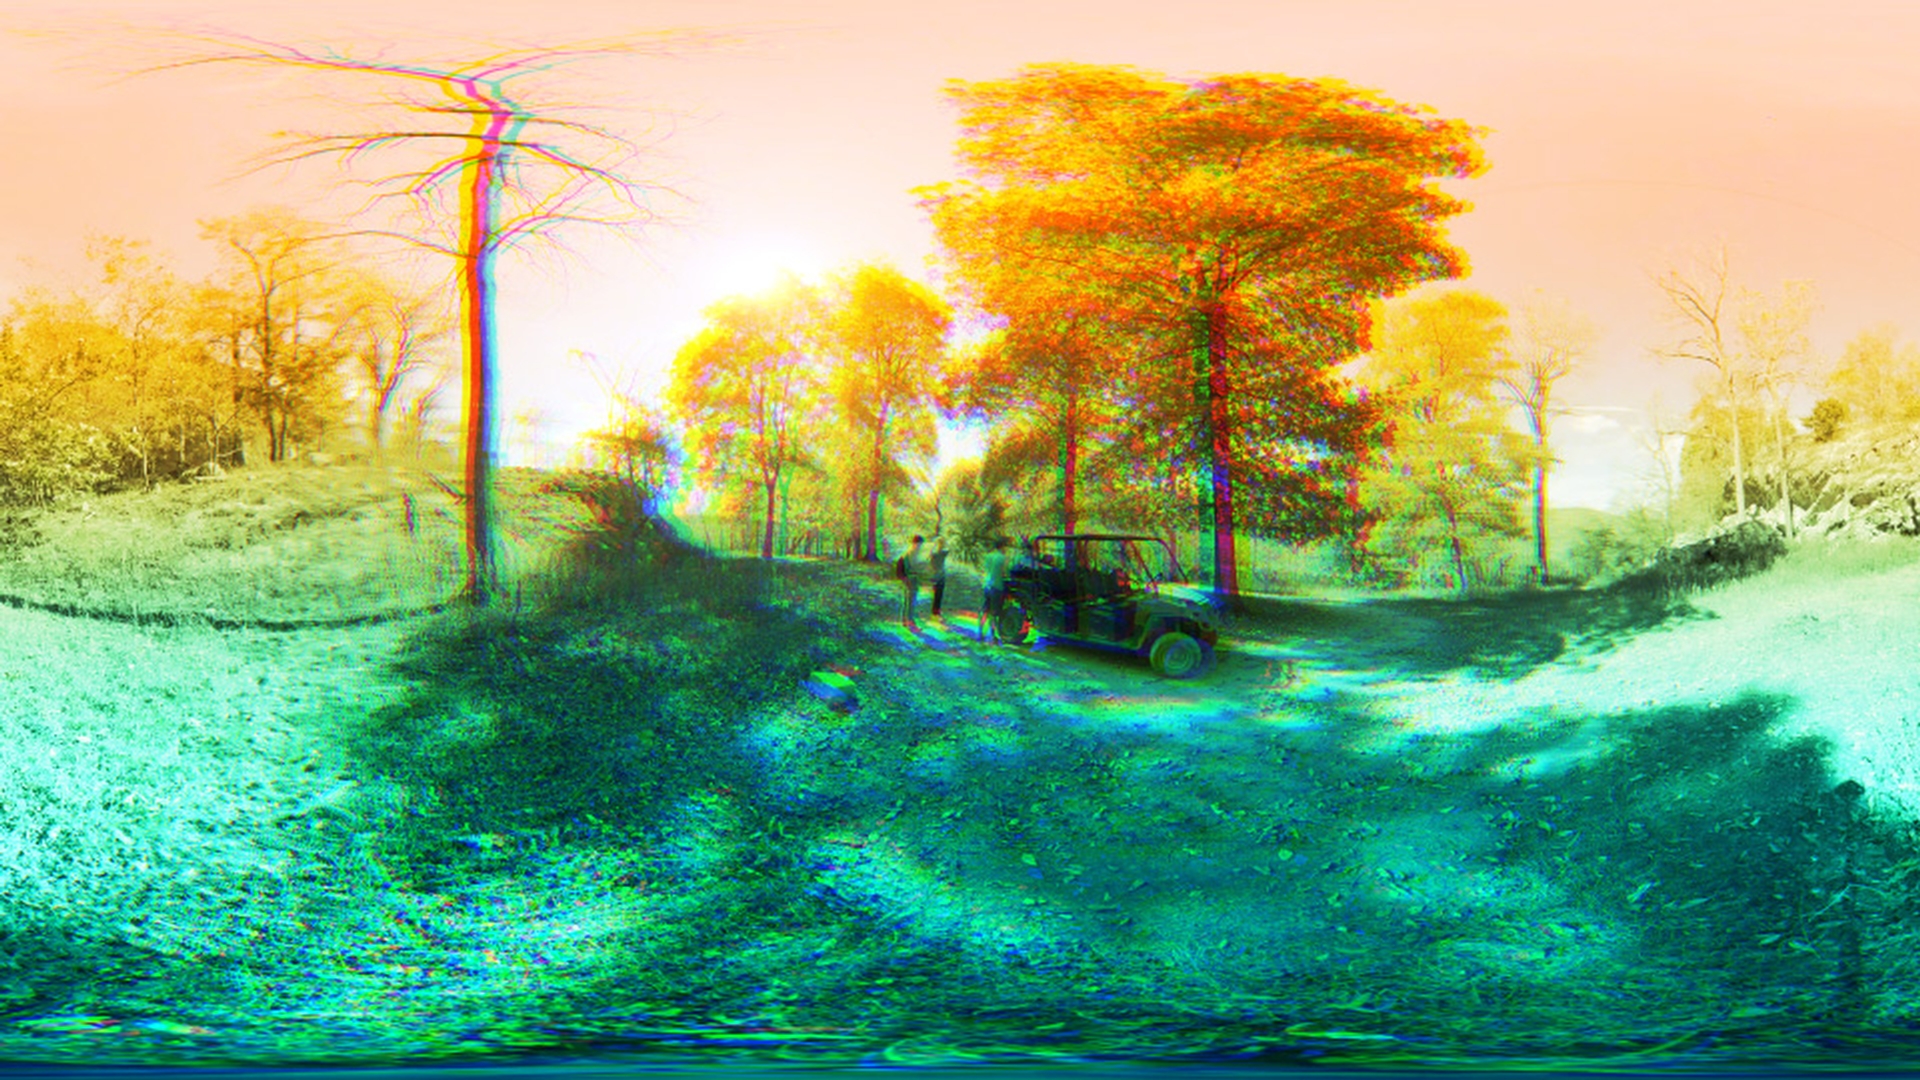
Now the four filter effects are; we have the VR Chromatic Aberrations, I'm going to actually select that now and apply that to this footage.
Now we can see our 360 footage has a lot of chromatic aberrations occurring.
If we actually jump over here into the toggle VR Video Display, we can see this a lot easier in 360, so you can see how it's actually affecting our clip.
You can dial in the various settings here to make adjustments as you need.
And you can keyframe all these as well.
So, I'm going to go ahead and delete the VR Chromatic Aberrations.
Next, we have the VR Color Gradients.
So, I'm actually going to apply this to my footage.
And if we exit out of Toggle VR Video Display we can see we can use up to eight different colors seamlessly on our Equirectangular shot and we can adjust the number of points and we can come down here to the points we can actually select colors for each one of those points if we would like.
This is a nice way you can add kind of a two-color filter to your shot I'm going to change this to two.
And again, you can reposition those points as needed, as you can see here Then actually, I'm going to come down here to the bottom, and I'm going to change the Blending Mode, I'll change this to a Screen.
And you can see how that reflects now on our 360 footage.
So, I'm going to lead the VR Color Gradients effect.
Next, we have a VR Digital Glitch.
I'll apply this to our shot.
This is going to apply some digital glitching into our 360.
And again, we have some parameters over here that we can adjust.
Now let's go ahead and toggle the VR Video Display and now we can actually see this in 360.
This is a nice effect you can use for transitions, or if you just want to add some digital glitching to a particular shot.
But again, this is also seamless, because it has been formatted to work with 360 footage.
I'm going to exit out of the toggle VR Video Display and I'm going to go ahead and delete the VR Digital Glitch effect.
Finally, we have the VR Fractal Noise effect.
I'm going to select that and apply it to my 360 shot, and you can see how this creates some fractal noise, which may be used to from the Fractal Noise effect.
But again, this has been formatted for 360 footage, so it will be seamless.
We can jump into the toggle VR Video Display and take a look around this particular shot.
Then again, we have a host of options over here that we can adjust, and we can also adjust the Blending Mode if we need to.
I'm going to set this to a screen just so we can kind of see through this and you can see how this kind of emulates some fog, or something like that on our 360 shot.
All these VR effects are also available in After Effects CC you can see under Immersive Video and you can go ahead and apply any of these effects in here as well.
So, I'm just going apply the VR Chromatic Aberrations to this 360 shot.
Then again, if we come over to the Effect Controls you'll see we have those same effect options available to us here in After Effects CC.


